ImageTech iMage A2 User manual

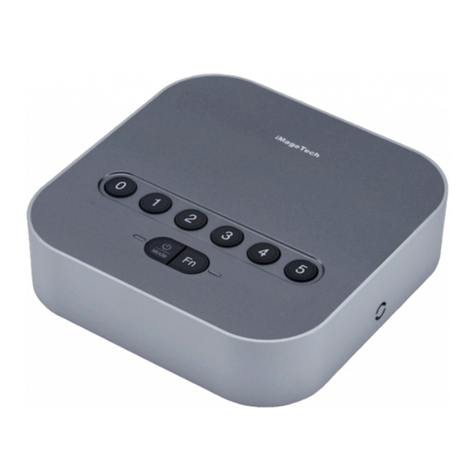
1. Increase volume
2. Lower volume
3. Mute
4: Mute microphone
5: Answer
6: Hang up
7: Mode selecon
8: Mode status
indicator
9: Power status
indicator
Bluetooth Mode
USB Mode
AUX Mode
Adapter Mode
LED Indicator
Power status/Charging
10: Audio In
11. USB Slot
12. Power switch
AUX IN
Charing First!
Please connect the USB cable to iMage A2 Bluetooth Conference Spea-
kerphone to charge it; it is recommended to fully charge the power for
approximately 6 hours (charge unl power indicator goes off) before
using it for the first me.
Power Status
When the power is turned on, if one of the four mode indicators on
the
right has a blue light on, it means that the unit is currently powered
-on.
Charging: When the orange light is constantly on, it means that it is
currently charging; when the orange light goes off, it means
that charging is complete.
Power remaining: If the blue light flickers it means
that there is
sufficient power remaining; if the red light flickers it
means that power is low and requires charging.
Packing
1. iMage A2 Bluetooth Conference Speakerphone
2. Micro-USB cable
3. User manual
Mode selection: Bluetooth Mode
You can connect other portable devices or computer using
Bluetooth connecon to make iMage A2 Bluetooth Conference
Speakerphone your mulmedia speakerphone.
Connecon method:
1. Select “Search for Bluetooth device” on the device you want to
connect.
2. You will see “iMage A2_XX (number differs according to the
different devices)”; click on it to perform pairing.
3. Pairing complete.
Blue light remains constantly on: Bluetooth device has successfully
connected with iMage A2 Bluetooth Conference Speakerphone, and
supports HFP and A2DP.
* If the device could not be paired, you can clear the previous
pairing data to pair it over again; press and hold the hang up
buon for 3 seconds and wait unl you hear the prompt then
release it to search for iMage A2 Bluetooth Conference
Speakerphone again for pairing.
* Please confirm the Bluetooth chip built in the computer before
connecng to a PC or notebook using Bluetooth Mode, and
download the related driver programs etc. from the original
manufacturer of the chip; please refer to the user manual of your
computer for details.
Dimensions: 165mm X 165mm X 55mm
Product weight: 360±5g
Bluetooth version: Bluetooth v3.0+EDR/HFP/A2DP/WBS
Communicaon me: 6~8 hr.(BT)
Playback me: 6~8 hr.(BT), 8~10 hr.(AUX)
Standby me: 48~60 hr.(BT)
Baery capacity: 950mAH
Recepon angle: Omni-Direconal
Operang frequency: 2402MHz-2480MHz
Recepon distance: 0.3~3m
Audio output: Bluetooth/USB
Audio input: Bluetooth/USB/AUX
Module type: GFSK
Antenna type: Build-in Antenna
Operang environment: 0 ~ 70℃
* Note: Data listed above were measured by actual testing in laboratories;
actual data may differ according to usage scenarios.
iMage A2 Bluetooth Conference Speakerphone
I/O Port buttons and slots
Welcome!
Thank you for purchasing iMage A2 Bluetooth Conference
Speakerphone; this instrucon manual will guide you on how to start
using this product.
Start
Turn on the power and start iMage A2 Bluetooth Conference
Speakerphone; press the (mode selecon) buon to select the
mode you need.
Note: The baery life will significantly decrease if your device has not
been charged for a lone me.Therefore, we recommend you to charge
your device at least once every week
.
Specification
Mode selection: AUX Mode
You can make iMage A2 Bluetooth Conference Speakerphone an
expansion speaker by connecng it to a signal source using a 3.5Ø
audio cable.
Connecon method: Connect the audio output of the device (PC, NB
etc.) to the Audio In socket(3.5Ø jack) of iMage A2 Bluetooth
Conference Speakerphone.

Mode selection: USB Mode
You can connect to a PC or notebook through Micro-USB to make
iMage A2 Bluetooth Conference Speakerphone your expansion
speakerphone set.
Connecon method:
1. First connect the USB cable to the Micro-USB jack of iMage A2
Bluetooth Conference Speakerphone.
2. Wait for the computer to automacally install the drivers (please
first confirm that your computer is connected to the internet).
3. Set the “Playback device” and “Recepon device” of the computer
as iMage A2.
* To use iMage A2 Bluetooth Conference Speakerphone with specific
applicaon programs, you must first go to the program’s sengs to
select the
“Playback device” and “Recepon device”
.
FAQ
I hear connuous burst noises
* Bluetooth is a wireless technology and is very sensive to the
objects between the connected devices.If there are no large objects
(such as walls etc.) blocking between iMage A2 Bluetooth
Conference Speakerphone and the connected device, the maximum
allowed distance between the two can reach up to 10 meters.
I cannot receive calls using iMage A2 Bluetooth Conference
Speakerphone
* Please confirm that the mode selected is “Bluetooth Mode”.
* Please confirm that iMage A2 Bluetooth Conference Speakerphone
has successfully paired with your device.
* Please increase the volume of iMage A2 Bluetooth Conference
Speakerphone.
I had problems during pairing
* You may have accidently deleted the pairing data during operaon.
- Please refer to the pairing instrucons in the “Bluetooth Mode”
chapter.Problems faced when playing music from music devices
(mobile phones, PC, MP3 players etc.)
* Please confirm that other devices support Bluetooth 3.0
(downwards compable) and A2DP, or else it will not be able to
operate.Please refer to the user manual of the device used, and find
out how to pair it with the Bluetooth playback device.
Contact Us!
1. Website Introducon: hp://www.iMagetech.com.tw (provides
the newest support informaon and online user manual)
2. E-mail address: hp://www.iMagetech.com.tw/contact.php
3. Please call: 886-2-27967041
4. Address: 5F., No.16, Aly. 15, Sec. 6, Minquan E. Rd., Neihu Dist.,
Taipei City 114
Mode selection: Adapter Mode (optional purchase)
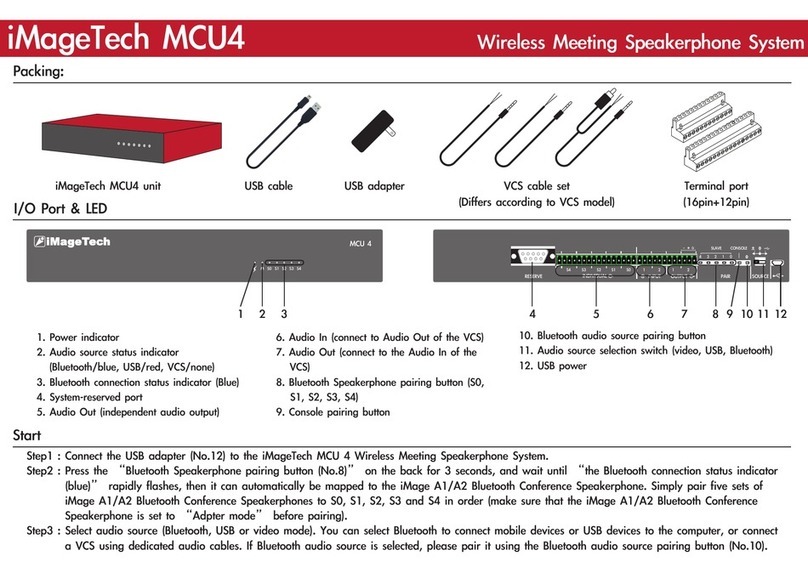
You can purchase the
iMageTech MCU4 Speakerphone System
or
iMage A1 Bluetooth Adapter Tx/Rx addionally to connect the audio
input and output of the video device, making iMage A2 Bluetooth
Conference Speakerphone your external auxiliary speakerphone for
your video set.
Connecon method:
1. Connect the
iMageTech MCU4 Speakerphone System
or iMage A1
Bluetooth Adapter Tx/Rx output/input to the audio input/output of
the video device.
2. Connect the
iMageTech MCU4 Speakerphone System
or iMage A1
Bluetooth Adapter Tx/Rx power and press the connect (Bluetooth
connecon) buon.
3. iMage A2 Bluetooth Conference Speakerphone will automacally
connect with the adapter.
* Please refer to the user manual of
iMageTech MCU4 Speakerphone
System
or iMage A1 Bluetooth Adapter Tx/Rx for detail seng
process.
Statement
This product complies with the provisions of the low-power radio
wave radiaon Administrave Regulaons Arcle XII-XIV etc.
* Without permission granted by the DGT, any company, enterprise,
or user is not allowed to change frequency, enhance transming
power or alter original characterisc as well as performance to an
approved low power radio-frequency devices.
* The low power radio-frequency devices shall not influence aircra
security and interfere legal communicaons; If found, the user shall
cease operang immediately unl no interference is achieved.
* The said legal communicaons means radio communicaons is
operated in compliance with the Telecommunicaons Act.
* The low power radio-frequency devices must be suscepble with
the interference from legal communicaons or ISM radio wave
radiated devices.
Notice: Changes or modifications not expressly approved by the
party responsible for compliance could void the user's authority to
operate the equipment.
Note: This equipment has been tested and found to comply with the
limits for a Class B digital device, pursuant to part 15 of the FCC
Rules. These limits are designed to provide reasonable protection
against harmful interference in a residential installation. This
equipment generates, uses and can radiate radio frequency energy
and, if not installed and used in accordance with the instructions,
may cause harmful interference to radio communications. However,
there is no guarantee that interference will not occur in a particular
installation. If this equipment does cause harmful interference to
radio or television reception, which can be determined by turning the
equipment off and on, the user is encouraged to try to correct the
interference by one or more of the following measures:
—Reorient or relocate the receiving antenna.
—Increase the separation between the equipment and receiver.
—Connect the equipment into an outlet on a circuit different from
that to which the receiver is connected.
—Consult the dealer or an experienced radio/TV technician for help.
Other ImageTech Telephone manuals
