IMC IMCHX-007 Series User manual
!
1!
!!
!
IMCHX'007!Series!of!Ultrasonic!Soft!
Tube!Sealing!Machinery!
!
INTERNATIONAL)MACHINE)CONCEPTS)WELCOMES)YOU)TO)YOUR)NEW)
MACHINE)
)
)
)
)
)
)
)
)
)
)
)
)
)
)
)
)
)
)
)
)
)
)
)
)
Operation!Manual:!Date!2016.!!
!

!
2!
!
CONTENTS'
Chapter'1'
Machine!Description!!!!!!!!!!!!!!!!!!!!!!!!!!!!!!!!!!!!!!!!!!!!!!!!!!!!!!!!!!!!!!!!!!!!!!!!!!!!!!!1.1!
Uncrating!Instructions!!!!!!!!!!!!!!!!!!!!!!!!!!!!!!!!!!!!!!!!!!!!1.2!
Installation!!!!!!!!!!!!!!!!!!!!!!!!!!!!!!!!!!!!!!!!!!!!!!!!!!!!!!!!!!!!!!!!!!!!!!!!!!!!!!!!!!!!!!!!!1.3!
Electrical!and!Pneumatic!connections!!!!!!!!!!!!!!!!!!!!!!!!!!!!!!!!!!!!!!!!!!1.4!
Chapter'2'
Technical!Parameters!and!Description!!!!!!!!!!!!!!!!!!!!!!!!!!!!!!!!!!!!!!!!!!!2.1!
Chapter'3'
Operation!Instruction!
Machine!layout!!!!!!!!!!!!!!!!!!!!!!!!!!!!!!!!!!!!!!!!!!!!3.1!!!
HMI!Touch!Screen! 3.2!!!!!!!!!!
Operation!process!!!!!!!!!!!!!!!!!!!!!!!!!!!!!!!!!!!!3.3!!!
Chapter'4'
Malfunctions!(Faults)!and!their!rectification!
Table!of!possible!faults!!!!!!!!!!!!!!!!!!!!!!!!!!!!!!!!!!!!!!!!!!!!!!!!!!!!!!!!!!!!!!!4.1!
Chapter'5'
Electrical!diagram!!!!!!!!!!!!!!!!!!!!!!!!!!!!!!!!!!!!!!!!!!!!!!!!!!!!!!!!!!!!!!!!!!5.1'
Chapter'6'
List!of!Spare!Parts!!!!!!!!!!!!!!!!!!!!!!!!!!!!!!!!!!!!!!!!!!!!!!!!6.1!
'
'
'
'
'

!
3!
Chapter'1'
1.1 Machine'Description'
'
This!machine!was!used!high'quality!imported!and!domestic!parts,!Designed!and!made!by!
professional!engineers!and!technicians!with!advanced!technology.!This!machine!has!simple!
operation,!low!failure!rate,!etc.!
Use!ultrasonic!to!weld!plastic!soft!tube!tail.!Do!not!need!any!adhesive!or!filler!or!solvent!when!
welding,!do!not!consume!large!amounts!of!heat,!and!easy!to!operate,!high!welding!speed,!
high!efficiency.!
This!machine!is!widely!used!in!toothpaste,!cosmetic,!medical!product,!food!and!industrial!
tubes!etc!
!
1.2 Un=crating'Instructions'
'
During!un'crating!make!sure!that!no!physical!damage!to!the!outside!of!the!crate!has!taken!
place.!Carefully!break!open!the!exterior!panels!to!reveal!the!machine!and!its!working!parts.!
The!machine!will!be!covered!in!a!plastic!protective!cover.!This!is!to!be!removed.!Make!sure!
that!no!parts!have!been!damaged!during!transport,!or!fallen!off!the!machine.!The!machine!will!
arrive!with!certain!parts!dis'assembled.!These!need!to!be!fitted!to!the!machine!!to!resemble!
the!photos!above!the!machine.!The!machine!is!fixed!to!the!wooden!pallet!by!four!metal!
brackets.!Remove!these!brackets!and!discard!or!keep!for!future!use.!The!doors!and!covers!
have!been!taped!closed!for!safety!reasons,!these!taped!parts!can!now!be!opened.!Surface!rust!
can!take!place!due!to!the!excessive!sea!sir!during!shipping.!This!will!only!be!surface!rust!and!a!
dry!cloth!should!be!used!to!remove!this!rust!residue.!The!entire!machine!has!bee!shipped!with!
an!oil!coating!on!the!surface!to!safeguard!the!machine!from!corrosion.!This!can!now!be!
removed!with!a!very!light!detergent.!The!non'stainless!steel!parts!should!be!re'oiled!to!
prevent!rusting!taking!place!after!cleaning.!Do!not!leave!the!machine!wet.!
!
The!machine!is!top'heavy!and!as!such,!care!should!be!taken!when!handling!the!!machine!and!
removing!it!from!its!wooden!pallet.!
!
NOTE:!DO!NOT!HANDLE!THE!MACHINE!ON!THE!FILM!BRACKETS!OR!ROLLERS.!These!parts!are!
critically!aligned!and!should!they!be!bent!out!of!position!the!film!may!run!off.!
!
!
1.3 Installation'
'
!Only'a'qualified'technician'should'perform'the'machine'installation'or'a'suitably'trained'
person.'

!
4!
Note:'it!is!dangerous!to!work!on!a!moving!machine!and!the!machine!should!be!off!and!
isolated!before!any!form!of!work!is!performed.!
!
•Machine!should!be!placed!in!a!well'ventilated!room,!free!from!dust!and!excessively!
corrosive!materials.!
•There!should!be!at!least!1,5m!space!around!each!side!of!the!machine!for!convenient!
operation!and!maintenance.!
•Prepare!the!power!supply!380V!or!220V/50HZ.!Three/Single!Phase!and!neutral,!and!
connect!to!an!appropriate!earth!wire.!
!
•Pneumatic!connections!should!take!place!as!the!designated!connection.!The!air!should!
not!be!less!than!6Bar!while!the!machine!is!operational.!Air!should!be!free!of!water!and!
contaminants.!
•The!machine!should!be!placed!on!level!ground.!After!installing!the!machine,!check!if!the!
machine!is!level!by!Level!Instrument.!If!not,!please!adjust!the!four!legs.!
•Check!every!part!of!the!machine!carefully!for!damage!during!shipping.!Tighten!any!loose!
parts,!screws!and!moving!parts.!
•All!gearboxes!should!be!checked!for!sufficient!oil.!
•Check!all!electrical!connections!for!loose!wires.!
•Make!a!test!of!the!machines!electrical!power!and!confirm!the!voltage!and!earth!
continuity.!All!safety!connections!relative!to!your!own!country!should!be!adhered!to.!
•Before!operating!the!machine,!please!lubricate!the!following!parts:!across!sealing!bearing!
and!its!bearing!holes,!longitudinal!where!sealing!the!parts!needs!oil.!
!
1.4'''''''Electrical'and'Pneumatic'connections'
This!machine!requires!only!a!single!phase!connection!and!earth!wire!
!
!DISCLAIMER!
IMC!will!not!be!held!responsible!for!incorrect!installation!and!subsequent!failure!of!the!
machine!due!to!any!installation!procedure!not!being!followed.!
!
!
!
'
'
'
'
'
'

!
5!
Chapter'2'
2.1'Technical'Parameters'and'Description'
'
Rated!Voltage!
AC220V!50/60HZ!singe!phase!
Sealing!Diameter!!
5'50mm!
Max!tube!height!
5'250mm!
Machine!Power!!
1.5KW!
Production!Speed!
8'16!tubes/min!
Outline!Dimension!
850x600x640mm!
!
!
!
!

!
6!
Chapter'3'
3.1'Machine'layout''
'
'
'
'
'
'
'
'
'
'
'
'
'
'
'
'
'
'
!
1.!Main!body!! 11.!PLC!
2.!Sensor!!!!12.!Holder!
3.!Tube!Height!adjustment!!!13.!Mould’s!gap!adjustment!!!
4.!Front!mould!! 14.!Power!lamp!
5.!Back!mould!! 15.!Power!switch!!!!!!!!!!!!!!!!
6.!Cutter!! 16.!Operational!plate!!!
7.!Gas'pressure!meter!!!17.!Tune!
8.!Gas'pressure!adjustment!! 18.!OSC!check!
9.!Emergency!button!! 19.!Over!load!lamp!
10.!Start!button!! 20.!Loading!meter!
!
'
Remark:!Please!check!the!front!mould!screw,!if!it!is!tightly!locked,!during!the!!
transportation!the!screw!can!become!loose!
!

!
7!
3.2'HMI'Touch'Screen''
'
'
!
!
!
Press!to!English!to!next!page,!and!press!Auto!to!switch!to!the!Manual!mode!
! On!the!Manual!mode!screen!
!
! Motor!start:!! This!is!to!control!the!Tube!holder!running!
! Feeding!cylinder!start:!! This!is!to!control!the!Tube!holder!feeding!
! Ultrasonic!cylinder!start:!This!is!to!control!the!up!mould!and!down!mould!working.!
! Trimming!cylinder!start:!!This!is!to!control!the!cutter!
! Ultrasonic!start:!! This!is!to!control!the!frequency,!this!is!same!as!the!“18.!OSC!!!!
!!!!!!!!!!!!!!!!!!!!!!!!!!!!!!!!!!!!!!!!!!!!!!!!!!!!!!!!!!!!!check”!!
! Tube!Orientation!on!:!! This!is!to!control!the!Sense!off/on!!
! Time!setting:!! This!is!to!Adjust!the!Delay!time/!Welding!time/Holding!!
!!!!!!!!!!!!!!!!!!!!!!!!!!!!!!!!!!!!!!!!!!!!!!!!!!!!!!!!!!!!time!
! Delay!time:!!0.80!
! Welding!time:!! Tube!Diameter!20,!the!time!will!about:!0.20,!
! ! Tube!Diameter!30,!the!time!will!about!0.40!
! ! Tube!Diameter!40,!the!time!will!about!0.50!
! ! Tube!Diameter!50,!the!time!will!about!0.7!
! Holding!time:!! 0.35!
!
!

!
8!
3.3'Operation'process'
1. Connect!power!and!compressed!air!correctly!(suggest!0.5MPa).!
!
2. Press!the!Power!switch!
!
3. Press!‘OSC!check’!button!and!set!‘Tune!button’!at!the!same!time,!Please!use!the!screw!on!
the! Tune! button,! you! can! turn! to! Left! or! Right,! while! find! the! minimum! of! ‘Signal! light’!!!!!
(it' will' be'lower' than' 1A)' fixed! ‘Frequency! adjustment’.! (do' not' press!‘OSC' check’!
continuously,'press'it'intermittently)!
!
4. Put!tube!in!the!holder.!
!
5. Press!‘Ultrasonic!cylinder!start’,!front!mould!and!back!mould! will! close.! Set! ‘Moulds! gap!
adjustment’,! let! the! two! moulds! just! touch! with! no! gap.! Press! ‘Cutter! controller’! and!
confirm!the!cutter!works!smoothly.!(You!need'to'put'the'plastic'tube'in'the'tube'holder'
when'you'are'adjusting'it)!
!
6. Set!front!mould!and!back!mould!and!cutter!at!original!position.!
!
7. Put!the!tube!in!the!‘Holder’!and!press!‘Feeding!cylinder!start’,!the!tube!will!run!between!
two! moulds.! Adjust! the! height! of! holder! if! necessary.! (Our! suggesting! is! that! the! tube!
should!be!higher!than!the!back!mould!by!2!to!3!mm)!
8. Make!tube!back!to!original!position.!
!
9. Set!to!auto!status,!turn!on!sensor!if!tube!has!color!code!otherwise!turn!off!it.!
!
10. Press!‘Auto’!the!machine!will!work!automatically.!
!
'
'

!
9!
Chapter'4!
4.1.1''Malfunctions'(Faults)'and'their'rectification'
'
Failure'
Cause'
Remedy'
Machine!doesn’t!
work!or!work!
abnormal'
No!power!or!compressed!air'
Connect!power!and!compressed!air'
Low!compressed!air!pressure'
Increase!air!pressure'
Plastic!overflow!or!
not!good!after!
welding'
Two!moulds!too!closed!or!too!
parted'
Adjust!the!gap!between!two!
moulds'
Rough!edge!after!
cutting'
Cutter!blunt'
Sharpen!cutter!or!replace!sharp!
one'
Cutter!!has!!large!!gap!!between!!
back!mould'
Make!cutter!touch!back!mould!
'

!
10!
Chapter'5'
Electrical'diagram'
'
'
!
11!
Chapter'6'
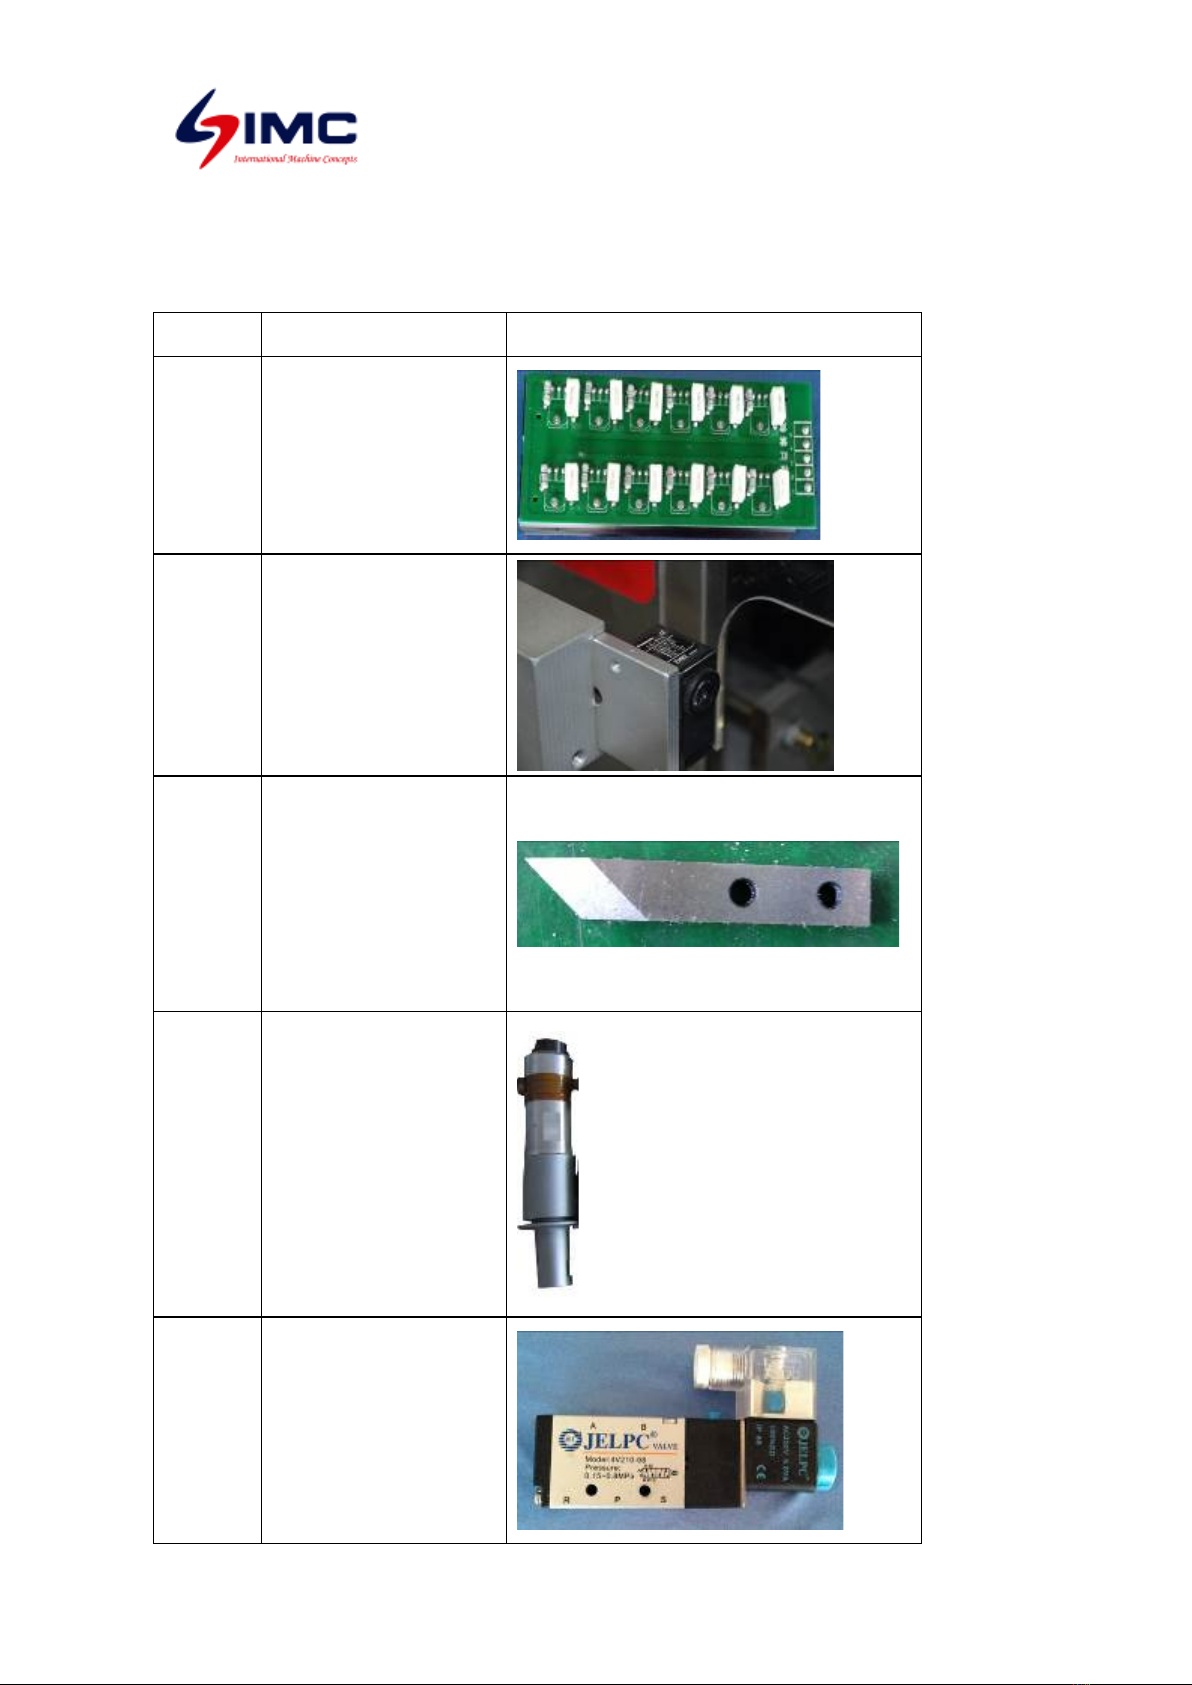
6.1'list'of'Spare'parts'
'
Num.
Spare parts name
Picture
1
Power board
2
Electric eyes
3
Cutter
4
Transducer
5
Electromagnetic valve
!
12!
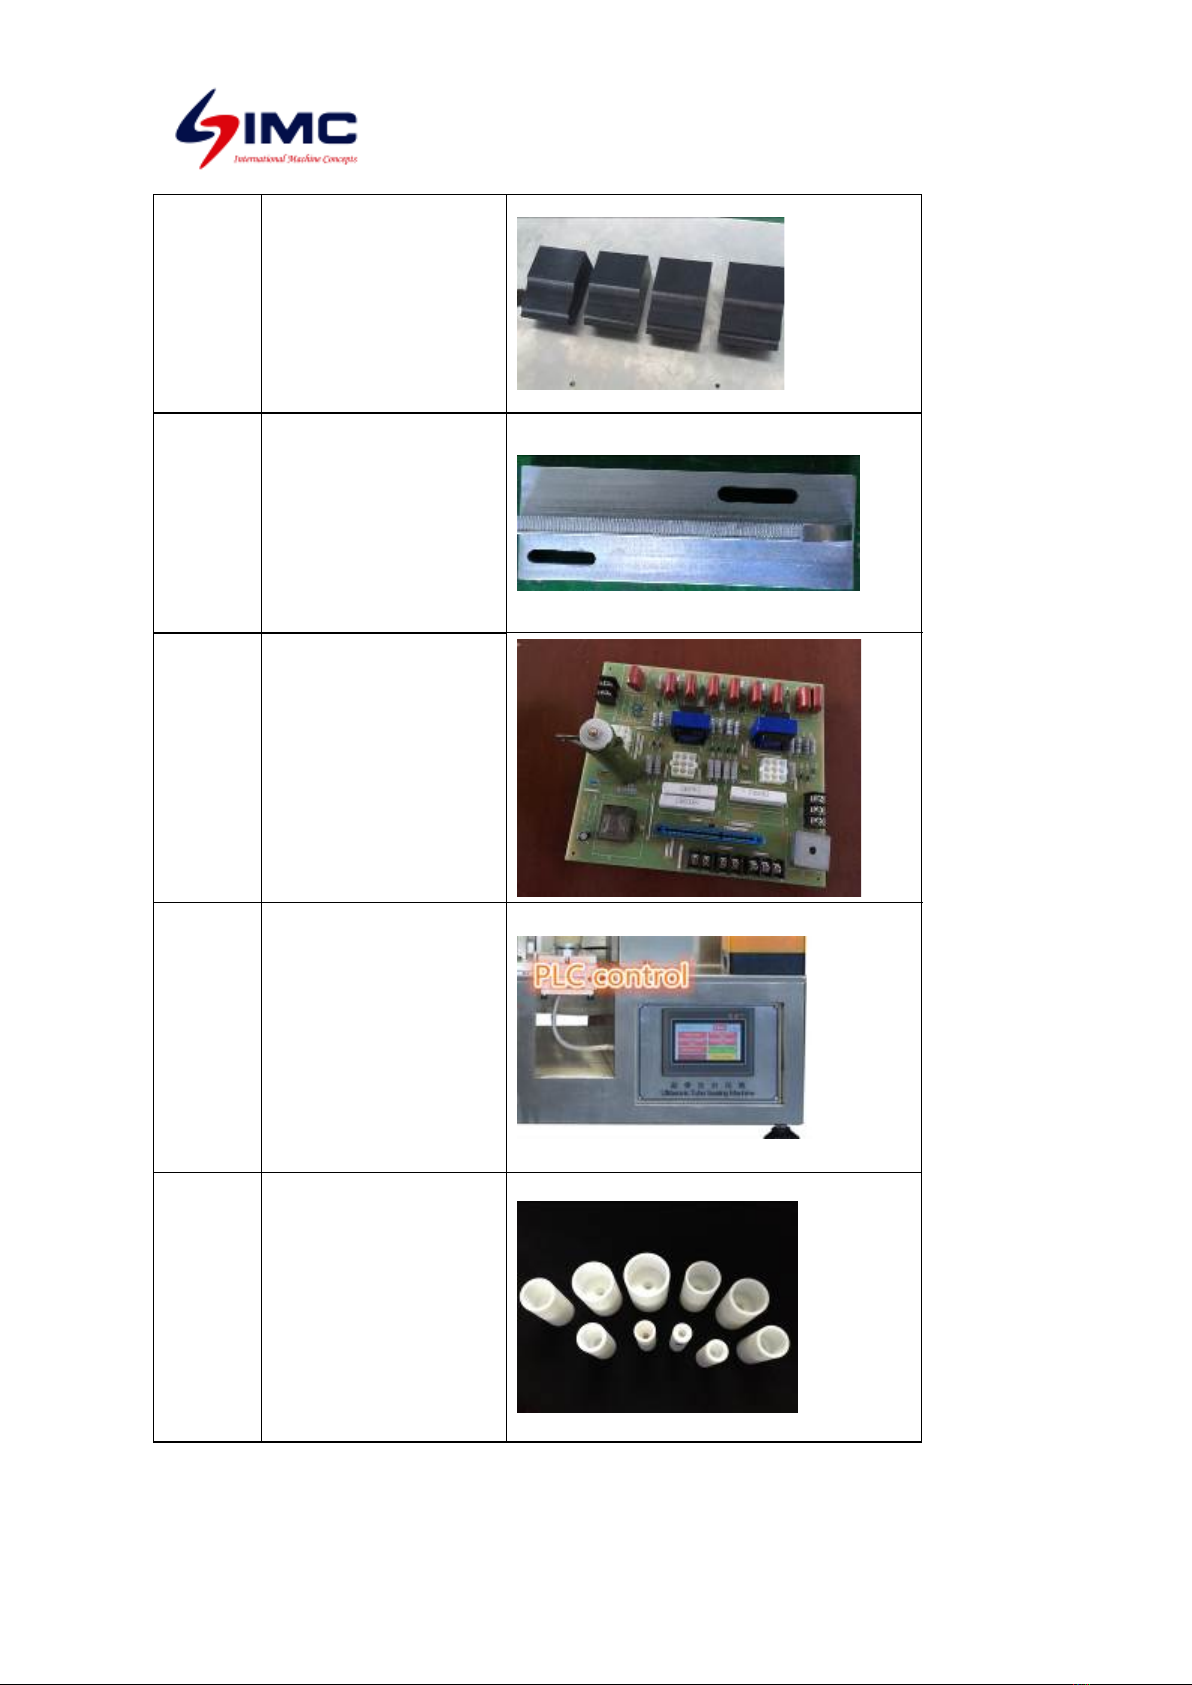
6
Upper mould
7
Lower mould
8
Main board
9
PLC
10
Tube holder
!
!
Table of contents
Other IMC Industrial Equipment manuals


