IMDK MY HEALTHSTYLE C101A2 User manual
PULSE OXIMETER - FINGERTIP
Version: V1.2 Release Date: Sept 2021
Model No: C101A2
INSTRUCTION MANUAL
O2

Responsibility of the Manufacturer
IMDK is responsible for the safety, reliability and performance of the device
provided no assembly, extensions, re-adjustments, modications or repairs
are carried out by individuals not authorised by IMDK. The electrical
installation complies with international standards, provided the instrument
is used in accordance with the instructions for use. The device is compliant
with IEC60601-1 electrical safety standard and delivers the required voltage
and current as per the reported specications.
Measuring principle
Pulse oximetry is a non-invasive and painless test that measures your
oxygen saturation level, or the oxygen levels in your blood. It can rapidly
detect even small changes in how eciently oxygen is being carried to the
extremities furthest from the heart. Pulse oximetry interprets oxygenation
of haemoglobin in red blood cells by measuring infrared light absorption
and applying the "Beer-Lambert Law”to the reading.The instrument
operates using photoelectric recording technology to detect blood oxygen
and pulse volume with the following process: Fluorescent light emission
wavelength equal to 660nm Red and 940nm Near-infrared light irradiation
through the digit, measured by a photosensor. The information regarding
wavelength range is especially useful to clinicians. The data recorded by
electronic circuits and microprocessors are displayed on the OLED Easy-to
read device display screen.
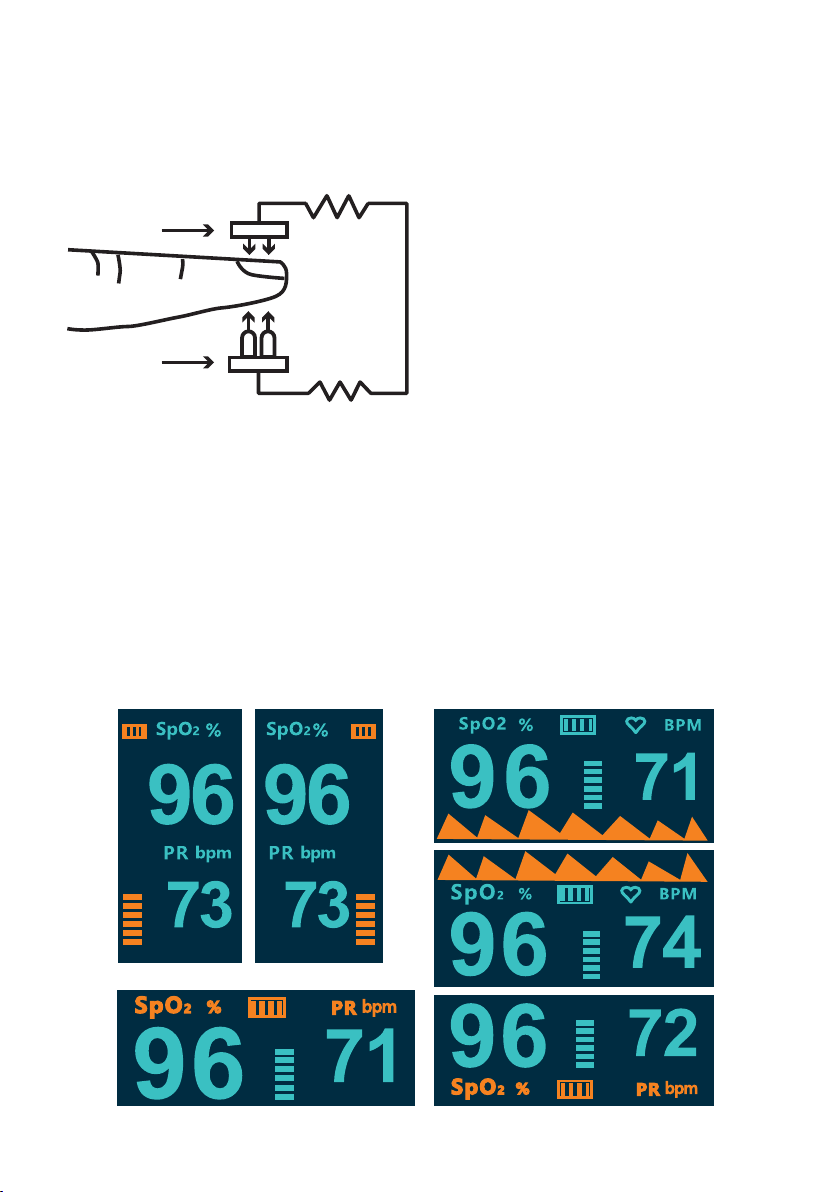
Operation schematic diagram:
1. Infrared/red light emitting tube
2. Light receiving tube
1.
2.

1.1 Safety information
Carefully read the manual regarding safety information, operation and
specications before using this pulse oximeter.
• Do not leave this device unattended in the vicinity of children or pets.
• Do not attempt to open or service the pulse oximeter. Only qualied service
personnel should attempt any servicing required.
• Do not use this device in clinical environments where an alarm is required.
Although this oximeter provides an alarm function it does not meet
IEC60601-1-8 standard.
• The specied environmental temperature should be between 5°C~40°C.
Transport and storage temperature: - 10°~+40°C. When the ambient
temperature is low or high, ensure that the product has acclimatised
to room temperature before use.
• It is not suitable for long term continuous patient monitoring.
Continual measurement must not exceed 2 hours.
Do not change location during measurement. The transfer of blood
oxygen saturation and pulse rate data value oximetry takes about
8-10 seconds and the data update cycle around 20 seconds.
• Sp02 measurements may be adversely aected in the presence of
elevated levels of ambient light. Shield the sensor area from direct
sunlight if necessary.
• The following reasons will cause interference:
- Other high-frequency electrosurgical devices.
- The placement of a sensor on a digit aected by a blood pressure cu
arterial catheter or intravascular line.
- The patient has hypotension, severe vasoconstriction, severe anaemia
or hypothermia.
- The patient is in cardiac arrest or is in shock.
- Fingernail polish or false ngernails may cause inaccurate Sp02 readings.

1.2 Warnings
WARNING: EXPLOSION HAZARD - Do not use the pulse oximeter in a ammable
atmosphere where concentrations of ammable anaesthetics or other
materials may occur.
WARNING: Degraded sensors and electrodes may aect performance or cause
other issues.
WARNING: Do not attempt to recharge normal dry-cell batteries, they may
leak, cause a re or even explode.
WARNING: Do not use the pulse oximeter in an MRI or CT environment.
CAUTION: Keep the operating environment free of dust,vibrations, corrosive or
ammable materials, extreme temperature and humidity.
CAUTION:When not in use for extended periods of time, remove the batteries
from the battery compartment.
CAUTION: Do not operate the unit if it’s damp or wet.
Avoid using the equipment immediately after moving it from a cold
environment to a warm, humid location.
1.3 Note
1. Fingernail polish or false ngernails may cause inaccurate SpO2 readings.
2. The SpO2 waveform is disproportional to pulse.
3. Do not use this equipment on any limb with an arterial cannula, intravenous
infusion set or inated blood pressure cu.
4. The device is pre-calibrated to display arterial oxygen saturation(SpO2) and
pulse rate(PR).
5. If a result is not obtained, the device will not display values and will
represent the waveform as a straight line. A weak signal is represented by
the amplitude of the waveform. If the signal is low, it will aect the
accuracy and function of the pulse oximeter. If your blood oxygen does not
give the correct result, check the signal strength.

There are several reasons for a weak signal:
• Low perfusion.
• Dirty sensor or LED light.
• Incorrect positioning of the pulse oximeter.
• Cold temperatures and general health can cause low blood pressure.
6. The images and diagrams in this manual are for reference purposes only.
7. This manual covers a series of models, some congurations and functions
may be not available on your device.
1.4 Denitions and Symbols
1.4.1 Cleaning instruments:
Use 70% alcohol on a cotton tip or alcohol swab to clean the sensor.
Please ensure that the instrument is inverted during cleaning to prevent any
liquid from entering the instrument.
1.5 Maintenance:
The instrument does not require any maintenance or calibration except for
the replacement of the 2 x AAA batteries.
Under normal conditions the device may last more than ve years if used
less than ten times a day for ten minutes.
1.6 Instructions:
When inserting your nger into the pulse oximeter, your nail surface must
face upwards.

Recommendation:Wipe down the rubberised area inside the pulse oximeter
with a 70% alcohol swab before each test and wipe, clean and air dry the
tested nger with alcohol before and after each test. (The rubber inside the
pulse oximeter is hypoallergenic and contains no harmful toxins).
Install two AAA batteries into battery cassette before closing.
• Insert one nger all the way into the rubberised cavity of the pulse oximeter
before releasing the clamp. The nail must face upwards.
• Press the power button on the front panel.
• Avoid any movement including any trembling of the nger whilst
conducting a reading as this will aect the results.
• Press the power button again on the front panel to change the orientation
of the display (4 dierent settings).
• Read relevant data from the display screen.
• If there is no signal input the pulse oximeter will shut o automatically.
If this happens repeat the process or try a dierent nger.
• Replace new batteries when OLED display screen indicates the batteries are
in low power.
Section 2 - Introduction
2.1 Brief Device Description: This device measures and displays functional
oxygen saturation of arterial haemoglobin (%SpO2) and pulse rate (PR). The
device measures %SpO2 and PR with a SpO2 sensor through the nger and
displays this on the OLED display screen.
2.2 Application: The pulse oximeter is intended for use in home care and for
hospital outpatients measuring pulse oxygen saturation and pulse rate in
adults. Oximetry is suitable for use with vascular diseases, respiratory diseases,
pneumonia, bronchial asthma, COPD, lung cancer, anaemia, the elderly,
people working more than 12 hours a day, extreme sports at altitude causing
hypoxia and chronic alcoholism.

Denition of symbols
Follow instructions for use
No alarm
Type BF Applied Part
Battery indication
Oxygen saturation of arterial haemoglobin
Pulse Rate
Serial Number
Manufacturer
Refer to user manual before application
Authorized representative in the European community
Symbols
The symbol indicates that the device should be
disposed responsibly according to local regulations
when no-longer required or not working.
The symbol indicates that the device complies
with the European Council Directive 93/42/EEC
concerning medical devices.

2.4 Specications
1. Type of protection against electric shock: Internally powered equipment
2. Degree of protection against electric shock:Type BF
3. Protection Against Ingress of Liquids: IP22 (protected against ingress of
water when the water is dripping vertically and the device is tilted up to 15°)
4. Mode of operation: Continuous
5. Expected Service Life: 5 years
6. Display Type: OLED display screen
7. SpO2: Measurement range: 70%-99%
Accuracy: ±2% between 70%-99%,Unspecied(≤70%)
Resolution: ±1%
8. PR: Measurement range:30BPM-240BPM
Accuracy: ±2BPM or ±2%
9. Working Power: Power Supply: 2 x AAA 1.5V batteries,
Electric current: ≤50MA
Battery life: 2 x AAA 1.5 V alkaline batteries may last up to
30 hours continuously.
Battery voltage: Low battery indicator appears if batteries need replacing.
10.Dimension: 60 x 35 x 35mm
11.Environmental:
Operation Temperature
Storage Temperature
Operation Humidity
Storage Humidity
Air Pressure
5 °C - 40°C
-10°C - 40°C
15% - 80%
15% - 80%
70 - 106kpa

Section 3 - Installation, Setup and Operation
Item Name
Power button
Description
3.1 Description of the Front Panel (as gure3.1.1)
3.2 Display
After switching on, the OLED display screen appears as follows:
Battery Indicator
Power
Pulse Rate
Plethysmogram
Hemoglobin
Saturation
Figure 3.1.1 Functions on Front Panel
Table 3.1.1 Function Name and Description
Turns on the device as well as changes
the display screen orientations
OLED display panel
1
2Displays the SPO2/PR data
& Plethysmogram
3.3 Parameter settings
To adjust the parameters, turn on the device by pressing the power button.
Press and hold the power button for 2 seconds and the setting functions will
appear. Identify the symbol '*' and press the power button to change between
the settings options.To adjust the desired setting, hold down the power button
for 2 seconds. Once you have completed your adjustments, align the symbol '*'
with the“Exit”setting and hold down the power button for 2 seconds.
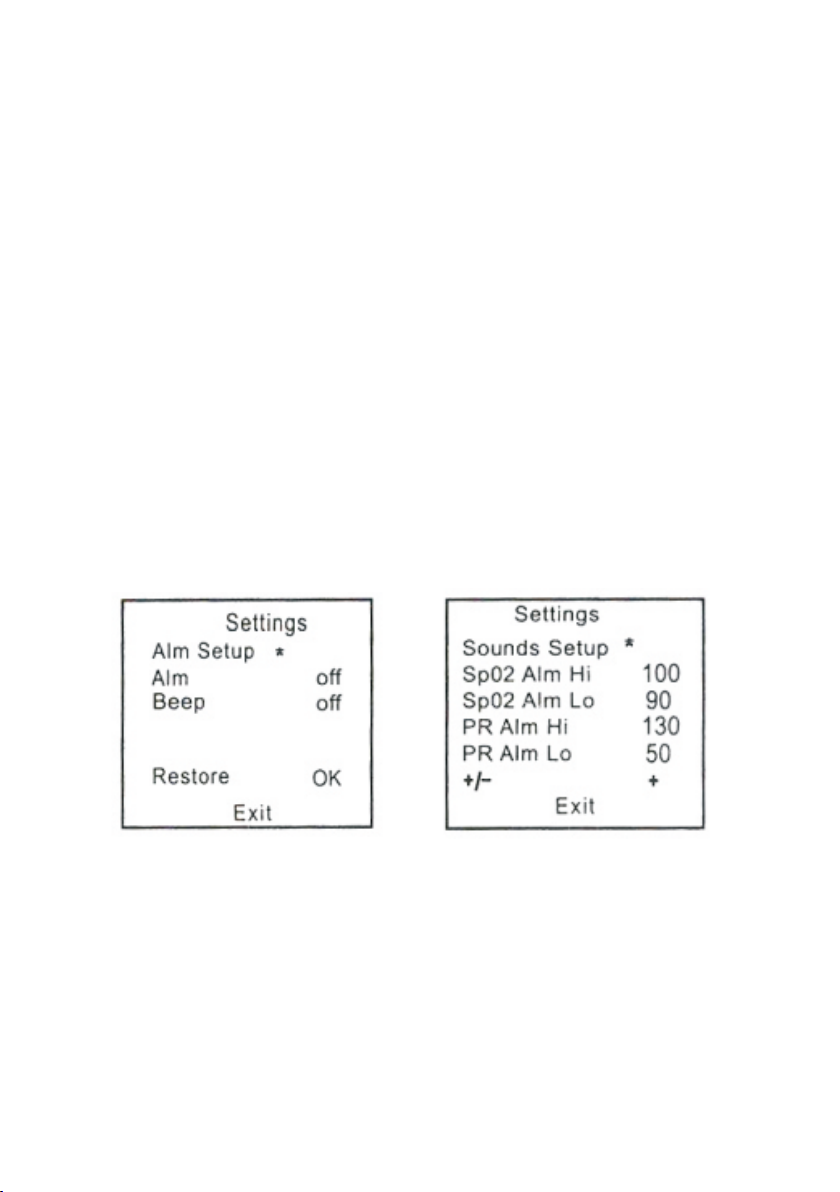
There are two submenus to choose from:
• When the '*' symbol shows on the "Sounds Setup”press the power button
for 2 seconds and enter the sounds setting menu (Figure3.3.1). You can
press the power button to change to the desired settings.
• When the '*' symbol shows on the “Alm Setup”press the button for 2
seconds and enter the alarm setting menu(Figure3.3.2). Press the power
button to set the on/o for the alarm and beep.
3.4 Operation
3.4.1 Install battery:
Install the 2 x AAA batteries into battery cassette with the correct polarity
and close the cover.
WARNING: Do not attempt to recharge normal alkaline batteries, they may
leak and may cause a re or even explode.
Figure3.3.1 Figure3.3.2
3.4.2 Turning the Pulse Oximeter ON/OFF:
Insert the nger fully into the rubberised hole of the pulse oximeter with
the nail surface facing upwards.
3.4.3 Read corresponding data from the display screen.
3.4.4 Display screen orientations:
The display screen can rotate in four orientations.
To alternate between them press the power button for less than 0.5 second
as shown below:
Display screen modes
1.
2.
Release the clamp and press the
power button to turn the device on.
The oximeter will automatically
power o when there is no
nger inserted into the device
after 8 seconds.

Features
• Two colour OLED display screen with dierent orientation modes.
• Low-power consumption.
• Low voltage indicator.
• Automatically powers o after 8 seconds when there is no signal.
• Small in volume, light in weight and convenient to carry.
Section 4 - Maintenance and Solutions
4.1 Maintenance and Preservation:
• Replace the batteries timely when low voltage symbol shows.
• Clean the surface of ngertip oximeter before using to assess patients.
• Remove the batteries inside If you will not operate the pulse oximeter for
extended periods of time.
• It would be better to store the product in -10~40 C (14-104 F) and
humidity between 10%-80%.
• It is recommended that the product should be always kept dry.
A damp/humid environment may aect its lifespan.
• Please follow the local government laws for disposal of used batteries.
4.2 Product Declaration:
Guidance and manufacture' s declaration-electromagnetic radiation for
other EQUIPMENTS and SYSTEMS
The pulse oximeter is designed to be used in specied electromagnetic environment.
Users of the pulse oximeter must use it in the following environments.
Radiation Test Compliance
RF interference
CISPR 11 Group 1
RF interference
CISPR 11 Class B
Electromagnetic environment-guidance
RF signal of pulse oximeter caused by its internal functioning.
Therefore, the RF interference is extremely low and is not likely
to cause any interference to nearby electronic equipment.
The pulse oximeter complies with all establishments,
including domestic establishments and those directly
connected to the public low-voltage power supply network
that supplies buildings used for domestic purposes.

Section 5 - Applicable models
C101H1,C101A2,C101A3,C101B1,C101B2.
Note:
1. The images and illustrations in the manual may dier slightly from
your actual device.
2. Technical parameters are subject to change without prior notice.
4.3 Troubleshooting
Problem Probable Reason Solution
SPO2 or PR
not displaying.
Sp02 or PR is
uctuating.
The device does
not turn on.
Display screen
turns o
suddenly.
1. Finger not inserted
correctly or deep enough.
2. Patient’s oxyhemoglobin
value is too low and
not measurable.
1. Finger not inserted
correctly or deep enough.
2. Finger is trembling or there
is movement.
1. Insucient battery power.
2. Batteries may be
installed incorrectly.
3. The device might
be damaged.
1. The product automatically
shuts o when no signal is
detected after 8 seconds.
2. Insucient battery power.
1.Normal
2.Replace the batteries
1. Replace the batteries.
2. Re-install the batteries.
3. Contact the distributor.
1. Retry by reinserting
the nger.
2. Keep hand still.
1. Try reinserting the nger.
2. Try other ngers for
readings failing which
go to hospital for an
exact diagnosis.

Product Warranty
The Pulse Oximeter is warranted by manufacturer to be free from defects
in material and workmanship under normal use and service for a period
of one year from the date of purchase. Proof of purchase is required. This
warranty does not cover batteries, damage to the sensors, display screen,
or damage to the instrument caused by misuse, negligence or accident,
and extends only to the rst purchaser of the product.
Australian Consumer Warranty
The benetsconferred bythiswarrantyare in additiontotheconsumer
guaranteesand otherrights andremediesinrespect ofthe productwhich
theconsumerhasundertheAustralianConsumerLaw.
Ourgoods comewithguaranteesthat cannot be excluded underthe
AustralianConsumer Law.Youare entitledto areplacementor refundfor
amajorfailure.You arealso entitledtohavethe goods repairedor
replacedifthe goodsfailto beof acceptablequalityandthefailuredoes
not amounttoamajorfailure.
Distributed by: Silverline Medical Pty Ltd
14/265-271 Pennant Hills Road, Thornleigh, NSW 2120
Tel: 1800 959 777 | silverlinemedical.com.au
Section 6 - Contact Information
If you have any question about maintenance, technical specications, or
malfunctions of devices, contact your local distributor or manufacturer.
Shenzhen IMDK Medical Technology CO. Ltd CZone,10F,Building
16,Yuanshan Industrial B Area, Gongming Street, Guangming District,
Shenzhen. China Post:518106 Tel:+86-755-36637905
MedNet EC-REP GmbH, Borkstrasse 10,48163.Münster,Germany
Table of contents
Popular Medical Equipment manuals by other brands


Nonin
Nonin Onyx II 9550 Instructions for use

SSCOR
SSCOR Quickdraw 2400 Series Operating Instructions & Maintenance Manual

Koya
Koya Dayspring Directions for use

Stryker
Stryker 6390 Maintenance manual

KaVo
KaVo ESTETICA E30 Service instructions

Verathon
Verathon BladderScan BVI 6100 Operation & maintenance manual