Netech 200-BP-CAL-KIT User manual
Sphygmomanometer Calibration Verification Guideline
200-BP-CAL-KIT
Sphygmomanometer Calibration Kit
INSTRUCTION MANUAL
公司:深圳市净康科技有限公司
地址:深圳市龙岗区沙平北路111号6008
联系人:王小姐 电话: 15813841944 0755-28917660
QQ:422612157 邮箱:[email protected]
www.300buy.com

Sphygmomanometer Calibration Verification Guideline 2
Copyright
Copyright © 2003 by Netech Corporation. All rights reserved. No part of this
publication may be reproduced or transmitted in any form other than for the
purchaser’s personal use without written permission from Netech
Corporation.
Quality Assurance
Netech Corporation is ISO 9001-2000 Registered. This instrument was
thoroughly tested and inspected according to Netech’s ISO 9001-2000
quality standards (ISO/IEC 17025) and test procedures, and was found to
meet those specifications when it was shipped from the factory.
Warranty
Netech warranties the Blood Pressure Calibration Kit against defects in
materials and workmanship for one year from the date of original purchase.
During the warranty period, we will repair or, at our option, replace at no
charge a product that proves to be defective, provided you return the product
shipping prepaid to Netech Corporation. This warranty does not apply if the
product has been damaged by accident or misuse, or as the result of service
or modification by other than Netech Corporation, or if its serial number is
defaced or removed.
Netech reserves the right to discontinue the Blood Pressure Calibration Kit
at any time, and change its specifications, price, or design without notice and
without incurring any obligation. Netech guarantees availability of service
parts for 5 years after the manufacture of the unit is discontinued.
The warranty is void if you elect to have the unit serviced and / or calibrated
by someone other than Netech.
The purchaser assumes all liability for any damages or bodily injury that
may result from the use or misuse of the unit by the purchaser, his
employees, agents or customers.
In no event shall Netech Corporation be liable for consequential
damages.

Sphygmomanometer Calibration Verification Guideline 3
Table of Contents
1. General Overview
Introduction----------------------------------------------------- 05
Specifications-------------------------------------------------- 05
Accessories---------------------------------------------------- 06
Optional Accessories---------------------------------------- 06
2. Operating Instructions
Controls and Indicators ------------------------------------- 07
Typical Calibration Setup -----------------------------------08
3. Troubleshooting The Calibration Setup
Maintaining Initial Zero ------------------------------------- 09
Maintaining Steady Pressures ---------------------------- 10

Sphygmomanometer Calibration Verification Guideline 4
GENERAL OVERVIEW SECTION 1
1.1 INTRODUCTION
GENERAL DESCRIPTION
The heart of the Blood Pressure Calibration Kit is a Digimano 1000 series Pressure
Meter. The Digimano 1000 is a portable digital instrument designed to measure the
pressure and vacuum of non-corrosive fluids and gases. The versatile instrument
presents its measurement results in one of two engineering units on a large 3 _ digit
LCD display.
The Blood Pressure Calibration Kit contains the 200-2000IN,
The Digimano 1000 has an accuracy of 0.25% full scale. Seven models with different
engineering units and pressure ranges are available. To provide superior performance,
the Digimano 1000 incorporates one of the latest semiconductor pressure sensors.It is
powered by one 9-Volt alkaline battery.
Optionally, an AC adapter may be used. The Digimano 1000 is CE marked and is
shipped with a Certificate of Calibration traceable to the NIST. The Digimano 1000 is
a rugged instrument that performs its measurements quickly, accurately, and with
ease.
1.2 SPECIFICATIONS
Display:
3-1/2 Digit 0.5 in LCD.
Polarity Display:
The negative sign (-) is displayed when there is a vacuum reading.
Accuracy:
0.25% full range, +/- 1 count (Pressure Only).
Operating Temperature:
0 degree C to 40 degree C
Media Compatibility:
Non-corrosive fluids and gases.
Maximum Pressure:
Double the rated Pressure.
Power:
One 9 volt alkaline battery or optional AC adapter.

Sphygmomanometer Calibration Verification Guideline 5
Low Battery Indicator:
LED on if battery voltage is ≤6.8 volts.
Physical Dimensions:
Size: 3 x 2 x 1.4 in (7.6 X 5 X 3.6 cm)
Weight: 6.5 oz (.18 kg)
Digimano 1000 Standard Models:
Model # Measurement Units & Range
200IN 199.9 mmHg / 199.9 inH2O
2000IN 1999 mmHg / 199.9 inH2O *
200PS 199.9 mmHg / 19.99 PSI
2000PS 1999 mmHg / 19.99 PSI *
200cmH2O 199.9 cmH2O / 19.99 PSI
200kPa 199.9 kPa / 1999 cmH2O
2000kPa 199.9 kPa / 199.9 inH2O
* User can pick any of these models for the BP-Cal Kit.
1.3 ACCESSORIES
Description Part Number
User Manual 200-Manual
Syringe Pressure Applicator 204
Silicon Tubing
Three-way Plastic TEE Connector
Hard Carrying Case
1.4 OPTIONAL ACCESSORIES
Description Part Number
110 VAC Adapter 302
220 VAC Adapter 302-220

Sphygmomanometer Calibration Verification Guideline 6
GENERAL OPERATION SECTION 2
2.1 CONTROLS AND INDICATORS
1. Display Screen
2. ON/OFF Switch
3. mmHG/PSI Switch
4. Luer Lock Fitting (Female)
5. DC Proportional Output
6. Zero Adjustment
7. Lead Screw Release
8. Precision Adjust
9. Luer Lock Fitting (Female)
10. Barb Fitting
11. Zero Square
Digimano Pressure Meter
Figure 1
3
5
4
2
1
6
Sphygmomanometer Calibration Verification Guideline 7
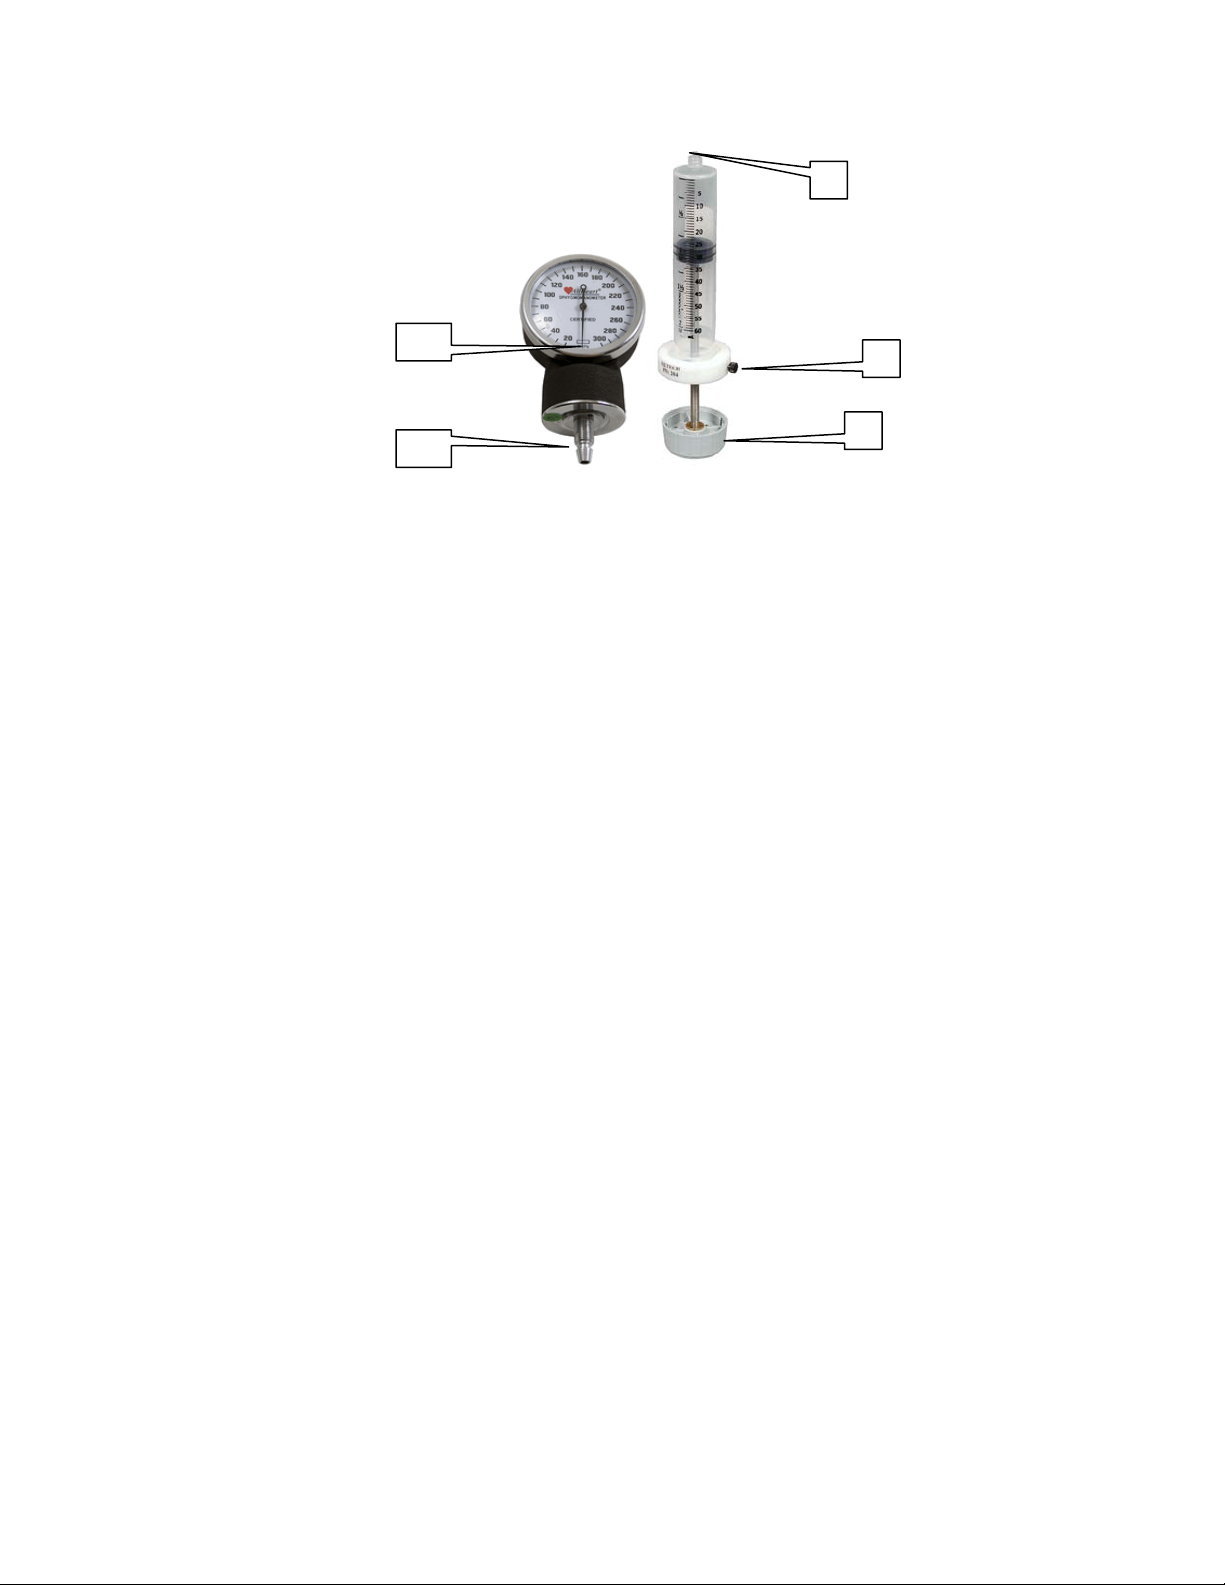
Sphygmomanometer Syringe Pressure Applicator
Figure 2
2.2 TYPICAL CALIBRATION SET UP
Place the cuff in a rigid enclosure such as a tin can. Using the inflation bulb pump unit to 200
mmHG and hold. Pressure should remain steady. If it does not stay steady go to Section 3 and
use the same technique to determine where the system is leaking. The bulb, cuff and
connecting hose can all leak and may require removal.
Remove any hoses from your sphygmomanometer (Unit Under Test (UUT)) and inspect them
for cracks. If cracks are present replace hose.
Inspect the Unit Under Test (UUT) for indications of impact or physical damage.
If the UUT is an aneroid style, Sphygmomanometer, ensure that the needle is with the
rectangular zero indicator (11), see Figure 2. If not the unit requires repair prior to
proceeding.
Turn your digital pressure meter on and insure that the display (1) reads zero, if it does not
adjust to zero by using the zero adjustment. See Figure 1.
Adjust the plunger on the Pressure Applicator Syringe to to its mid point by pushing or
pulling the plunger (8) while pressing in the lead screw release button (7), see Figure 2.
Connect the silicon tubing to both the UUT and the Pressure Meter as shown in Figure 3.
Ensure both the UUT and the Pressure Meter read zero, then carefully attach the Pressure
Applicator Syringe, while ensuring that both the UUT and the Pressure Meter remain at zero.
During the remainder of the tests ensure the needle on an aneroid sphygmomanometer travels
smoothly at all times.
Turn the fine adjustment knob (8) Figure 2, until the UUT reads 100 mmHg and hold. Ensure
that the reading remains steady, if the pressure drops refer to section 3.0 Troubleshooting.
7
11
9
10 8

Sphygmomanometer Calibration Verification Guideline 8
By turning the fine adjustment knob apply three values such as 50, 150 300 plus zero. Ensure
that both the sphygmomanometer and digital pressure meter read within 3 mmHG of each
other.
Sphygmomanometer Digital Pressure Meter
Pressure Applicator Syringe
Figure 3
3.0 TROUBLESHOOTING THE CALIBRATION SET UP
3.1 Maintaining Initial Zero readings
The sphygmomanometer and/or the digital pressure meter reads a pressure
after connecting all the tubing and devices.
Make sure that you use the male luer lock fitting when connecting either the
digital pressure meter or the pressure applicator syringe. Always connect the
sphygmomanometer first and the syringe last using care to not induce pressure
into the setup.
TEE Connector
Silicon Tubing (a) Silicon Tubing (b)
Silicon Tubing (c)

Sphygmomanometer Calibration Verification Guideline 9
Do not readjust zero using the zero adjust on the digital meter, zero can
only be adjusted when the unit is open to atmosphere.
3.2 Maintaining A Steady Pressure Reading
If the sphygmomanometer and the digital pressure meter will not stay steady
your calibration set up is leaking.
Using a clamp or some other tool that will seal off the silicon tubing,
clamp tubing segment (c) at the syringe. If the pressure remains steady
tighten up the syringe connection.
If this fails clamp tube segment (c) at the TEE Connector if pressure
stays steady tighten up this connection.
Else clamp segment (b) at the TEE connector. If pressure stays steady
tighten up this connection.
Else clamp segment (b) at the Digital Pressure Meter connection. If
pressure stays steady tighten up this connection.
Else clamp segment (a) at the TEE connector. If pressure stays steady
tighten up this connection.
Else clamp segment (a) at the Sphygmomanometer connection. If
pressure stays steady tighten up this connection.
Table of contents
Other Netech Medical Equipment manuals


Popular Medical Equipment manuals by other brands


Johnson & Johnson
Johnson & Johnson DePuy Synthes Battery Power Line II Instructions for use

Ramsey Medical
Ramsey Medical petMAP+ II Operator's manual

Kartsana
Kartsana TGM-241 Series instruction manual

Aspect
Aspect BIS VISTA Service information manual
EyeQue
EyeQue Personal Vision Tracker EQ101 product manual

Impulse Dynamics
Impulse Dynamics OPTIMIZER Integra CCM-D Patient manual