12
MASONRY300
IMERINTERNATIONALS.p.A. GB
GB
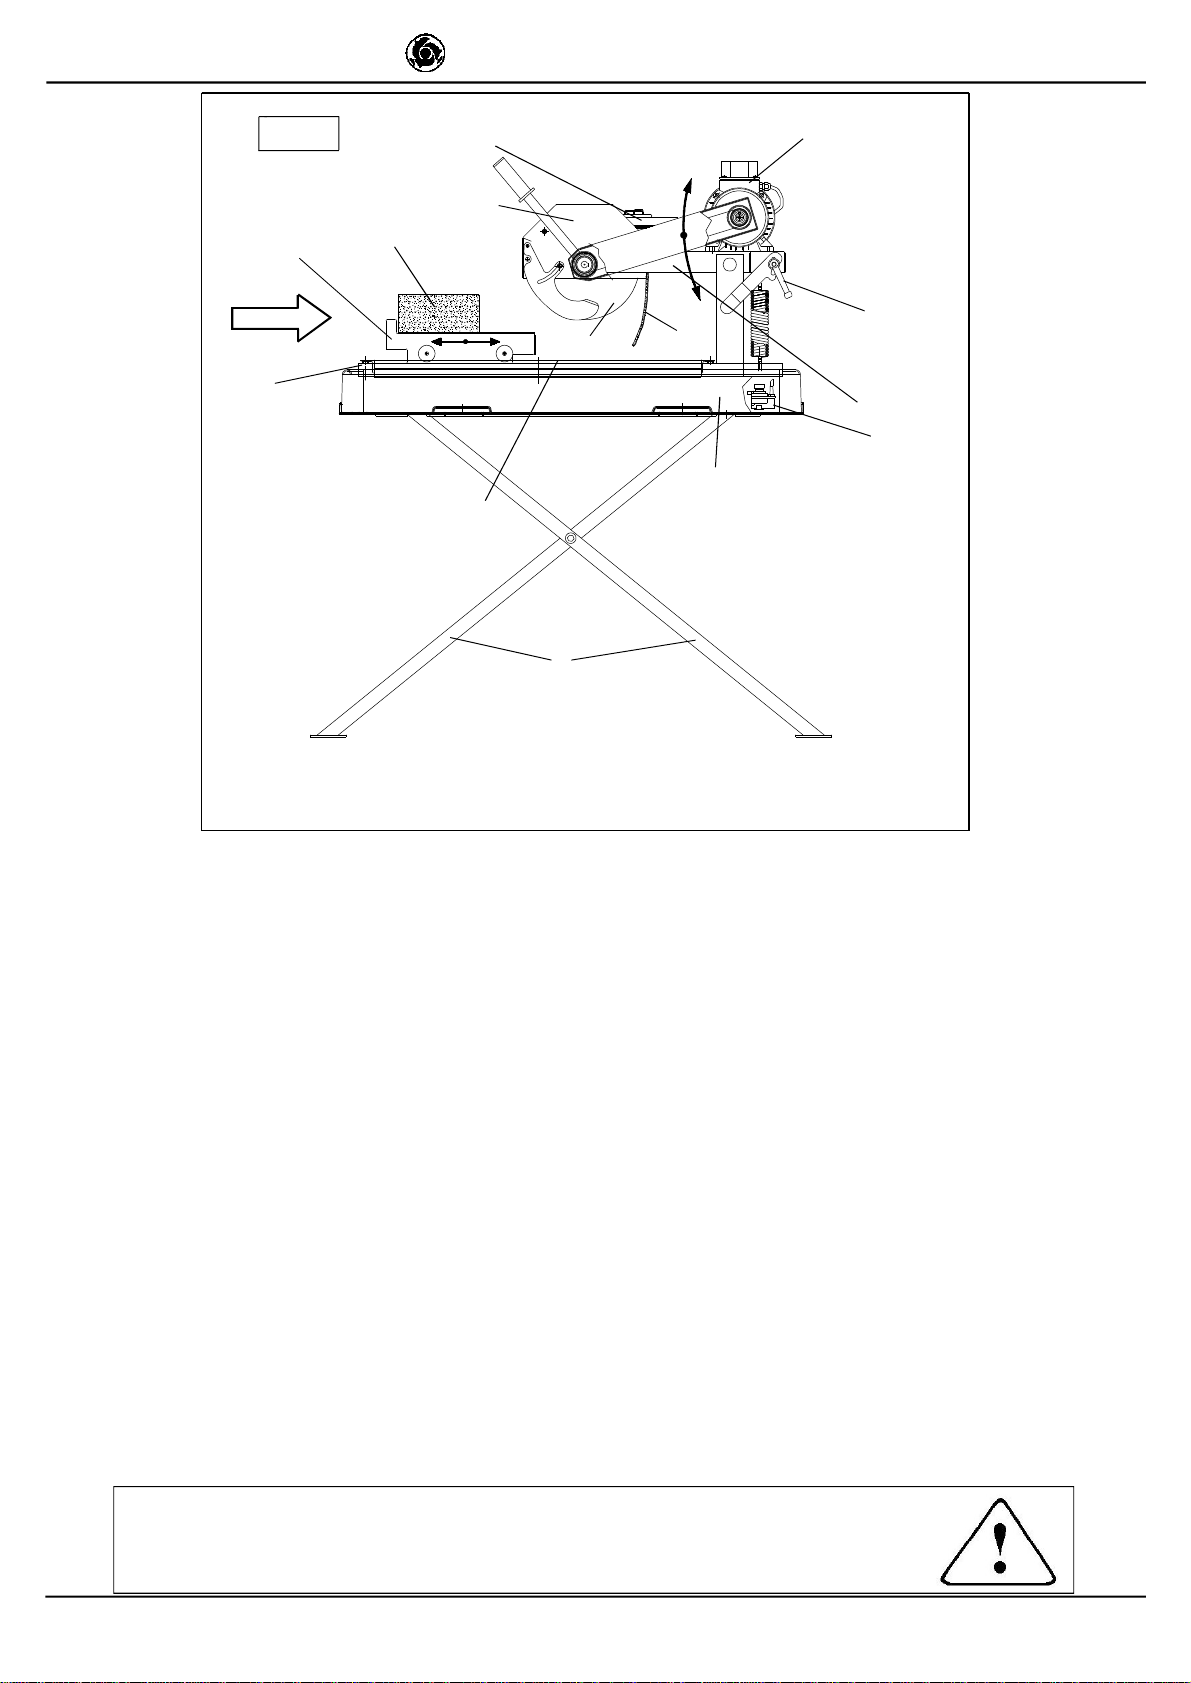
9.TRANSPORTATION
-WARNING! Beforemovingthesaw,lock head
supportcarriagemovementbymeansoftherelative knob
(Ref.11,fig.1).
Thesawweights 53 Kgand canbemovedbymeansofthe
sidehandlesonthetank.
Alwaysemptythetankbeforemovingthemachine.
10.INSTALLATION
The machine must be placed on asmoothsurfacethatisatleast
as large as the tank, withthe sawon the relativestand (Ref. 11,
fig.1).ThecorrectsidefortheoperatorisasshowninFig.1
position X.
- Ensurethatthestand ispositionedontherelative
inserts on thetankbase and thussecured.
Always remove theplug fromthemainspowerbefore
movingthemachine.
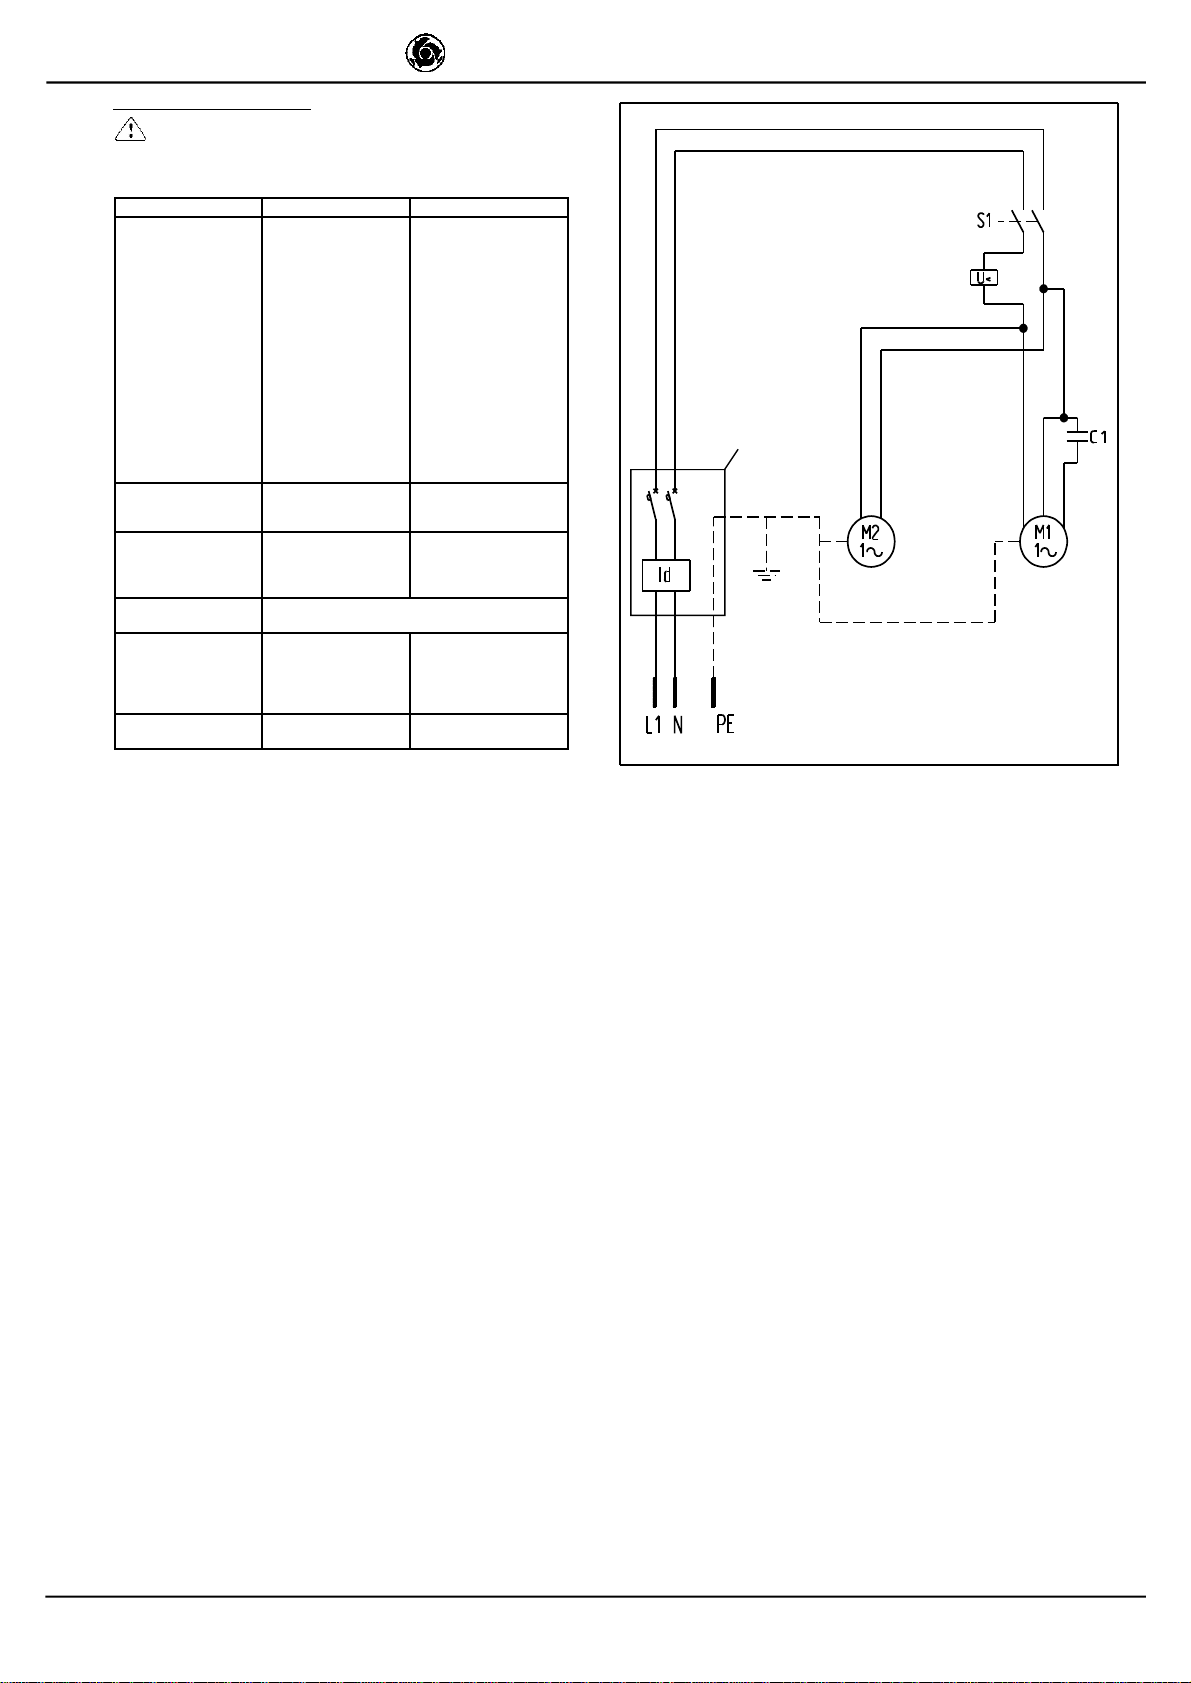
11.ELECTRICALCONNECTION
Connect the mainspower cabletothe plug on the electrical
panel.
RESIDUALCURRENTCIRCUITPROTECTION
(KIT230V-P/N.1169245 -KIT110V-P/N.1169249):
It’sobligatorytofitthesawwiththedifferential
switchkitP/N1169249 on thefeeding cable.
Tostartup the saw,press the green ONkeyon the RCCB
switchand an orange led illuminates(RCCBprotection on).
RESIDUALCURRENTCIRCUITBREAKERTEST:
Press the black key TESTon the RCCB; the switch
disconnects and the orange led turnsoff.
After performing the TEST,press the ONkeyagaintoactivate
theRCCB.
-CarryouttheRCCB TESTbeforeeachmachinestart-
up.
Then startthe sawbysupportofthe switchon the handle,
comprising twobuttons: green for start, red for stop.
The RCCBisdeactivated eachtimethe power supplyis
disconnected
THERMALCUTOUTPROTECTION:
-Theelectricmotor isprotectedagainst overloadby
athermalcutout;intheeventofoverheatingthisdevice
shuts down themotor.
CoolthemotorandrestartbymeansoftheRCCB
switchand themainswitchon thehandle.
Themachineisprotectedagainstshortcircuits bya
magneticprotection insidetheRCCB.
-Ensure thatthe mainsvoltagecorrespondstothatspecified
forthe machine: 230V/50Hz. The electricalpowercablemust
besuitablysizedtoavoidvoltagedrops. Cabledrumsmustnot
beused.
Cablesusedonconstructionsitesmust be fittedwithsuitable
externalsheathingthatisresistanttowear,crushingand
extremeweatherconditions(for exampleH07RN-F).
-All powersupplyinstallationsmust complywith
CEI64-8standards(harmoniseddocumentCENELEC
HD384).
12.MACHINESTART-UP
Before connecting the machine tothe power supply:
1-Ensure thatthe tankcontainssufficientcooling water.
2-Connect the power supplycabletothe electricpanelplug.
3-Turn on the concretemixer using the switchlocated on the
electriccontrolpanel(ref. 7,fig.1) comprising twobuttons: the
green one switcheson the machine,whilethe red one switches
itoff. The switchhasminimumvoltage protection:after apower
failure or accidentalpower loss, pushthe green startbutton to
startthe machine up again.
4-Check thatthe direction of blade rotation correspondstothat
indicated bythe arrowon the blade guard.
Open the valveand ensure sufficientflowofcooling water to
the diamond blade.
5-Never drycutmaterialor cutwhen cooling water levels
arelow.
6-If all isinorder,proceed withcutting.
13.EMERGENCYSTOP
-Incase ofanemergency,stop themachineby
pressing theredstop button (extended),thendisconnect
theplug fromthepowersupplysocket.
-Themotorisprotectedagainstautomaticre-start
afterinterruptionsduetopowerfailure.Toresume
operation,whenpowerisre-connected,press thegreen
switchontheoverloadcutoutdevice.
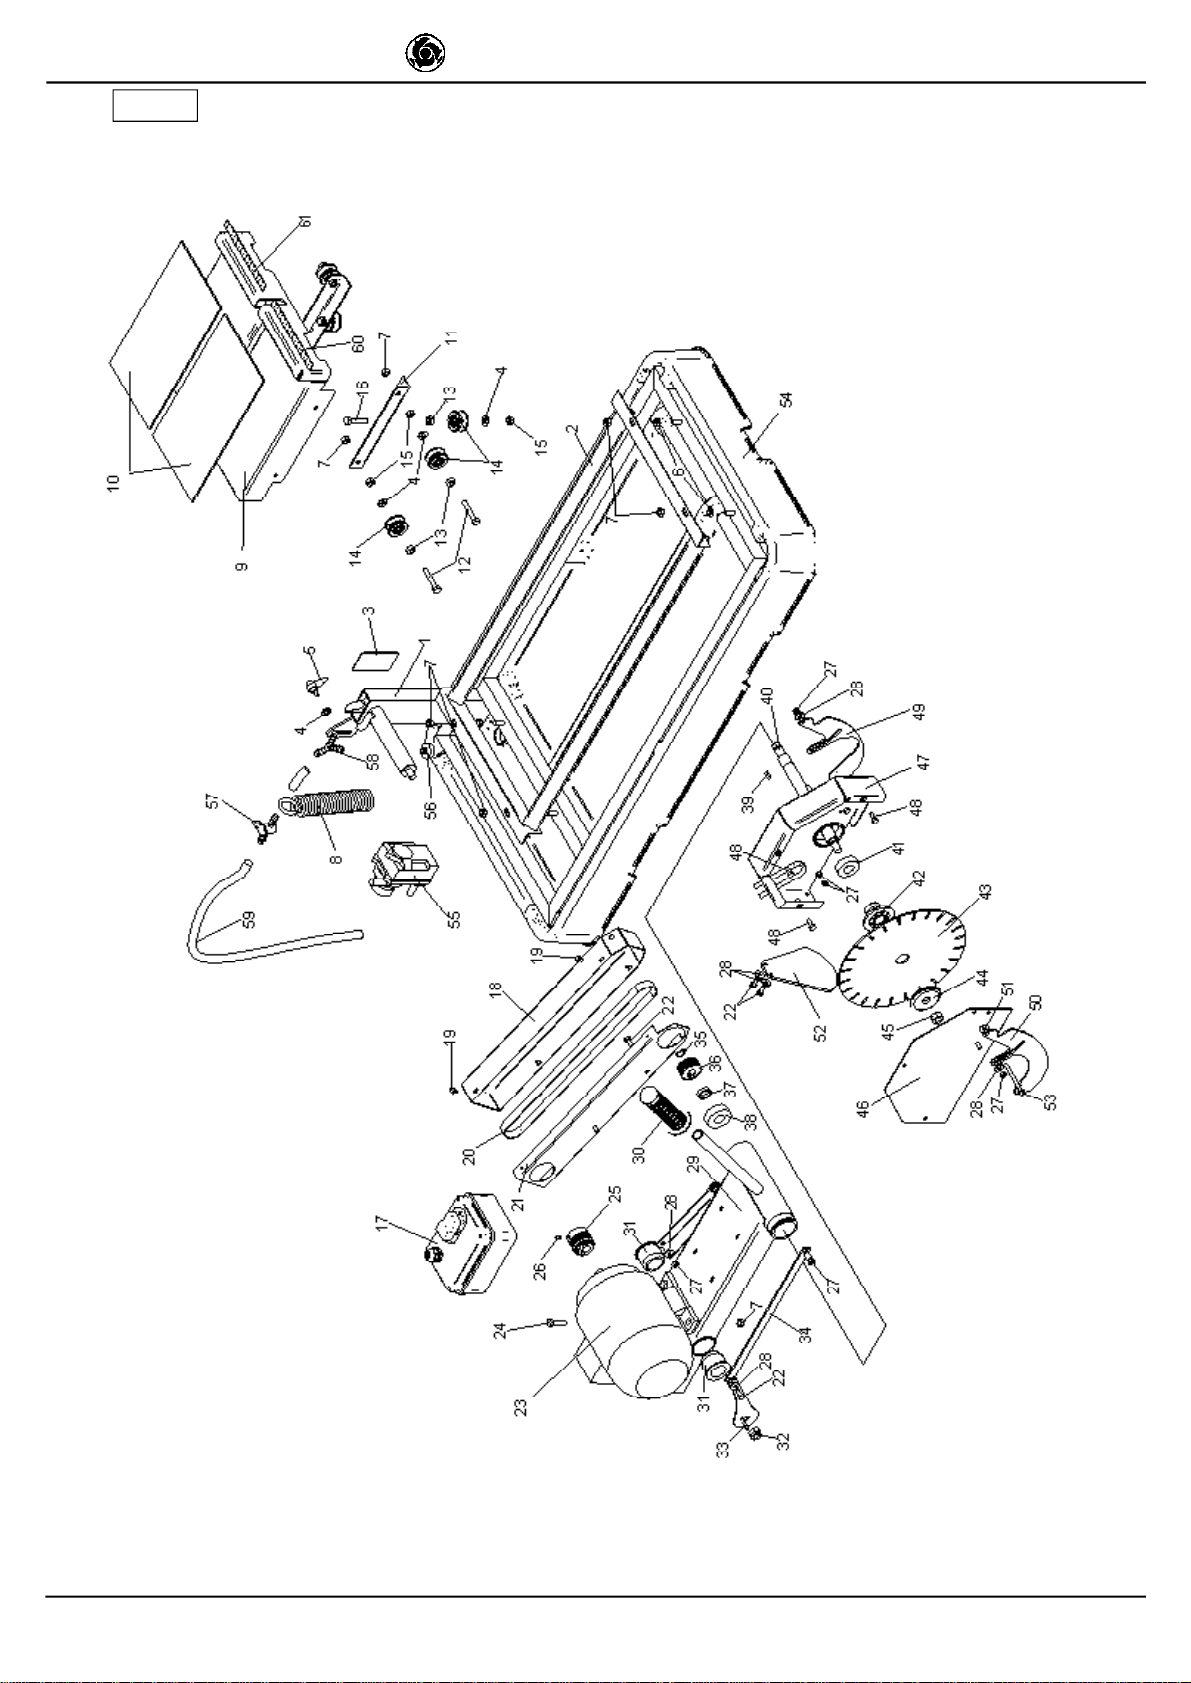
14.BLADEINSTALLATION
Alwaysremovetheplug fromthemainspower.
The diamond blade ismade ofmaterialthatmaybe damaged
when subject tohigh temperatures, and therefore must be
cooled during the workphases.
Toreplacethe blade,proceed asfollows:
1.Block axialmovementofthe cutting head bymeansofthe
handwheels(ref.11fig.1).
2.Stop the blade rotation fitting the shaftblocking pin(ref. 1fig.
5) inthe holeofthe beltcover (ref. 2fig.5) rotating the blade
till the pinhasentered the holeinthe shaft.
Verifythattheblade doesn’tturn,otherwiserepeatthe
operation again.
3.Disassemblethe frontguard.
4.Loosen the locknutbyrotating clockwise(left thread),
using a19 mm wrench.
5.Movethe cutting head forward slightlyand incline to
removethe blade fromits seat.
6.Ensure thatthere are no foreign objects between the
fixing flange and diamond blade.During disassembly,avoid
useoftoolsthatcoulddentor deformthe flange.
7.Insertthe newblade proceeding inreverseorder ofthe
operation described atpoint4.Takespecialcare toensure
correct direction ofrotation ofthe diamond blade.
8.Tighten the blade locknutfullydownbyrotating
anticlockwise(left thread),toatorque of40 Nm.
9.Takethe shaftblocking pinoffthe beltcover.
10.Verifythe blade turn freely.
11.Connect the plug again.
-Note that theblademust have anexternaldiameter
of300 mm, acentralholediameterof25.4mm and max.
thickness of3mm.
-Check that thebladetobeusedissuitablefor the
materialtobecut.
-Neverdrycutmaterialorcutwhencooling
waterlevelsarelow.
-Donotuse blades for wood!(fig.6).
15. USE
-Leave aspace of150cmaroundthe
machinetooperateinfull safety.
-Donotallowother personstoapproachthe
machineduringcutting.
-Never usethe machineinfire-risk areas.Sparks
cancausefireorexplosions.
-Makesurethatthemachine isswitchedoffbefore positioning or
handling.
-Always ensure thatthe blade isfree ofanycontact beforestart-
up. -Ensurecorrectinstallationofallprotectivedevices.
Before starting work,fill the water tank. Topup during operation
whenever necessary:N.B. thepumpsuction hosemust
alwaysremainimmersedinwater.
-Insertthe pluginthe powersocket.
-WARNING! For safety purposes theremovalof
protectiveguardsfromthemachineisstrictlyprohibited
-WARNING! Alwaysswitchoff themachinebefore
Fig.6