IN-ECO RH12008 User manual
EN
Rotary Hammer
Rotary Hammer
RH12008 URH12008
RH12008-6 RH12008S
RH12008-4
RH12008-8
ingcoglobal
INGCO GLOBAL
2|English
The symbols in instruction manual and the label on the tool
Double insulated for additional protection.
Read the instruction manual before using.
CE conformity.
Wear safety glasses, hearing protection and dust mask.
Waste electrical products should not be disposed of with household waste.
Please recycle where facilities exist. Check with your Local Authority or
retailer for recycling advice.
Safety alert.
Please only use the accessories supported by the manufacture.

3|English
follow the warnings and instructions may result in electric shock, fire and/or
serious injury.
Save all warnings and instructions for future reference.
The term "power tool" in the warnings refers to your mains-operated (corded)
power tool or battery-operated (cordless) power tool.
1) Work area safety
a) Keep work area clean and well lit. Cluttered and dark areas invite
accidents.
b) Do not operate power tools in explosive atmospheres, such as
in the presence of flammable liquids, gases or dust. Power tools
create sparks which may ignite the dust or fumes.
c) Keep children and bystanders away while operating a power
tool. Distractions can cause you to lose control.
2) Electrical safety
a) Power tool plugs must match the outlet. Never modify the plug
in any way. Do not use any adapter plugs with earthed
(grounded) power tools. Unmodified plugs and matching outlets will
reduce risk of electric shock.
b) Avoid body contact with earthed or grounded surfaces such as
pipes, radiators, ranges and refrigerators. There is an increased
risk of electric shock if your body is earthed or grounded.
c) Do not expose power tools to rain or wet conditions. Water
entering a power tool will increase the risk of electric shock.
d) Do not abuse the cord. Never use the cord for carrying, pulling
or unplugging the power tool. Keep cord away from heat, oil,
sharp edges or moving parts. Damaged or entangled cords
increase the risk of electric shock.
e) When operating a power tool outdoors, use an extension cord
suitable for outdoor use. Use of a cord suitable for outdoor use
reduces the risk of electric shock.
f) If operating a power tools in a damp location is unavoidable, use
WARNING Read all safety warnings and all instructions. Failure to
GENERAL POWER TOOL SAFETY WARNINGS

4|English
a residual current device (RCD) protected supply. Use of an RCD
reduces the risk of electric shock.
3) Personal safety
a) Stay alert, watch what you are doing and use common sense
when operating a power tool. Do not use a power tool while you
are tired or under the influence of drugs, alcohol or medication.
A moment of inattention while operating power tools may result in
serious personal injury.
b) Use personal protective equipment. Always wear eye protection.
Protective equipment such as dust mask, non-skid safety shoes,
hard hat, or hearing protection used for appropriate conditions will
reduce personal injuries.
c) Prevent unintentional starting. Ensure the switch is in the off-
position before connecting to power source and/or battery pack,
picking up or carrying the tool. Carrying power tools with your
finger on the switch or energizing power tools that have the switch on
invites accidents.
d) Remove any adjusting key or wrench before turning the power
tool on. A wrench or a key left attached to a rotating part of the
power tool may result in personal injury.
e) Do not overreach. Keep proper footing and balance at all times.
This enables better control of the power tool in unexpected
situations.
f) Dress properly. Do not wear loose clothing or j ewellery. Keep
your hair, clothing and gloves away from moving parts. Loose
clothes, jewellery or long hair can be caught in moving parts.
g) If devices are provided for the connection of dust extraction and
collection facilities, ensure th ese are connected and pr operly
used. Use of dust collection can reduce dust-related hazards.
4) Power tool use and care
a) Do not forc e the power tool. Us e the corr ect power tool for your
application. The correct power tool will do the job better and safer at
the rate for which it was designed.
b) Do not use the power tool if the switch does not turn it on and off.
Any power tool that cannot be controlled with the switch is dangerous

5|English
and must be repaired.
c) Disconnect the plug from the po wer source and/or the battery
pack from the po wer tool be fore making any adjustments,
changing accessories, or storing power tools. Such preventive
safety measures reduce the risk of starting the power tool accidentally.
d) Store idle power tools out of the reach of children and do not allow
persons unfamiliar with the po wer tool or these instructions to
operate the po wer tool. Power tools are dangerous in the hands of
untrained users.
e) Maintain power tools. Check for misalignment or bindin g of
moving parts, breakage of parts and an y other condition tha t may
affect the power tools operation. If da maged, have the power tool
repaired before use. Many accidents are caused by poorly maintained
power tools.
f) Keep cutting tools sharp and clean. Properly maintained cutting tools
with sharp cutting edges are less likely to bind and are easier to control.
g) Use the pow er tool, accessories and tool bits etc. in accor dance
with these instructions, taking into acc ount the working
conditions and the work to be performed. Use of the power tool for
operations different from those intended could result in a hazardous
situation.
5) Service
a) Have your power tool serviced by a qualified repair person using
only identical. This will ensure that the safety of the power tool is
maintained.
Additional Safety Warnings
Hammer safety warnings
– Wear ear protectors. Exposure to noise can cause hearing loss.
– Use auxiliary handle(s), if supplied with the tool. Loss of control can cause
personal injury.
– Hold power tool by insulated gripping surfaces, when performing an operation
where the cutting accessory may contact hidden wiring or its own cord.
Cutting accessory contacting a "live" wire may make exposed metal parts of the
power tool "live" and could give the operator an electric shock.

6|English
Degree of protection /
II
Residual risks
Even when the po wer tool is used as prescribed it is not possible to
eliminate all residual risk factors. The follo wing hazards may arise in
connection with the power tool’s construction and design:
a) Health defects resulting from vibration emission if the power tool is being
used over longer period of time or not adequately managed and properly
maintained.
b) Injuries and damage to property to due to broken accessories that are
suddenly dashed.
Warning! This power tool produces an electromagnetic field during
operation. This field may under some circumstances interfere with active or
passive medical implants. To reduce the risk of serious or fatal injury, we
recommend persons with medical implants to consult their physician and the
medical implant manufacturer before operating this power tool.
SPECIFICATIONS
Model No.: RH12008
RH12008-4
URH12008 RH12008S
(SAA PLUG)
RH12008-8
(BS PLUG)
RH12008-6
(ISRAEL PLUG)
Voltage: 220-240V~ 110-120V~ 220-240V~ 220-240V~ 220-240V~
Frequency: 50/60Hz 50/60Hz 50/60Hz 50/60Hz 50/60Hz
Input power : 1250W 1250W 1250W 1250W 1250W
No-load speed: 850/min 850/min 850/min 850/min 850/min
Impact rate: 3800/min 3800/min 3800/min 3800/min 3800/min
Drilling
capacity:
Concrete:
30mm 1-3/ 30mm 30mm 30mm
Steel:
13mm
13mm 13mm 13mm
Wood:
40mm 1-9/ 40mm 40mm 40mm
7|English
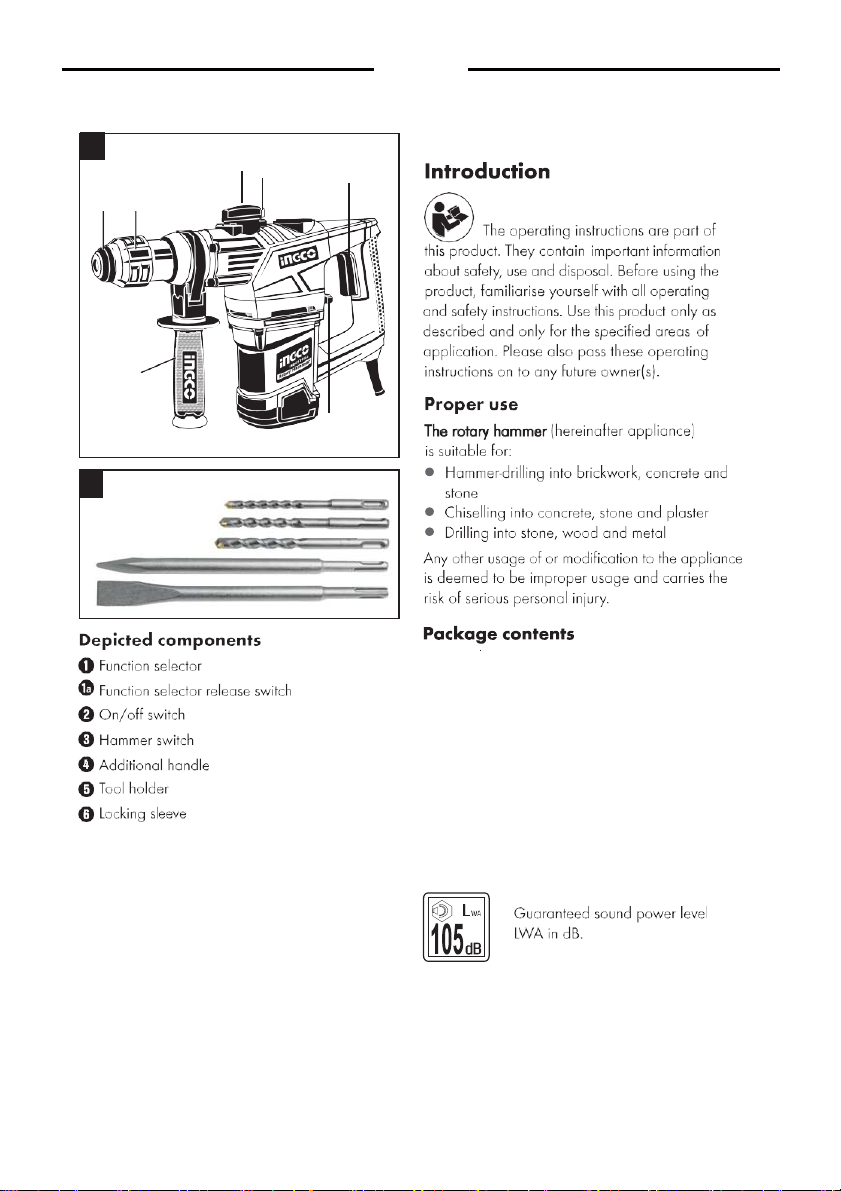
The rotary hammer
ROTARY HAMMER
1pcs rotary hammer
1pcs INGCO handle
3pcs drill bits (see fig.B)
1pcsflatchisel(see fig.B)
1pcs pointed chisel (see fig.B)
1pcs depth stop
1pcs carrying case
1pcs grease tube
1set carbon brushes
1pcs dust cap
1pcs operating manual
B
3
4
5 6
2
1 1a
A

8|English
4
3
1a
1
The following combinations are available
►
3
Ha
mme
「
O
FF
+
1
ha
mme
「
d
r
i
lli
ng
=
hammer drilling =
chiselling = chiselling
chiselling = no function
4
I()
(
Appliance-specific safety instructions
for hammer drills
■
Wear ear protectors: Expa su
「
e to
/
noise can cause heanngloss
■
Use auxiliary handle(s), if supplied with the
tool.
Loss of
control can cause personal injury
■
Hold power tool by insulated grippingsurfac-
es, when performing an operation where the
cutting accessory may contact hidden wiring
or its own cord. Cutting accessory cantacting
a "live" w
「i e
may make exposed metal pa
「
ts of
the power tool "live" and could give the opera-
to r an electric shack.
■
Wear a dust mask.
■
ATTENTION - SERVICE LINES! DANGER!
Take steps to ensure that you do not hit any
service lines (electricity, gas, water) when
WO「king with the elec 「t ic tool. If necessary,
check with a service Ii ne detector be 妇e you
start to cut or drill into a surface.
Original accessories/additional
equipment
■
Only use the accessories and additional
equipment that are specified in the operat-
ing instructions and are compatible with the
appliance.
Initial
operation
Additional handle
◆
Fix the additional handle in the new position
by turning it anti- clockw ise.
Tool:
◆
Pull the locking sleeve
6
backwards and insert
the tool in the tool ho lde
「
5
◆
Release the locking sleeve
6
. This locks the
ho
l
de
r.
Check
that
the
tool is
properly
locked
by
pulling it. The system has radial play because of
the design
Removing tool
◆
Pull the locking sleeve
6
on the tool backwards
Operation
Select operational mode
Hammer switch:
◆
Turn the hammer switch to the required
sym bol:
lf§Hammer drilling - Hammer ON
D
名
Drill i ng - Hammer OFF
Function selector:
◆
Turn and hold the release button for the lune-
tion selector switch and rotate the function
selector switch so that the 「e quire d symbol
engages at the arrow mar k.
『
售
Ha mme r drilling
lf Chiselling
◆
Remove the additional handle
4
clockwise direction
by turning it
◆
Turn the additional handle to the desired
position.
►
Working with harmful/toxic dusts results
,n
health hazards for the persan operating the
appliance and far other pe
「
so ns in the area.
必
WARN ING! TOXIC DUST!
drilling
►
For safety reasons, you should only use th,s
►
3
Hammer ON
hammer drilling
+
1
appliance with the additional handle
4
►
3
Hammer ON
+
1
attached.
►
3
Hammer OFF+
1

9|English
5
5
6
Switching on and off
Switching the appliance on:
◆
Press the ON/OFF switch
Switching the appliance off:
◆
Release the ON/OFF switch
Maintenance and Cleaning
WARNING! RISK OF I N」URY! Switch
, the appliance off and remove the
power plug before starting any
work.
■
The appliance must always be kept clean, dry
and free I
「om oil o「g「ease
■
To clean the casing, use a soft dry cloth.
■
Clean the
tool
ho
l
de
r
5
「
e
g
u
lo
r
ly
◆
To do this, pull the locking sleeve bockwa「ds
and pull the dust protector cop off the tool
holder
◆
Before inserting the tool, lightly grease the tool
holder
Disposal
;
言
I
:
骂
;
勹
。
s
二言
』?
:
I
言
了
n
p
。
:
二
of at your local recycling plant
宣
Do not dispose of p wer tools in
. your normal domestic waste!
European Directive 2012/19/EU requires that
worn-out power tools a 「e collected separately and
fed into an environmentally compatible recycling
process.
Your local community or municipal authorities can
provide in fo「mation on how to dispose of the worn-
out appliance.
■
If the supply co 「d of this power tool is dam-
aged, it must be replaced by a specially
prepared cord available through the service
0 「ga nization.
2
2
必
WARNING!

10|English
RH12008,URH12008,RH12008-4,RH12008-6,RH12008-8,RH12008S

11|English
RH12008,URH12008,RH12008-4,RH12008-6,RH12008-8,RH12008S
No. Part Description Qty
No. Part Description Qty
No. Part Description
Q
1
ty
1
Rubber Head
1
33 Bearing6001
1
65 SpringW7.8×1.2×33
1
2
Steel Ring17.5X2
1
34 Rotor
1
66 Pin8×18.7
1
3
Steel Frame
1
35 Bearing608
1
67 Needle Bearing HK1210
1
4
Spring 30.2×1.8×76
1
36 Fan Guide
1
68 Stell Sleeve22×26×9
1
5
Inner Hexogon Screw M5×25
4
37 Screw ST4.8*60
2
69 Pin5×5×22
1
6
Spring Washer 5
8
38 Stator
1
70 Ring47
1
7
Washer 5
8
39 Main House
1
71 oil Plate
1
8
Cylinder Case
1
40 Tension Spring
2
72 Oil bearing30×47×9
3
9
Oil Seal FB35×51×6
1
41 Brush Holder 6.5×7.5
2
73 Screw M4×10
1
10 Big Washer 45*54.5*1
1
42 Carbon Brush 6.5×7.5×12.5
2
74
Double function button component
1
11 Teleflex
1
43 Brush Cap14×9.5
2
75 O-ring 10.2×1.9
1
12 Stell Ball 7.14
5
44 Tail Cover
1
76 oil cap
1
13 X-ring
1
45 Inner Hexogon ScrewM5*50
4
77 O-ring 31.5×2
1
14 O-ring 11×2
2
46 ScrewM3*6
1
78 Gear Box
12
15 Punch Hammer
1
47 Third Function Button
1
79 Screw ST3.9×16
1
16 Ring 35
1
48 Oil Seal FB19×28×4.5
1
80 Switch
1
17 Bearing61907-RZ
1
49 Cone gear shaft(10:31)
1
81 Handle
1
18 Stell Ball 7.94
3
50 adjusting washer15×19×4.7
1
82 Capactitor(option)
1
19 Cylinder
1
51 Bearing 6002-RS
1
83 Inductance(option)
1
20 Flat Key3×2.5×18
2
52 Washer14×20×0.5
1
84 Cable Board
1
21 Plastic Range Ring 47×55×7
1
53 Square hole washer14.5×34.5×1.5
1
85 Cable Cover
1
22
Plastic Cylinder case49.5×55×58.8
1
54 Friction Plate 14×35×2
2
S-1 Cable 2*1.0 2m
1
23 Big Spring33.5×3.5×76
1
55 Gear 39teeth
1
S-2 Square head screwM8×38
1
24 Gear 31teeth
1
56 Square hole washer14.5×34.5×2
1
S-3 Hoop
1
25 Ring28*1.6
2
57 Saucer spring16×30×1.8
1
S-4 Bracket
1
26 Rammer
1
58 NutM10×0.75
1
S-5 U-shape Iron
1
27 O-ring19×3.1
2
59 Bearing627-RZ
1
28 Piston Pin6×24
1
60 Crankshaft
1
29 Piston
1
61 Bearing6003-RS
1
30 Connecting Rod
1
62 Ring35
1
31 Needle Bearing HK0810
1
63 Ring 17
1
32 Inner Cover
1
64 Gear 27teeth
1

This manual suits for next models
5
Table of contents
Other IN-ECO Rotary Hammer manuals


