Independence Duo User manual

Owner´s manual 12.04.2007
Harness for tandem pilots: Duo
With the Duo you got one of the most comfortable and most functional harnesses, which is available on the market at
present. We thank you for the confidence, for buying the Duo harness.
Please read this operating instructions carefully and consider, that Independence can not be made liable for accidents
and damage, which result from disregarding of the operating instructions.
Technical description:
!DHV certified back protector (P2)
!Passing-through shoulder-belts for optimal comfort
!maximum pilot weight: 120 kg
!unloaded weight: 5,8 kg
!seat position in flight adjustable
Overview:
Fly-market GmbH & Co. KG
Am Schönebach 3
D-87637 Eisenberg
Tel.: 08364-98330
Fax: 08364-983333
e-mail: info@independence-world.com
gliders for real pilots
independence
www.independence-world.com
a) Rescue system container
b) Lateral chest-belt
c) Safety device lateral chest belt
d) Safe-T-System
e) Bridle for connecting the rescuesystem
This bridle must be connected to the T-bar of
the tandem, and not only to the pilot´s
harness.
f) Main suspension
g) Leg-loops
h) Chest-belt
i) Rescue system release-handle
f)
g)
b)
c)
f)
a)
d)
f)
f)
i)
e)
e)
h)
g)
g)
1. Adjustment possibilities:
Adjustment possibilities exist at the shoulder belts, the chest belt, the lateral chest belts and the leg loops. By the
versatile adjusting possibilities of the Duo we recommend in any case that all adjustments are done in a simulator
before the first flight to guarantee an optimal seat comfort.
Adjusting of the chest belt:
The chest belt is closed with the Click-Lock-buckles. If the chest belt is closed, also the falling out safety device (Safe-T-
System) is closed. The Click-Lock-buckles must be closed audibly! The chest belt should not be tightened too closely.
Unintentional opening of this buckle is not possible, because both buttons at it´s side must be pressed at the same time to
open.
Adjusting of the shoulder belts:
Please note that with correct adjusting the shoulder belts are felt with light pressure on the shoulders. With the shoulder
belts you adjust the harness on the pilot´s height, but also you adjust the seat position between sitting and lying.
Adjusting of the lateral chest belts:
Adjusting the lateral chest belts takes place as third step and offers on the one hand again the variation of the seat position
between sitting and lying, on the other hand you adjust with the lateral chest belts the most comfortable seat position.
During adjusting it should be paid attention to the fact that the body load is distributed evenly on shoulder belt and lateral
chest belt. Please take care that the lateral chest belt is attached correctly to the main suspension´s carbines as shown at
point c).
Adjusting of the leg loops:
When you put the harness on, please take care that the Click-Lock-buckles are closed correctly and audibly. The leg loops
should be fastened tight but should leave still enough space for the starting and landing phase, in which the legs should
have still some space to move.
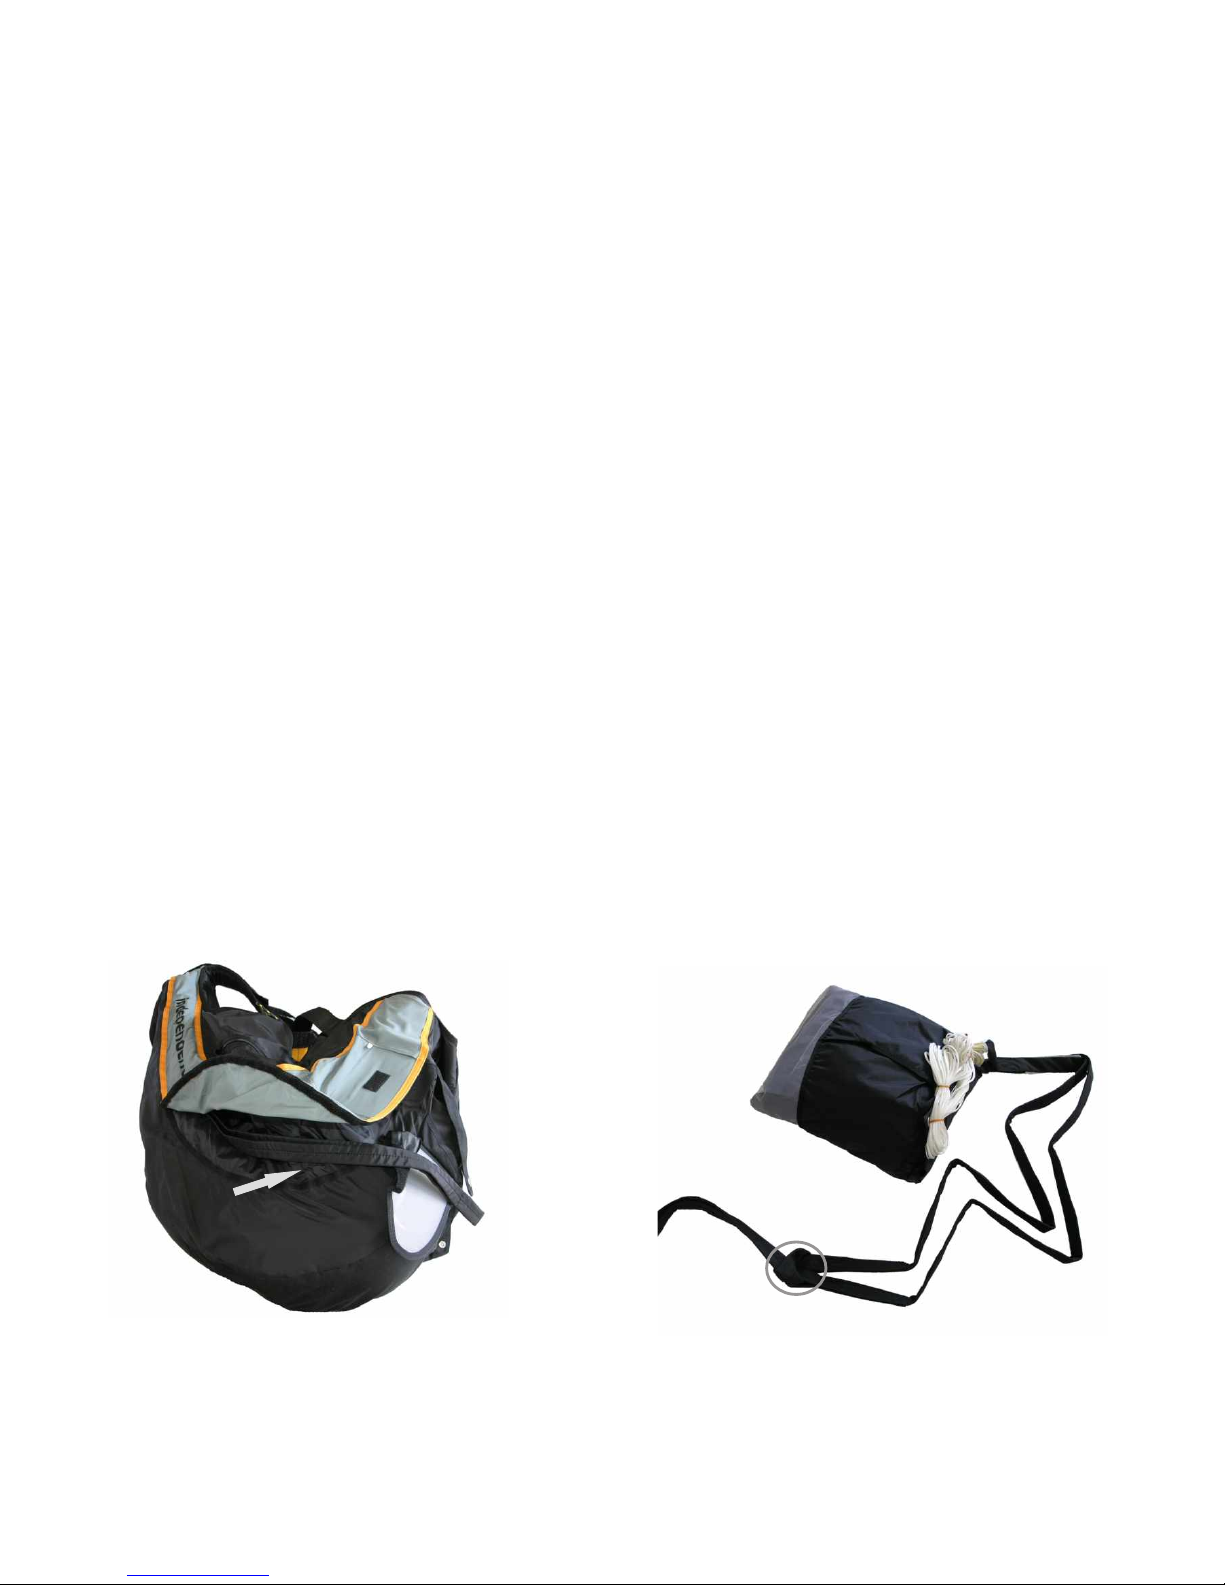
Open the channel of the bridle and take out this
V-shaped bridle of the harness.
The bridle of the rescue-system has to be
connected to the single end of the V-bridle of the
harness. If also the rescue-system has a V-
shaped bridle (as you can see in the picture),
you have to take care that both ends of the V-
bridle of the rescue-system are connected to the
single end of the harness´ V-bridle.
2. Built-in of the rescue-system
The rescue-system have to be built-in into the therefore assigned container under the seatboard of the harness. If already
the rescue-system gets a V-shaped bridle which is long enough, this bridle have to be used. Otherwise the V-shaped bridle
which is enclosed to the harness Duo have to be connected to the bridle of the rescue-system.
Proceeding:
V-bridle
ar
hness
V br dle rescue-system
-i
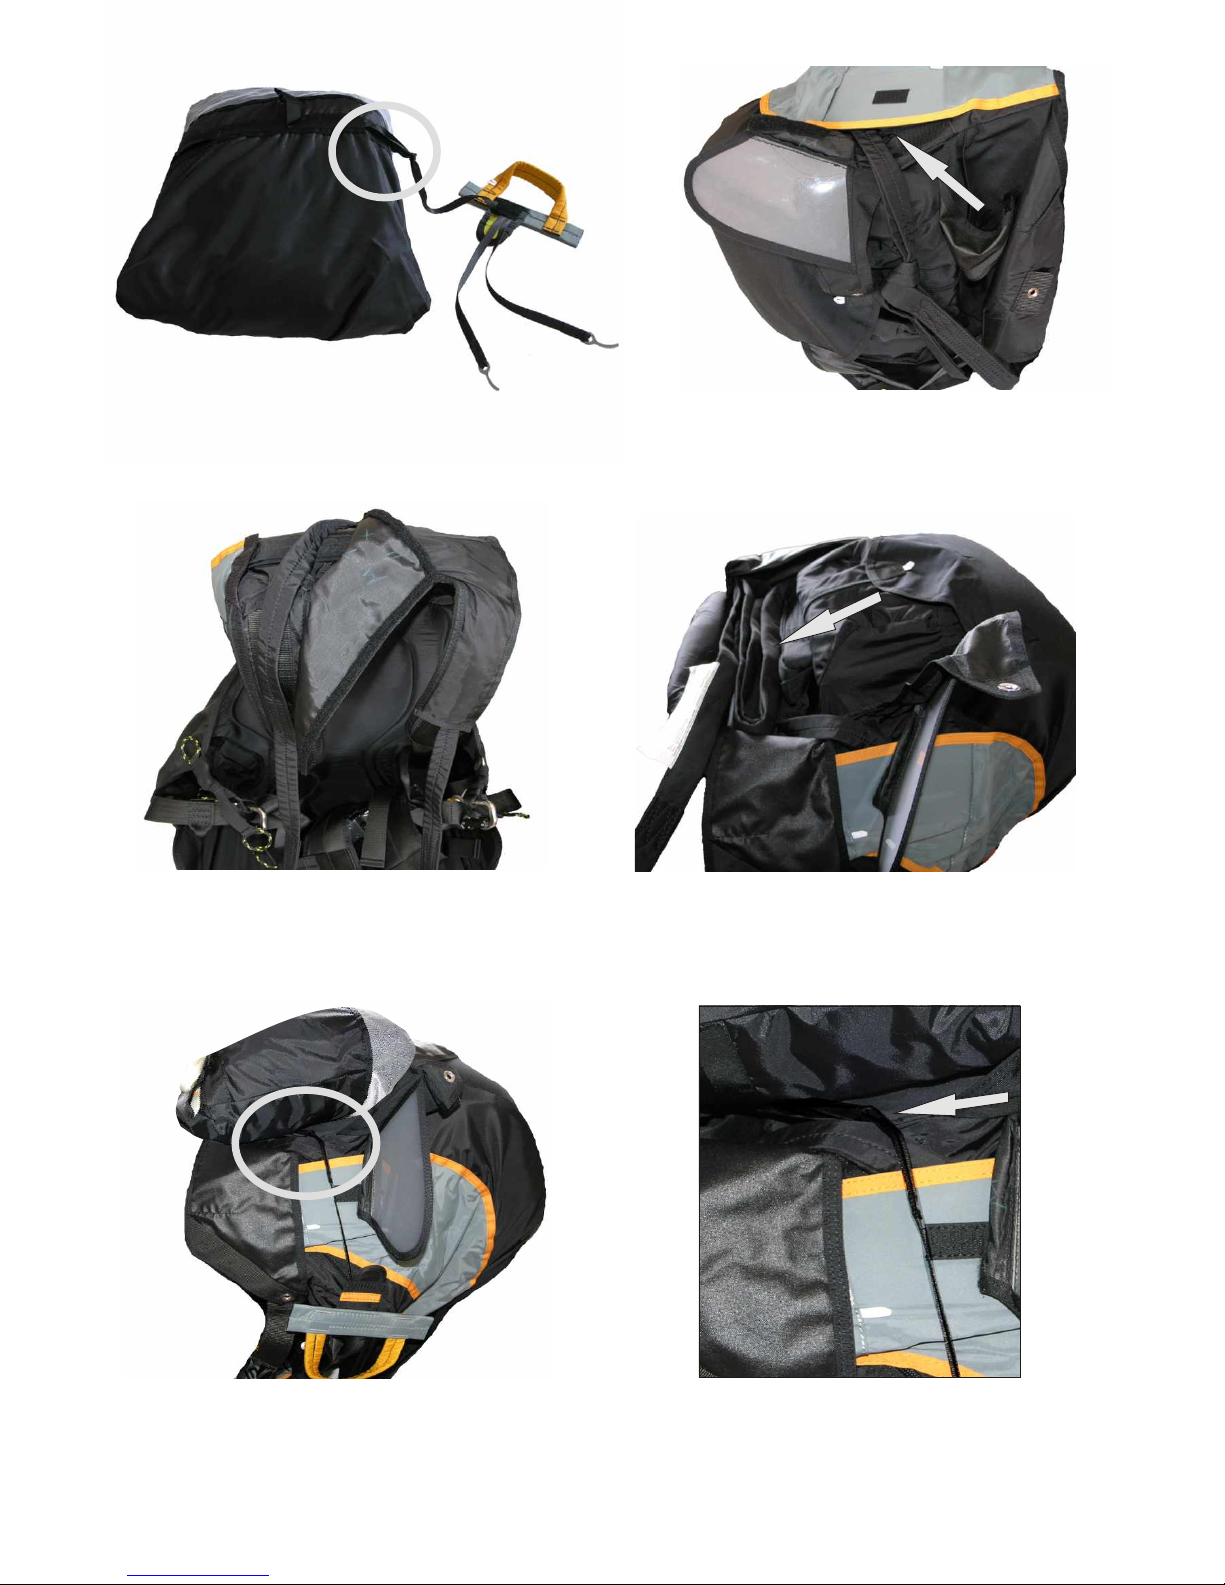
...and brought to the upper side of the harness,
where one end each is placed in each shoulder belt
of the harness. These ends of the bridle have to be
connected to the T-bar of the tandem!
Put the rescue-system into the container. The
connection to the handle must be between the
inner-container and the harness, as shown on the
picture. So you can be sure that the rescue-system
can be pulled out easily.!
Store the bridle of the rescue-system in a kind of S-
shape into the container of the harness.
Once again detailed: The connection from the
innercontainer of the rescue-system to the handle
runs between the rescue-system and the harness
and is not hindered in any way by the bridle.
The two free ends of the V-bridle are put back in it´s
channel...
Enclosed handle have to be attached as short as
possible at the inner container of the rescue-system
1. Adjustment possibilities:
Adjustment possibilities exist at the shoulder belts, the chest belt, the lateral chest belts and the leg loops. By the
versatile adjusting possibilities of the Duo we recommend in any case that all adjustments are done in a simulator
before the first flight to guarantee an optimal seat comfort.
Adjusting of the chest belt:
The chest belt is closed with the Click-Lock-buckles. If the chest belt is closed, also the falling out safety device (Safe-T-
System) is closed. The Click-Lock-buckles must be closed audibly! The chest belt should not be tightened too closely.
Unintentional opening of this buckle is not possible, because both buttons at it´s side must be pressed at the same time to
open.
Adjusting of the shoulder belts:
Please note that with correct adjusting the shoulder belts are felt with light pressure on the shoulders. With the shoulder
belts you adjust the harness on the pilot´s height, but also you adjust the seat position between sitting and lying.
Adjusting of the lateral chest belts:
Adjusting the lateral chest belts takes place as third step and offers on the one hand again the variation of the seat position
between sitting and lying, on the other hand you adjust with the lateral chest belts the most comfortable seat position.
During adjusting it should be paid attention to the fact that the body load is distributed evenly on shoulder belt and lateral
chest belt. Please take care that the lateral chest belt is attached correctly to the main suspension´s carbines as shown at
point c).
Adjusting of the leg loops:
When you put the harness on, please take care that the Click-Lock-buckles are closed correctly and audibly. The leg loops
should be fastened tight but should leave still enough space for the starting and landing phase, in which the legs should
have still some space to move.
Open the channel of the bridle and take out this
V-shaped bridle of the harness.
The bridle of the rescue-system has to be
connected to the single end of the V-bridle of the
harness. If also the rescue-system has a V-
shaped bridle (as you can see in the picture),
you have to take care that both ends of the V-
bridle of the rescue-system are connected to the
single end of the harness´ V-bridle.
2. Built-in of the rescue-system
The rescue-system have to be built-in into the therefore assigned container under the seatboard of the harness. If already
the rescue-system gets a V-shaped bridle which is long enough, this bridle have to be used. Otherwise the V-shaped bridle
which is enclosed to the harness Duo have to be connected to the bridle of the rescue-system.
Proceeding:
V-dle
bri
arnessh
Vcss-bridle res ue-y tem
...and brought to the upper side of the harness,
where one end each is placed in each shoulder belt
of the harness. These ends of the bridle have to be
connected to the T-bar of the tandem!
Put the rescue-system into the container. The
connection to the handle must be between the
inner-container and the harness, as shown on the
picture. So you can be sure that the rescue-system
can be pulled out easily.!
Store the bridle of the rescue-system in a kind of S-
shape into the container of the harness.
Once again detailed: The connection from the
innercontainer of the rescue-system to the handle
runs between the rescue-system and the harness
and is not hindered in any way by the bridle.
The two free ends of the V-bridle are put back in it´s
channel...
Enclosed handle have to be attached as short as
possible at the inner container of the rescue-system
...and fix it immediately with one of the pins.
Then remove the frontal packing cord!!
Now close the last flap...
Put in the flaps a) and b). Therefore fold flap a)
down. Attach the release-handle to the small velcro
and put it into the therefore assigned openings.
Finally secure the handle with a special thread at the
white loops of the handle. (see next point!)
Now close the frontal flap of the container with a
second packing cord as you can see in the picture...
1)
2)
3)
4) 1)
2)
...remove the packing cord and close the container
with the second pin. Please check again that the
connection of the handle is not hindered in any way
and is still long enough, so that you can be sure that
the pull is coming first on the closing-pins and not on
the connection to the inner container.
b)
b)
a) a)
How to secure the pin
To avoid an unintentional opening the DHV prescribe to use a
special thread to secure the handle. This defines a minium
opening force. This special thread must be put through the
loop at the harness and the loop at the handle, and have to be
fixed by a knot.
To secure the pin it is only allowed to use certified material
because if the strength of this material is too high the save
operation of the rescue system is not guaranteed.
This thread is supplied by Fly market GmbH & Co. KG! Do not
use other threads which may look the same!
Attention:
After every installation of a rescue-system in a harness there must be a test if the opening force is between 2 and 5
daN. If harness and rescue parachute are combined the first time a compatibility check have to be done by a
authorized person!
After the built-in of the rescue-system you have to take care that all maybe used packing-cords and so on have
been removed again!
Built-in of the back-protector:
It´s just allowed to use the therefore assigned back-protector P2. To build it in and take it out you have to open the
zippers inside of the rescue-system container and the storage-pocket at the back-part of the Duo harness. You
have to take care that the P2 is fixed against sliding around in it´s bag.
Therefore you have to put the P2 into the Nylon-cover which is between the two zippers. Furthermore you have to
put the protector under the belts in the upper back-part of the harness. After you build in the P2 or taking it out, you
have to close the zippers at the rescue-container and inside the storage-pocket at the back-part again!
Towing:
Mounting the towing-device: If you fly tandem at the winch, the towing-device is generally mounted to the
passenger´s harness. So please pay attention to the manual of the passenger´s harness.
Note: The used connecting links must stand at least 150kp per side! If you are not sure about the mounting, an
authorized person or the manufacturer should be consulted.
Life span, replacing time of construction units, repair hints:
The harness Duo was built for high loads and strong use. Accordingly, for the choice of the materials particularly
high criteria were set. However the life span depends also on the treatment of the harness by the pilot, so we
recommend to check the harness from time to time, if there are faulty or damaged parts, which should be replaced
or repaired then.
Especially take care of defective seams, which should be immediately repaired by an authorized workshop.
Further you have the possiblity to send us the harness for checking.
In order to prevent problems with the harness we recommend:
- avoid handling with fire and sharp edged articles near your harness.
- avoid unnecessarily long sun effect, because ultraviolet radiation destroys the molecular structure of the material
- avoid the contact with seawater or acid liquids.
Maintenance and control:
The harness Duo is more or less maintenance-free. But regular control in short periods gives you the guarantee of
an unrestricted function of your belt system. Take particularly care that the Click-Lock-buckles stay free of dirt. If
needed you can oil the Click- Locks a little bit.
Close the container with packing cords. First the
rear flaps have to be closed in the right order
(1,2,3,4). The connection of the handle runs
between the flaps 2) und 4). You have to take care
that the connection of the handle is not hindered in
any way!

DHV-Certification:
Other Independence Accessories manuals


