Indesit DEA 700 - PLP 2 User manual

DISH WASHING
Service Quick Guide
Service Quick Guide
Indesit Company, Service Department
SQG_DW_23_EN
Steps to complete before starting the autotest cycle:
TAll EOS dishwashers with electronics DEA 700 - PLP 2 - Synchronous and BLAC* Motor
Models Covered:
Entry sequence:
BUILT-IN INSTALLATION
- Switch on with on/off button
- Press P
- Press P
- Switch off with on/off button
- Press P
- Press P
- Switch on with on/off button
- Close the door to start autotest
LCD-DISPLAY:
- Switch on with on/off button
- Switch off with on/off button
- Press button (P) top arrow
- Switch on with on/off button
- Press Start/Pause to start autotest
SELECTOR KNOB:
- Switch on with on/off button
- Switch off with on/off button
(start position different for 3 and 5)
- Turn selector knob to program 5 position (prog. 3)
- Turn selector knob to program 1 position
- Turn selector knob to program 5 position (prog. 3)
- Switch on with on/off button
- Press Start/Pause to start autotest
AUTOTEST EOS DEA 700 - PLP 2 - Synchronous and BLAC* Motor
1/3
1. close dispenser door
2. place a thermometer on drum (not essential for the test)
3. mount clear door - in this case, use a closure device to simulate electrical closure of door - (not es-
sential for the test)
4. complete the autotest entry sequence
5
*Nota Bene: L N.B.: The procedures for running the autotest, setting water
hardness and rinse aid levels for DEA 700 PLP2 (visually distinguishable
thanks to the new DISPENSER and TUB) differ from before.

2/3
Last Fault Management:
On starting the autotest sequence, after completing the autotest entry sequence:
The dishwasher shows the code of the last fault detected during a wash cycle.
This is displayed for 15/20 seconds, after which it indicates the start of the loads sequence.
Reset alarm:
During the autotest procedure, to reset the last alarm that occurred during a wash cycle, you must run an
autotest cycle right through until there are no more errors.
Autotest Sequence:
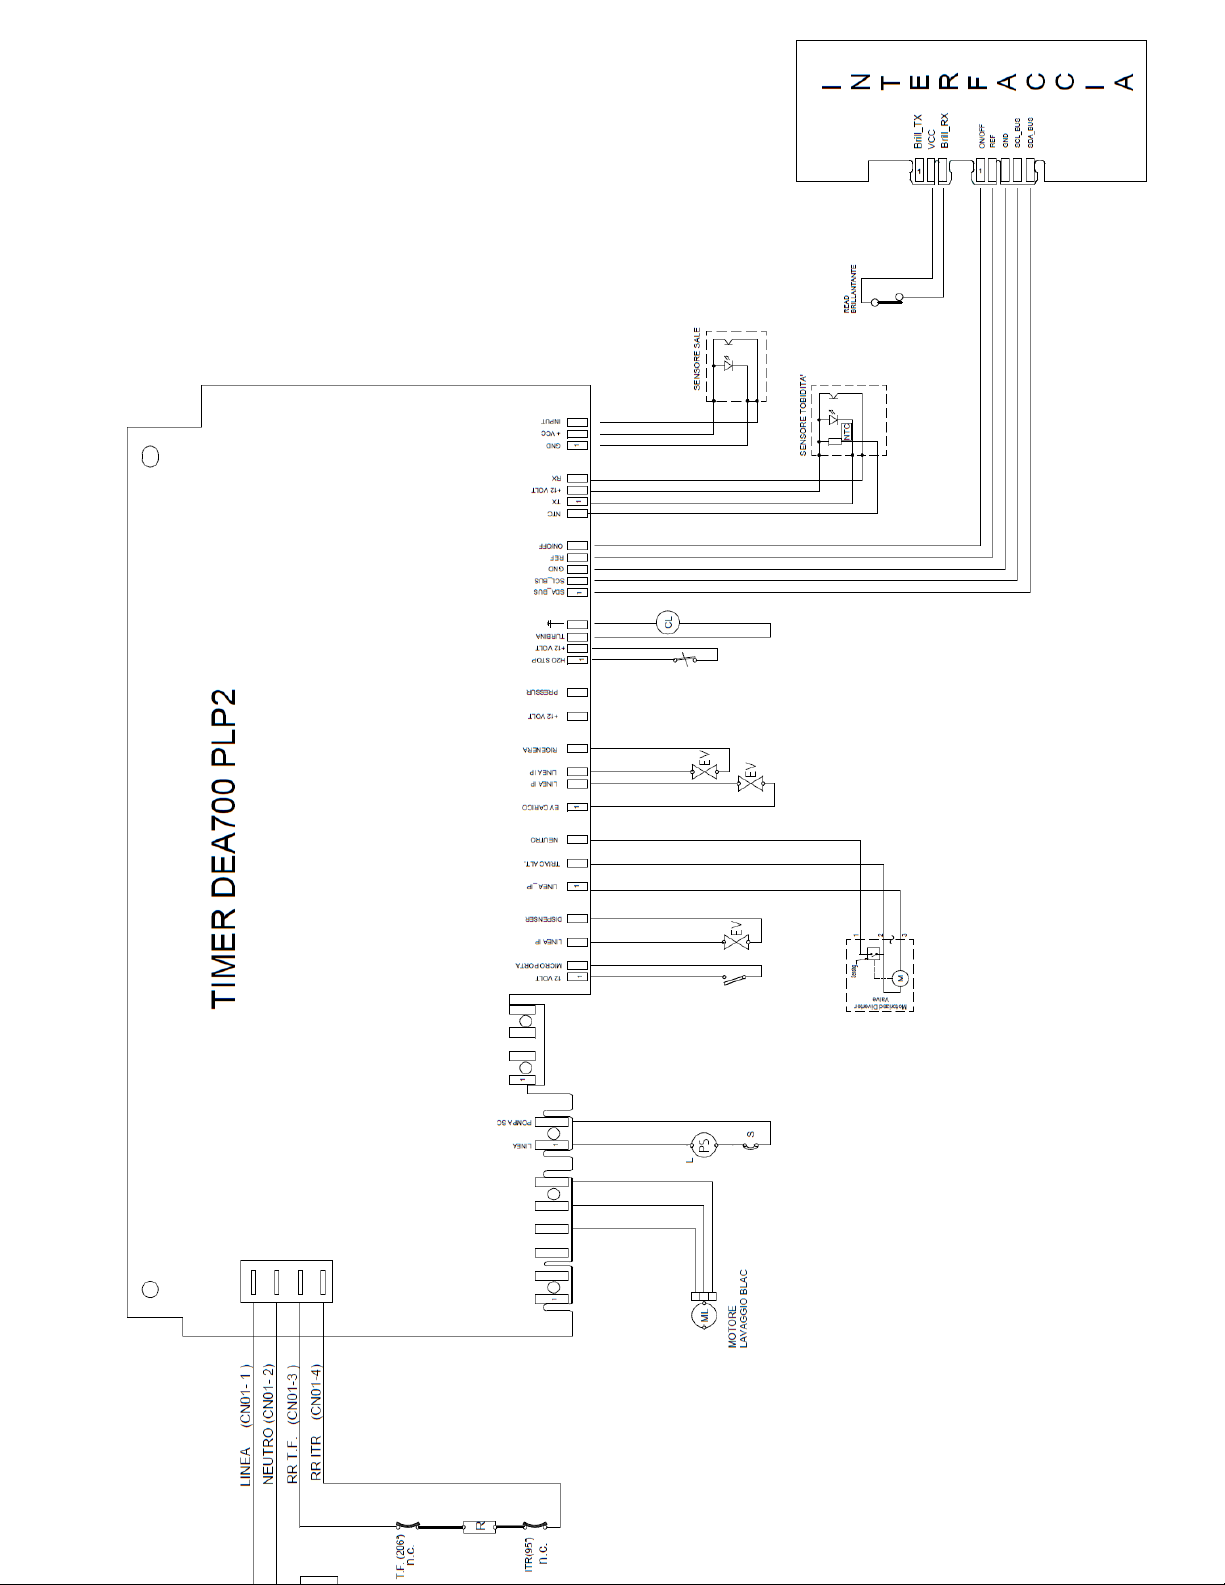
The autotest sequence in machines DEA 700 – PLP2 with“L”-shaped plumbing layout (BLAC Motor
with two sprayer arms) is as follows:
1. VDisplay of last fault (if any) for 15/20 seconds
2. The machine is drained to empty status + 15 seconds (D-Sensor); meantime the alternating wash
motor is repositioned to operate with the bottom delivery outlet open
3. Empty status is verified by the wash pump (W-sensor), running with the bottom delivery outlet open
at 1400 rpm for 40 seconds
4. The tub takes in 2 litres of water, with activation of the W-sensor to confirm full status
5. Another 2 litres are added in dynamic mode
6. The wash pump is activated for 30 seconds with the top delivery outlet open
7. The pump is switched to the bottom outlet for 30 seconds
8. The wash heating element is activated, with the wash pump running at 2500 rpm, and the tempera-
ture raised to 30 °C
9. The machine is drained to empty status (D_sensor) + 15 seconds
10. The dispenser is opened by activating the solenoid valve for 2 seconds
11. 10-second pause
12. Service action: once the dispenser has opened, open the door, remove the salt cover and insert
the door needle
13. The regenerate solenoid is activated for 5 seconds
14. The fill solenoid valve and regenerate solenoid valve are activated for 10 seconds. Check for outflow
of water from the salt container
15. The Turbo Dry Fan is activated (if installed)
16. Drain to empty status (D-Sensor) + 15 seconds
The autotest sequence in DEA 700 – PLP2 machines with “C”-shaped plumbing layout (BLAC
motor with two spray arms and showerhead) is as follows:
1. Display of LAST FAULT (if any) for 15/20 seconds
2. The machine is drained to empty status + 15 seconds (D_sensor); at the same time, the alternating
wash motor is repositioned to operate with the bottom delivery outlet open
3. Empty status is verified by the wash pump (W-sensor), running at 1400 rpm for 40 seconds
4. The tub takes in 2 litres of water, with activation of the W-sensor to confirm full status
5. Another 2 litres are added in dynamic mode
AUTOTEST EOS DEA 700 - PLP 2 - Synchronous and BLAC* Motor

DISH WASHING
AUTOTEST EOS DEA 700 - PLP 2 - Synchronous and BLAC* Motor
3/3
6. The wash pump is activated for 30 seconds on the top spray arm and showerhead delivery outlets
7. Flow is switched to the bottom spray arm and showerhead delivery outlets for 30 seconds
8. Flow is switched to the bottom and top spray arm delivery outlets for 30 seconds
9. The wash heating element is activated, with the wash pump running at 2500 rpm, and the temperature
raised to 30 °C
10. The machine is drained to empty status (D_sensor) + 15 seconds
11. The dispenser is opened by activating the solenoid valve for 2 seconds
12. 10-second pause
13. Service action: once the dispenser has opened, open the door, remove the salt cover and insert the
door needle
14. The regenerate solenoid is activated for 5 seconds
15. The fill solenoid valve and regenerate solenoid valve are activated for 10 seconds. Check for outflow
of water from the salt container
16. The Turbo Dry Fan is activated (if installed)
17. The machine is drained to empty status (D_sensor) + 15 seconds
The Autotest sequence in DEA 700 – PLP2 Synchronous motor machines is as follows:
1. Display of last fault (if any) for 15/20 seconds
2. Activation of drain pump until pressure switch empty + 15 seconds
3. Activation of filling solenoid valve until pressure switch full status reached
4. Activation of wash motor until pressure switch empty status reached
5. The wash motor is switched off
6. Water filling until reaching a total of 4 liters
7. Activation of wash pump
8. Activation of drain pump + 10 seconds
9. Activation of dispense solenoid (for 15 seconds)
10. INTERVENTION BY THE TECHNICIAN (not essential for completing the autotest): immediately after
hearing the sound of the dispenser opening, the technician must: open the door to check opening of
the dispenser cover, remove the salt cap, insert a service needle in the door closing mechanism and
check the proper functioning of the regeneration circuit, checking water coming out the salt container
11. Activation of regeneration solenoid valve for 15 seconds
12. The dispenser is opened by activating the solenoid valve for 2 seconds
13. 10-second pause
14. Service action: once the dispenser has opened, open the door, remove the salt cover and insert the
door needle

Table of contents