Individual Computers Keyrah v3 How to use
Keyrah V3 Short Manual
Thank you for purchasing an Individual Computers product. It is important to read the following
instructions carefully before attempting installation. Individual Computers cannot be held
responsible for any damage caused due to incorrect installation.
Before installing Keyrah in the case of a C64 VIC-20 or C-16 please remove the mainboard of the
old computer. Use the screws of the mainboard to mount Keyrah. Older "breadbox“ models of the
C64 and the VIC-20 also have a metal bracket on the side of the mainboard that should be mounted
on Keyrah.
For mounting inside an Amiga case you should use double-sided duct tape or Velcro® tape. Both
can be found in the DIY-store of your choice. Keyrah's mounting holes are aligned for installation in
a Commodore 8-bit computer and cannot be used in an Amiga without drilling new holes.
Keyrah should not be used without a case. If you want to use it outside a case anyway you should at
least protect the solder side (bottom) of Keyrah from short circuit.
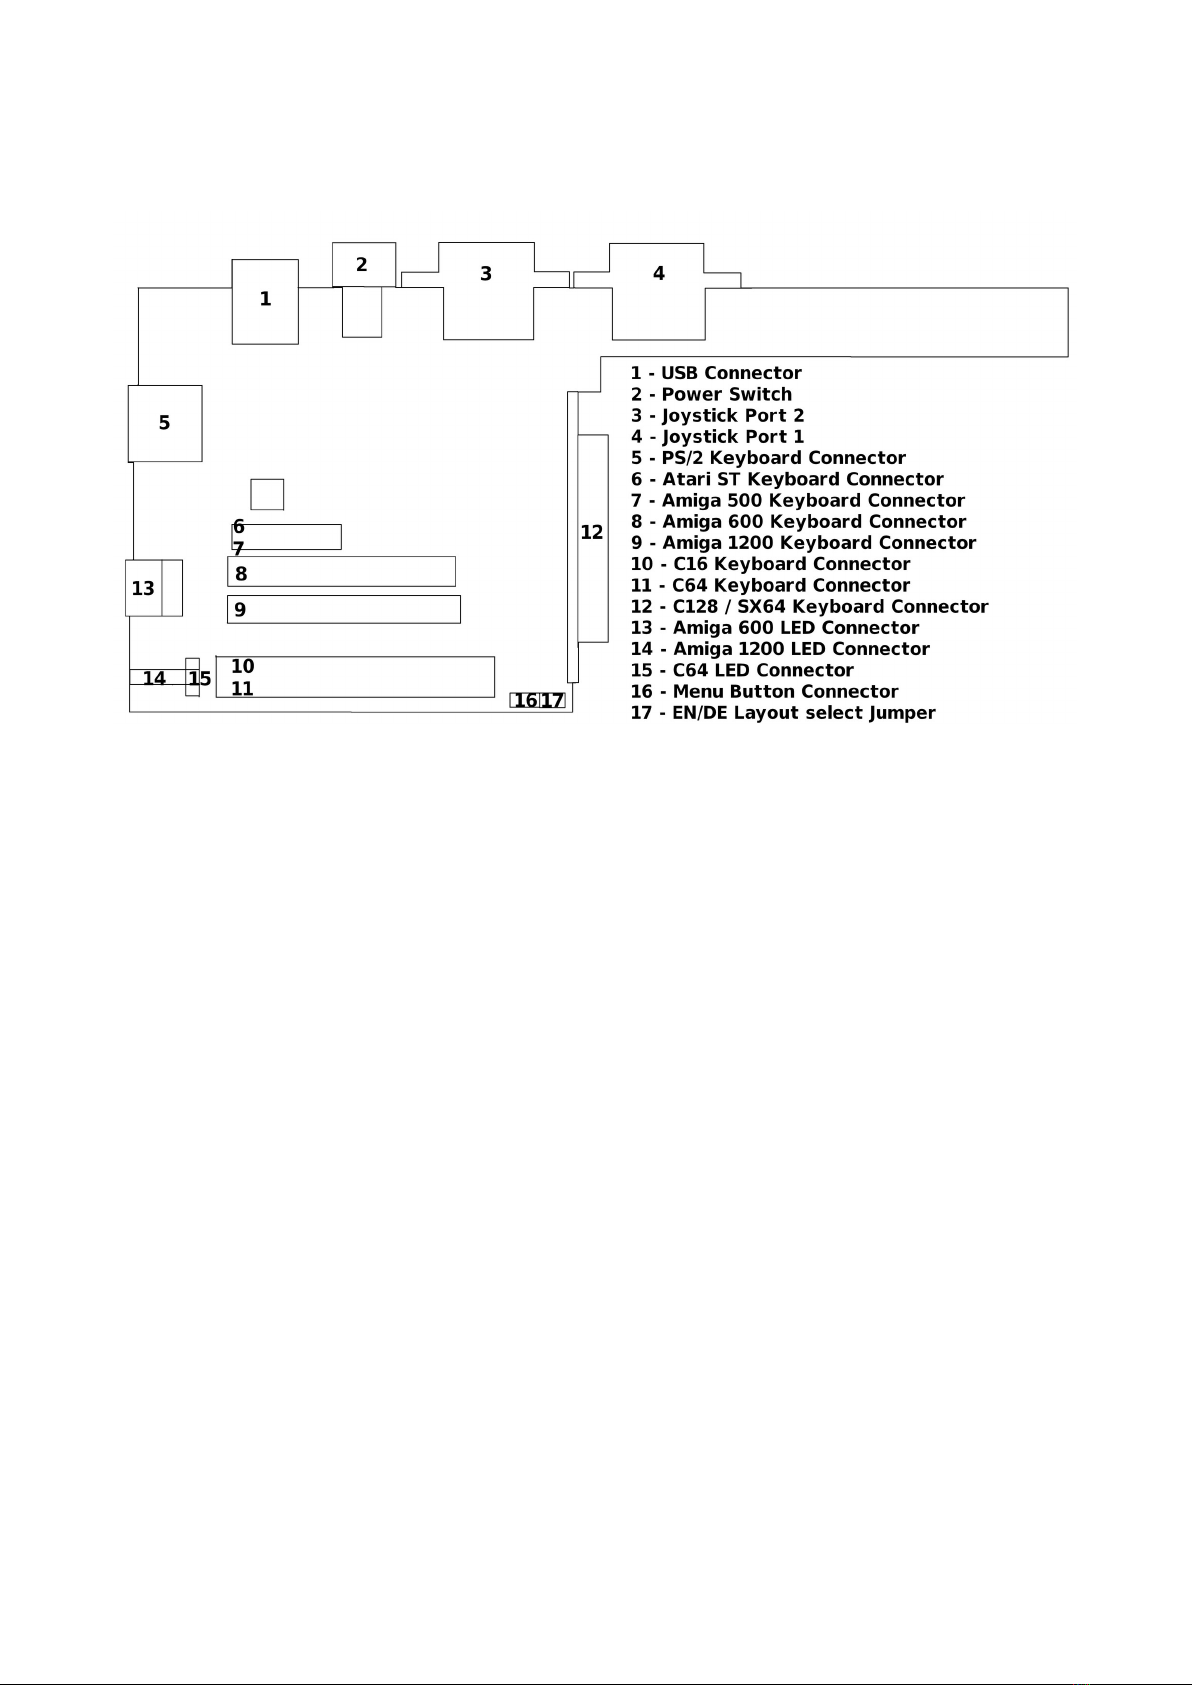
Connect the keyboard to the corresponding connector of Keyrah V3 and set the EN/DE jumper to
the layout you intend to use (Jumper closed: DE Layout Jumper open: US layout).
LED connection
The power LED of a C64 VIC-20 or C16 should be connected to the 3-pin header right above the
C64 keyboard. If your computer has a thin (black) connector for the LED you can also flip the
connector around and the power LED will show the NumLock status.

The A1200 LED connector shares the middle pin of the C64 LED connector. The Floppy-LED
shows scroll lock status (labelled „F.Disk“ on A1200) and the H.Disk-LED shows numlock status
(labelled „Disk“ on A600). Never connect power to the A600 LED connector!
You do not need drivers for using Keyrah V3 on a Mac PC or Raspberry Pi. Just plug it in and
driver installation will happen automatically (if required at all).
Switch settings
The switch chooses between two key mappings: “down“ selects a layout that is suitable for
everyday PC tasks “middle” selects a layout suitable for emulators like VICE (Commodore 8-bit)
WinUAE (Amiga) and Steem (Atari ST).
For the detailed key mapping of each keyboard please download the full manual from our wiki at
http://wiki.icomp.de/wiki/Keyrah_V3
The third non-latching switch position „up“ has two functions: a short press will press the key that
enters the emulator menu or releases input capturing (usually F12). A long press will send the
ACPI-sleep signal to the computer. To make sure that you really want to execute this you must hold
this position for at least five seconds.
Joysticks
The joystick ports support DE9 “Atari” joysticks or Commodore Paddles which will appear as
regular HID game controllers.
Technical hints
Keyrah is a USB-only device. Connection to a PS2 port with an adapter is not possible.
Keyrah V3 offers more options and features than can be described in this short manual - please
download the full manual from our wiki at http://wiki.icomp.de/wiki/Keyrah_V3
To get further help please visit our support forum at https://forum.icomp.de.
Please understand that we can not provide any support via email.

Keyrah V3 Kurzanleitung
Vielen Dank dass Sie sich für ein Produkt aus dem Hause Individual Computers entschieden haben.
Obwohl sich „Keyrah“ an erfahrene Benutzer richtet bitten wir Sie sich die Zeit zu nehmen diese
Anleitung ganz zu lesen auch wenn die meisten Handgriffe offensichtlich erscheinen mögen.
Vor dem Einbau in das Gehäuse eines C64 VC-20 oder C-16 entfernen Sie bitte das Mainboard des
alten Computers ganz. Verwenden Sie die Schrauben des Mainboards um Keyrah V3 im Gehäuse zu
befestigen. Beim VC-20 und älteren „Brotkasten“-Modellen des C64 sollten Sie auch die seitliche
Metall-Abdeckung des Boards an Keyrah anschrauben.
Für die Befestigung im Amiga-Gehäuse sollten Sie z.B. doppelseitiges Klebeband oder Klettband
verwenden – beides ist bestimmt im Baumarkt Ihres Vertrauens zu haben. Die Montagelöcher sind
ausgelegt auf Commodore 8-Bit Computer und können nicht zur Befestigung in einem Amiga
benutzt werden ohne das Gehäuse dabei anzubohren.
Keyrah V3 sollte nicht ohne Gehäuse verwendet werden. Falls Sie dies trotzdem wünschen sollten
Sie wenigstens die Unterseite (Lötseite) vor Kurzschlüssen schützen.
Schließen Sie die Tastatur an den dafür vorgesehenen Anschluss von Keyrah V3 an. Vor
Inbetriebnahme stecken Sie den EN/DE Jumper in die Position für Ihre Tastatur (Jumper gesteckt:
DE Layout Jumper offen: US Layout)
LED Anschlüsse
Die Power-LED eines C64 VC-20 oder C16 sollte an den 3-poligen Anschluss direkt über dem
C64-Tastaturanschluss angeschlossen werden. Falls Ihr Computer einen flachen (schwarzen)
Anschluss für die LED hat können Sie ihn auch herumdrehen. In diesem Fall zeigt die Power-LED
den NumLock Status.

Der Anschluss für die A1200 LEDs benutzt den mittleren Pin des C64-LED Anschlusses mit. Die
Floppy-LED zeigt den scroll lock Status (die Beschriftung lautet „F.Disk“ am A1200). Die H.Disk-
LED zeigt den NumLock Status (Beschriftung „Disk“ am A600). Schließen Sie niemals Strom an
den Anschluss für die A600-LEDs an!
Für den Betrieb von Keyrah V3 an einem Mac PC oder Raspberry Pi benötigen Sie keine
speziellen Treiber. Falls überhaupt Treiber benötigt werden installiert sie Ihr Betriebssystem beim
ersten Einstecken von Keyrah V3 selbst.
Schaltereinstellungen
Der Schalter von Keyrah V3 wählt zwischen zwei Belegungen für die Tastatur. Die Stellung
“unten” wählt ein Layout für den täglichen Gebrauch. Die Mittelstellung wählt ein Layout daß zum
Gebrauch mit Emulatoren wie VICE (Commodore 8bit) WinUAE (Amiga) oder Steem (Atari ST)
optimiert ist.
Details zur Tastenbelegung der jeweiligen Tastatur entnehmen Sie bitte der ausführlichen Anleitung
aus unserem Wiki: http://wiki.icomp.de/wiki/Keyrah_V3
Die dritte Position „oben“ rastet nicht ein und hat eine doppelte Funktion: eine kurze Betätigung
sendet einen Tastendruck der Taste die im Emulator das Menu aufruft oder “Input Capturing”
ausschaltet (normalerweise F12). Wenn Sie den Schalter mehr als fünf Sekunden lang in dieser
Position gedrückt halten sendet Keyrah V3 das ACPI-sleep Signal zum Computer.
Joysticks
An den Joystick Ports können DE9 “Atari” Joysticks sowie Commodore Paddles betrieben werden.
Dieser erscheinen als reguläre HID Gamecontroller im System.
Technische Hinweise
Keyrah ist ein reines USB-Gerät. Der Anschluss per Adapter an einen PS2-Port ist nicht möglich.
Keyrah V3 bietet mehr Funktionen und Optionen als in dieser Kurzanleitung beschrieben werden
können die ausführliche Anleitung laden Sie bitte aus unserem Wiki herunter:
http://wiki.icomp.de/wiki/Keyrah_V3
Für weitere Hilfe besuchen Sie bitte unser Supportforum unter https://forum.icomp.de.
Bitte haben Sie Verständnis dafür daß wir keinen Support per Email leisten können.
Other manuals for Keyrah v3
1
Table of contents
Languages:
Other Individual Computers Recording Equipment manuals


