IndoorLED QUANTUM MAX 480/640 User manual
Manuel d’instruction
Instruction Manual
FR
E
N
Veuillez conserver le manuel d’instructions et ne pas le jeter. Cela pourrait s’avérer utile lors du dépannage futur.
Please keep the instruction manual and desist from throwing it away. It might come in handy with future trouble shooting.
CONTRÔLEUR
480/640

PANNEAU ET TOUCHES DU CONTRÔLEUR INTELLIGENT
Mode : Timer - Dimmer - Growphase - System
Heure/Date : 15:02 21-05-06
PROGRAMMATION SIMPLE
FR1
TELECOMMANDE
2
15:02 21-05-06
CH1: 65
Start at 06:00
End at 19:00
Flowering 1/62
CH2: 65

Commencer à : L’heure à laquelle le lever du soleil commence.
CH1/CH2 : afche le pourcentage de luminosité de chaque canal.
Fin à : l’heure à laquelle le lever du soleil se termine.
Remarque : Le mode peut être modié à l’aide du bouton < et >.
Réglage du mode minuterie
Étape 1 : Appuyez sur menu pour accéder au réglage de la fonction fonction.
FONCTIONNEMENT DES MENUS
3 FR
1. Fenêtre d’afchage
2. Conguration des modes.
Étape 2 : Appuyez sur le bouton OK pour entrer en mode minuterie.
Étape 3 : Appuyez sur < et > pour choisir le lever ou le coucher du soleil et appuyez sur ^ v pour modier l’heure.
Étape 4 : Appuyez sur le menu pour revenir aux fonctions
Appuyer sur le bouton ok
Appuyer sur le bouton menu
Appuyez sur ^ v pour modier la
température de gradation.
Appuyez sur ^ v pour activer ou désactiver
la gradation automatique.
Réglage du mode variateur FR
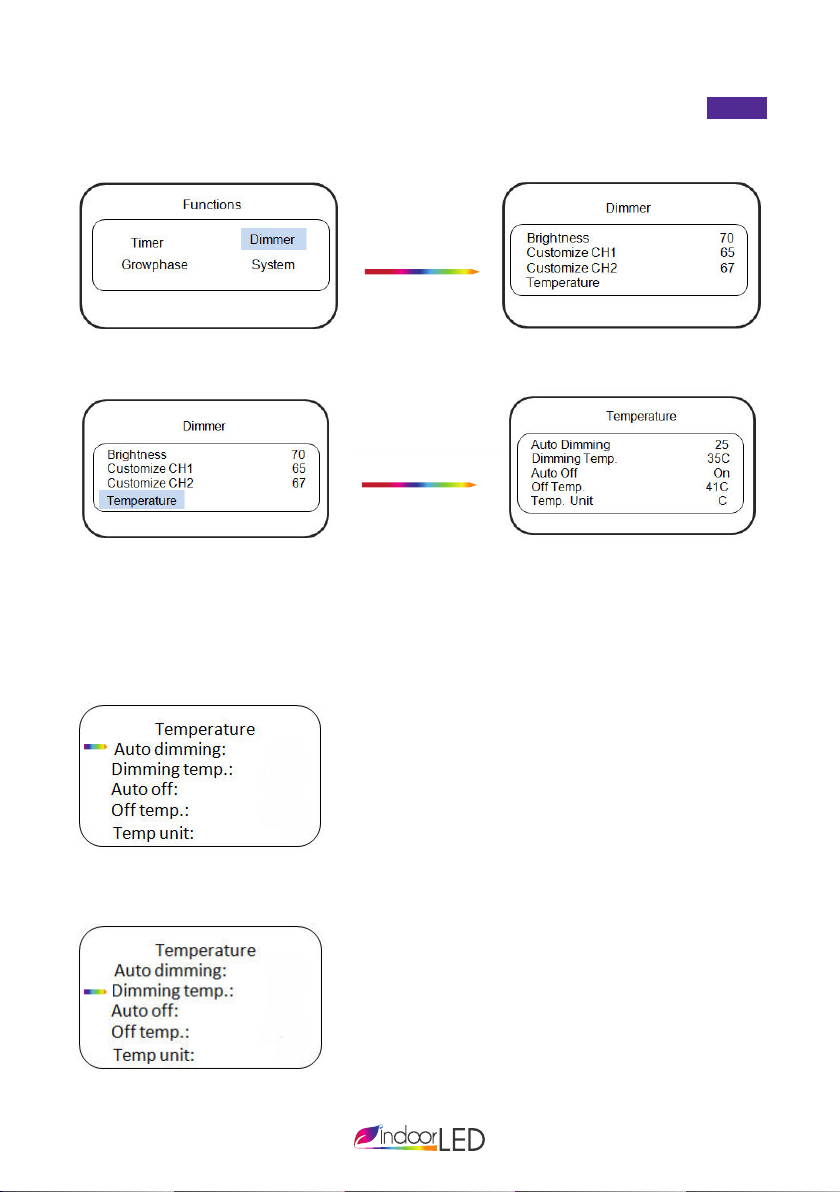
Étape 1 : Appuyez sur le bouton ok pour entrer en mode gradateur
Étape 2 : Appuyez sur la touche ok pour congurer la gradation.
Appuyer sur le bouton ok
Appuyez sur ok ket pour congurer
la gradation
L’image ci-dessus montre que lorsque la température atteint 35 °C, la luminosité
de la lumière diminue à 25 %, lorsque la température atteint 41 °C, toute la
lumière s’éteint automatiquement.
Étape 3 : Appuyez sur > pour choisir la gradation automatique.
Étape 4 : Appuyez sur > pour choisir la température de gradation.
Appuyez sur ^ v pour modier
l’unité de température.
Appuyez sur ^ v pour modier
la température d’arrêt.
Appuyez sur ^ v pour activer ou désactiver
l’arrêt automatique.
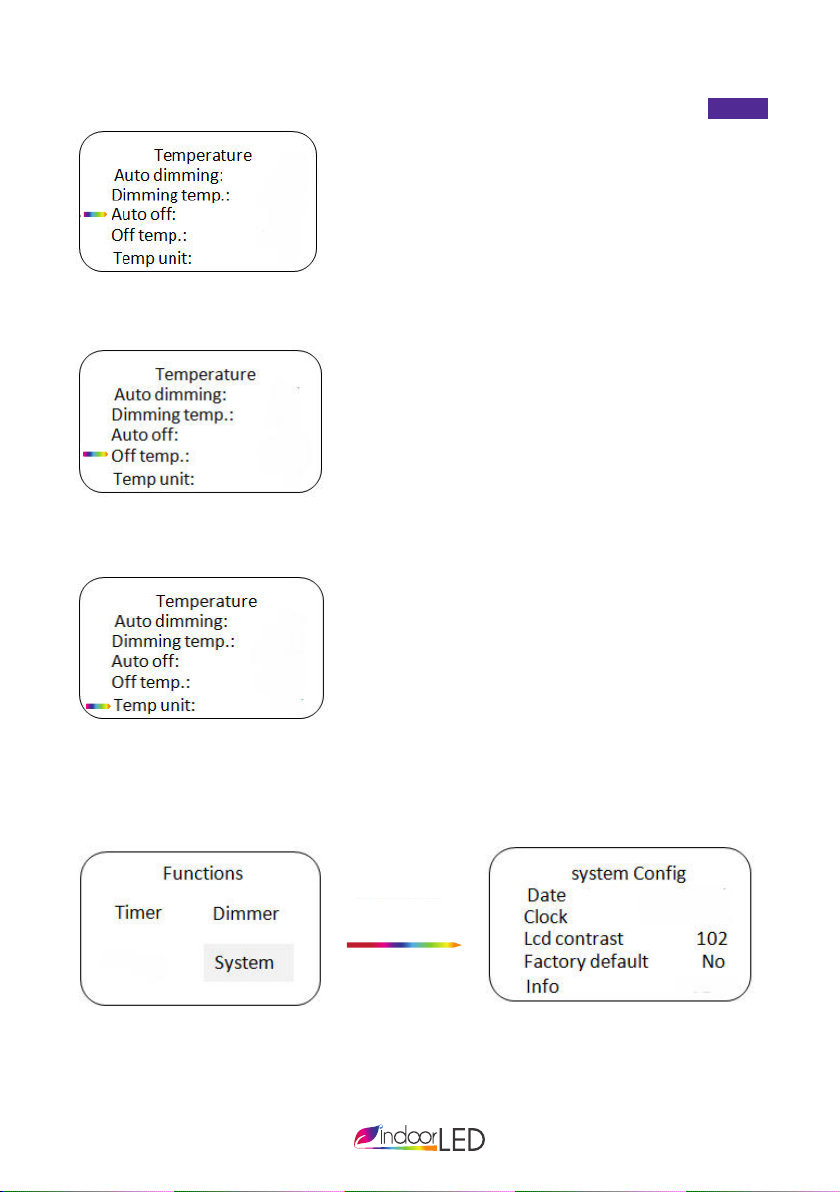
Étape 5 : Appuyez sur > pour choisir l’arrêt automatique FR
Étape 6 : Appuyez sur > pour choisir la température désactivée
Étape 7 : Appuyez sur > pour choisir l’unité de température
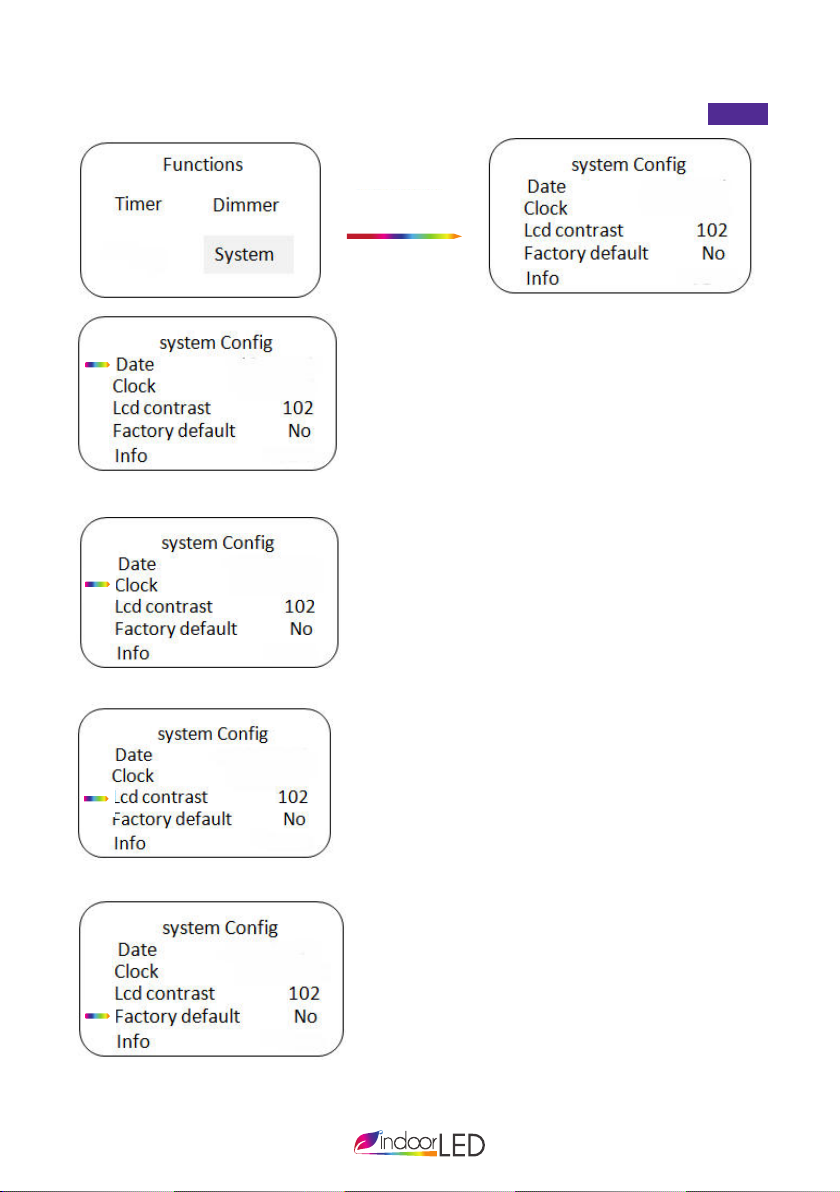
Réglage du mode système
Étape 1 : Appuyez sur le bouton OK pour entrer en mode système
Appuyer sur le bouton ok
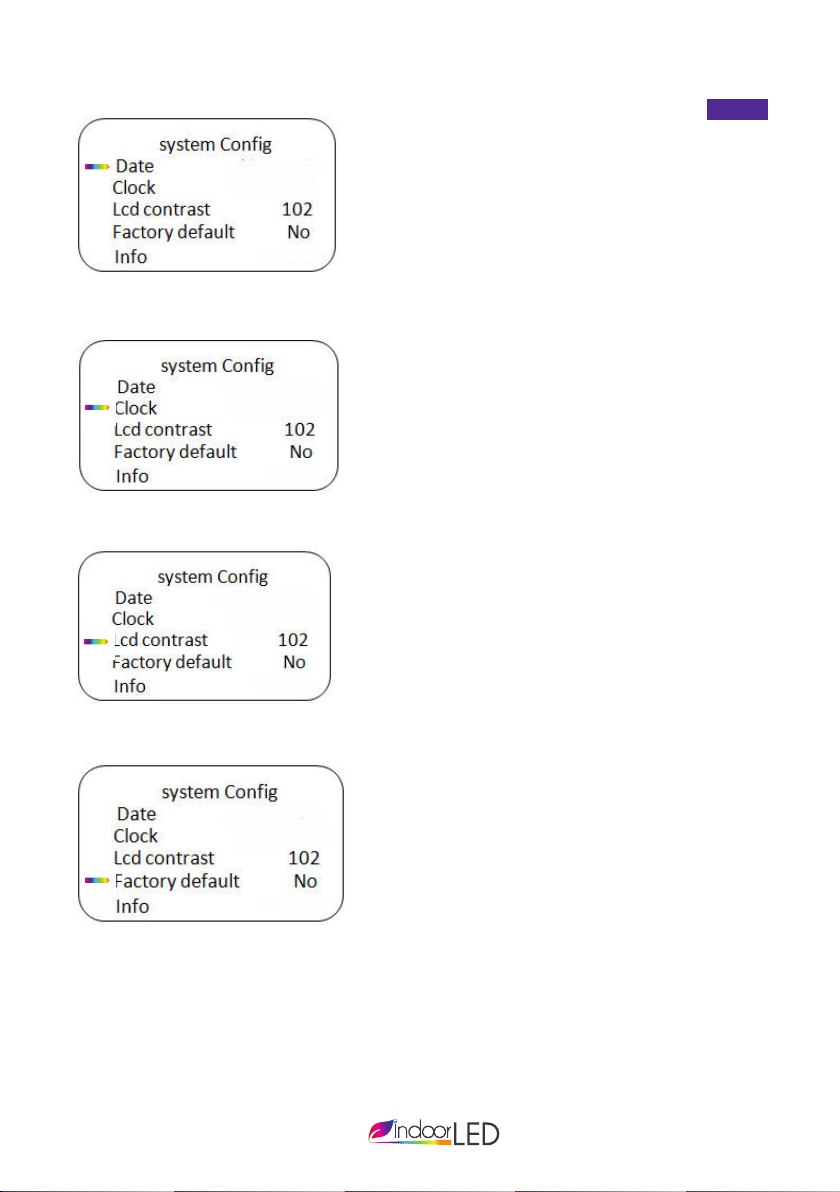
Appuyez sur ^ v pour modier la date
Étape 2 : Appuyez sur > pour choisir l’horloge.
Appuyez sur ^ v pour modier l’horloge
Étape 3 : Appuyez sur > pour choisir le contraste de l’écran LCD
Appuyez sur ^ v pour modier le contraste
Étape 4 : Appuyez sur > pour choisir la valeur d’usine par défaut.
Appuyez sur oui ou non
Dernière étape : appuyez une fois sur le menu pour revenir à Fonctions, appuyez à
nouveau sur le menu pour revenir à l’interface.
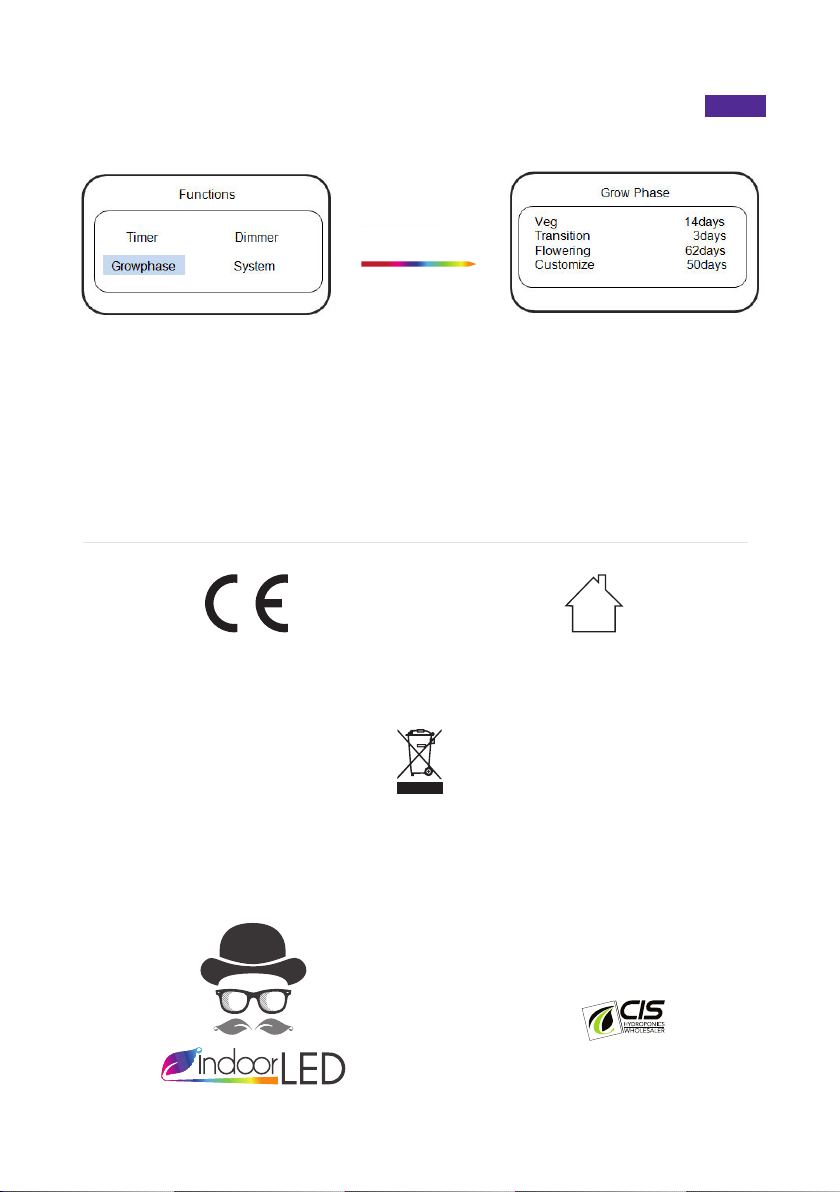
Réglage du mode de phase de croissance
FR
Étape 3 : La partie de transition est corrigée.

Appuyer sur le bouton ok
Étape 1 : Appuyez sur le bouton OK pour entrer en mode système.
Réglage du mode de phase de croissance FR
Étape 2 : Lorsque nous choisissons «Veg», la luminosité de CH2 sera de 0, et nous pouvons aller sur «Dim-
mer» pour changer la luminosité de CH1 et il s’afchera dans la fenêtre principale.
Étape 3 : La partie de transition est corrigée.
Étape 4 : Lorsque nous choisissons «Floraison», la luminosité du CH1 et du CH2 sera la même en
fonction du pourcentage de luminosité que nous modions sous Gradateur
Dernière étape : Lorsque nous choisissons «Personnaliser», le pourcentage de luminosité de CH1 et CH2 peut
être différent. Nous pouvons les changer dans «personnaliser CH1» et «personnaliser CH2» sous Dimmer.

On - Off
(on / off the lamp)
Up / Down / Left / Right
Up / Down / Left / Right
Add
Menu
Edit
Del
SMART CONTROLLER PANEL & KEYS
Mode : Timer - Dimmer - Growphase - System
Time : 15:02 21-05-06
Step 1 : Press menu to enter the function setting
EASY PROGRAMMING
EN1
REMOTE CONTROLLER
2
MENU OPERATION
3
Start at : The time of the sunrise starts
CH1/CH2 : Show the percent brightness of each channel
End at : The time the sunset ends
Note : Mode can be change by < > button
1. Display Window
Step 2 : Press ok button to enter timer mode
Step 3 : Press < and > to choose sunrise or sunset and press ^ v to change the time
Power Indicator
Display Window
Infrared receiver
15:02 21-05-06
CH1: 65
Start at 06:00
End at 19:00
Flowering 1/62
CH2: 65
Step2 : Press ok key for dimming set up.

Timer mode setting
Step 1 : Press menu to enter the function setting
EN
2. Mode conguration
Step 2 : Press ok button to enter timer mode
Step 3 : Press < and > to choose sunrise or sunset and press ^ v to change the time
Step 4 : Press menu back to the functions
Press ok key
Press menu key
Dimmer mode setting
Step1 : Press ok button to enter dimmer mode
Step2 : Press ok key for dimming set up.
Press ok key
Press ok ket to set up dimming
Above picture shows when temp up to 35°C, the brightness of the light will
decline to 25%, when the temp reaches 41°C, the whole light will be auto-off.

Press ^ v to change the dimming temp.
Press ^ v to turn on or off the auto dimming.
EN
Step 3 : Press > to choosse autodimming.
Step4 : Press > to choose dimming temp.
Step 5 : Press > to choose auto off
Step6 : Press > to choose off temp
Step7: Press > to chosse Temp unit
Step1 : Press ok button to enter system mode
Press ^ v to change temp unit.
Press ^ v to change the off temp.
Press ^ v to turn on or off the auto off.
Step2 : Press > to choose the clock.
Step3 : Press > to choose the LCD contrast
Step4 : Press > to choose the factory default.
EN
System mode setting
Step1 : Press ok button to enter system mode
Appuyer sur le bouton ok
Press ^ v to change the date
Step2 : Press > to choose the clock.
Press ^ v to change the clock
Step3 : Press > to choose the LCD contrast
Press ^ v to change the LCD contrast.
Step4 : Press > to choose the factory default.
Select yews or no
Last step: press menu once back to Functions, press menu again will back to the
interface.
DISTRIBUE EN EUROPE PAR :
32 Rue de la Regalle – ZI la Regalle 77181 COURTRY
Tél : 0164212000 - Fax : 0160202834
Made in RPC
Press ok key
Step1 : Press ok button to enter system mode.
Growphase Mode Setting EN
Step2 : When we choose «Veg», the birghtness of CH2 will 0, and we can go to «Dimmer» to change the
brightness of CH1 and it will show initeh main window.
Step3: The transition part is xed.
Step4: When we choose «Flowering», the brightness of the CH1 and CH2 will be same according to the bri-
ghtness percentage we change under Dimmer
Last step : When we choose «Customize», the brightness percentage of CH1 and CH2 can be different. We can
change them in the «customize CH1» and «customize CH2» under Dimmer.
Ce produit est conforme aux normes EU applicables
This product complies with all the applicable EU directives
Utilisation en intérieur exclusivement
Indoor use only
Les produits électriques ne doivent pas être jetés avec les produits ménagers. Les produits électriques utilisés doivent être collectés
séparément et éliminés das des points de collecte prévus à cet effet.
Electrical products should not be thrown away with household products. The electrical products used must be collected separately
and disposed of in designated collection points.
Table of contents
Languages:
Other IndoorLED Lighting Equipment manuals


