manuals.online logo
Brands
  1. Home
  2. •
  3. Brands
  4. •
  5. Inel
  6. •
  7. Engine
  8. •
  9. Inel YYGL35RE-10/17 User manual

Inel YYGL35RE-10/17 User manual

P. I. E. INEL Sp. z o. o., ul. Mostowa 1, 80-778 Gdańsk, [email protected] www.inel.gda.pl
Operating instructions
Obstacle detection motor with built in radio receiver and
electronic limit switches
YYGL35RE-10/17
YYGL45RE-20/15
1. SAFETY GUIDELINES
1.1 Basic guidelines
The obstacle detection motor is delivered in a condition allowing
for safe installation and operation, provided that all guidelines
herein as well as relevant safety and accident prevention
regulations are observed. Only qualified and licenced personnel
is allowed to install and repair electrical devices. It is prohibited to
make any changes or modifications to the drive. Warranty repairs
may be conducted only by the manufacturer. Use only original
spare parts and accessories during post-warranty repairs.
Operational safety of the drive can only be ensured if it is used for
its intended purpose. Do not exceed limit values given in
technical information.
1.2 Additional safety regulations
Observe relevant safety and accident prevention regulations
when installing, commissioning and maintaining the drive. The
following must be given special consideration:
1. Fire safety regulations.
2. Accident prevention regulations.
1.3 General notes on risks and safety measures
These notes are general guidelines for the use of INEL devices in
combination with other devices. These guidelines must be strictly
observed when installing and operating the devices.
Warning - against possible damage to the drive,
roller blind, roller blind cassette, elevation etc. if no
relevant safety measures are taken:
• Check if all screw connections are secure before
installing the drive and setting limit switches
Danger - means that there is a threat to life and
limb of the user if no relevant safety measures are
taken:
 Check the compatibility of the permissible voltage
of the device with the local power supply before connecting.
 Observe applicable safety and accident prevention
regulations.
 Use an isolation switch allowing for safe power supply
disconnection (e.g. fuse cut-off switch) installed in such a
way that all connections can easily be cut out.
 Inspect wires and cables regularly for damaged insulation
and conductor continuity.
 If any damage is identified, cut off power immediately and
replace the damaged wiring.
1.4 Warning
 Do not allow children to play with control devices.
 Keep the remote control out of reach of children.
 Observe the moving roller blind and keep people away until
it fully opens or closes.
 The users of the roller blind must be instructed in its
operation and existing risks related to its usage. Persons
are deemed to have been trained if the employer,
administrator or owner allowed them to use the roller blind
and instructed them in its operation.
It is not permitted to dispose of waste equipment
together with other waste. Dispose only in specially
designated areas. The household plays a key role in the
recycling of waste equipment. By correct sorting of waste,
including waste equipment and batteries, household members
ensure that the equipment is not disposed together with
household waste, but in specially designated areas, and thus
may be used again after recycling.
2. INSTALLATION INSTRUCTIONS
2.1 Safety regulations
 Only persons with appropriate authorisation may install the
drive.
 The weight of the roller blind may not exceed the maximum
load of the drive specified in the selection table (see the end
of the instructions)
 Routing the cable properly (loop aimed downwards) will
protect the drive against any water damage.
 Do not drill holes in motor housing.
 Protect the motor against contact with any liquids.
 Avoid crushing and impacting the motor, protect the motor
against shock.
 Do not connect more than one on/off switch to a single
motor.
 Do not connect more than one motor to a single on/off
switch.
Figure 1
2.2 Installing the motor
 Fix the mounting bracket (A) to the side of the roller blind
cassette, connect the adapter (D) to the thrust ring of the
motor (C).
 Place an appropriate driver provided with the motor (E) on
the motor axis, secure it with a pin (F), and slide the entire
motor to the roller tube (G).
WARNING: The motor is fitted with an internal thermal cut-out
which allows the roller blind to work continuously for ca. 4 min.
After this time the temperature inside the motor will exceed the
permissible value, which will cause power cut-out. Subsequent
vertical movement of the roller blind will only be possible after the
motor cools down (it can take up to twenty minutes). Using this
cut-out greatly increases the life of the drive
Figure 2
NO
YES
P. I. E. INEL Sp. z o. o., ul. Mostowa 1, 80-778 Gdańsk, [email protected]
www.inel.gda.pl
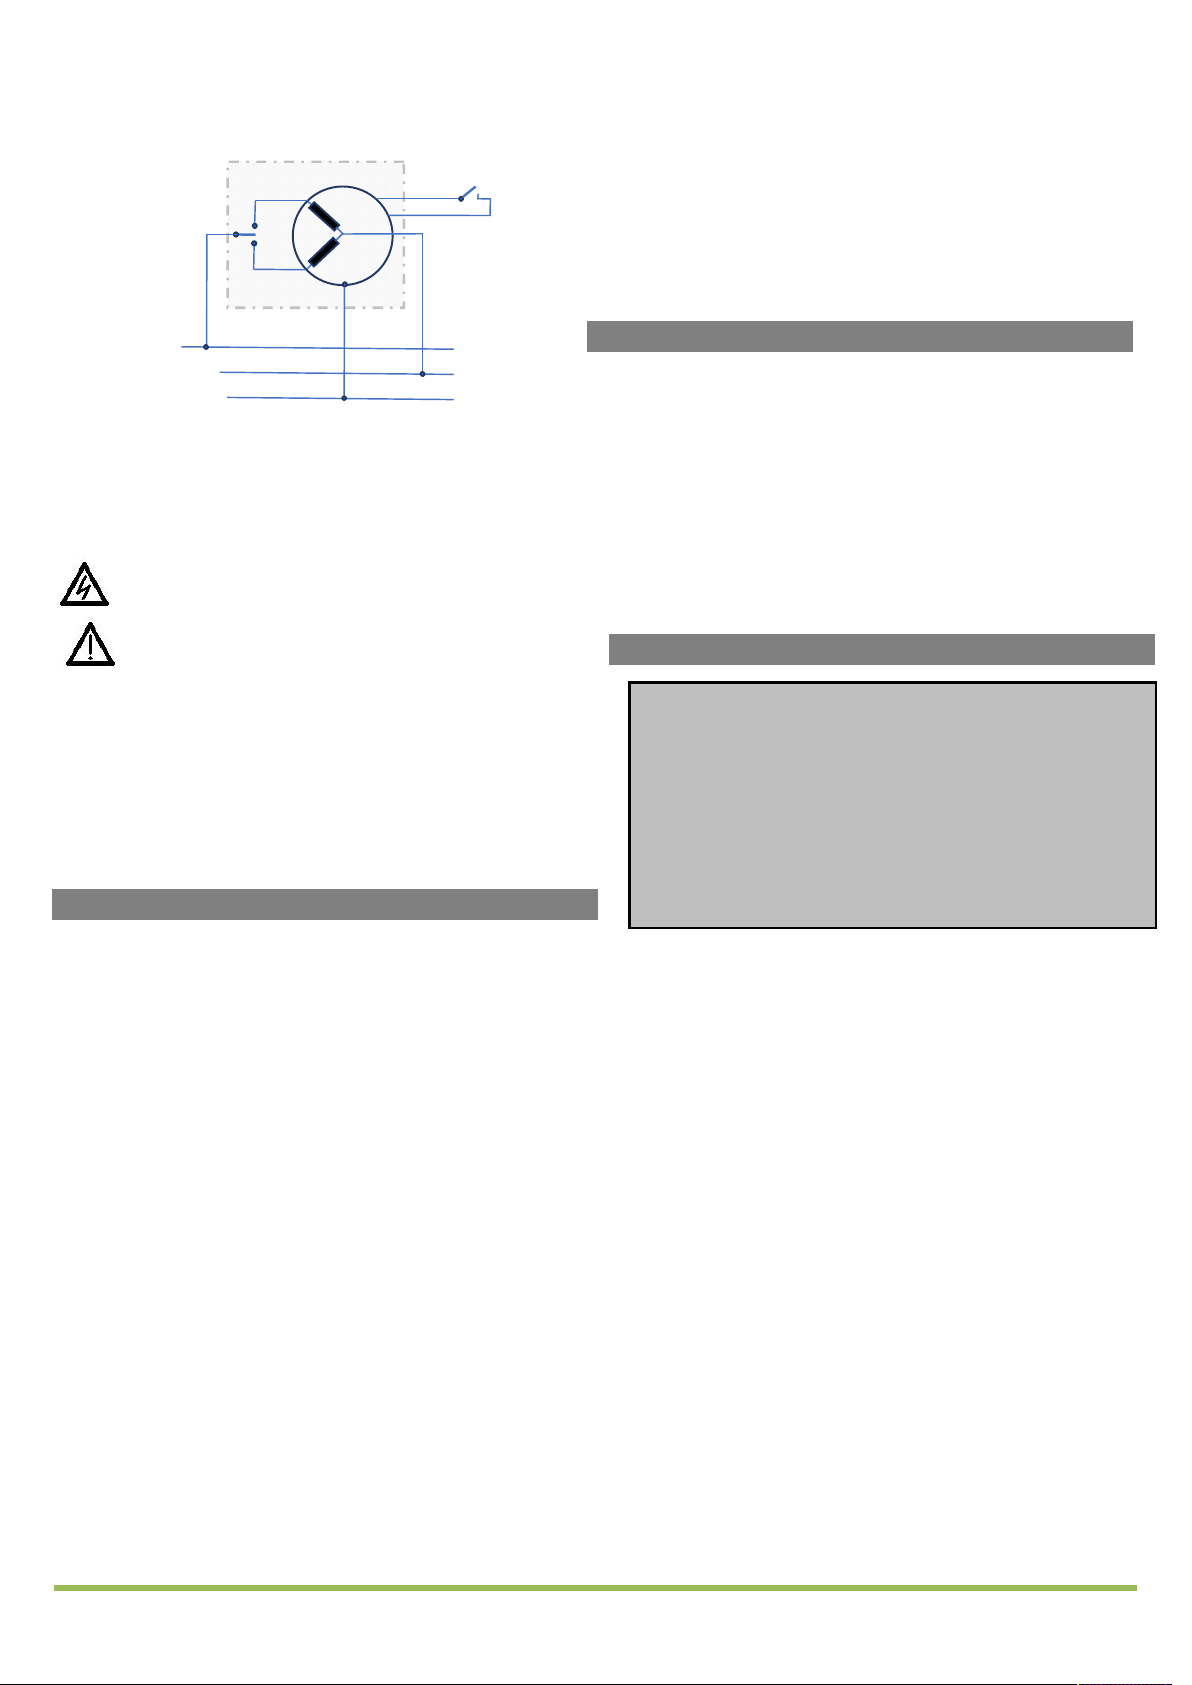
2.3 Electrical connections
A monostable switch can be connected to the motor, which will
short the control signal (black wire) with ground (grey wire) when
pressed.
The switch operates in a loop: up - stop - down - stop.
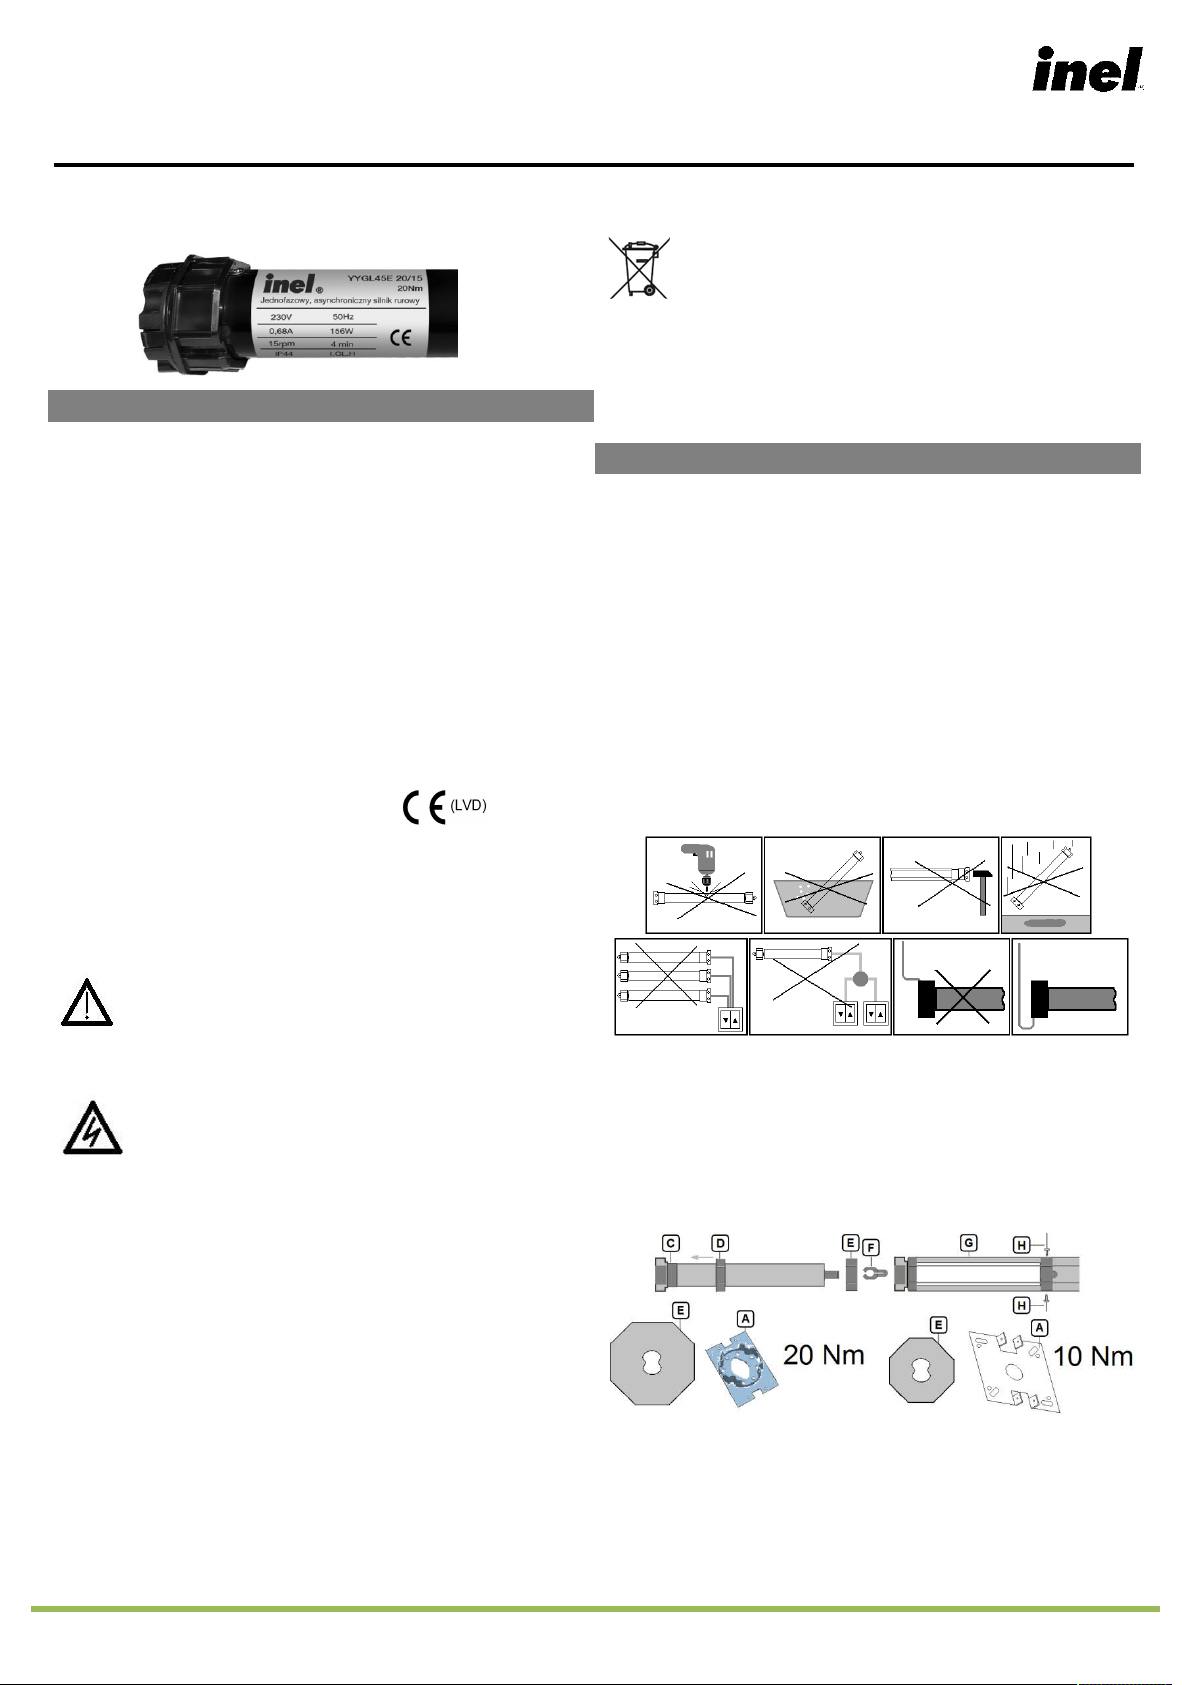
DISCONNECT POWER SUPPLY BEFORE MAKING
ANY CONNECTIONS!
Improper roller blind installation will cause the
motor to stop unexpectedly.
In order for the obstacle detection drive to function properly,
the following is required:
1. Use a special driver provided with the motor (figure 2-E)
2. Ensure that the curtain can move freely in the guides and
the cassette. This movement may not be obstructed (e.g.
by increase of the roller blind cassette temperature,
mosquito net etc.)
3. REGISTERING REMOTE CONTROLS
The motor is compatible with the following remote controls: PIL-
01/04NS, 01/05/09/19PM, PIL-19/99PMT, PIL-01/05/09/19DL,
PIL-19/99DLT, PIL-01PT.
Our drives allow for two methods of entering the remote control
registration mode:
3.1. Each time after connecting to mains each drive will
enter the registration mode for 10 seconds.
After the motor is received from the manufacturer or if the
remote control is lost, a new remote can be registered as
follows:
Connect the drive to the mains: 230 VAC. The motor will make
two up-down movements. Within 10 seconds from connecting
to the mains, press the ▲ and ▼ buttons on the remote control
at the same time for the selected channel
The drive will make a short up and down movement. Within the
next 10 seconds register the channel by pressing ▲.
The registration will be confirmed by a short up-down
movement.
WARNING: The procedure will erase all previously
registered channels from the memory. This will allow to
register a remote control with a drive without another
registered remote control (new drive or lost/stolen remote).
3.2. Entering the registration mode with a previously
registered remote control.
If a remote control has already been registered, subsequent
channels of the same or another remote can be registered
without disconnecting from the mains. On the registered
remote,
press the ▲ and ▼ buttons at the same time.
The roller blind will move up and down. It will remain in
registration mode for the next 10 seconds. During that time, in
order to register a new channel of the same or another remote,
select the desired channel on the remote and press the ▲
button.
This way you can register any channel to any drive, but only if
you have a previously registered remote control.
4. INVERTING MOVEMENT DIRECTION
If you need to invert the movement of the roller blind (roller blind
movement direction does not match the directions on the
remote control), you must enter programming mode (with a
previously registered remote).
Press the ▲ and ▼ buttons on the remote at the same time, the
motor will make a short up-down movement, then press STOP,
the motor will make another short up-down movement. Press ▲
and ▼ again, and then STOP, the motor will move up-down-
down-up.
WARNING: Changing motor direction will delete limit
positions.
5. PROGRAMMING
In the factory mode and during limit position set-up the drive
will move with a 1-second pause immediately after start - this
means that no limit positions have been set.
5.1. BEFORE PROGRAMMING
A. Check whether the direction of roller blind movement
matches the buttons on the remote control (if they are
opposite, use the remote to switch them around). See
section 4.
B. Place the lower edge of the curtain at half the height of
the guides. Starting the programming procedure too
near the roller blind cassette may damage it.
WARNING! Programming always starts with the set-up of
the upper limit.
5.2. AUTOMATIC LIMIT PROGRAMMING
The programming procedure may be performed
automatically only if blocking hangers and stoppers are
used, and a sill is mounted in the window. The length of the
curtain must be adjusted to the length of the guides.
1. Press and release the "↑" button on the remote, the
drive will move upwards.
2. At the top, the drive will stop on the stoppers, after 3
seconds it will set the upper limit and switch movement
direction. At the bottom the drive will stop as soon as it
reaches the sill and set the lower limit, after which it will
Before drive startup/programming check the condition of
the curtain, guides and roller blind cassette and whether
there is a sill mounted in the window!
The roller blind cassette and guides should be free from
any contaminants and ensure unrestricted curtain
movement throughout the entire length. If the guides are
contaminated with building materials or are too tight, they
can cause damage to the drive and the roller blind, which
is not covered by the warranty.
Figure 3
N - neutral
PE - protective
L -
brown
yellow-green
black
blue
grey
P. I. E. INEL Sp. z o. o., ul. Mostowa 1, 80-778 Gdańsk, [email protected]
www.inel.gda.pl
return to the upper limit and confirm that programming is
finished.
WARNING! Stopping the motor with a remote control
during automatic programming will automatically enter
the SEMI-AUTOMATIC programming mode.
5.3. SEMI-AUTOMATIC LIMIT PROGRAMMING
UPPER LIMIT
Upper limit in the desired position (if no stoppers are
present):
a. Press and release the "↑" button on the remote control.
b. Press the STOP button on the remote control in the desired
upper limit position. You may correct this position after
switching the remote into shutter mode.
c. To confirm the upper limit, press the STOP button on the
remote. The roller blind will confirm the registration of the
upper limit by making two sequences of short down-up
movements.
d. At this point start programming the lower limit.
OR
Upper limit by overload (if stoppers are used):
a. Press and release the "↑" button on the remote control.
b. Press the STOP button after the drive stops (if the button is
not pressed within 3 s the drive will enter automatic
programming mode). You may correct this position after
switching the remote into shutter mode.
c. To confirm the upper limit, press the STOP button on the
remote. The roller blind will confirm the registration of the
upper limit by making two sequences of short down-up
movements.
d. At this point start programming the lower limit.
LOWER LIMIT
Lower limit in the desired position:
a. Press and release the "↓" button on the remote control.
b. Press the STOP button on the remote control in the desired
lower limit position. You may correct this position after
switching the remote into shutter mode.
c. To confirm the lower limit, press the STOP button on the
remote. The roller blind will confirm the registration of the
lower limit by making three sequences of short up-down
movements.
d. Press and release the "↑" button on the remote, the roller
blind will start moving towards the upper limit, where it will
confirm the end of programming.
OR
Lower limit on sill:
a. Press and release the "↓" button on the remote control.
b. The drive will stop on the sill. You may correct this position
after switching the remote into shutter mode.
c. Press and release the STOP button to confirm the lower
limit. The roller blind will confirm the registration of the
lower limit by making three sequences of short up-down
movements.
d. Press and release the "↑" button on the remote, the roller
blind will start moving towards the upper limit, where it will
confirm the end of programming.
In the semi-automatic lower limit programming phase (on sill),
the motor will attempt to detect the type of hangers used. After
the drive detects the sill, it will make another 1/4 revolution. If
no overload is detected at this point (lower RPM), it will move
back by 1/4 revolution (no blocking hangers detected). If
overload is detected during the 1/4 revolution, the motor will
stop at the position of overload (blocking hangers detected).
Press the "↑" to set the limit.
6. RETURN TO FACTORY MODE
Press the ▲ and ▼ buttons on the remote at the same time, the
motor will make a short up-down movement, then press STOP.
The motor will make another short up-down movement.
Perform this operation 4 times.
7. OBSTACLE DETECTION OPERATING PRINCIPLE
Before limit positions are set (factory mode), the motor will
only detect decreased rpm caused by overload. The
obstacle detection function will be activated only after both
limit positions are set.
Obstacle detection works only for downward movement.
During upward movement, the drive will stop if decreased
rpm are detected.
If the roller blind stops unexpectedly (an obstacle appears),
the drive will move in the opposite direction in order to
release curtain tension, allowing you to remove the obstacle.
P. I. E. INEL Sp. z o. o., ul. Mostowa 1, 80-778 Gdańsk, [email protected]
www.inel.gda.pl
8. TROUBLESHOOTING
Problem: The motor does not react to commands
Cause: Thermal cut-out was activated
Solution: Wait for 10-20 minutes
Problem: Curtain fins do not close fully
Cause: The curtain is blocked in the guides
Solution: Check the roller blind guides and curtain slats
Problem: The motor stops on its own
Cause: The curtain is blocked in the guides
Solution: Check the roller blind guides and curtain slats
Problem: Blocking hangers were not detected
in semi-automatic programming
Cause: Roller blind curtain too long.
Solution: Shorten the curtain to appropriate size.
Problem: The motor does not detect obstacles when
moving down.
Cause: Limits programmed wrong way.
Solution: Reset the drive to factory mode, then repeat the
programming procedure, starting from the upper
limit.
WARNING! Pauses between individual presses of the remote
control buttons should be at least 1 second long! This
applies both to the programming and operating mode (after
programming limit positions).
9. MOTOR SELECTION TABLE
TORQUE
ROLLER BLIND LENGTH

This manual suits for next models

1

Other Inel Engine manuals

Inel YYGL45E-20/15 User manual

Inel

Inel YYGL45E-20/15 User manual

Inel YYGL35E-10/17 User manual

Inel

Inel YYGL35E-10/17 User manual

Inel YYGL35P-10/17 User manual

Inel

Inel YYGL35P-10/17 User manual

Inel YYGL35RP-10/17 User manual

Inel

Inel YYGL35RP-10/17 User manual

Popular Engine manuals by other brands

Calpeda CS-R Series operating instructions

Calpeda

Calpeda CS-R Series operating instructions

Hatz Diesel 1B20V Original instruction book

Hatz Diesel

Hatz Diesel 1B20V Original instruction book

Novarossi MEPHISTO.21 GT5 instructions

Novarossi

Novarossi MEPHISTO.21 GT5 instructions

RCGF 70CC-Twin Operator's manual

RCGF

RCGF 70CC-Twin Operator's manual

Toshiba EQP III 300 Series Brochure & specs

Toshiba

Toshiba EQP III 300 Series Brochure & specs

Moe's AM43 instruction manual

Moe's

Moe's AM43 instruction manual

LOMBARDINI MARINE LMG 9000 MONOFASE Use and maintenance manual

LOMBARDINI MARINE

LOMBARDINI MARINE LMG 9000 MONOFASE Use and maintenance manual

Nidec LEROY-SOMER FFB Series Maintenance Guide

Nidec

Nidec LEROY-SOMER FFB Series Maintenance Guide

Barrus Shire 43 WB Original instruction

Barrus

Barrus Shire 43 WB Original instruction

ABB TPL71-C35 Operation manual

ABB

ABB TPL71-C35 Operation manual

CHERUBINI Plug&Play Ocean Easy instructions

CHERUBINI

CHERUBINI Plug&Play Ocean Easy instructions

Briggs & Stratton 90000 series Operator's manual

Briggs & Stratton

Briggs & Stratton 90000 series Operator's manual

Kohler Command PRO ECV940 owner's manual

Kohler

Kohler Command PRO ECV940 owner's manual

Iveco VECTOR Series Technical and repair manual

Iveco

Iveco VECTOR Series Technical and repair manual

Beta Marine Beta 10 Operator's  maintenance manual

Beta Marine

Beta Marine Beta 10 Operator's maintenance manual

O.S. engine FS-40S Owner's instruction manual

O.S. engine

O.S. engine FS-40S Owner's instruction manual

Mitsubishi S4S-DT Operation & maintenance manual

Mitsubishi

Mitsubishi S4S-DT Operation & maintenance manual

O.S. engine 49PI Owner's instruction manual

O.S. engine

O.S. engine 49PI Owner's instruction manual

manuals.online logo
manuals.online logoBrands
  • About & Mission
  • Contact us
  • Privacy Policy
  • Terms and Conditions

Copyright 2025 Manuals.Online. All Rights Reserved.