GAPOSA XQ50 User manual

AUTO-LIMIT SETTING & OBSTACLE
DETECTION MOTOR
Radio programming quick guide

1
1
1 2
1
2 3
1
3
2
5
4
1. CONNECT POWER TO THE MOTOR
AUTOMATIC LIMIT SETTING
2. PAIRING THE REMOTE
3. CHANGING DIRECTION
4. SETTING THE LIMITS (Always set TOP limit first)
Press and hold Prog-TX (4)
on the back of the remote till
the motors starts running
Press and hold Prog-TX (4)
on the back of the remote till
the motors starts running
Press and hold the Prog-FC (5)
button on the back of the remote
till the motor makes a brief jog
To confirm make a
full TOP/BOTTOM operation
of the shutter
- The motor runs upward to the TOP limit, it stops itself (because of
the mechanical top stops) and sets the TOP limit.
- After few seconds it starts running automatically downwards to
set the BOTTOM limit.
- When the roller shutter is completely closed the motor stops
setting the BOTTOM limit
Release Prog-TX (4) then press STOP.
The motor makes a brief jog.
Direction of the motor has been reversed
IMPORTANT: the change of direction of
operation must be performed BEFORE
initiating limit setting procedure
otherwise limits must be reset
Check the motor rotational direction then
release Prog-TX (4). Motor stops
Within 5 seconds, press the corresponding button:
- UP if the motor turns upwards
- DOWN if the motor turns downwards
Remote is now paired
2
1UP Rolling shutter up
2STOP Rolling shutter stops
3DOWN Rolling shutter down
4PROG-TX Pairing remote
5PROG-FC Set limits
- Press UP button on the front and hold it for more than 2 sec:

1
1
12 3
1
2 3
2”
1. CONNECT POWER TO THE MOTOR
MANUAL LIMIT SETTING
2. PAIRING THE REMOTE
3. CHANGING DIRECTION
4. SETTING THE LIMITS (Always set TOP limit first)
Press and hold Prog-TX (4)
on the back of the remote
till the motors starts
running
Press and hold Prog-TX (4)
on the back of the remote till
the motors starts running
Press and hold the Prog-FC (5)
button on the back of the remote
till the motor makes a brief jog
Press UP (1) button on
the front and hold it for
more than 2 sec: the
motor starts running
automatically upwards to
set the TOP limit.
When you reach the
position of the top limit
press STOP. Motor stops
Press DOWN (3) button on the front
and hold it for more than 2 sec: the
motor starts running automatically
downwards to set the BOTTOM limit.
When the roller shutter is completely
closed the motor stops setting the
BOTTOM limit.
BOTTOM limit is now set
Release Prog-TX (4) then press STOP.
The motor makes a brief jog.
Direction of the motor has been
reversed
IMPORTANT: the change of direction
of operation must be performed
BEFORE initiating limit setting
procedure otherwise limits must be
reset
Check the motor rotational direction then
release Prog-TX (4). Motor stops
Within 5 seconds, press the corresponding button:
- UP if the motor turns upwards
- DOWN if the motor turns downwards
Remote is now paired
2
To confirm press STOP
again.
Motors jogs: TOP limit is
now set
STOP

Option 1 - Using a programmed transmitter
Press and hold both PROG-TX and STOP buttons for at least
15 seconds: as confirmation feedbacks the motor makes first a
brief jog and after 5 seconds an additional jog
Memory is now empty
Option 2 - Using a new transmitter without ID (not paired).
1 Switch the motor power supply OFF. Then switch it ON.
2Within 8 seconds, using any Gaposa transmitter, press and hold both
PROG-TX and STOP buttons until the motor makes a jog
Memory is now empty
PREFERRED POSITION
DELETING A TRANSMITTER OR A CHANNEL
RESET TRANSMITTER MEMORY (DELETING ALL THE TRANSMITTERS OR CHANNELS OR SENSORS)
1Move the motor and
stop it at the desired
intermediate position
Using the transmitter to be deleted press and hold both PROG-TX and STOP
buttons till the motor makes a brief jog
Only the transmitter used for this procedure has been deleted from
motor memory
Press both UP and DOWN buttons till
the motor makes a brief jog.
The intermediate position has been
erased
2. RECALLING THE
INTERMEDIATE POSITION
1. SETTING THE
INTERMEDIATE POSITION
3”
Press and hold the STOP button for
3 seconds: the motor will move and
stop at the intermediate position
3. ERASING THE
INTERMEDIATE POSITION
2Press both UP and DOWN
buttons together till the motor
makes a brief jog
The intermediate position is set
1 2
GAPOSA srl
via Ete, 90 - 63900 Fermo - Italy
T. +39.0734.22071 - F. +39.0734.226389
GAPOSA Inc.
3920 Providence Road
Newtown Square PA 19073
Ph. 484 885 0540

In addition to the programming from the remote, we added a programming button on the head
of the motor
Advantages and how it works:
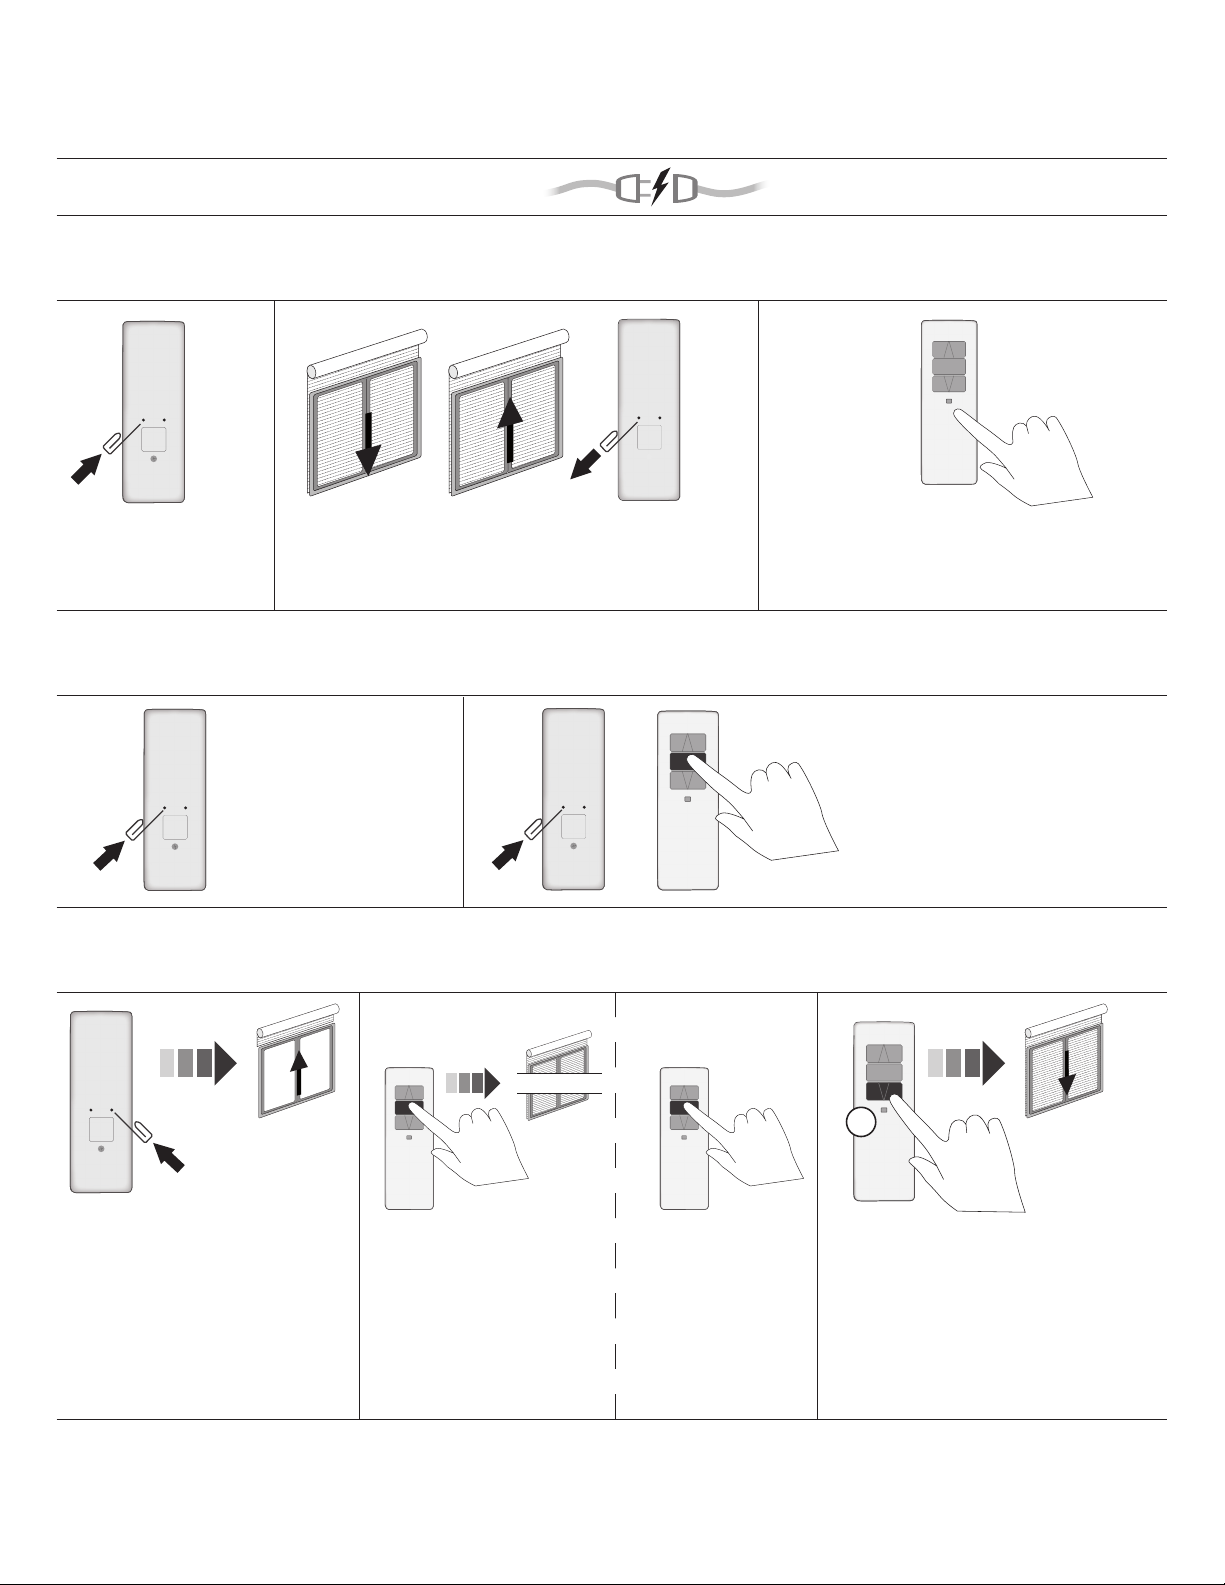
1. Push and hold it down until the motor wakes up and turns in one direction. The motor has
opened the memory to accept the remote signal for pairing. Release the white button and push
the corresponding UP or DOWN button on the remote You paired the remote and synchronized
the rotational direction with the commands.
2. Every time you push the white button the motor turns in one direction. It may be clockwise or
anti clockwise. If the motor turns clockwise but you want it to turn anti clockwise, release the
white button and push it again quickly holding it down. Now the motor turns in the opposite
direction.
3. Every time you push the white button you clear the memory erasing any former paired remote
and automatically you open it to accept the new remote. An interesting feature when you get a
service call because the remote was lost, broken or stolen (in case or restaurants or commercial
sites) the only thing you need to do, is to get a brand new remote push and hold down the white
button on the motor and until it wakes up and turn in one direction, push the corresponding UP
or DOWN button on the remote. PAIRED!! You do not need to reset the limits since they work in
memory fashion. (no double cutting power)
4. When in a multiple motors installations, if you pair every unit individually each one in one
separate channel, the programming by the white button on the motor head it allows you to have
all the motors powered and pair each one individually (otherwise if the motors are all powered,
by opening the programming from the remote all of them will respond to you)
Limit setting:
By pushing the FC button you need to set the top AND the bottom limits. Top always first.
When you want to reset the Top or the bottom:
You do not need to run the screen to the original TOP or BOTTOM limit. The Gaposa radio
protocol is flexible and gives you the ability to reset Top or Bottom from any point the screen is.
To reset the TOP limit:
You need to push and hold down the FC button and the UP button until the motor jogs. Run the
screen to the new top limit position you want. When you reached it press the STOP button. Motor
jogs. New TOP limit is set.
To reset the BOTTOM limit:
You need to push and hold down the FC button and the DOWN button until the motor jogs. Run
the screen to the new bottom limit position you want. When you reached it press the STOP
button. Motor jogs. New BOTTOM limit is set.

Español
Además de la programación desde el control remoto, agregamos un botón de programación en
la cabeza del motor.
Ventajas y cómo funciona:
1. Empuje y manténgalo presionado hasta que el motor se despierte y gire en una dirección. El
motor ha abierto la memoria para aceptar la señal remota para el emparejamiento. Suelte el
botón blanco y presione el botón ARRIBA o ABAJO correspondiente en el control remoto.
Emparejó el control remoto y sincronizó la dirección de rotación con los comandos.
2. Cada vez que presiona el botón blanco, el motor gira en una dirección. Puede ser en sentido
del relog o contra el relog. Si el motor gira en sentido horario pero desea que gire en sentido
antihorario, suelte el botón blanco y vuelva a presionarlo rápidamente manteniéndolo
presionado. Ahora el motor gira en la dirección opuesta.
3. Cada vez que presiona el botón blanco, borra la memoria borrando cualquier control remoto
emparejado anterior y automáticamente lo abre para aceptar el nuevo control remoto. Una
característica interesante cuando recibe una llamada de servicio porque el control remoto se
perdió, se rompió o fue robado (en el caso de restaurantes o sitios comerciales) lo único que
debe hacer es obtener un nuevo control remoto y mantenga presionado el botón blanco el motor
y hasta que se despierte y gire en una dirección, presione el botón ARRIBA o ABAJO
correspondiente en el control remoto. Emparejado !! No es necesario restablecer los límites, ya
que funcionan en forma de memoria. (sin doble poder de corte)
4. En instalaciones de motores múltiples, si empareja cada unidad individualmente, cada una en
un canal separado, la programación mediante el botón blanco en el cabezal del motor le permite
tener todos los motores encendidos y emparejar cada uno individualmente (de lo contrario, si el
todos los motores están alimentados, al abrir la programación desde el control remoto, todos
responderán a usted)

Ajuste de límite:
Al presionar el botón FC, debe establecer los límites superior e inferior. Arriba siempre primero.
Cuando desee restablecer la parte superior o inferior:
No necesita ejecutar la pantalla al límite superior o inferior original. El protocolo de radio Gaposa
es flexible y le permite restablecer la parte superior o inferior desde cualquier punto de la
pantalla.
Para restablecer el límite superior:
Debe presionar y mantener presionado el botón FC y el botón ARRIBA hasta que el motor se
mueva. Ejecute la pantalla a la nueva posición de límite superior que desee. Cuando lo alcances,
presiona el botón STOP. Motor jogs. Se establece un nuevo límite superior.
Para restablecer el límite INFERIOR:
Debe presionar y mantener presionado el botón FC y el botón ABAJO hasta que el motor se
mueva. Ejecute la pantalla a la nueva posición de límite inferior que desee. Cuando lo alcances,
presiona el botón STOP. Motor jogs. Se establece un nuevo límite INFERIOR.
Other manuals for XQ50
2
Table of contents
Other GAPOSA Engine manuals

GAPOSA
GAPOSA XQ40 User manual

GAPOSA
GAPOSA XQ40 User manual

GAPOSA
GAPOSA QC400 User manual

GAPOSA
GAPOSA XQ6M User manual

GAPOSA
GAPOSA XQ40EX User manual

GAPOSA
GAPOSA XQ Auto User manual

GAPOSA
GAPOSA XQ40ER User manual

GAPOSA
GAPOSA XQ50 User manual

GAPOSA
GAPOSA QCF4 User manual

GAPOSA
GAPOSA SPLIT SQ 140S User manual
Popular Engine manuals by other brands

gunt
gunt ET 796 instruction manual

REXROTH
REXROTH HyQuip 63 Series instruction manual

MerCruiser
MerCruiser Sterndrive 4.3 MPI user manual

DANA
DANA 4360-84 parts list

Briggs & Stratton
Briggs & Stratton 83100 Operator's manual

Briggs & Stratton
Briggs & Stratton 120000 Operating and maintenance instructions