Inelco DANIA Onewheel User manual


2
General warnings for using the unit ............................................................................................................4
Disclaimer .............................................................................................................................................. 4
Intended use .......................................................................................................................................... 4
Safety instructions........................................................................................................................................5
Hazards.................................................................................................................................................. 5
Safety recommendations....................................................................................................................... 5
Description of the unit..................................................................................................................................7
Preparing the unit for operation ..................................................................................................................9
Supplied items ....................................................................................................................................... 9
Mounting the handle.............................................................................................................................. 9
Mounting the dust bag......................................................................................................................... 10
Mounting tools on grinding support..................................................................................................... 11
Adjusting the grinding angle................................................................................................................ 11
Minimizing noise and vibration ............................................................................................................ 12
Operating the unit ......................................................................................................................................13
Preparations before starting the grinding unit..................................................................................... 13
Safe operation procedures .................................................................................................................. 13
Maintaining the unit ...................................................................................................................................15
Changing the belt ................................................................................................................................ 15
Test of safety switches........................................................................................................................ 16
Cleaning & storage.............................................................................................................................. 17
Repairs & claims.................................................................................................................................. 17
Technical data............................................................................................................................................18
Declaration of conformity...........................................................................................................................19

3
Congratulations with your new Dania Onewheel grinding unit!
Dania Onewheel is a compact, low noise grinding system with integrated dust suction. Dania Onewheel
performs grinding from rough deburring to the finest precision sharpening of knives.
The core of Dania Onewheel is a rubber wheel with carefully adjusted elasticity. A sanding belt mounts
onto the wheel. When the rotation starts, the rubber expands exactly enough to firmly secure the belt
and provide a perfect grinding surface.
A special design of the surface of the wheel creates a flow of air, cooling the grinding surface, as well
as transporting the grinding dust through the perforated grinding support, the unit and out through an
exhaust tube, which can be fitted with a bag or connected to an extraction system.
Dania Onewheel’ s grinding support can be adjusted step less from 90 to 20 degrees, enabling correct
and consistent grinding results, whether the task at hand is wood or metal, a unit part or a knife.
The grinding angle is read out on the side of the unit and is adjusted in seconds with finger screws.
Dania Onewheel utilizes standard sanding belts, meaning low operating cost, high availability, and a
large assortment. One moment the operator may use grit 1000 for a knife, the other grit 60 for a piece
of wood.
We hope you will like the unit. If you have any complaints, comments, or suggestions, please, do not
hesitate to contact your local dealer or us as manufacturer directly.
Inelco A/S
Phone (DK office) +45 98 21 15 55
Phone (PL office) +48 915 788 390
Thank you!

4
General warnings for using the unit
WARNING
Before use, read the entire User’s manual. Keep this manual for future reference. When you hand
over the unit, please also hand over the manual to the new user.
The manufacturer is not liable for damages resulting from failure to comply with the User’s manual.
CAUTION
Use ear protection when grinding. Noise can damage your hearing.
Wear a breathing mask. The material in workpieces can generate harmful dust.
Wear safety googles and work gloves. Grinding may generate sparks, filings, chips, or splinters that
may be harmful.
Disclaimer
The Dania Onewheel grinding unit complies with the applicable European Union safety standards. The
manufacturer is not liable for any damage resulting from non-compliance with safety instructions,
operating instructions, legal requirements and from use other than intended. In particular, the
manufacturer is not liable for damages resulting from unauthorized changes to the unit design. The
manufacturer reserves the right to make changes at any time without prior notice.
Intended use
The Dania Onewheel grinding unit is intended for grinding of metals, wood, and other materials, excluding
harmful and hazardous materials e.g. asbestos.
It is necessary to use a sanding belt appropriate to the material being processed. It is only allowed to
use sanding belts the size given in this manual. Please contact your local dealer or the manufacturer
for advice on how to choose correct sanding belt.
WARNING
Use the grinding unit only for its intended purpose. Using the unit for other tasks or in other ways
than that described in this manual is unintended use of the unit. The manufacturer is not responsible

5
for the consequences of unintended unit use. The owner or user is responsible for any consequences
of such use, including personal injury and damage.
The unit is not suitable for wet grinding.
Safety instructions
DANGER
Failure to follow the safety instructions may cause personal injury danger, electric shock and
cause a risk of fire.
Never use a malfunctioning unit e.g. with a damaged cable, power supply, incomplete cabinet or
with disassembled covers of moving elements.
Hazards
Despite the intended use, there are hazards and risk associated with the design of the unit, e.g.:
1. Touching exposed areas of the sanding belt while unit is running.
2. Ejection of damaged parts of the sanding belt outside the unit.
3. Ejection of the processed material and its parts outside the unit.
4. Emission of the dust of the processed material, which may be harmful, especially in closed
rooms.
5. Rotational and working elements, which due to their function remain unprotected.
6. Forces occurring during grinding of the workpiece, which, if not held properly, may slide off
the sanding belt and bring your hands into contact with the sanding belt; or move violently.
Safety recommendations
1. Do not use the unit in way inconsistent with its intended use.
2. Use the grinding unit indoors only. Do not expose it to humidity, e.g. precipitation, contact
with liquids, or splashes of water.
3. Place the unit on a flat, stable surface resistant to spurious sparks.
4. Adjust the height of the base to the height of the operator and the task at hand.

6
5. Disconnect the unit from the power source when not in use.
6. Only connect the power cord to outlet equipped with an earthing system.
7. When disconnecting the unit from the power source, hold the power cord by the plug. Do
not pull on the cable.
8. A damaged power cord must be replaced with a new one at an authorized manufacturer
service centre or a specialized service point.
9. Repair of a defective unit must be conducted by the manufacturer or an authorized service
dealer.
10. The grinding unit may be used by adults only; or by minors over 16 years of age under the
supervision of adults.
11. People with limited physical, sensory, or intellectual abilities and people who have
insufficient experience or knowledge must be supervised by a person responsible for their
safety.
12. Store the unit out of reach of children.
13. If you notice any signs of malfunction, remove the plug from the socket. Contact the
authorized dealer for service or contact the manufacturer.
7
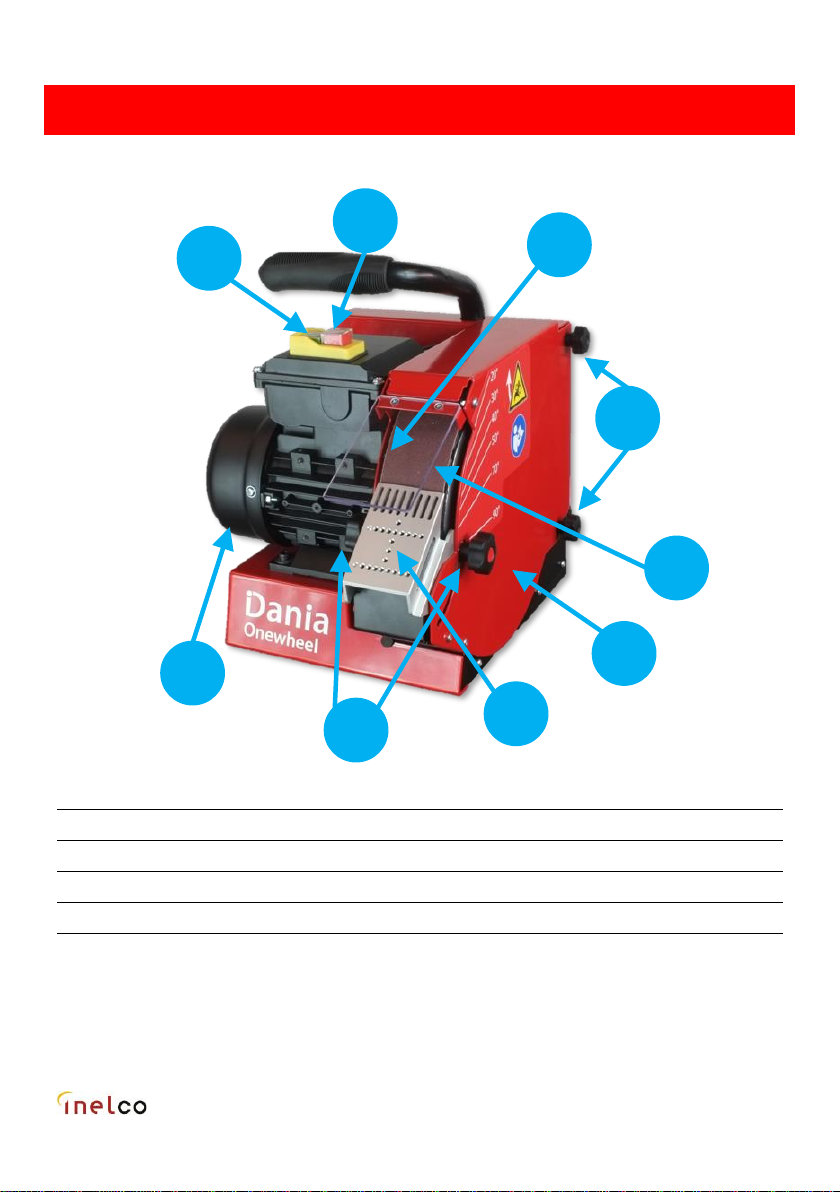
Description of the unit
#1
Grinding support
#7
Switch “On”
#2
Screws fixating the grinding support
#8
Switch “Off”
#3
Spark deflector
#9
Transport handle
#4
Belt
#10
Grinding wheel
#5
Motor
#11
Wheel cover securing bolts
#6
Cover for grinding wheel
#12
Dust exhaust
#1
#2
#3
#8
#7
#11
#5
#6
#3

8
#1
Grinding support
#7
Switch “On”
#2
Screws fixating the grinding support
#8
Switch “Off”
#3
Spark deflector
#9
Transport handle
#4
Belt
#10
Grinding wheel
#5
Motor
#11
Wheel cover securing bolts
#6
Cover for grinding wheel
#12
Dust exhaust
#4
#9
#6
#12
#10
#5

9
Preparing the unit for operation
Supplied items
When you open the box, you will find inside:
1 pc. grinding unit.
1 pc. handle incl. 2 screws and washers.
1 pc. dust bag incl. plastic strip.
1 pc. fixation tool for grinding support.
1 pc. sanding belt 50x686 mm, mounted on grinding wheel.
For additional and other types of sanding belts please contact your local dealer.
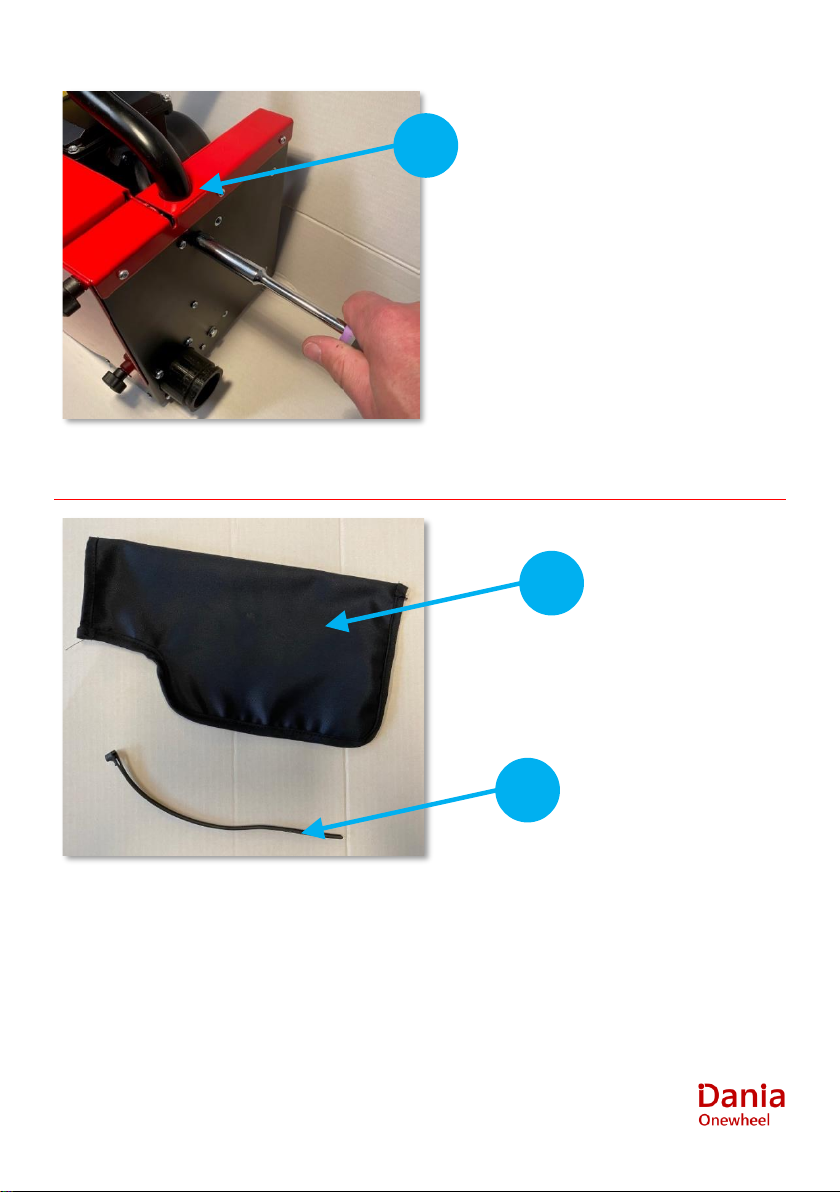
Mounting the handle
Put black handle (#15) into the hole (#16) in top of cabinet. Place two screws with washers into the
appropriate two holes in the backplate and tighten firmly tightened. Use 10 mm wrench.
#15
10
Mounting the dust bag
Take the dust bag (#13) and plastic clips (#14) and mount it on the dust exhaust (#12). Tighten the
plastic clips until dust bag is securely fastened. Empty the dust bag when bag before being half full.
#16
#13
#14

11
Mounting tools on grinding support
Use the fixation tool when you want to obtain a precise lateral (“sideways”) angle, e.g. on a chisel.
Mount the fixation tool (#17) with the small tap in one of the long holes. Mount the screw into one of
the holes in the fixing tool and tighten.
Several special tools for drills, knifes and other uses are available. Please, contact your local dealer
for further information.
Adjusting the grinding angle
Adjust the angle of the grinding support (#1) with the following procedure:
#12
#17

12
1. Turn the unit off by pressing the red “O” button or disconnecting the power plug from the
power outlet.
2. Make sure that the grinding wheel is not spinning.
3. Loosen bolts fixing the support position (#2).
4. Select the grinding angle by changing the inclination of the working support. Use the scale
on the grinding wheel cover.
5. Fix the grinding support position by tightening the fastening screws (#2).
6. Adjust the spark deflector (#3).
CAUTION
Adjust grinding angle only when the power switch is set to “Off” and the grinding wheel is not
spinning.
Minimizing noise and vibration
Recommendations for minimizing noise and vibration:
1. Make sure to place the unit on a well-supported, smooth, and horizontal surface.
2. Clean the grinding unit regularly.
3. Do not overload the unit during operation.
4. Make sure not to drop and inflict damages to the unit.
5. Switch the unit on just before starting work and switch it off immediately after finishing work.
13
Operating the unit
Preparations before starting the grinding unit
1. Make sure that mains rating corresponds to the data on the rating plate.
2. Make sure the grinding unit is disconnected from the power source. If it is connected, pull
the plug out of the socket.
3. Place the base or the worktable on a level, stable surface.
4. Adjust the height of the table or the base to the height of the operator and the type of task
being performed.
5. Place the unit in a stable position on the base.
6. Check that the working wheel of the sanding belt moves freely (#10).
7. Check that the power cord is not damaged.
8. Check whether the sanding belt needs to be replaced (#4).
9. Assess the completeness of the unit. Check that all covers of the moving parts are closed
and secured (#3, #6, #11)
10. Check that the grinding support is in the desired angle and secured (#1, #2).
11. Connect the power cable.
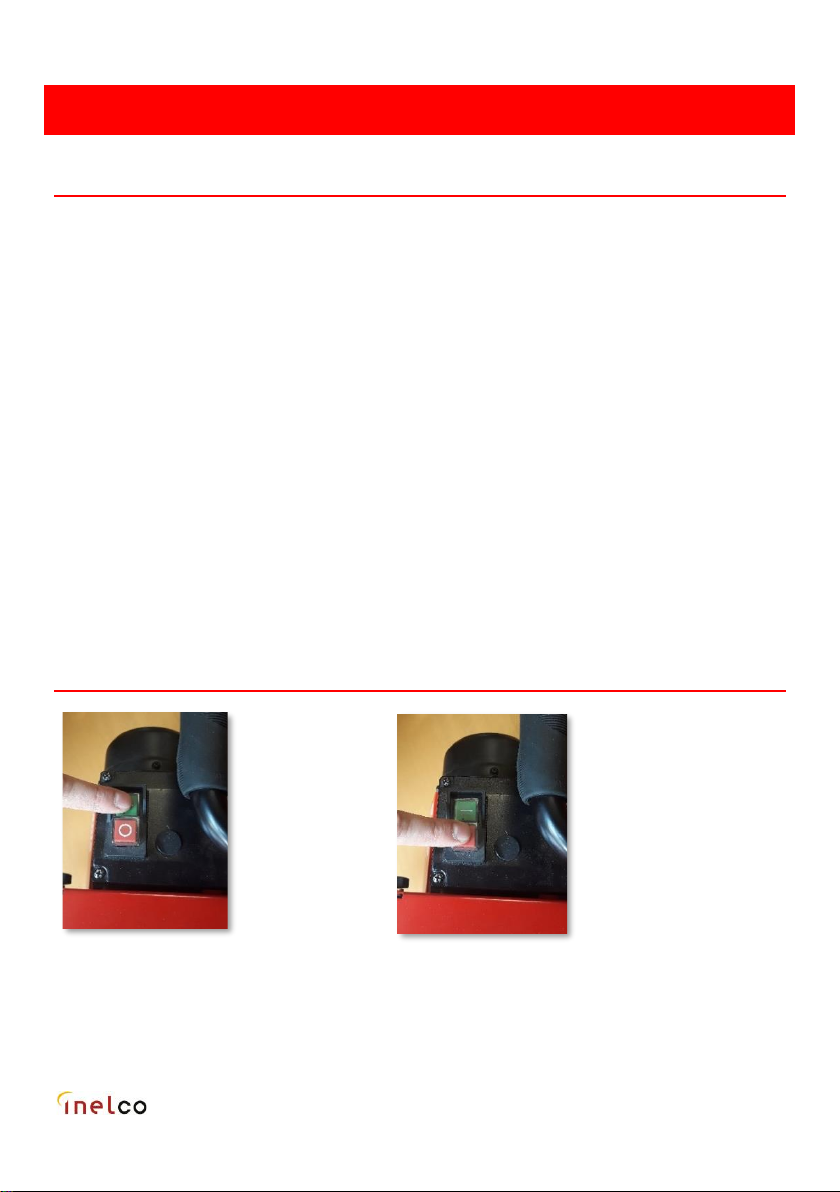
Safe operation procedures
1. Ensure that the section “Preparations before starting the grinding unit” is completed.
2. Press the power button "I" to turn the unit on (#7). Wait for the motor speed to stabilize at
the maximum level after turning on the unit. Now you can start grinding.
Switch “ON”
Switch “OFF”

14
3. Place the workpiece on the grinding support. Slowly move it towards moving sanding belt,
bringing the workpiece into contact with it.
4. For best results, slide the workpiece to the right and left over the support, keeping the
surface being sanded in contact with the grinding belt. This will allow the sanding belt to
wear evenly.
5. Periodically check the grinding result to be able to decide whether to finish grinding. Do not
press the workpiece too tightly against the sanding belt. This will result in increased load on
the drive motor, a decrease in the belt speed, its uneven wear, and the possibility of
damaging the sanding belt.
6. Press the power button "0" to turn the unit Off (#8) before leaving the unit.
WARNING
First, place the workpiece on the grinding support, not touching the rotating belt. Hold the
workpiece firmly securing solid contact to the grinding support. A workpiece held too loosely
may slip off the grinding rest in s violent way, possibly hitting the operator, or damaging belt or
workpiece.
Then slowly slide the workpiece towards the belt, carefully controlling the friction between the
workpiece and the belt. Do not press the workpiece against the belt with excessive force.

15
Failure to follow this procedure may harm the belt, the workpiece or cause violent movements of
the workpiece, dangerous for the operator.
CAUTION
The motor of the grinder can be continuously loaded with the nominal power (180W) for 60 min.
After 60 minutes, the unit should be turned off until it has cooled down to ambient temperature.
Continued operation may damage the motor and may be hazardous.
Maintaining the unit
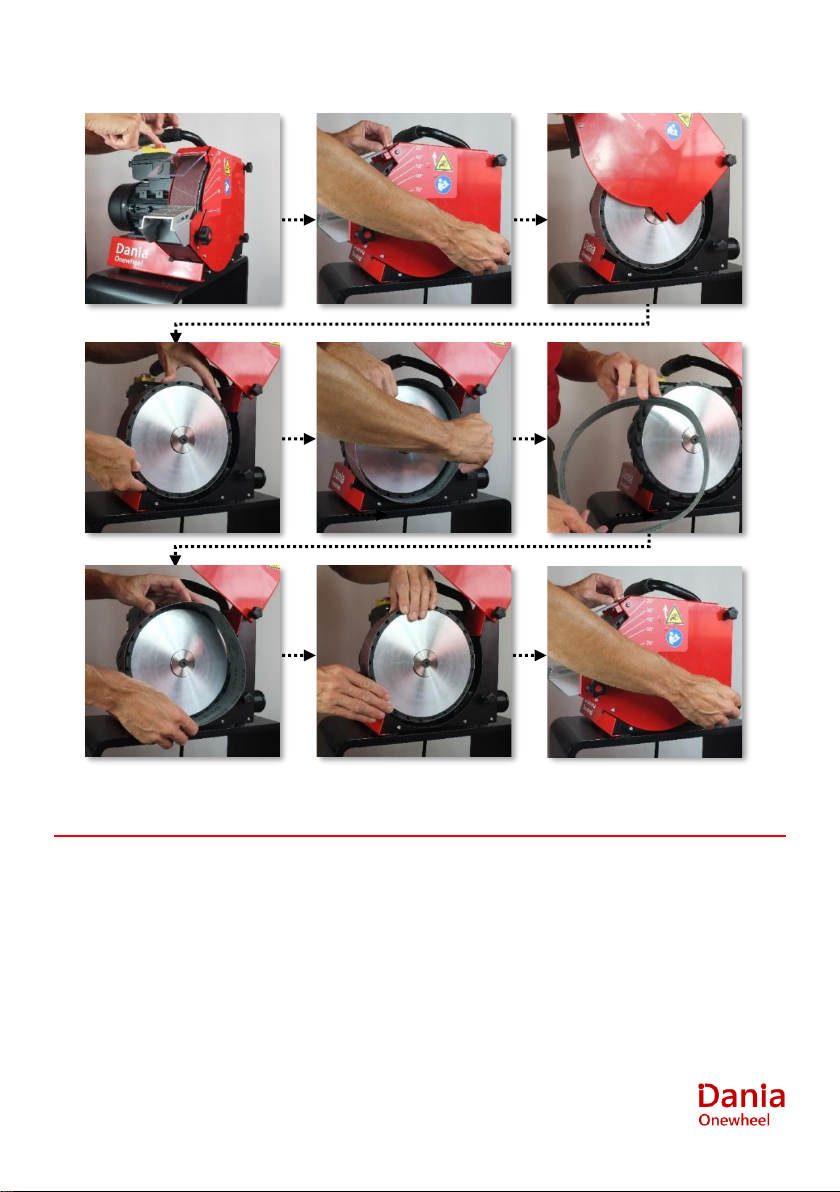
Changing the belt
1. Turn the unit off by pressing the red “O” button or disconnecting the power plug from
the power outlet.
2. Make sure that the grinding wheel is not spinning.
3. Undo the screw securing the grinding wheel cover (#11).
4. Uncover the grinding wheel by moving the cover (#6) to the vertical position.
5. Take the sanding belt off the grinding wheel by pulling it perpendicular to the wheel
plane.
6. Do not use cutting tools to cut the sanding belt. This may damage the surface of the
wheel and cause hazards!
7. Use only a 50 x 686 mm sanding belt. Using a different type may be hazardous!
8. Slide the new sanding belt over the wheel, making sure that the belt is centred on the
rubber surface of the wheel.
9. Check that the wheel moves freely.
10. Close the grinding wheel cover to the horizontal position.
11. Secure the cover by tightening the 2 securing bolts (#11)
16
Test of safety switches
On a regular basis, test the safety switches in the following way.
Test 1:
1. Turn on the unit by pressing the green button marked “I”.
2. Remove the mains power from the unit, e.g. by pulling the plug out of the socket.
3. Restore the power to the unit.

17
4. Check that the motor does not start once power is restored. If it does, do not use the unit
and contact your local dealer.
Test 2:
1. Turn on the unit by pressing the green button marked “I”.
2. Carefully open the grinding wheel cover, making sure not to touch any moving parts.
3. Check that the power to the motor is cut off. If not, do not use the unit and contact your
local dealer.
Cleaning & storage
CAUTION
Disconnect the unit from the power source before cleaning or maintenance.
Keep the unit clean.
Clean the unit periodically blowing with compressed air at low pressure. While doing this, remember
about the safety precautions, including protecting your eyes from being sprinkled with filings.
Clean the housing with a damp cloth with a mild detergent. Leave the cleaned unit to dry completely
before using it again. Be careful - not to let water get inside the unit to be cleaned.
Do not use aggressive cleaning agents, including solvents and abrasive agents.
Keep the unit out of reach of children.
Use the original packaging or replacement packaging for storage.
Store the unit in a dry place.
Repairs & claims
If you experience any faults on the unit, please contact your local dealer for advice or repair.
For warranty repairs please hide receipt from your purchase and serial numbers on type label attached
under the bottom of the unit and inform this to your local dealer or manufacturer directly.
The repair of the grinding unit and replacement of the damaged power cord should be entrusted to an
authorized dealer or manufacturer’s service.

18
Technical data
Rated voltage
230V/50Hz
Power rating
180W S2 60min
Duty Cycle Rating
S2 60 min (short-time duty)
Idle speed
1380 rev/minute
Grinding wheel
Ø218 mm
Grinding belt linear speed
940 m/minute
Sanding belt size
50 x 686 mm
Pos. weight
13 kg
Sound pressure level LpA
80 dB(A)
Uncertainty KpA
3 dB(A)
Sound power level LWA
95.0 dB(A)
Uncertainty KWA
3 dB(A)
Vibration emission value ah
< 2.5 m/s2
Uncertainty K
1.5 m/s2
19
Declaration of conformity
18kW/2020
20 designation
We:
Company name: Inelco Polska Sp. z o.o.
Address: Pyrzycka 44, 74-240 Lipiany, Poland
hereby declare that the product:
Product name; Onewheel
Product type: Grinder
is in conformity with:
Low Voltage Directive 2014/35/EU (LVD)
Regulation of the Minister of Economy, Labour and Social Policy of 12 March 2003 on essential requirements for
electrical equipment (Journal of Laws no. 49/2003, pos. 414).
and
Electromagnetic Compatibility Directive 2014/30EU (EMC)
Regulation of the Minister of Infrastructure of 2 April 2003 on conducting conformity assessment of apparatus with the essential
requirements regarding electromagnetic compatibility and the method for its marking (Journal of Laws no. 90/2003, pos. 848).
Harmonised standards applied:
PN-EN 60335-2-30:2004
Household and similar electrical appliances. Safety. Particular requirements for room heaters.
PN-EN 55014-1:
Electromagnetic compatibility. Requirements for household appliances, electric tools and similar apparatus. Emission.
EN 55104-2
Electromagnetic compatibility. Requirements for household appliances, electric tools and similar apparatus. Immunity requirements.
PN-EN 610003-2: 2004
Electromagnetic compatibility (EMC). Limits. Limits for harmonic current emissions (equipment input current ≤16 A per phase).
PN-EN 610003-3:1997/A1:2002 (U)
Electromagnetic compatibility. Limits. Limitation of voltage changes, voltage fluctuations and flicker in public low-voltage supply
systems, for equipment with rated current ≤16 A per phase and not subject to conditional connection (amendment A1).
Last two digits of the year in which the CE marking was affixed: 20
This EC declaration of conformity is issued under the sole responsibility of the manufacturer
Manufacturer: Full name: __Søren Rødbro____________
Signature: __________________________
Date: ______1 Sept. 2020______________

Table of contents
Other Inelco Grinder manuals


Popular Grinder manuals by other brands


Universal Tool
Universal Tool UT8707K General Safety Information & Replacement Parts

Makita
Makita 9005BY parts manual

Makita
Makita 9561CR instruction manual

Atlas Copco
Atlas Copco G2408-115 Original product instructions

Makita
Makita GA7001L instruction manual

Baileigh Industrial
Baileigh Industrial DG-500HD Operator's manual


