iNels LARA User manual

LARA & MUSIC
IN THE SWITCH
KIT FOR CONROLLING MUSIC, WHICH
PERFECTLY FITS IN YOUR HOME´S INTERIOR.
P
4
0
MUSIC AND INTERNET
RADIO STATIONS PLAYER
IN THE SIZE OF THE SWITCH
www.inels.com/kits
User‘s manual 2.0

EVEN YOUR HOUSE
CAN BE „HEARD“!
+420 800 100 671
TECHNICAL SUPPORT
Would you like some help?

LARA is a music an
d
internetra
d
iop
l
ayer. We
h
ave registere
d
40
f
avorite Czec
h
radios stations as presets stations, but you can easily chan
g
e it usin
g
confi
g
u-
rator. LARA plays the music stored in the NASA stora
g
e or in the external sour-
ce (p
h
one, MP3 p
l
ayer) connecte
d
t
h
rou
gh
ca
bl
e on t
h
e
f
ront pane
l
o
f
d
evice.
Inbuilt am
p
lifier allows direct connection of s
p
eakers (in the same LOGUS 90
desi
g
n) or allows connection of external in-wall or ceilin
g
speakers.
RADIO &MUSIC
IN THE SWITCH
KIT FOR CONROLLING MUSIC, WHICH PERFECTLY FITS
IN YOUR HOME´S INTERIOR.
Thank you for buying the kit RADIO &MUSIC IN THE SWITCH.
www.inels.com/lara
Another kits and additional units can be found on the last pages of the manual
or at our webpage.
T
h
is
k
it wi
ll
open up new
h
orizons
f
or
h
ome automation. It can
b
e exten
d
e
d
a
ny time you need and accordin
g
to your wishes. Depends on you if you want
to
fi
nd somethin
g
new and up
g
rade your current installation.

4U´ 2.0
USER´S MANUAL CONTENT
Kit content ...............................................................................................................................................................................................................................
Installation ................................................................................................................................................................................................................................
Control .........................................................................................................................................................................................................................................
Additional setup ...................................................................................................................................................................................................................
Lara Configurator.................................................................................................................................................................................................................
Setting up radio stations ..............................................................................................................................................................................................
Additional setup - Lara Configurator .................................................................................................................................................................
Device settings .....................................................................................................................................................................................................................
Additional setup ..................................................................................................................................................................................................................
Remote controller ..............................................................................................................................................................................................................
Technical parameters of LARA ...............................................................................................................................................................................
Accessories .............................................................................................................................................................................................................................
The overview of other kits ........................................................................................................................................................................................
Virtual kits ...............................................................................................................................................................................................................................
5
6
8
10
13
14
16
17
18
19
20
21
24
27
L
E
G
E
N
D
:
LARA-NAS a
pp
lication
-
application for controllin
g
the music via a Smartphon
e
Network
cable
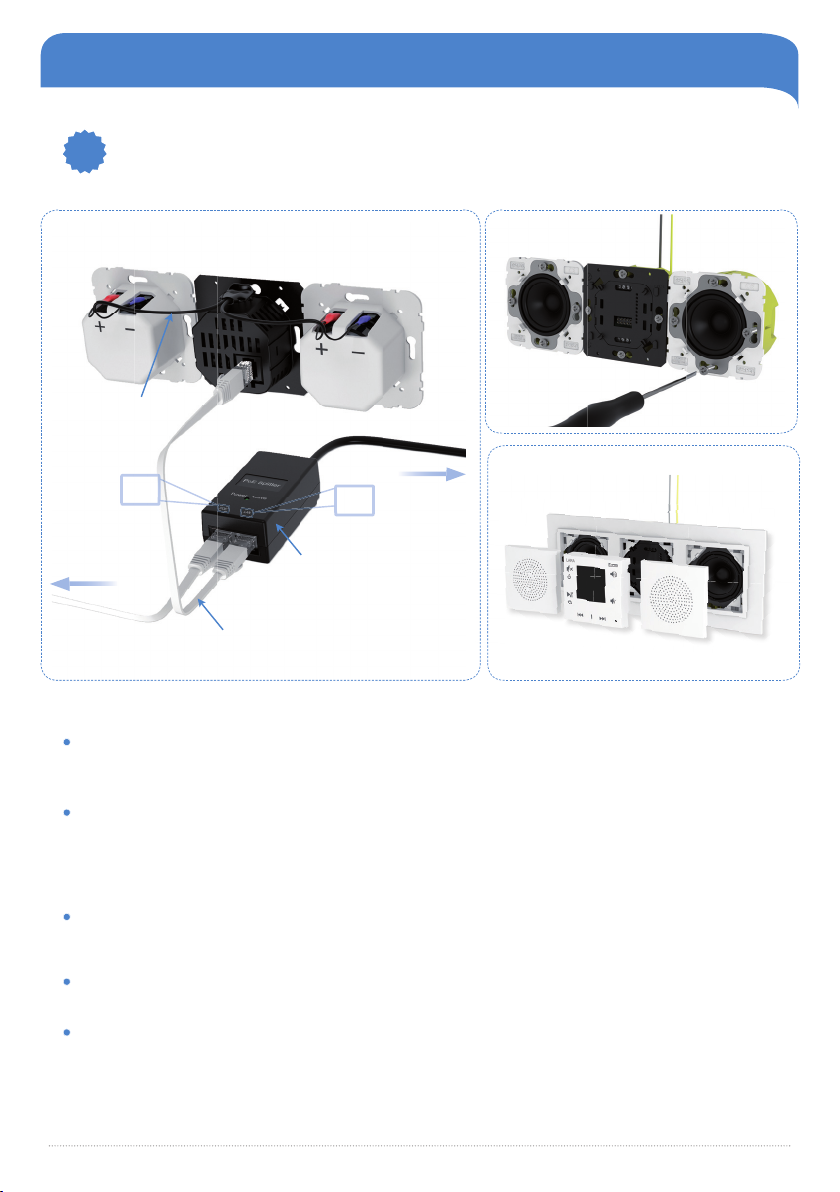
- LAN cable for connection LARA PoE ada
p
ter
L
AN (Loca
l
Area Et
h
ernet, com
p
uter networ
k
) -
c
om
p
uter ca
bl
es (UTP)
d
istri
b
ute
d
t
h
rou
gh
out t
h
e
b
ui
ld
in
g
an
d
connecte
d
to t
h
e switc
h
. It connects computers an
d
ot
h
er IP
d
evi
-
ces to
g
et
h
er t
h
at are connecte
d
to t
h
e networ
k
.
PoE (Power Over Et
h
ernet, power supp
l
y t
h
rou
gh
a networ
k
ca
bl
e) - ena
bl
es to supp
ly
termina
l
d
evices via t
h
e LAN ca
bl
e. T
h
rou
gh
a
d
apter (6191) connecte
d
to LAN ca
bl
e or t
h
rou
gh
switc
h
w
h
ic
h
h
as an in
b
ui
l
t PoE
(
6605
).
Switc
h,
router
-
a
b
ox w
h
ic
h
connects LAN ca
bl
es to
g
et
h
er an
d
provi
d
es communication
b
etween
d
evices w
h
ic
h
are connecte
d
to t
h
e router; router a
ll
ows
y
ou to s
h
are wire
l
ess In
-
ternet to LAN networ
k
IP (Internet Protoco
l)
- it is a
d
evice protoco
l
operating in LAN networ
k
s; eac
h
d
evice
h
as
its own unique IP a
dd
ress (e.
g
. 192.168.11
)
WiFi (Wire
l
ess Fi
d
e
l
ity) - wire
l
ess com
p
uter networ
k
(WLAN)
WiFi
b
ri
dg
e
-
converter t
h
at a
ll
ows
y
ou to convert wire LAN connection to WiFI (5210
)
1)
2)
3)
4)
5)
6)
7)
8)
9)
10)
11)
12)
13)
14)

5
../
USER´S MANUAL CONTENT
MUSIC PLAYER IN THE SIZE OF THE SWITCH - LARA
Speakers 2“ Speaker cover
LARA Radio - white
3 frame - white
LARA Remote
controller
LARA Speaker
cable
Network cable,
20 cm
LARA PoE adapter
(21581)
(6508)
(5209)
(6702)
(LARA-R/BR)
(90930 TBR)
(90710 TBR)
(6191)

6U´ 2.0
THE EXAMPLE OF INSTALLATION
In-wall speaker Installation box
Ceiling speaker
Surface
mounting
Flush mounting
(adapted to be
mounted
inside the wall)
Box for surface mounting
1
1
2
23
4
3
4
LARA - can be mounted inside your wall (installation box) or offers a surface mountin
g
o
p
tion. You can use the installation boxes mentioned in the Section “Accessories”.

7
../
The description of installation
INSTALLATION
1.
The back of LARA player is installed into an installation box (e.g. KU). We recommend a box which
allows you to mount devices with greater depth. Installation boxes can be found at eshop.elkoep.com.
To terminals OUT +/- OUT +/- you connect speakers cables (Fig.1). To terminals LINE OUT L, LINE OUT R,
GND you can connect input to the external amplifier. Plug a network cable into connector RJ45 (on LARA).
Using screws fix a device to the installation box (Fig. 2). The upper part of music player should be snapped
into the frame (LOGUS90 design) - (Fig. 3).
The upper part of the player with frame should be snapped to the bottom of the player. Be careful to avoid
damaging the connectors.
Connect the other end of the network cable via PoE adapter to Wi-Fi router switch (Fig. 1).
The system information will be displayed on the player screen once powered. After about 5 seconds, the
main screen of the player appears.
ROUTER
POWER
SUPPLY
230 V
Fig. 2
Fig. 3
Fig. 1
POE LAN
SPEAKER
LARA
SPEAKER
SPEAKER
CABLE
NETWORK
CABLE
POE
ADAPTER

8U´ 2.0
CONTROL
Long
press
Multiple
press
Short
press
LARA has a DHCP, what means that LARA automatically assigns itself an IP address from
the range of your network settings. In the case of other network settings please contact our
technical support or your Internet provider.
IP address of LARA can be changed - see page 10.
IP
address
01.01.2013 12:54
NASTAVENY CAS:
00:00
STANICE:
Budík
HLASITOST: 30%
STAV: VYPNUTO
Radio stations selection
(To choose a radio station
please press PAUSE, then
switch the radio station and
press PLAY).
OFF/ON
Mute
Pause / Play
Settings
Volume +
Volume -
01.
01.
201
201
201
3
3
3
12
12
12
:54
4
:54
:54
NAS
NA
NA
NA
NA
N
N
N
N
NA
N
N
N
N
N
N
N
N
T
T
00
0
0
0
0
0
0
0
STA
STA
N
N
Bu
d
d
HLA
S
S
S
S
S
S
STA
S
ST
ST
T
T
S
T
ST
S
S
ST
S
T
T
V:
:
:
:
VYP
VYP
VYP
VYP
VYP
NUT
NUT
UT
UT
T
NUT
NUT
NUT
NUT
O
O
O
O
O
O
O
O
O
}
}
}
}
}
.2013
12:54
TAV
AV
AV
AV
A
AV
A
A
A
AV
A
ENY
ENY
ENY
NY
N
NY
Y
CA
CA
CA
CA
CA
A
C
C
A
CA
C
C
C
CA
A
C
S:
S
S
S
S
0
:
:
:
:
0
0
0
0
0
0
0
0
0
0
0
0
0
0
0
0
0
0
0
0
0
0
0
0
0
0
0
0
0
0
0
IC
C
C
C
C
C
C
C
C
E:
E:
E:
E
E:
E
E:
E
:
E
E
:
dí
í
í
í
k
k
k
SIT
T
T
T
T
I
T
T
T
T
T
OST
OST
OST
OS
O
O
O
OS
O
S
S
:
:
:
30%
30%
30%
:
VYP
VYP
V
V
VY
VYP
VY
VY
VYP
Y
P
P
VYP
V
Y
VYP
Y
VY
V
VYP
V
VY
VYP
VYP
VYP
V
NU
N
NU
NUT
N
U
NU
N
NU
U
U
O
To return to the main screen please press
repeatedly the icon.

9
../
Activating an external audio input
1.
The AUX IN input serves to connect external music source (mobile phone, mp3 player) through cable.
In this mode, the player serves as audio amplifier. If the input is activate, the volume gets set to 100%
and you can control the volume just on the connected external music source.
01.01.2013 12:54
Radio stations
01.01.2013 12:54
AUX input
01.01.2013 12:54
AUX input
100%
Lock buttons:
By long press on the both arrow keys the touch screen will be
locked. The locking is indicated by the symbol on the display.
In the same way the display is unlocked.
There are 40 preset radio stations in LARA radio, the overview of radio station you can find on
page 15.
an
d
yo
u
ca
n
c
External source
MP3, iPod, phone
CONTROL

10 U´ 2.0
ADDITIONAL SETTINGS
The setting up a network2.
01.01.2013 12:54
LAN
01.01.2013 12:54
Radio stations
01.01.2013 12:54
Settings
01.01.2013 12:54
IP ADRESA:
10.10.3.171
MASKA PODSITE:
255.255.255.0
BRANA:
10.10.3.254
PORT:
61695
01.01.2013 12:54
IP ADRESA:
10.10.3.171
MASKA PODSITE:
255.255.255.0
BRANA:
10.10.3.254
PORT:
61695
01.01.2013 12:54
Do you want to
save changes?
<< NO >>
01.01.2013 12:54
Language
LARA has a DHCP, what means that LARA automatically assigns itself an IP address from the
range of your network settings. In the case of other settings of your network, you can change
LARA parameters according to the procedure described below.
Language selection1.
01.01.2013 12:54
English
01.01.2013 12:54
English
01.01.2013 12:54
English
01.01.2013 12:54
Radio stations
01.01.2013 12:54
Settings
01.01.2013 12:54
Language

11
../
ADDITIONAL SETTINGS
Audio Output Settings
3.
PA output to the speakers connected to terminals OUT L, R OUT
Line output to terminals Line OUT L, Line OUT R intended for external amplifier
PA+Line output to both terminals simultaneously
(The default audio output is PA)
01.01.2013 12:54
Radio station
01.01.2013 12:54
Settings
01.01.2013 12:54
Language
01.01.2013 12:54
Audio output
01.01.2013 12:54
PA
01.01.2013 12:54
PA+Line
The display settings - Illumination time of the display4.
It is an illuminating
(backlit) time of the
display. After a peri-
od of inactivity, the
display is turned off.
To activate, touch any
button.
01.01.2013 12:54
Radio stations
01.01.2013 12:54
Settings
01.01.2013 12:54
Language
01.01.2013 12:54
Display
01.01.2013 12:54
SWITCH OFF DISPLAY:
2 minutes
<< >>
01.01.2013 12:54
SWITCH OFF DISPLAY:
5 minutes
<< >>

12 U´ 2.0
ADDITIONAL SETTINGS
Device reset to the factory default setting
5.
01.01.2013 12:54
Radio stations
01.01.2013 12:54
Settings
01.01.2013 12:54
Language
01.01.2013 12:54
Factory reset
Factory rst
5
Factory rst
0
Long press on the hidden button (>10 s)
01.01.2013 12:54
Reset device?
<< NO >>
01.01.2013 12:54
Reset device?
<< YES >>
Restart
6.
01.01.2013 12:54
Jazyk
Short press on the hidden button (<10 s)
Init DECODER... OK A
Init BUFFER...... OK
Init DTF............. OK
Load Settings... OK
Load Stations... OK
Load MAC.......... OK
Load Alarm........ OK
Init ETHERNET..
MAC: 00:0A:59:F2:25:87
FW: 2.2.001
After resetting the player, the default IP address is set to 192.168.1.10 and all saved stations will be
deleted. There are two ways of resetting:
a)
b)
Used to restart without deleting all set data.
The same function has a disconnection
(connection) of LAN cable or PoE adapter.

13
../
PROGRAM LARA CONFIGURATOR
LARA Configurator can be downloaded from web page:
http://www.elkoep.com/download/software/
download here
LARA Configurator
Thanks to LARA Configurator you can:
set sign-in info
set parameters of network connection
set parameters for automatic time synchronisation
edit the Internet radio list
set iMM parameters of audiozone
firmware update of LARA Radio
remotely control LARA Radio
LARA Configurator can simply run without installing the operating systems Microsoft Windows XP,
Windows 7 and Windows 8. The condition that allows starting the program is support Microsoft. NET
Framework 4 or its installation (free download at www.microsoft.com).

14 U´ 2.0
RADIO STATION EDITING
Tab „Station List“ is used for the complete management of the list of Internet radio saved on your LARA
Radio.
EDIT THE STATION: In the Tab „Edit stations“ you can add a new radio station or modify existing sta-
tions in the list.
LIST OF RADIO STATIONS: It is possible to store up to 40 presets into the list for music network
streams. The current version of LARA radio supports SHOUTcast streams, ICEcast streams with supported
file formats MP3, AAC and OGG which are used for webcasting in most cases.
CONTROL TOOLS: After successful loading stations along with overall device settings, it is possible to
view the list of radio stations and change their order. For sorting and removing items from the list, use the
appropriate control tools on the right side of the list.
IMPORT/EXPORT THE LIST: These functions allow you to easily back up the list of preset radio sta-
tions by saving the file.
TO ADD A NEW RADIO STATION:
Run LARA Configurator on your PC, which is on the same network as LARA radio, then click on
LOAD SETTINGS.
a) Click the button ADD
b) Station name
c) Check the box „automatic filling“
d) Insert a source link of selected radio from www.radiosure.com/stations to box no.
e) Click OK, warning message warns you of a result of automatic processing.
f) To save a new radio station in the list, use the button SAVE.
Note: Adding a radio station requires an active Internet connection.
Boing
Box UK Radio
Dainem radio
Direct FM
40 from 40

15
../
RADIO STATION EDITING
1.FM AMERICAS
1.FM
1DANCE.FM
89.0 RTL
100HITZ
181.FM LITE
181.FM MIX
181.FM ROCK
181.FM
ABC 80s
ALL HITS STATION
BOING
BOX UK RADIO
DAINEM RADIO
DIRECT FM
DUBLINS KISS
GOT RADIO
HITS 80s
KALMAN RADIO
KISS HITS
KISSFM ROMANIA
LOLLIRADIO
MEGAHITRADIO
OLAFM
POLSKASTACJA
POLSKIE RADIO
RADIO CONTINU
RADIO FREJUS
RADIO FUNKY
RADIO INTERNATIVA
RADIO JUNIOR
RADIO LIVE ROMANIA
RADIO MIL80
RADIO SUNCHINE
RADIO TARAF
RADIOUP
REAL DANCE RADIO
RMN RADIO
TDI RADIO
THE MIX RADIO
THE LIST OF THE PRESET STATIONS
BIT RATE
Quality Transmission
A bit rate is the number of bits that are conveyed or
processed per unit of time. The bit rate is quantified
using the bits per second unit (symbol bit/s).

16 U´ 2.0
ADDITIONAL SETTINGS - LARA CONFIGURATOR
Run LARA Configurator on your PC, which is on the same network as LARA radio, then click on
LOAD SETTINGS.
ADMIN LOGIN: In the dialog box, please enter the login information. The default setting is - admin:
„admin“ and password: „elkoep“. In the case of invalid data, it is unable to continue with loading the LARA
Radio settings.
LAN PARAMETERS: In the dialog box, it is necessary to enter the IP address of connected LARA RADIO.
You can obtain the IP address of connected device using function „Search a device“. Within a few seconds the
function „Search a device“ will find all LARA radio connected to a network. In the dialog box „Search a device“
there is a list of all devices. Mark the required device and press button „Select“ - then the Configurator is ready
to load the device settings with chosen IP address.
THE DEVICE INFORMATION: The Tab „The device information“ displays the status of connection, login
and FW version of LARA Radio. The status of connection does not depend on a successful login. If the device is
properly connected to the network, the status „Connected“ appears. If all of your login information is correct,
you‘re able to log in successfully.
THE DEVICE INFORMATION: Information about device and program including hyperlinks to the manual
and the data sheet.
LOAD SETTINGS: Button „Load settings“ used to save settings to LARA Radio.
SAVE SETTINGS: The button „Save settings“ is used to store the full settings to the LARA Radio.
REMOTE CONTROL: Using „Remote Control“ in the app LARA Configurator, the function of a configured
device can be verified easily and quickly.
The function „SEARCH DEVICES“ will find all LARA devices connected to network in a few seconds. In the
dialogue box „Search for a device in the LAN network“ there is a list of all devices found on the network. By
marking the required device and pressing the button „Select“ the configurator is ready for loading the settings
of device with the chosen IP address.
...

17
../
THE DEVICE SETTINGS
ADMINISTRATOR LOGIN: To change your login information please enter your new login information in
the text boxes. The password confirmation is required.
LAN PARAMETERS:
To change connection parameters, please select the „DHCP“ (automatically assign IP address by DHCP
server) or „Static IP address“.
When selecting a static IP address, please enter the required address, subnet mask and default gateway in
the text boxes.
IP address: Enter a new IP address of the device in dotted decimal notation (default IP Address 192.168.1.10).
The default subnet mask: 255.255.255.0
Gateway: Setting the local network gateway.
DATE AND TIME:
IP address of the time server is preset from the factory.
SNTP server: If necessary, enter the IP address of another time server that supports SNTP protocol.
Time Zone: Select the time zone in the place of LARA Radio installation to display the correct times.
Winter / Summer clock changes can be done using the control tool „Summer time“.

18 U´ 2.0
THE ADDITIONAL SETTINGS
FW update2.
To update Lara Radio FW it is necessary to download the update file with the extension „* .lfw“ from the
webpage http://www.elkoep.com/download/software/.
TO OPEN A FILE: Using the button „ open file file“ the dialog box to search and select the update file
will appear on your screen. After a file is opened, the content checking is performed and user is informed
about the results. If you choose the correct file, the FW version is displayed.
FW UPDATE: Pressing the „UPDATE FIRMWARE“ button causes the update to be started, the course
is also graphically depicted. If you load a damaged or an invalid file, the update will fail and it is necessary
to repeat it with the valid update file.
Functions1.
Functions of IMM audio zones:
IMM audio zone: function „iMM audio zone“ can be activated/deactivated using the control tool.
IP server: enter a IP address of iMM server in dotted decimal notation.
Note: iMM server is used to connect almost all technologies at home with intelligent electro-installation
iNELS BUS System.
Used for already installed iNELS system, where LARA radio serves as Audio zone player.

19
../
LARA TECHNICAL PARAMETERS
Control/settings
Remore control:
Ethernet communication:
IR controller (included in the package)
via PC setup and communication SW LARA configurator
Front panel: Touch buttons
RESET button: device reset / reset to factory settings
Communications Interface: 0/100 Mbps
Max. UTP cable length with PS*: 50 m
Connector: RJ45
Type: color OLED
128 x 128 pixels
Visible area:
Resolution:
26 x 26 mm
Min. power:
Max. power:
1.4 W
26 W
Power supply: POE 24V DC/1.25 A
Parameters of power supply:
Ethernet interface
Display
Supported file formats for data
transfer: mp3, ogg, acc
Amplifier: The Class D stereo with digital output control
Max. power amplifier: 2 x10 W/8
Amplifier: 3.5 stereo jack
terminals LINE OUT (use for external amplifier)
Audio input 2:
Audio input 1:
terminals out L/out R (speaker output of integrated amplifiers)
Screw terminal: 0.5 - 1 mm2(audio outputs)
Connection:
Amplifier parameters:
Inputs / Outputs:
Other information:
Overvoltage category:
Pollution degree:
IP 20
II.
Operating temperature: 0 .. + 55 °C
Installation: into an installation box
Frame - plastic:
Frame - metal, glass, wood, granite:
85 x 85 x 46 mm
94 x 94 x 46 mm
Weight: 87 g (plastic frame)
Note: * Power supply
Dimension:

20 U´ 2.0
ACCESSORIES - SPEAKERS AND CABLES
PICTURE DEVICE DESCRIPTION ORDER CODE
AUX CABLE LARA (LARA CINCH CABLE)
Switching stabilized power supplies with fixed output vol-
tage, intended for mounting into an installation box (e.g.
KU-68). PSB-10-24 - stabilized power supply 24V/10 W.
POWER SUPPLY (PSB-10-24)
AUX CABLE LARA (LARA AUDIO CABLE)
Speaker is suitable for the installation in suspended cei-
lings and hollow walls. Mounting hole diameter 143 mm,
Power 15W, 32speaker impedance.
CEILING SPEAKER
75023
CMF
Two-way speaker intended for mounting in a ceiling
or on the walls: Power 15W, 32 speaker impedance,
dimensions 270x183x37 mm. Color: White
SURFACE SPEAKER
75106
CBR
Two-chamber NAS server with the function of hosting,
sharing and data security.
NAS EXTERNAL STORAGE
4378
6704
7212
5208
Used to connect LARA with external music source (smart-
phone, mp3 player). Length 20cm terminated with 2x ste-
reo jack 3.5mm.
Used to connect LARA with exter. amplifier.Reduction 4pinfrom
LARA LINE OUT to 2x CINCH plug into amplifier, length 2x20 cm.
Used to connect LARA with external amplifier. Reduction 4pin
from LARA LINE OUT to 2x CINCH plug into amplifier.
Flat white LAN cable CAT5, length 1 m, terminated with 2x
RJ45 plugs.
NETWORK CABLE, 1 M
6700
Flat white LAN cable CAT5, length 20 cm, terminated with
2x RJ45 plugs.
NETWORK CABLE, 0.2 M
6702
Table of contents