inergy Flex 1500 User manual

FLEX USER MANUAL v 1.2
1. When you unbox your Flex Modular
System, PLEASE DO NOT throw away
the packaging. It may come in handy
down the road in case of damage from
shipping or handling, or any issues
requiring a return.
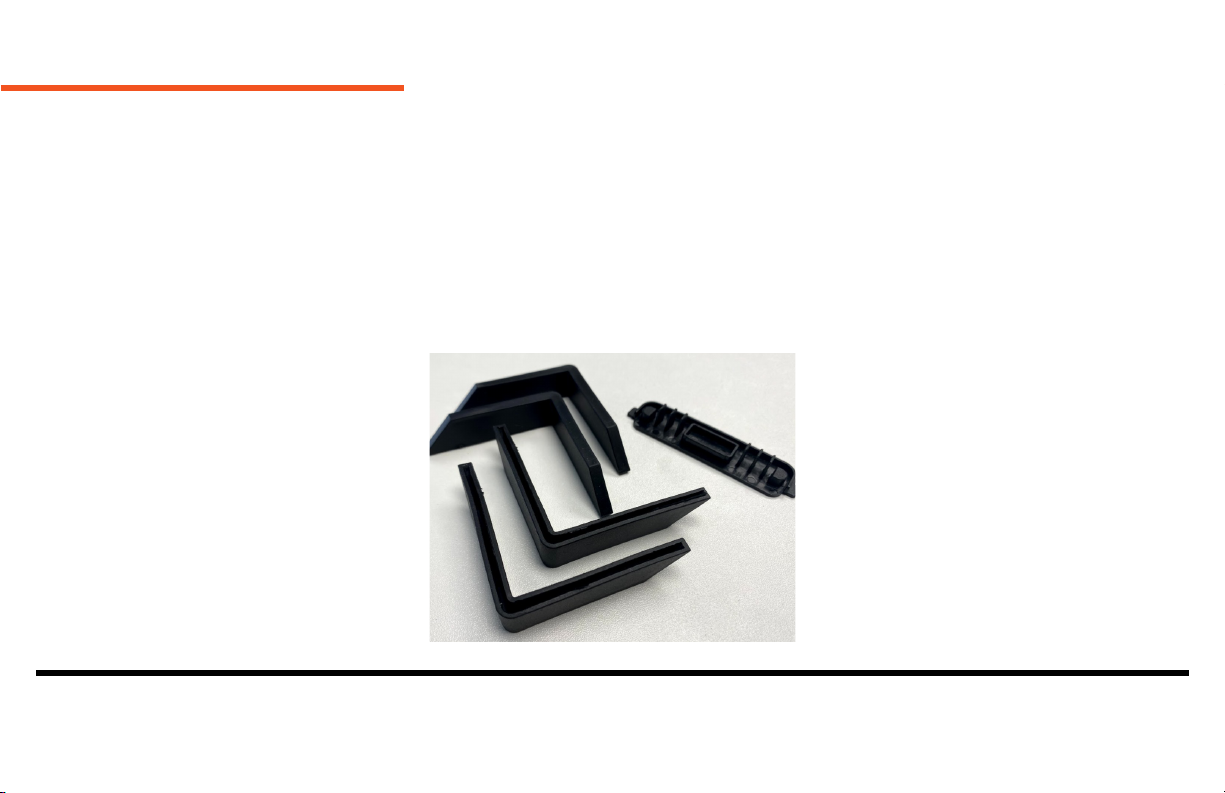
2. Before stacking your Flex modules
together, remove the plastic protectors
from the large connector on the bottom
of each module and the foot protectors
from all but the bottom module. These
protectors (see right) prevent damage in
shipping and are removable to allow the
modules to stack properly.
DO NOT attempt to stack the Flex
modules with these protectors in place.
Doing so may cause damage to the
connection points.
You can use these protectors on the
bottom module in your stack to protect
fragile surfaces, but be aware they are
designed to be removed and may fall off
on their own. If you choose to afx them
permanently to one module, be aware
that module will always need to be the
bottom module of your Flex system.
3. Next, charge your Flex Modular
System to 100% by plugging a Standard
Wall Charger (included) into the DC port
on the left side of your Flex Battery.
For more pro tips on how to keep your
battery in the best shape possible, see
the Flex Battery section of this manual.
For instructions on connecting multiple
Flex Batteries together, see Using
Your Flex system with Multiple Flex
Batteries.
4. 4. When your Flex Batteries are fully
charged, plug a device into each output
to make sure that nothing was damaged
in shipping and handling.
5. Keep your Flex modules connected
together as much as possible, so the
batteries remain equalized.
01
FIRST THINGS FIRST

FAILURE TO FOLLOW THE ABOVE SAFETY TIPS MAY RESULT IN PERMANENT DAMAGE TO YOUR FLEX MODULAR
SYSTEM, RISK OF FIRE, WARRANTY VOID, AND/OR BODILY HARM. IF YOU HAVE ANY QUESTIONS, PLEASE
CONTACT OUR U.S.-BASED TECH SUPPORT TEAM (SEE CONTACT US).
NEVER connect an input exceeding 90
volts, e.g. the open circuit voltage (VOC)
on solar panels, to the blue EC8 charging
port (right side) on the Flex 1500, Flex
DC, or Flex MPPT Supercharger.
NEVER exceed output and input
connector ratings. Failure to do so may
result in unit damage, re, or electrical
shock. You can nd these ratings under
Tech Specs.
NEVER store a Flex Battery in hot
environments, such as a hot vehicle.
Lithium batteries are sensitive to
extremely high temperatures. For more
information see Tech Specs.
NEVER touch, stick metal objects into,
or otherwise come in contact with the
AC outlet terminals on the Flex 1500.
Doing so risks death, serious injury, and
electrical shock. These outlets supply
power identical to that of a normal home
wall outlet and, while ungrounded, still
present many of the same dangers.
NEVER operate the Flex system in wet
conditions. Allow any condensation to
dry completely before powering-up or
charging your Flex system. If your Flex
system does get wet, contact us to
ensure it’s safe before attempting to use
it again.
NEVER attempt to repair your Flex
system or replace the internal
battery yourself; any manipulation or
disassembly of any Flex module will
void all warranties, including the 10-
Year No “B.S.” or 10-Year Pro-Rated
Warranties. Any tampering with the
warranty stickers (black dot with Inergy
logo) may also void the warranty. For
questions about repair/service, please
contact our U.S.-based Tech Support
team (see Contact Us). There are no
user-serviceable parts inside.
ALWAYS keep your Flex system clean
and dry. Regularly inspect for dirt, dust,
or moisture. Clean connectors with
canned air for electronics. Never use an
air compressor to clean or dust-off your
system.
NEVER use a generic or off-brand
charger to charge your Flex Battery.
Use only the Inergy-supplied charger
specically for this device.
02
IMPORTANT SAFETY GUIDELINES

NEVER connect your Flex AC outlets to
another power source. Doing so will
permanently damage your device and
void your warranty. These outlets are
output only, and any such damage is
easily detected when diagnosing Flex
system failures.
BE AWARE that the Standard Wall and
Quick Wall chargers can get hot when in
use. Charge your Flex system in a well-
ventilated, dry area. We recommend
placing your charger on top of the Flex
system while charging; the aluminum
case works as an effective heat sink for
the charger.
TAKE CARE not to leave anything
plugged into the DC outputs that are
unsafe if left to run unattended (cooking
equipment, and heaters), or other loads
you don’t want draining your battery
unexpectedly.
NEVER use or store any Flex module
or Flex Battery in any orientation other
than standing straight up. The Flex
Modular System is designed to be
stored and operated while sitting on a
at, secure surface.
ALWAYS secure the Flex system with
straps or cords when using it in a
vehicle to protect against excessive
vibration or impacts?
FAILURE TO FOLLOW THE ABOVE SAFETY TIPS MAY RESULT IN PERMANENT DAMAGE TO YOUR FLEX MODULAR
SYSTEM, RISK OF FIRE, WARRANTY VOID, AND/OR BODILY HARM. IF YOU HAVE ANY QUESTIONS, PLEASE
CONTACT OUR U.S.-BASED TECH SUPPORT TEAM (SEE CONTACT US).
03
IMPORTANT SAFETY GUIDELINES

FIRST THINGS FIRST
IMPORTANT SAFETY GUIDELINES
TABLE OF CONTENTS
GETTING TO KNOW YOUR FLEX
Flex 1500 Power Station
Flex DC Power Station
MPPT Supercharger
Flex Battery
Using Your Flex system with Multiple Flex Batteries
Expand Your Apex or Kodiak Power Station with the Flex Battery
CHARGING YOUR FLEX MODULAR SYSTEM
General Information
Charging with Solar Panels
Inergy Ascent Panels (or Other MC4 Panels Connected in Series)
Legacy Inergy Panels With EC8 Connectors
Solar Charging with the MPPT Supercharger
Charging with the Grid (110-120VAC Wall Socket)
Charging with Your Vehicle’s 12VDC System
01
02
04
07
14
04
TABLE OF CONTENTS

USING YOUR INERGY FLEX MODULAR SYSTEM
Flex 1500 Power Station with AC and Regulated DC Output
Flex DC Power Station with Regulated DC Output
Using the Flex Battery
Getting the Most out of your Flex system
Using the Flex in Extreme Cold Weather
Reading the LCD Displays
Flex power consoles
Flex Battery
Flex MPPT Supercharger
TECH SPECS
Flex 1500 Power Station (AC and DC Output)
Flex DC Power Station (DC–Output)
Flex Battery
Flex MPPT Supercharger
FAQs
23
26
33
39
05
TABLE OF CONTENTS

WARRANTY INFORMATION
Warranty Period
“No Lemon” Policy
Remedy
Limited to Original Consumer / Buyer
Exclusions
How to Receive Service
CONTACT US
47
49
06
TABLE OF CONTENTS
Currently, the Flex Modular System is
made up of four unique Flex modules:
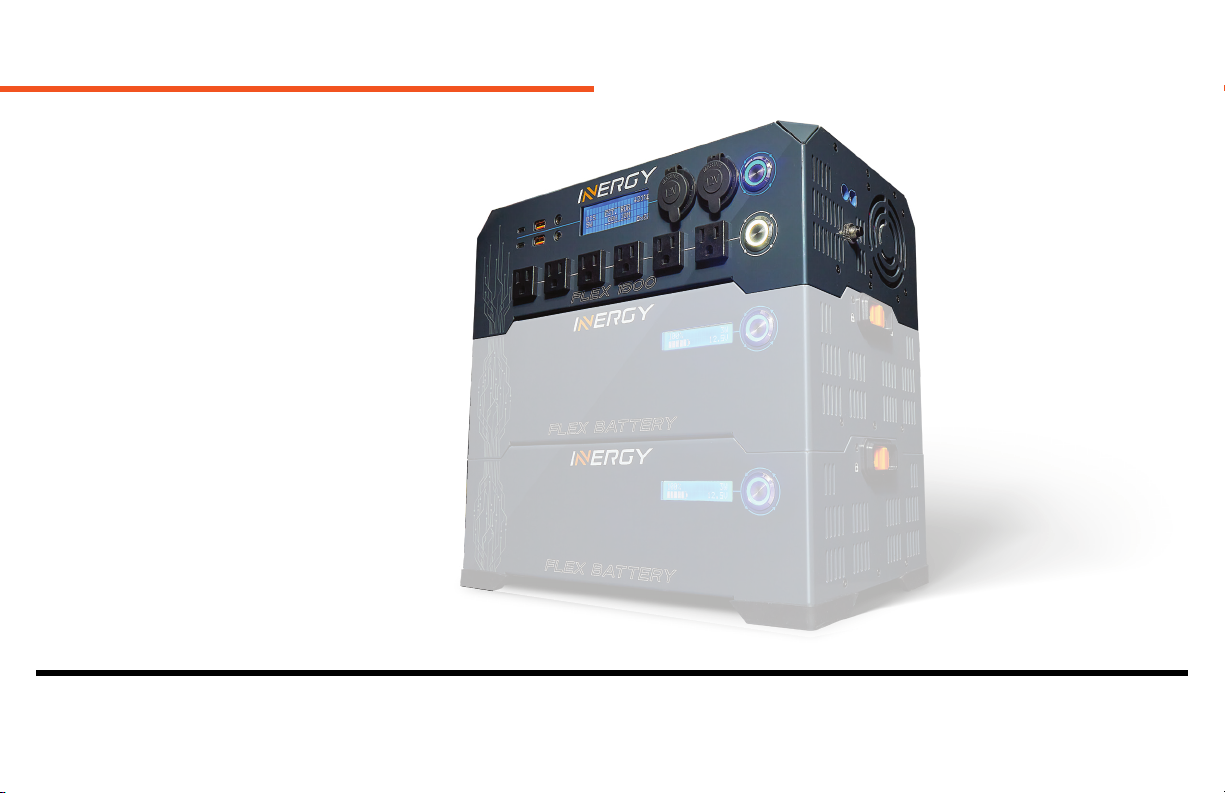
1. Flex 1500 Power Console
2. Flex DC Power Console
3. Flex Battery
4. Flex MPPT Supercharger
With these modules, you can create a
Flex system that is perfectly tailored
to your present needs and save
money in the future by replacing/
adding individual modules instead of
purchasing an entirely new system.
07
GETTING TO KNOW YOUR FLEX
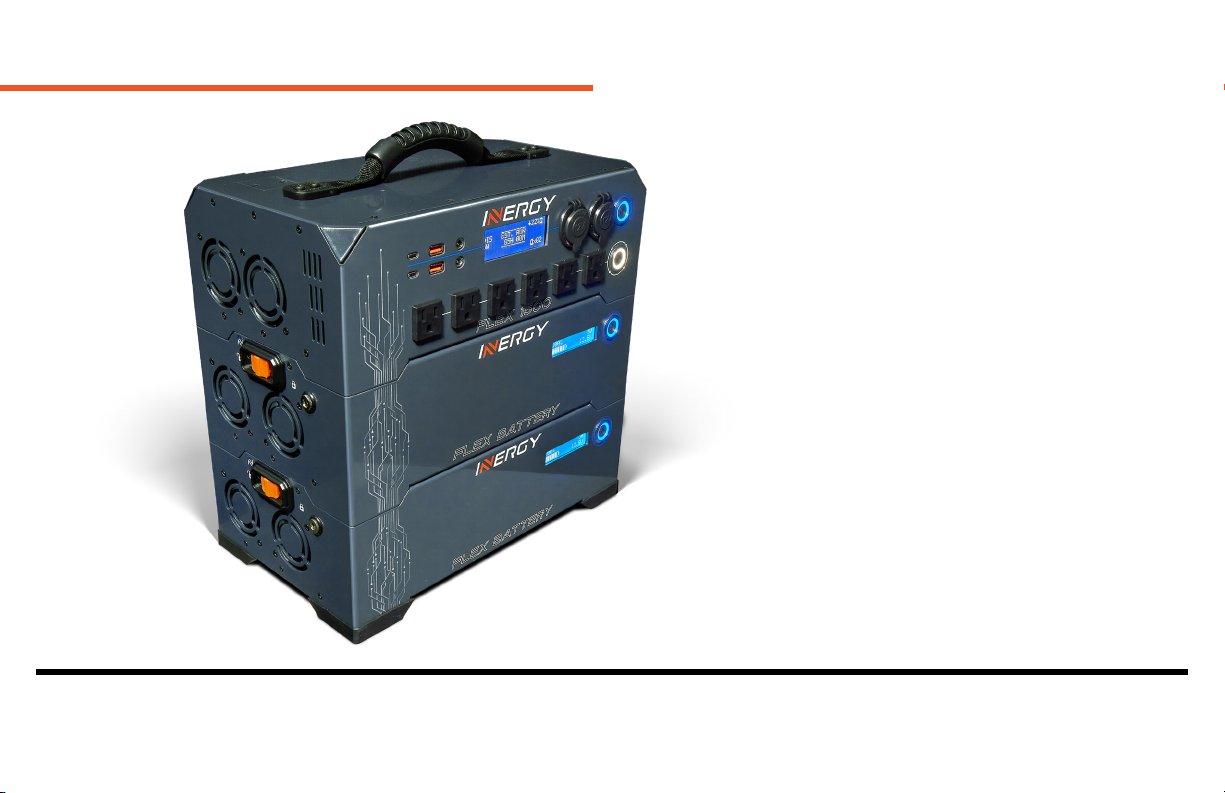
Flex 1500 Power Station
Most people will start with a Flex 1500
Power Station, which is the combination
of the Flex 1500 Power Console and a
single Flex Battery.
From there, you can choose to expand
your battery storage capacity and
solar charging rate by adding more
Flex Batteries and additional MPPT
solar inputs with the Flex MPPT
Supercharger. The possibilities are
almost endless.
08
GETTING TO KNOW YOUR FLEX

Flex DC Power Station
People who use only DC power, such
as off-grid or van life enthusiasts,
may choose the Flex DC Power
Station, which is the combination
of the Flex DC Power Console and a
single Flex Battery.
09
GETTING TO KNOW YOUR FLEX

Flex MPPT Supercharger
The Flex MPPT Supercharger includes two advanced maximum power point tracking (MPPT) charge controllers, each
equivalent to the MPPT input of the Power Console, giving you more input options and faster solar charging. Rapidly charging
and discharging your battery can affect the cycle life of lithium-ion batteries. For more information, see CHARGING YOUR FLEX
MODULAR SYSTEM.
10
GETTING TO KNOW YOUR FLEX
11
GETTING TO KNOW YOUR FLEX
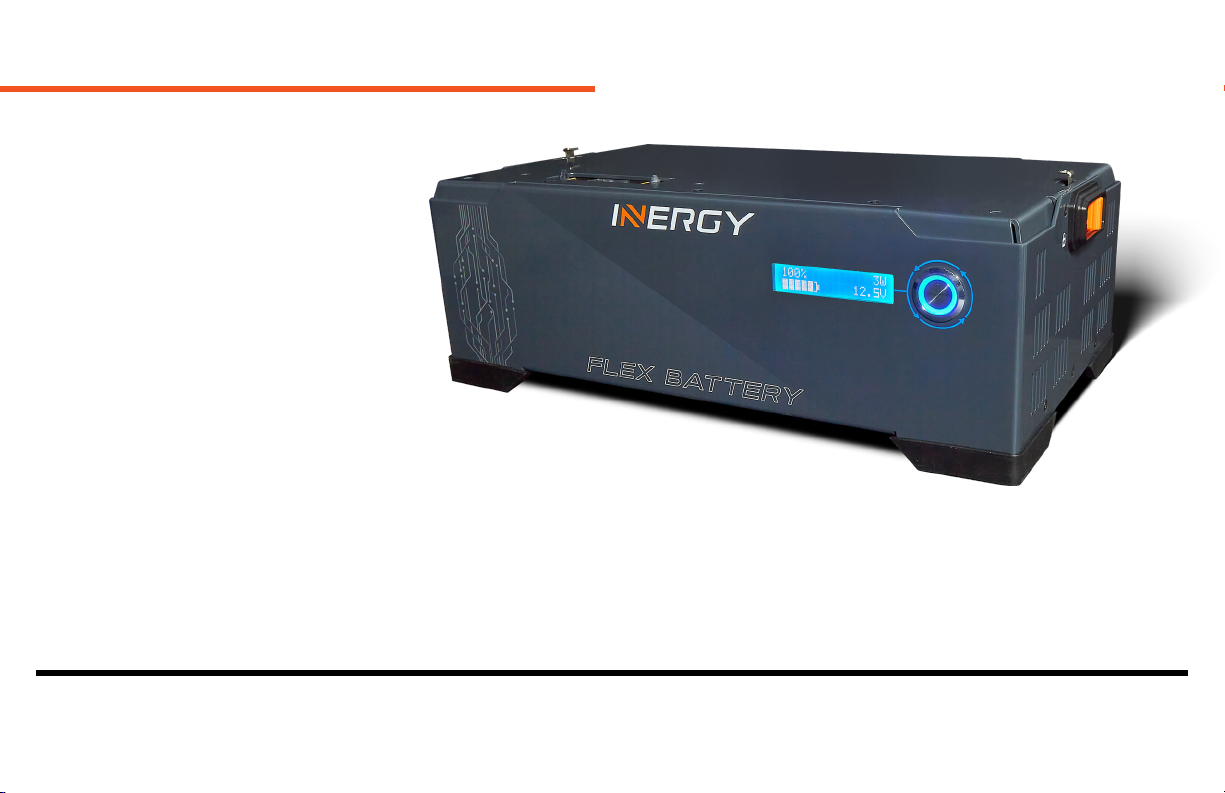
Flex Battery
The Flex Battery is a lithium-ion, low-
voltage battery containing a smart
BMS (battery management system).
The Flex Battery is capable of smart
charge and discharge management,
self temperature regulation, advanced
safety features, and other features to
provide the high power density you’ve
come to expect from Inergy, along with
industry-leading safety standards and
controls.
Each Flex Battery is self-managed,
which means that your system can continue operating in the event of a failure of any/all extra batteries in the system. Each
battery displays its individual state-of-charge (SoC), voltage, and power measurements on the built-in LCD screen. Batteries
are automatically activated by a Flex power console, but you can use the built-in button to activate the display manually.
We’re rm believers in simplicity, and have kept the number of buttons in the Flex system to a minimum.

If you intend to charge your system
before using it, place the lowest charge
battery on the top of the stack. As the
top battery charges and the voltage
increases, the others will enable as
they come within range. The order of
the other batteries is not important.
If you intend to discharge your system
rst, place the battery with the highest
charge on top instead. As you use
power from the top battery, the voltage
will drop, and the lower batteries will
enable when within range. The order of
the lower batteries is not important.
The best practice for connecting
multiple batteries to your Flex power
console is to charge all batteries to
100% before stacking them. Once
If you have any questions, please call us (see Contact Us), and we’ll be happy to help you. 12
you can still connect them, though
they won’t enable until the voltages
get within range. As you use the Flex
system, the batteries will automatically
enable and equalize. Once connected,
the power console display will show
the combined state of charge for all
batteries in the stack.
The top battery in the stack acts as
the master, providing initial power to
the Flex system. Flex Batteries stacked
below the master will automatically
enable when the voltage is within
range of the master. If your batteries
are too far out of range and you don’t
have time to wait, you can speed up the
process of connection by following a
few simple steps:
Using Multiple Flex Batteries
To expand your Flex Modular System’s
overall battery capacity, simply add
more Flex Batteries to your stack.
Having multiple batteries reduces the
strain on each, resulting in longer cycle
life for your batteries. Each stack can
have up to ve (5) Flex Batteries. To
connect more than ve batteries, you’ll
need to add a Flex Stack Base, allowing
you to connect an additional stack to
the system. Do not connect more than
ve (5) Flex Batteries in one stack.
When you add Flex Batteries in a stack,
they will automatically connect to each
other when their voltages are within
range of each other (about 0.8V). If
your battery voltages are too far apart,
GETTING TO KNOW YOUR FLEX

ATTENTION: Failure to follow the above safety information may result in re, property damage, or bodily harm.
Permanent damage to your Flex Battery, Flex-to-Ring-Terminal Adapter, Kodiak, or Apex can occur,
voiding your warranty.Contact us if you have any questions.
13
they’re connected, we recommend
leaving them together, so the packs
remain in balance with each other.
Expand Your Apex or Kodiak with
the Flex Battery
You can use the Flex-to-Ring-Terminal
Adapter to connect a Flex Battery to
your Kodiak or Apex portable power
station. By connecting one Flex Battery
to your Apex or Kodiak with the Flex-
to-Ring-Terminal Adapter, you can
increase the total storage capacity by
that of the Flex Battery.
To add even more storage capacity,
simply stack additional Flex Batteries
(up to ve per stack). The Flex Batteries
will measure the Apex or Kodiak battery
level, and automatically enable when
their respective voltages get within
range (about 0.4V) of each other. Once
the batteries automatically enable,
they will act as one expanded battery.
We suggest you charge all batteries to
100% before connecting them. If you
wish to add more than ve batteries,
please call us for additional information.
(See Contact Us)
Never connect any other type of battery
to the Kodiak or Apex with the Flex
Battery at the same time.
Never connect external lithium
batteries not supplied by Inergy to the
Kodiak or Apex.
GETTING TO KNOW YOUR FLEX

faster than most systems, but this can
still take up to a few hours to reach
100%. You may see the SoC remain at
~99% until balancing nishes.
You can still use the Flex system
without charging up those last few
percentage points, but you won’t get
the max capacity until the system
reaches 100%. Just give your unit a full
overnight charge every now and then to
ensure the maximum charge capacity is
reached.
Charging for Long-Term Storage
If you intend to store your battery for
an extended period of time, we strongly
recommend you check the state of
charge once every three months. If the
state of charge dips below 30%, we
14
CHARGING YOUR FLEX MODULAR SYSTEM
as the power console is powered on).
Note: If the Flex Battery is too warm
or cold, it won’t allow charging until it
reaches a safe temperature (see Tech
Specs).
Cell Balancing
Lithium battery packs with multiple cells
can become unbalanced after heavy
use, or going a long time between full
charges. This means that one cell group
is at a higher or lower state of charge
(SoC) than the others.
In order to resolve this imbalance, the
battery needs to be charged while
the intelligent management system
automatically balances each cell group.
The Flex Battery employs a rapid cell
balancing system which is over 10x
General Information
When charging your Flex system,
the power console LCD screen will
indicate an estimated charge time
and the amount of power being sent
to the battery. This estimated charge
time is based on the power input and
output numbers at that moment, and it
will change as the average charge or
discharge rates uctuate. The power
console LCD combines the states of
charge of all batteries in your Flex
system as a percentage of the total
combined capacity.
When more than one battery is
successfully connected, any charge
input will charge all batteries, even the
Standard Wall Charger input (so long
ATTENTION: Do not allow your Flex system to remain in storage at a low state of charge for a long time. This may damage
your Flex Battery and void your warranty.

recommend charging it to about 50%
before putting it back into storage. The
ideal battery SoC range for long-term
storage is 30 - 50%.
Charging With Solar Panels
Solar energy is as simple as pointing
panels at the sun. However, there are
many variables that can affect the
panel’s performance, and there are a
few rules involved. For help on charging
with solar panels and conguring your
solar arrays correctly, please call us
(see Contact Us) and we’ll be happy
to help you out. Here are a few of the
most common variables that affect
performance, and some tips and tricks
to help you maximize your results:
Ideal Time of Day
As a general rule of thumb, the brighter
the sun is shining, the better solar
panels will work. Panels operate at peak
efciency when the sun is most direct—
typically around midday. Solar panels
run off of light, not heat. In fact, solar
panels produce the most during cold,
clear days rather than in extremely hot
conditions. Even on a windy day, solar
panels can still operate at peak output.
Cloud cover will signicantly reduce
the efciency of the panels, though
they will still continue to generate some
electricity.
Time of Year
The amount of daylight changes with
the seasons, as the sun moves closer
and farther away from you. During
summer months overall solar production
is generally higher. Although the winter
months have fewer daylight hours,
cold temperatures positively affect
the panel’s performance. In fact, cold
temperatures in clear conditions can
generate the most solar production
overall.
Panel Placement
Place your solar panel where it will get
as much direct sunlight as possible.
Shade on one or more panels can
affect the performance of the whole
string. Take care to avoid trees and
other shade that may move with the sun
throughout the day.
Peak Your Panels
Pointing your panel directly at the sun
NOTE: Inergy solar panels are rated at maximum output in ideal conditions. Real output may vary based on your
unique situation. 15
CHARGING YOUR FLEX MODULAR SYSTEM

16
panels’ open circuit voltage, please call
us. (See Contact Us.)
Clean Your Panels
Solar panels function through the
interaction of many individual cells (see
right). Output can be greatly affected
with even the slightest obstruction to
a single cell of the panel. Make sure
the panel is free of any dirt, debris, or
other objects like stickers and decals.
Protective coatings can also greatly
reduce panel performance, including
clear lms, plastic sheet/paneling, and
even glass.
Panel Wiring - Series vs Parallel
Wiring your panels right is key to
getting the best efciency in your
unique situation. You can wire panels in
and adjusting them throughout the day
will yield the best results. The angle will
vary from month to month, but an angle
of 30-60 degrees from at is generally
considered ideal. As long as you point
your panels at the sun, you should get
good results.
Safety Tips
The Flex is designed for use with and
rated for Inergy-brand solar panels,
but you can use off-brand solar panels
if you have them. You should not mix
different types and ratings of panels;
always use identical panels in a string.
As a hard rule, any string of solar
panels must not exceed the open circuit
voltage (VOC) rating of the Flex system
(see Tech Specs). If you have any
questions or doubts about your solar
CHARGING YOUR FLEX MODULAR SYSTEM
parallel (connecting all positive wires
together, as well as all negative) or
series (connecting the positive wire of
one panel to the negative wire of the
next).
There’s another way, series-parallel,
which is a single series string of
multiple identical parallel strings, which
is a bit more complex. Simply-put, you’ll
DO NOT use the 5.5mm x 2.5mm charging port on the Flex Battery for solar charging. Doing so may cause serious
damage to your Flex Battery, and it will void your warranty. It can result in fire, electrical shock, and
personal harm.

CHARGING YOUR FLEX MODULAR SYSTEM
corresponding connectors on each end
of your string of solar panels. You should
end up with a closed loop (a completed
series connection).
You will know the Flex Modular System
is charging from your solar panels when
the LCD screen indicates a charge input
under SOLAR and an estimated charge
time on the center of the display. The
estimated charge time will uctuate as
the amount of power input and output
from the system uctuates.
It can take up to 30 seconds for charging
to begin, while the smart charger
detects your panels and the input
voltage stabilizes.
17
panels in series, always follow this
process when connecting them to your
Flex system:
Step 1. Plug the blue EC8 connector of
your 30’ EC8-to-MC4 Ascent Panel Cable
into the blue EC8 connector on your Flex
Power Station.
Step 2. Connect the male and female MC4
connectors on your solar panels in one
continuous string, male to female and
so on. When you are done connecting
your panels, you will have one open male
connector on one end of your string, and
one open female at the other end.
Step 3. Connect the MC4 connectors
on your EC8-to-MC4 cable to the
generally get the highest efciency
with a series conguration, but you
may want parallel or series-parallel if
you’re wanting to capture more energy
with more panels in low-light conditions
without over-voltaging the system on a
normal day. Refer to the Inergy blog for
more detailed information, where we
dive deeper into the pros and cons of
each conguration.
Inergy Solar Panels (or Other MC4
Panels) Connected in Series
Connecting solar panels in series
increases the voltage of the string. A
VOC over 45V can be dangerous, risking
electrical shock and personal harm if
not handled properly. When using solar
WARNING: DO NOT connect your EC8-to-MC4 adapter cable to your solar panel string before plugging the EC8
connector into your Flex Power Station. Connecting the EC8 connector rst decreases the risk of
severe electrical shock. Always follow the process described above. When disconnecting your
solar panels, always go in reverse order, removing the EC8 connector last.

CHARGING YOUR FLEX MODULAR SYSTEM
18
STEP 1 STEP 2 STEP 3
Male MC4
EC8 Port on the Flex Female MC4
Leftover
Panel Leads
30 FT EC8 to
MC4 Cable
30 FT EC8 to
MC4 Cable
NOTE: When charging with solar panels, you should use only the blue EC8 input port on the right panel of the Flex
1500 or Flex DC power console. Do not use the DC ports on the front of the unit, which are output-only.

CHARGING YOUR FLEX MODULAR SYSTEM
19
You will know the Flex Modular System
is charging from your solar panels when
the LCD screen indicates a charge input
under SOLAR and an estimated charge
time on the center of the display. The
estimated charge time will uctuate as
the amount of power input and output
from the system uctuates.
It can take up to 30 seconds for
charging to begin, while the smart
charger detects your panels and the
input voltage stabilizes.
Legacy Inergy Panels With EC8
Connectors
If using legacy Inergy panels with EC8
connectors, always use the following
process when connecting your panels:
Step 1. Plug one of the blue EC8
connectors on your 30’ EC8 Solar Panel
Cable into the blue EC8 connector on
your Flex Power Station.
Step 2. Connect the other end of your
30’ cable to one of the EC8 leads on
your Solar Storm or Linx panels.
Step 3. Connect additional cables as
desired using the 6’ EC8 Solar panel
cables between panels.
Table of contents
Other inergy Inverter manuals


Popular Inverter manuals by other brands

Sumitomo
Sumitomo HF-520 Series Technical manual

Mitsubishi Electric
Mitsubishi Electric FR-A760 Series instruction manual

Defort
Defort DCI-300 user manual

Mitsubishi Electric
Mitsubishi Electric FR-S500 Series instruction manual

Growatt
Growatt SPA 1000TL Installation & operation manual

Simphoenix
Simphoenix V800 Series manual


GMDE
GMDE 1KVA user manual

SolarEdge
SolarEdge Home Battery 48V installation guide

Unitronics
Unitronics UMI-S0 Series Technical Specifications and Installation Guidelines

REFU
REFU REFUsol 08K Installation and operating manual

Emergi-Lite
Emergi-Lite EMIU-125W instruction manual

Srne
Srne HF4830S80-145 user manual