InfoSense SL-RAT User manual

Sewer Line Rapid Assessment Tool (SL-RAT)
Quick Start Guide
(refer to Owner’s Manual for detailed instructions)
Step 1. Turn on both RX and TX units
Turn on Receiver (RX) and Transmitter (TX) unit. This should be
done outdoors, with a clear view of the sky (GPS synchronization
occurs during this step). Both units will go through a series of
screens while synchronizing data with each other and acquiring
GPS coordinates.
Step 2. Enter Operator ID on both RX and TX units
You can increase or decrease the number by pushing either the
LEFT or RIGHT buttons. Push the CENTER button when done. Do
this on both the Receiver (RX) and Transmitter (TX) unit.
Once completed, you should see the following screen:
Step 3. Place RX and TX units over a manhole
Remove manhole lids at both ends of a connected sewer pipe
segment. Place the RX unit over the manhole at one end, and the
TX unit at the other end.
Step 4. Prepare RX unit for pipe inspection
On the receiving unit, push the CENTER button (“START TEST”) to
setup a test. You should see the screen below.
If you agree with the GPS Estimated Pipe Length, then push the
CENTER button (“START TEST”) to continue. (If you want to adjust
the pipe length, push the RIGHT button (“CHANGE”) to cycle
through various pipe lengths, then push the CENTER button).
You should see the screen below:
Do not press the CENTER button (“START RX”) until the
transmitting unit (TX) has started (Step 5). Signal to the operator
with the transmitting unit that you are ready for them to start the
transmitter.
Proceed to the next page.
Sewer Line Rapid Assessment Tool (SL-RAT)
Quick Start Guide
(refer to Owner’s Manual for detailed instructions)
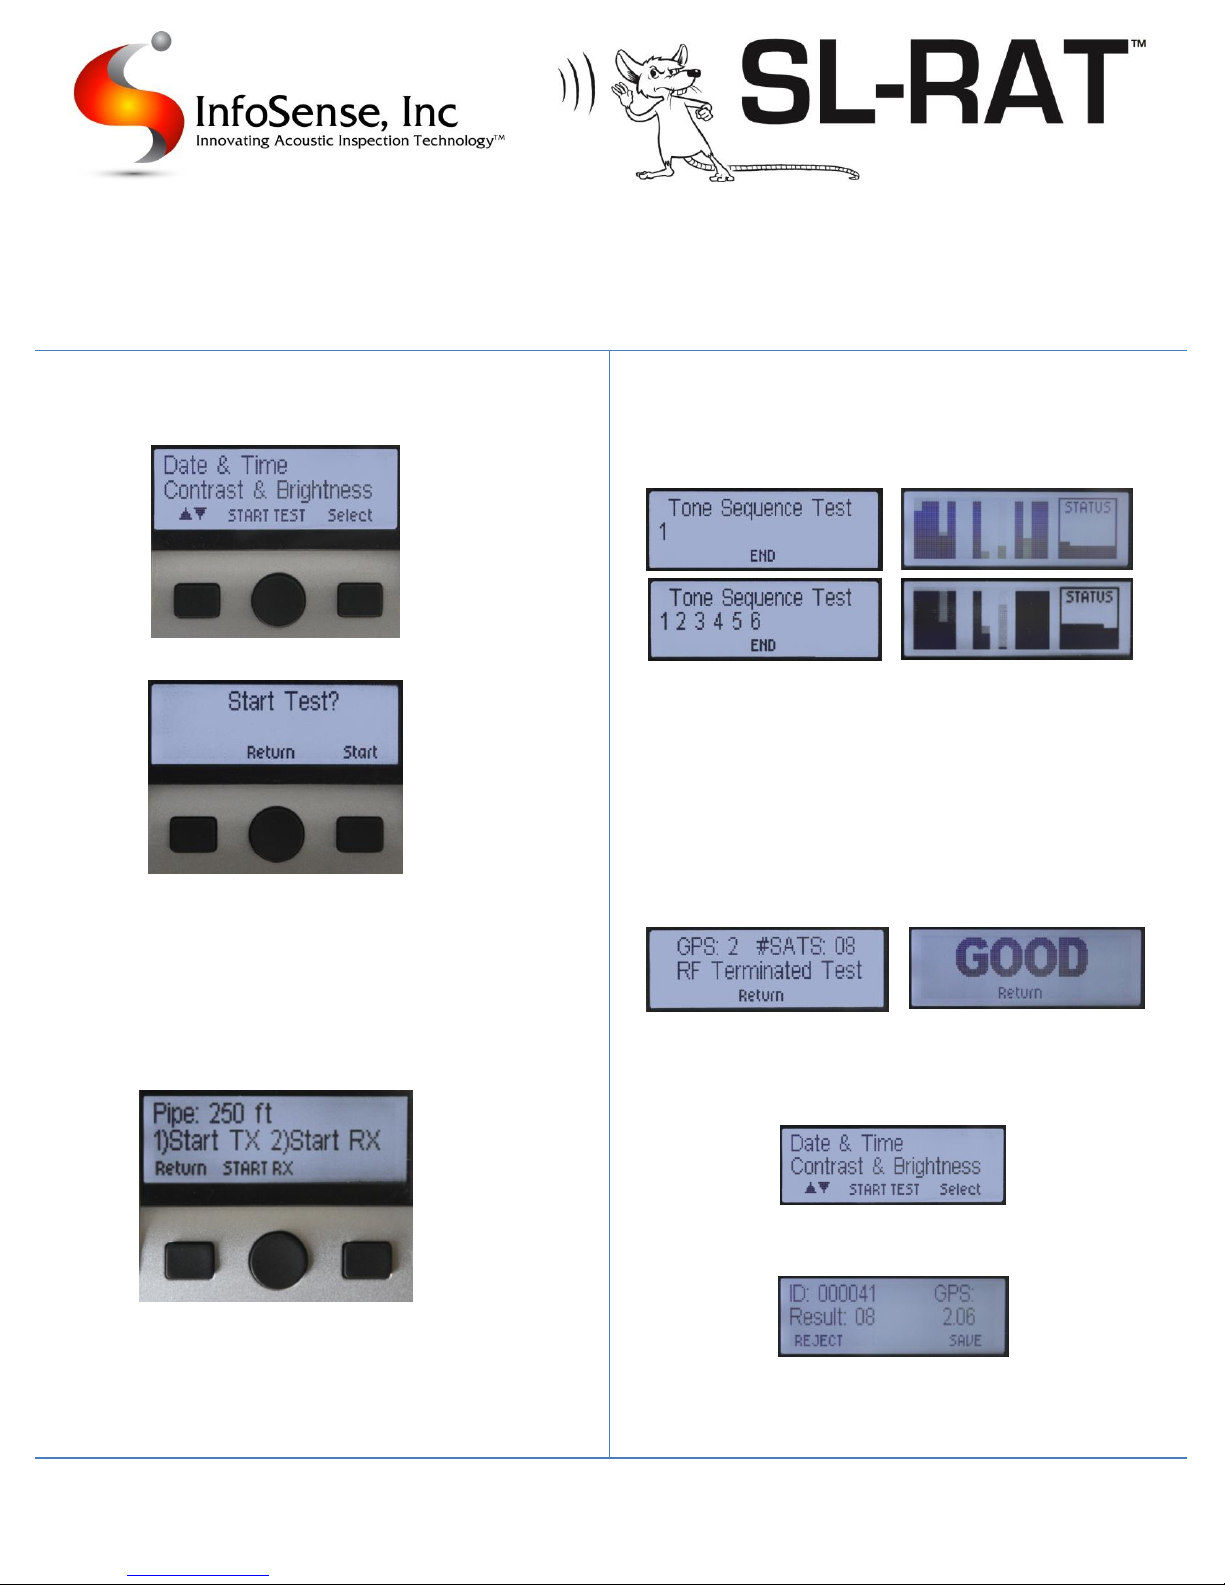
Step 5. Start TX unit speaker, begin listening with RX
On the transmitting unit, push the CENTER button (“START TEST”).
You will see the following screen:
Push the RIGHT button (“START”) to begin the test. Once the
Transmitter has started (you will hear a series of tones), signal to
the operator with the receiving unit to begin listening with the RX
unit).
On the Receiver, push the CENTER button (“START RX”) to begin
listening.
You should ALWAYS start the transmitter before the receiver!
Step 6. Wait for test to complete
You will see the following screens while the test is running:
Transmitter (TX) Receiver (RX)
The transmitter will go through a series of tones 6 to 12 times. You
can stop this at any time by holding the CENTER (“END”) button.
Once the test is completed, the RX unit will show some feedback
regarding the pipe condition (“GOOD”, “FAIR”, “POOR”, “BLOCK”,
etc.).
You will see the following screens when the test is complete:
Transmitter (TX) Receiver (RX)
Step 7. Prepare for next test
Transmitting Unit: Push the CENTER button (“RETURN”). You will
see the following screen:
Receiving Unit: Push the CENTER button (“RETURN”). You will see
the following screen:
Record the Record ID and the Result in a manual log. If the
measurement was valid, push the RIGHT button (“SAVE”) to
complete the test.
You have now completed an acoustic pipe inspection using the SL-RAT. Leave both the devices
turned on, and proceed to Step 3 to perform a measurement on the next pipe segment.
Table of contents
Other InfoSense Tools manuals


Popular Tools manuals by other brands


BIAX
BIAX FLV 1-20 Translation of the original operating manual

U-Line
U-Line H-9152 quick start guide

TREND
TREND HINGE/JIG quick start guide

Porter-Cable
Porter-Cable ts056 instruction manual

Harrington Hoists
Harrington Hoists ER2 Series Owner's manual supplement

Biesemeyer
Biesemeyer N027903 instruction manual