injen SP1869 User manual

Part number SP1869
00-05 Mitsubishi Eclipse
00-03 Mitsubishi Galant
00-04 Dodge Stratus R/T
00-03 Chrysler Sebring Coupe LXI
3.0 V6 only
1- Two piece cold air intake (CA)
1- 3 1/2” Injen filter (#1015)
1- 3 1/2” composite adapter (#14029)
1- 2 3/4” 90 deg elbow (#3095)
1- 3 1/4” straight hose (#3045)
1- 3 1/2” straight hose (#3037)
2- Power-Bands (.312) .040 (#4003)
4- Power-Bands (.412) .056 (#4005)
1- 8” 8mm vacuum hose (#3091)
1- m6 vibra-mount (#6020)
1- gray m6 vibra-mount (#6030)
3- m6 flange nuts (#6002)
4- m6 x m25 bolts (#6006)
2- fender washers (#6010)
1- instruction
Figure 1
Figure 1
Now available, Hydro Shield by Injen
Part Number X-1034
Hydro Shield Sold Separately
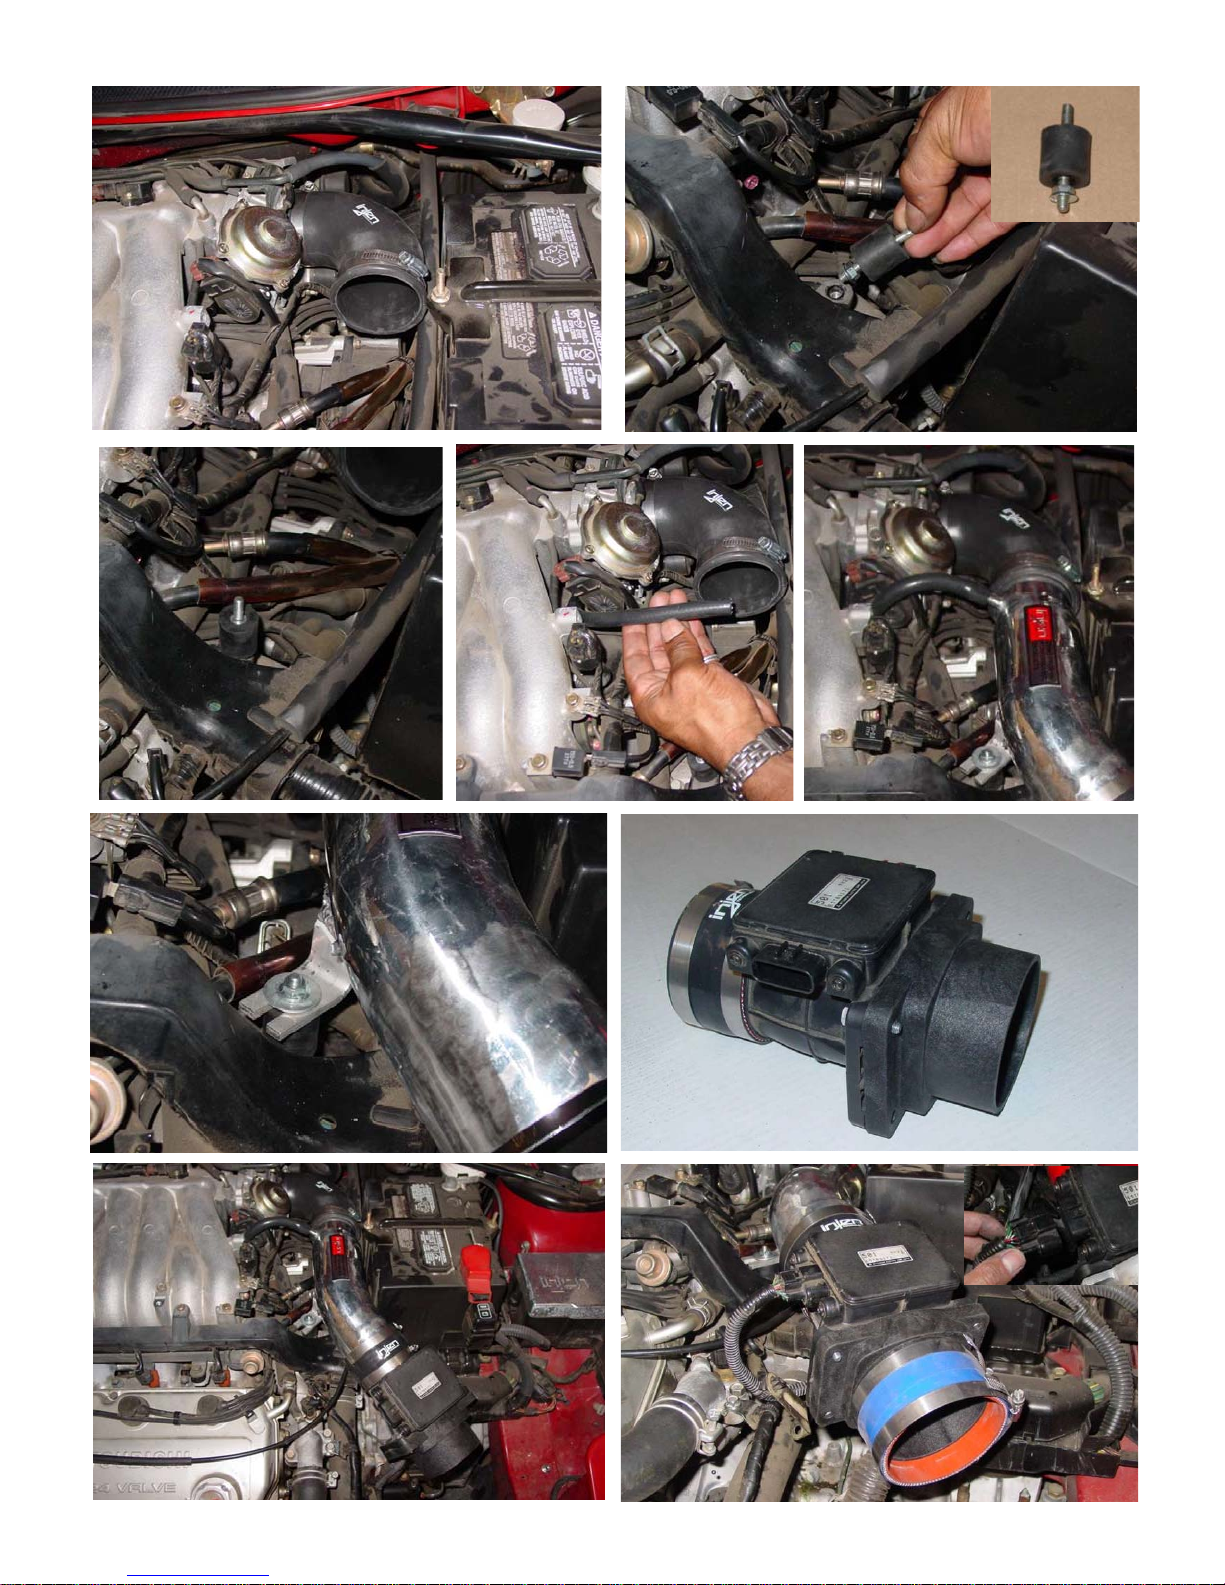
Figure 2
Figure 2 Figure 3
Figure 3
Figure 5
Figure 5 Figure 6
Figure 6
Figure 7
Figure 7 Figure 8
Figure 8
Figure 10
Figure 10
Figure 9
Figure 9
Figure 4
Figure 4
Press the 90 degree
Press the 90 degree
elbow over the throttle
elbow over the throttle
body. Use one clamp
body. Use one clamp
one each side of the
one each side of the
elbow.
elbow.
Remove the m6 bolt from the
Remove the m6 bolt from the
plastic harness cover.
plastic harness cover.
Screw the grey vibra-mount
Screw the grey vibra-mount
into the same pre-tapped hole.
into the same pre-tapped hole.
The m6 nut is screwed
The m6 nut is screwed
about 2/3 of the way.
about 2/3 of the way.
Shot of the vibra-
Shot of the vibra-
mount in place.
mount in place.
Remove the stock
Remove the stock
vacuum hose and
vacuum hose and
replace it with the
replace it with the
Injen 8mm nylon
Injen 8mm nylon
reinforced hose.
reinforced hose.
Press the reduced
Press the reduced
end on the intake
end on the intake
into the elbow.
into the elbow.
Press the other end
Press the other end
of the 8mm hose over
of the 8mm hose over
the 3/8” nipple on the
the 3/8” nipple on the
intake.
intake.
Set the bracket on the
Set the bracket on the
intake over the grey
intake over the grey
vibra-mount stud. Use
vibra-mount stud. Use
the m6 nut and fender
the m6 nut and fender
washer.
washer.
Press the 3 1/4” hose
Press the 3 1/4” hose
over the mass air
over the mass air
flow sensor and use
flow sensor and use
two large clamps.
two large clamps.
The specially designed
The specially designed
adapter with fins is
adapter with fins is
matched to the mass
matched to the mass
air flow sensor.
air flow sensor.
Use the m6 x m25
Use the m6 x m25
bolts in this kit to
bolts in this kit to
attach the adapter to
attach the adapter to
mass air sensor.
mass air sensor.
The assembled mass
The assembled mass
air flow sensor is
air flow sensor is
pressed on the end
pressed on the end
of the primary intake.
of the primary intake.
Press the 3 1/2” hose
Press the 3 1/2” hose
over the end of the
over the end of the
composite adapter,
composite adapter,
use two large clamps.
use two large clamps.
Press the harness clip
Press the harness clip
over the mass air
over the mass air
sensor.
sensor.
<<<<<
<<<<<
<<<<<
<<<<<
<<<<<
<<<<<
<<<<
<<<<
<<<<<
<<<<<
<<<<<
<<<<<
<<<<<
<<<<<
<<<<<
<<<<<
<<<<<
<<<<<
<<<<<
<<<<<
<<<<<
<<<<<
<<<<<
<<<<<
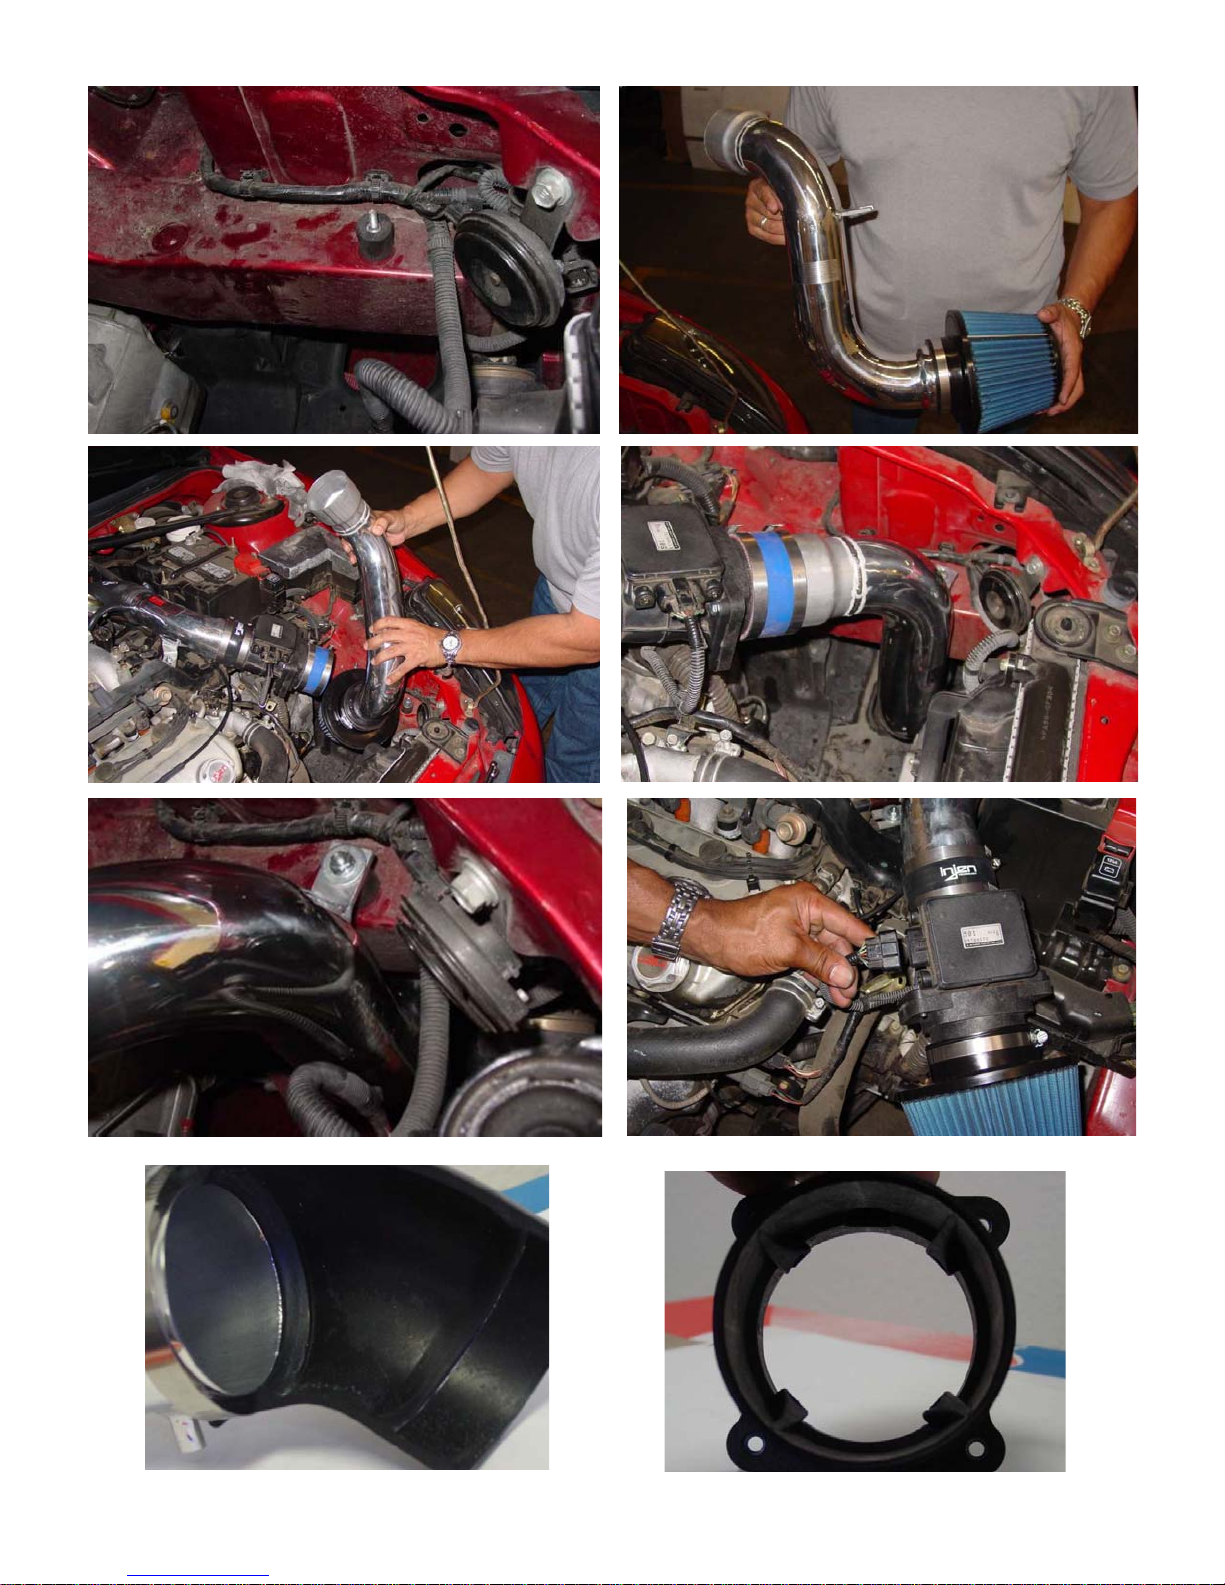
Figure 11
Figure 11 Figure 12
Figure 12
Figure 13
Figure 13 Figure 14
Figure 14
Figure 15
Figure 15 Figure 16
Figure 16
Screw the secondary
Screw the secondary
vibra-mount into the
vibra-mount into the
pre-tapped hole in
pre-tapped hole in
the top frame.
the top frame.
Press the filter over
Press the filter over
the end of the
the end of the
secondary intake
secondary intake
and tighten the clamp.
and tighten the clamp.
The assembled intake
The assembled intake
is inserted into the
is inserted into the
open cavity in the
open cavity in the
bumper section.
bumper section.
The top end of the
The top end of the
secondary intake is
secondary intake is
pressed into the hose
pressed into the hose
on the mass air sensor.
on the mass air sensor.
The bracket on the
The bracket on the
secondary intake is
secondary intake is
lined up to the vibra-
lined up to the vibra-
mount stud.
mount stud.
The intake is shown
The intake is shown
here used as a short
here used as a short
ram.
ram.
This silicone elbow is
This silicone elbow is
designed with a velocity
designed with a velocity
stack on both ends to
stack on both ends to
create a smooth transition
create a smooth transition
from the intake tract and
from the intake tract and
into the throttle body.
into the throttle body. This adapter is designed
This adapter is designed
out of special composites
out of special composites
that repeal heat while cre
that repeal heat while cre-
-
ating a vortex affect with
ating a vortex affect with
the patented fins scaling
the patented fins scaling
along the inside walls.
along the inside walls.
<<<<<
<<<<<
<<<<<
<<<<<
The harness is being
The harness is being
connected to the
connected to the
mass air sensor.
mass air sensor.
<<<<<
<<<<<
<<<<<
<<<<<
<<<<<
<<<<<
<<<<<
<<<<<
<<<<<
<<<<<
<<<<<
<<<<<

Note: Disconnect the negative battery terminal before starting this installation.
1- Remove the stock air intake box and air intake duct leading to the throttle body. For
this installation you also need to remove the mass air flow sensor from the stock air box.
Some early models may have the air intake resonator box located in the driver side
bumper area right under the head lamp. In situations when the resonator box is in the
bumper area, you will need to remove it and make room in that location.
2- Press the shortest end on the 90 degree elbow over the throttle body. Place a clamp on
each end of the elbow then semi-tighten the clamp on the throttle body. (See fig. 2)
3- Take the gray vibra-mount and screw the m6 nut 2/3rds of the way on to the stud.
Unscrew the m6 bolt from the plastic harness cover and screw the gray m6 vibra-mount
into the pre-tapped hole. (See figs. 3 and 4)
4- Remove the stock vacuum hose at the throttle body and press the Injen 8mm nylon
reinforced hose over the port on the throttle body. (See fig. 5)
5- Take the intake and press the 2 3/4” upper end into the elbow on the throttle body.
Line up the bracket on the intake to the gray vibra-mount stud, use the fender washer
and m6 nut to secure the intake in place. (See figs. 6 and 7)
6- Press the 3 1/4” straight hose over the round end on the mass air flow sensor. Place two
clamps on hose and only tighten clamp on the mass air sensor at this time. Take
the new composite fin adapter and butt it up against the mass air sensor. Use the four
m6 x m25 bolts in this kit to attach the adapter to the mass air flow sensor. (See fig. 8)
7- Press the hose end on the assembled mass air flow sensor over the end of the primary
intake. Position the mass air sensor in place then semi-tighten the clamp. (See fig. 9)
8- Take the 3 1/2” straight hose and press it over the end of the adapter inlet, use two
clamps and only tighten the clamp on the adapter at this point. (See fig. 10)
9- Take the secondary vibra-mount and screw it into the pre-tapped hole located on top
of the frame of the car. (See fig. 11)
10- Press the 3 1/2” over the end of the secondary intake secondary intake, tighten the
clamp on the filter. (See fig. 12)
11- Take the assembled intake and filter and insert the filter end into the resonator opening
behind the headlamp. (See fig. 13)
12- Press the top end of the secondary intake into the 3 1/2” hose on the composite
adapter. (See fig. 14)
13- Line up the bracket on the secondary intake to the vibra-mount stud. Use the m6 nut
and fender washer to hold the intake in place. (See fig. 15)
14- Make sure the harness clip is plugged into the mass air flow sensor. You will hear a
firm snap when the clip has been plugged in correctly. (See fig. 16)
Note: The C.A.I can be converted into a short ram by placing the filter directly over the composite fin adapter.
15- Align the entire cold air intake for best fit. Once proper clearance has been made
through out the length of the intake continue to tighten all nuts, bolts and clamps.
(See fig. 1)
16- Remove all tools and rags from the engine compartment and check all lines and
fittings for any leaks or rubbing.
17- Congratulations! You have just completed the installation.
AIR INTAKES CAR ACCESSORIES
Other injen Other manuals


Popular Other manuals by other brands


Extech Instruments
Extech Instruments RHT50 user guide

OVE
OVE ERIKA-LEA-SP32 manual

Measurement Computing
Measurement Computing USB-601 quick start

Venture Zebra
Venture Zebra G1-N user manual

BURG-WACHTER
BURG-WACHTER Universal Safe operating instructions

B&B ARMR
B&B ARMR 400 Series Installation and operation manual

Daka Corporation
Daka Corporation Model 622 Installation and operation instruction manual

Digital Innovations
Digital Innovations Disc Repair System user guide

BW Technologies
BW Technologies GasAlertMicroClip Series user manual

EHEIM
EHEIM Compact+ marine 1103 Series manual

JJB Electronics
JJB Electronics VTP-200 installation instructions

Juniper
Juniper IMPLEMENTATION SUPPORT - SERVICE DESCRIPTION DOCUMENT... manual