Venture Zebra G1-N User manual

© 2016 Shenzhen Venture Zebra Technologies Co., Ltd
www.vzg.com PN V211292016M
Page 1
Model G1-N
www.vzg.com
USER MANUAL
READ BEFORE OPERATING THE SKATEBOARD
Index
1.Product Description
2.Safety Warnings
3.Packing List
4.Specifications
5.Product Functions
6.Before You Ride
7.Charging the Skateboard
8.Charging the Remote Control
9.Change new Remote Control
10. Adjusting the Bushings
11. Electric Skateboard Riding Basics and Getting Started

© 2016 Shenzhen Venture Zebra Technologies Co., Ltd
www.vzg.com PN V211292016M
Page 2
12. Operating Instructions
13. Maintenance, Repair, and Disposal
14. Warranty

© 2016 Shenzhen Venture Zebra Technologies Co., Ltd
www.vzg.com PN V211292016M
Page 3
Product Description:
VZG redefines electric skateboarding with its new VZG G1-N – an ultra-portable, high performance, retro
mini-cruiser electric skateboard with single direct drive via the rear wheel. The G1-N’s compact size
combined with its light weight of 8.2 pounds make it easy to stow in a backpack or to carry along
anywhere. It features a powerful Lithium Ion battery and one 400W hub motor driving the rear wheel
directly for superior traction, thrilling acceleration, powerful braking, and long range. Sticky 55mmx72mm
PU wheels, a short 11.2” wheelbase, and 8.85” track width deliver agile and responsive handling.
The VZG G1-N’s lime turquoise or neon black plastic retro mini cruiser deck shape, kick-tail, and red
wheels will make you the envy of your friends when you post videos online. With the battery slung tightly
under deck and the single drive motor tucked away cleanly inside the wheel hubs, nobody will notice that
it’s a high performance electric skateboard till you start riding. When you accelerate to the 11 mph top
speed within 6 seconds, climb hills, use the brakes to stop quickly, or ride for the full 6 mile range, you’ll
get there faster and easier. Light and small enough to stow in a back pack, put in locker, or carry around
all day, the VZG G1-N is your ideal transportation companion for fun, tricks, and commuting.
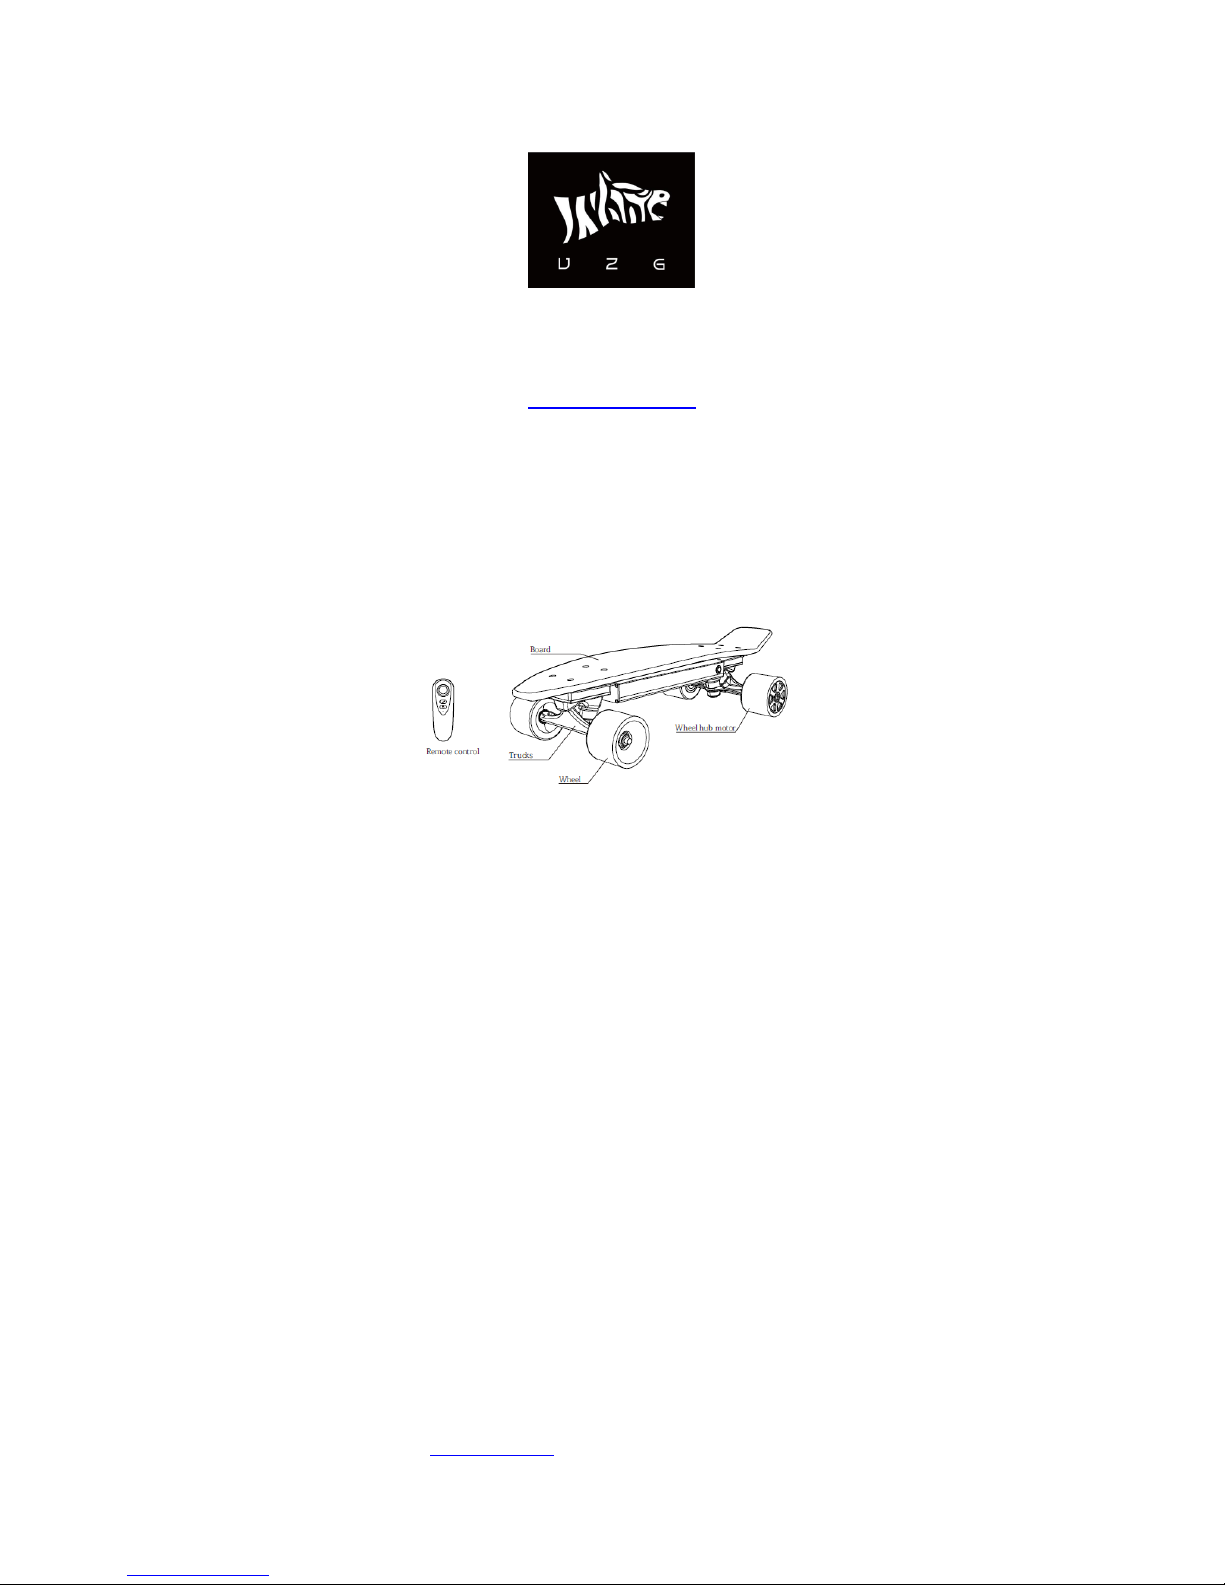
Everything you need to have a great ride is included, fully assembled skateboard, charger, wireless
remote and product manual. The wireless 2.4G remote control has a scroll wheel controller that allows
you to smoothly control acceleration, cruising, or control braking with simple forward and back motion.
The skateboard has 1 LED light, different color of the LED light indicates different capacity. When it is
time to recharge, just plug in the matching wall charger (included), after 90 minutes, a green light lets you
know the board is fully charged and ready to go. The batteries are UN/DOT 38.3 certified for easy and safe
transportation. The batteries are encased in a dust and splash resistant battery case, and the board has
been drop and shock tested for durability. The VZG G1-N is recommended for experienced and advanced
skateboarders ONLY, age 8 and older, under adult supervision.
Safety Warnings
Whenever your ride a skateboard you risk death or serious injury from loss of control, falls, road hazards,
and collisions. To ride safely, you must read and follow all warnings and instructions contained in this
manual. Always wear safety equipment when riding including a helmet, elbow pads, knee pads, gloves,
eye protection, and abrasion resistant clothing.
Do not ride in the rain, on wet surfaces, or on slippery surfaces including as steel plates or manhole
covers. Avoid any obstacles and debris including parked cars, rocks and gravel to avoid a loss of control.
Avoid uneven surfaces including cracks in the pavement, curbs, heaved sidewalk joints, broken or missing
pavement/sidewalks sections, grates and drains. Avoid riding in traffic, at night or in places where there
is limited visibility. Do not ride if you are under the influence of drugs or alcohol.
Do not immerse or expose the skateboard to water. Water causes permanent damage to the skateboard
that is not covered by the warranty.
Warning: Do not ride an electric skateboard at speeds or down hills where you would be unable to
maintain control of a normal non-motorized skateboard.
Warning: Do not touch the rear wheel, rear wheel hub or battery case immediately after use. It is HOT and
may burn you or cause external injuries.

© 2016 Shenzhen Venture Zebra Technologies Co., Ltd
www.vzg.com PN V211292016M
Page 4
Warning: Keep out of reach from children under age 8. Children under age 8 should never operate the
electric skateboard, it is not a toy.
Packing List
1. Skateboard
2. Charger of the skateboard
3. Remote Control
4. charge cable of the Remote Control
5. User Manual
6. Quick Start Guide
7. wheel cover
Specifications:
•Skateboard Dimensions: 22.6in x 6in wide x 5.75in high, 11.2in wheelbase with track of 8.75”
•Deck: Classic retro cruiser shape. Raised arrow-shaped tread for positive grip and kick-tail for tricks
•Colors: Cool Lime Turquoise or Neon Black with Red Wheels
•Wheels: 55mmx72mm PU

© 2016 Shenzhen Venture Zebra Technologies Co., Ltd
www.vzg.com PN V211292016M
Page 5
•Ultra-light weight: 8.5 pounds
•Dual Direct Drive: 1x400W Electric Hub Motor deliver superior traction, acceleration, and braking
performance. No belts to break or replace.
•Rechargeable 29.4V Lithium Ion Battery with 2200mAh capacity, 90 minute charge time
•Complete Package includes skateboard, charger of the skateboard, wireless 2.4G remote control with
charger cable, wheel Cover, Quick Start and manual. Skateboard has power on/off switch, power
indicator, and 1 LED lights to show battery charge level. UL Listed wall charger takes AC 100-240V input,
outputs 29.4 VDC/1.5A, and charge complete indicator light
•Top speed of 11 mph, Accelerates in <6 seconds (typical rider/conditions)
•6 mile range (typical rider/conditions)
•Maximum incline: 15% (typical rider/conditions)
•Maximum rider weight: 198 pounds
•Remote Batteries: 300mah lithium battery,3.7V, standby time: about 20 hours
•Dust and splash resistant, drop tested and shock tested for durability
•Product and/or components certified to UN/DOT 38.3, FCC, RoHS, and MSDS standards. Charger is UL
listed. For more information consult www.vzg.com
•Recommended ONLY for experienced skateboard riders age 8 and older under adult supervision
•Limited Warranty: Return for replacement or repair within 7 days of purchase due to defects in materials
or workmanship, Return for repair only within 90 days of purchase due to defects in materials or
workmanship. Other limitations apply - Accident or misuse voids warranty. No warranty coverage for wear
items.
Basic Product Information:

© 2016 Shenzhen Venture Zebra Technologies Co., Ltd
www.vzg.com PN V211292016M
Page 6
Skateboard Assembly Drawing

© 2016 Shenzhen Venture Zebra Technologies Co., Ltd
www.vzg.com PN V211292016M
Page 7
Product Functions:
Forward motion controlled by remote control, no reverse
Braking controlled by remote control
single rear wheel propulsion and braking via brushless hub motor
Rechargeable battery, DC charging port
Product Status Indicators
Location Indicator Color Status/indication ACTION
Remote
Control
Power Light
Dark OFF Turn on remote
Blue – Fast Flashing ON, Attempting to
connect with remote Turn on skateboard
Blue – Slow Flashing ON, Connected with
remote RIDE
Battery Charge
Red, Yellow, Green
Charge level:
1
、Red: < 30%
2
、
Yellow: 30%-
60%
2
、
Green: 60%-100%
Charge if necessary
Beep
Push forward the Scroll
wheel
,
it give out the
alarm
。
The battery of the
remote control is low RIDE
the remote control
gives out the alarm
every 5 seconds.
The battery of the
skateboard is low. Turn on the remote
control and the
skateboard
Skateboard
Power Light
Blue – Flashing Rapidly ON, Attempting to
connect with remote Turn on Skateboard
Blue – Flash Slowly ON, Connected with
remote RIDE
Battery Charge
Red, Yellow, Green
Charge level:
1
、Red: < 30%
2
、
Yellow: 30%-
60%
2
、
Green: 60%-100%
Charge if necessary
AC Wall
Charger
Status Dark Not plugged in to wall Plug In to wall
Light Green Not plugged in to
skateboard Plug in to board
Red Charging, plugged in Wait 90 minutes
Green Charging complete Unplug charger and
board, RIDE

© 2016 Shenzhen Venture Zebra Technologies Co., Ltd
www.vzg.com PN V211292016M
Page 8
Skateboard Indicator Lights
Powered on 30%-60% Charge Indicated
Remote Control:
Power Button: Press this to turn on and off the remote. After power on it will connect automatically with
the skateboard as long as the skateboard is turned on. After connection, check for function by using the
scroll wheel to briefly start and stop the wheels while holding the board off the ground.
Slide (Scroll wheel): Push forward to start or speed up the skateboard, push backwards to brake or stop
the skateboard.
Before You Ride
Warning: Do not ride the skateboard if it is damaged, shows any sign of malfunction, is misadjusted, or
shows signs of battery leakage – a fall, injury or death can result.
1.Always wear protective clothing including a helmet, knee guards, elbow guards, gloves, eye protection,
and abrasion resistant clothing.
2.Read and obey all the warnings in the manual
3.Inspect the equipment thoroughly before riding. Inspect the battery case for damage or signs of leakage,
inspect the wheels for damage and proper function, check that all the mounting hardware is secure,
check that the trucks are properly adjusted, and verify that the remote control is working and
communicates with the board.
4.Only ride and transport the electric skateboard where it is legal and allowed by law. Know and comply
with applicable traffic laws and other riding requirements specific to electric skateboards. Check and
comply with local, state, and federal regulations about where and how it is allowable to operate an
electric skateboard. Air transportation of electric skateboards may be prohibited by airlines or air freight
shippers, and is subject to federal and international regulations.
Warning: Do not ride if your health, physical and/or mental condition are not sufficient to safely operate a
motorized vehicle. Do not ride if: You are under the influence of alcohol, drugs, prescription medications,
your vision, balance, walking or running ability are impaired, you have a medical condition or are ill

© 2016 Shenzhen Venture Zebra Technologies Co., Ltd
www.vzg.com PN V211292016M
Page 9
5.Find a flat, smooth, open, and safe area to ride.
6.Do not ride if the conditions are unsafe, including the following commonly encountered riding conditions:
Slippery Conditions - Rain, Snow, Icy conditions, Low Visibility Conditions – Darkness, Smoke, Fog, Rain,
Dust, High or Gusting Winds,
7.While riding, avoid anything that can cause collisions including the following frequently encountered
skateboard hazards: Traffic, parked cars, fences, signs, walls, fences, light-posts, pedestrians, bicyclists,
dogs.
8.While riding, avoid anything that can cause a loss of control, slip, or fall, including the following
frequently encountered skateboard riding hazards: Curbs, joints, sidewalk cracks, missing sections of
sidewalk, broken, heaved, or uneven pavement, gravel, rocks, sand, puddles, water, spilled fluids
WARNING: DO NOT perform a “rail slide” with your electric skateboard. DO NOT slide or drop the
underside of the skateboard (between the wheels) against any object such as a rail, curb, or handrail.
Doing so will damage the battery case, causes product failure, voids the warranty, and creates the risk of
leakage, burns, fire, and/or explosion
Charging the Skateboard
Warning: Do not insert anything other than the matching charger connector into the skateboard DC
charging connector port, it can damage the battery, cause the skateboard to malfunction when used, or
cause a shock or fire.
1)Turn the skateboard power off
2)Plug the charger cable into the DC charging connector port on the left side of the skateboard. Only use
the matching battery charger and cable connector supplied with your skateboard. If the charger or cable
is lost, please contact the manufacturer to purchase an approved replacement.

© 2016 Shenzhen Venture Zebra Technologies Co., Ltd
www.vzg.com PN V211292016M
Page 10
Charger
Model # Input Output
CC2415 100-240V~, 50/60 Hz DC+29.4V/1.5A
Warning: Using the wrong charger or supply voltage can permanently damage the battery, cause risk of
fire or explosion that can result in burns or injury
3)Plug the Charger into the AC power outlet
4)A RED indicator light on the charger indicates that the skateboard battery is actively charging but
charging is NOT complete. Charging generally requires 90 minutes or less depending on the charge
remaining in the battery.
5)A GREEN light on the charger while still plugged in to the skateboard indicates that charging is
completed and the battery is full. A GREEN light is also displayed on the charger when it is plugged into
the wall circuit, but NOT plugged into the skateboard.
6)When fully charged, remove the charger plug from the AC wall socket, then remove the charger
connection to the skateboard
7)Replace the rubber plug into the DC charger port to protect it
Charging the Remote Control
1.Turn the Remote Control power off
2.Plug the charger cable into the USB charging connector port. Only use the matching battery charger
cable connector supplied with your remote control. If the cable is lost, please contact the manufacturer
to purchase an approved replacement.
3.A RED indicator light on the remote control indicates that the remote control battery is actively
charging but charging is NOT complete. Charging generally requires 90 minutes or less depending on the
charge remaining in the battery.
4.A GREEN light on the the remote control while still plugged into the remote control indicates that
charging is completed and the battery is full.
5.When fully charged, remove the charger plug from the AC wall socket, then remove the charger
connection to the remote control.

© 2016 Shenzhen Venture Zebra Technologies Co., Ltd
www.vzg.com PN V211292016M
Page 11
Adjusting the Bushings
The truck bushing adjustments play an important role in both the stability and maneuverability of a
skateboard. Before riding, ensure that the front and rear truck bushings are tightened appropriately for
your weight, desired riding style, and desired steering response.
Basics of Riding a Skateboard
Choose your stance – regular stance with left foot forward, or goofy foot stance – with right foot forward
Balance yourself with a wide stance and bent knees on the skateboard.
To turn the board, lean forward and in the direction you want to turn. Put pressure on the outer edge of
the skateboard on the side of the board in the direction you want to turn. Maintain your balance.

© 2016 Shenzhen Venture Zebra Technologies Co., Ltd
www.vzg.com PN V211292016M
Page 12
Electric Skateboard Riding Basics and Getting Started
· Electric skateboards are for intended for skateboard riders that already possess intermediate
or advanced skills for riding a regular (unpowered) skateboard
· Even experienced skateboard riders will need to learn new skills to maintain balance and
control.
· Children under age 8 should never ride or play with the electric skateboard.
· Children between age 8 and 16 should only operate the skateboard with adult supervision
· Use only as intended.
· Only one person may ride the skateboard at the same time
· Riders weighing over 180 pounds should never ride the skateboard
1) Before powering ON the electric skateboard for the first time, riders should practice riding
with the electric power turned OFF. Riding with the power OFF familiarizes the rider with the
slight drag that occurs when coasting in normal electric operation.
2) With the power turned OFF, practice: a) maintaining your balance, b) push starting the
skateboard from a stop, c) turning while in motion, d) maneuvering, e) foot or slide braking, and f)
safely dismounting the skateboard while in motion.

© 2016 Shenzhen Venture Zebra Technologies Co., Ltd
www.vzg.com PN V211292016M
Page 13
OPERATING INSTRUCTIONS
1) Turn on the Skateboard and Sync the Remote Control
a) Press the power button on the left side of the skateboard as highlighted in Figure 1
b) Press the power button on the remote control as highlighted in Figure 2
c) The Bluetooth 4.0 remote control will sync with the skateboard automatically, generally after 3
seconds.
d) Press the check mark button on the remote control and listen for the skateboard to beep. A beep
means the remote and skateboard have paired properly.
e) Verify that the remote control has synced properly by turning the skateboard upside down, applying the
accelerator via the remote control and observing proper response of the skateboard (wheels turn) then
apply the brake and observe proper operation (wheels stop). If the skateboard does not respond properly,
turn the remote control off for 3 seconds, the repeat from step c) above.
2)Riding
To Start from a Stop:
a)Grasp the wireless controller firmly in your hand with your fingers wrapped around the front of it and you
thumb on the scroll wheel controller. Push the scroll wheel forward to accelerate, push the scroll wheel
backwards to brake or slow down
b)Hold the board still with gentle backward (braking) pressure on the scroll wheel until you are ready to
start moving.
c)Place one foot on the skateboard

© 2016 Shenzhen Venture Zebra Technologies Co., Ltd
www.vzg.com PN V211292016M
Page 14
d)Release the scroll wheel on the remote control, balance yourself on the skateboard, and use your other
foot to push the skateboard into motion.
e)Place both feet on the skateboard in a wide stance and maintain your balance
f) Lean forward and gently push the scroll wheel forward and hold at the desired speed
To Speed Up or Accelerate:
Lean forward and move the scroll wheel very gently and slowly forward. Maintain your balance to avoid
falling off the back
To Slow Down or Brake:
Lean backward and move the scroll wheel very gently and slowly backward. Maintain you balance to avoid
falling off the front of the skateboard. Step off the skateboard to avoid losing your balance.
To Cruise at a Steady Speed:
Hold the scroll wheel in a steady forward position with your thumb
If the skateboard does not respond to remote control inputs for any reason:
a)Maintain your balance. b) Release pressure on the scroll wheel controller. c) Coast the skateboard to a
stop, use foot braking techniques or use sliding techniques to slow down then put your foot down and
safely dismount. d) Wait 1-2 seconds if necessary e) Follow instructions to start from a stop
After Riding:

© 2016 Shenzhen Venture Zebra Technologies Co., Ltd
www.vzg.com PN V211292016M
Page 15
Turn off the electric skateboard and remote control to conserve the battery life. Store the skateboard in a
dry place not accessible to young children.
WARNING: DO NOT perform a “rail slide” with your electric skateboard. DO NOT slide or drop the
underside of the skateboard (between the wheels) against any object such as a rail, curb, pool edge, or
handrail. Doing so will damage the battery case, may cause product failure, voids the warranty, and
creates the risk of chemical leakage, burns, fire, and/or explosion.
RIDING TIPS:
•Be careful when riding on rough roads, uneven surfaces, or where there is debris - the board can slow
suddenly or stop at any time
•Be careful when putting your foot on the kick-board tail, especially when accelerating, this can cause a
loss of control
•Do not ride faster than you can run, in the event you lose your balance and fall off
•Be ready to start running (if necessary) at any time if you lose your balance, jump or fall off the board
•Maintain balance on the skateboard and coast. If braking, dismount safely if required to avoid an
obstacle. Wait for one second, next gently and slowly re-apply pressure on the scroll wheel.
•Practice braking to a stop while maintaining your balance and dismounting on a flat area free of debris,
obstacles, or other hazards before riding at high speed or downhills.
•If you experience a malfunction, please contact the manufacturer before riding the board again
Warning: Abrupt or Rapid movement of the scroll wheel controller may cause a loss of control or for the
rider to fall from the skateboard due to sudden acceleration or braking.
Maintenance, Repair, and Disposal
Inspect your electric skateboard before every ride to ensure it is in good operating condition. Do not
perform any maintenance or repair on the battery case.
Warning: This product contains a Lithium Ion battery that is considered a Class 9 (hazardous material) and
must be handled carefully. Do not exposure to high temperature or fire. Improper disposal can result in fire
or explosion.

© 2016 Shenzhen Venture Zebra Technologies Co., Ltd
www.vzg.com PN V211292016M
Page 16
Warning: The skateboard battery is not replaceable, do not open the battery compartment or attempt to
change the battery.
Please consult your local regulations and hazardous materials disposal service provider for proper
disposal instructions.
Warranty Coverage
User Notice: Please retain your purchase receipt, warranty card, order information, and product manual in
a safe place after purchasing the product. These documents must be unaltered and original and be
provided to claim in order to claim replacement or repair services under warranty.
Warranty
The VZG G1-N electric skateboard comes with a 7 day limited exchange and repair warranty and a 90 day
limited repair warranty. Consumers may return the product for exchange or repair free of charge (except
shipping) within 7 days of purchase due to defect in materials or workmanship. Consumers may return the
product for repair only free of charge (except shipping) for up to 90 days after the date of purchase due to
defect in workmanship or materials. The warranty is limited to the wheel motors, skateboard power
electronics, and remote control.
Excluded from Warranty Coverage:
•Product does not match product receipt, order documents, serial or model number of the warranty card.
•Normal wear and tear.
•Excluded skateboard components including wheels, trucks, deck, and accessories.
•Damage or product failures stemming from abuse, abnormal use, towing, vandalism or due to force
majeure. Damage or malfunction resulting from water damage, extreme temperature exposure, extreme
shock or vibration, collision, or impact damage. Use of wrong charger, wrong battery connector, wrong
batteries, tampering with DC charging port, attempting to replace skateboard battery.

© 2016 Shenzhen Venture Zebra Technologies Co., Ltd
www.vzg.com PN V211292016M
Page 17
Any modifications, attempted repairs, disassembly, or attempted modification of software not expressly
approved by the manufacturer will void all warranty coverage.
The manufacturer reserves all rights to determine warranty coverage applicability, and to perform
replacement or repair at its own discretion.
Warranty Claim Contact Information
Please contact customer service to confirm coverage before returning any product for warranty
replacement or repairs. You may contact customer service online, via email, or by phone at the addresses
below:
Company Name: Shenzhen Venture Zebra Technologies, Ltd.
Website: www.vzg.com
Phone Number: (886) 0755-29594858
Physical Mailing Address:
121 N Andreason Drive
Escondido, CA 92029
Purchaser & Product Information Required for Warranty Claims
Name:_________________________________
Phone number:________________________
E-mail:_________________________________________________
Address :_______________________________________________
City, State, Zip: ________________________________________
Product Model: ________________________________________
Maintenance Record
Product Problem Description Date Sent
for Repair Repairs Performed Date
Repaired

© 2016 Shenzhen Venture Zebra Technologies Co., Ltd
www.vzg.com PN V211292016M
Page 18
Note:
Any changes or modifications not expressly approved by the party responsible for compliance could
void the user's authority to operate this equipment.
This device complies with part 15 of the FCC Rules. Operation is subject to the following two
conditions: (1)This device may not cause harmful interference, and (2) this device must accept any
interference received, including interference that may cause undesired operation.
Table of contents
Popular Other manuals by other brands

Nasco
Nasco Life/form Basic GERi LF04040U instruction manual

Kärcher
Kärcher SG1 C BP operating instructions

DreamGEAR
DreamGEAR DUAL CHARGE Product features

Chainway
Chainway UR4 user manual

Clarke
Clarke Strong-Arm CST11PF User instructions

Buyers Products Company
Buyers Products Company TGC25006C installation instructions