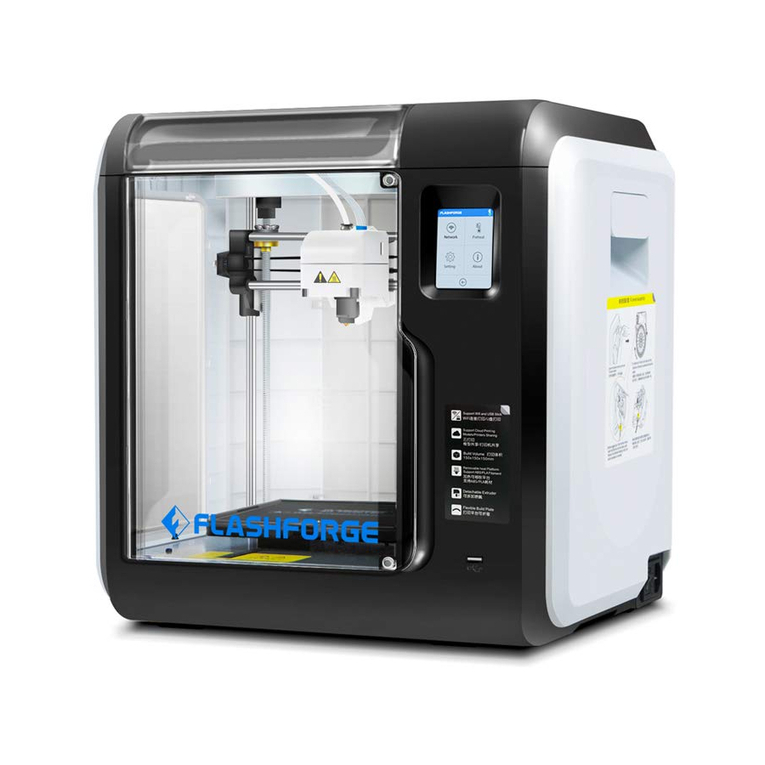
InkSmith MAKERFORGE User manual

InkSmith Makerforge User Manual
1
MAKERFORGE

InkSmith Makerforge User Manual
2
InkSmith Makerforge
Thank you for purchasing the InkSmith Makerforge!
Features
•Originally assembled in Korea, the Makerforge is built from a modular design which
allows for quick repairs and troubleshooting.
•The modular design also allows for quick change of parts if needed.
•High print stability.
•Triple layer air filter removes most particles and odor.
•Auto-leveling and heated bed.
•5-inch color touch screen.
•Wi-Fi, USB, and local storage options for sending your print file.
•Power failure protection
•Code SPE-1000 eSafe Evaluation
This user manual explains the entire process from the installation to the model printing in steps.
In order to use and become familiar with the new features and technology that are offered
exclusively by the InkSmith Makerforge 3D Printer, be sure to read this user manual thoroughly
even if you already have plenty 3D printer experience.
InkSmith Limited. shall not be held responsible for loss due to any errors in this document,
provision of this document or use of this document.

InkSmith Makerforge User Manual
3
Supplier’s Declaration of Conformity (SDoC)
Product Name
3D PRINTER
Model Name
InkSmith Makerforge - OPTIMUS-C23
FCC Rules
Tested to comply with FCC PART 15 SUBPART B
Operating Environment
For home, office, and classroom use
FCC COMPLIANCE STATEMENT:
This device complies with part 15 of the FCC Rules. Operation is subject to the following
two conditions: (1) this device may not cause harmful interference, and (2) this device
must accept any interference received, including interference that may cause undesired
operation.
INFORMATION FOR THE USER:
This equipment has been tested and found to comply with the limits for a Class A digital device,
pursuant to part 15 of the FCC Rules. These limits are designed to provide reasonable
protection against harmful interference when the equipment is operated in a commercial
environment. This equipment generates, uses, and can radiate radio frequency energy and, if
not installed and used in accordance with the instruction manual, may cause harmful
interference to radio communications.
Operation of this equipment in a residential area can cause interference to other devices. The
user will be required to correct the interference at their own expense.
CAUTION :
Any changes or modifications not expressly approved by the manufacturer responsible for
compliance could void the user’s authority to operate the equipment.

InkSmith Makerforge User Manual
4
Table Of Contents
1. Service & Safety 7
Service 7
Safety Precautions 8
Location of Labels 10
Cautions About Using the Printer 11
2. Components & Preparation for the Use 13
Components and Accessories 13
Packaging Unboxing 15
Parts of the Printer 19
Replacing the Filter Fan (Optional) 24
Replacement of the Clean Filter (Optional) 24
3. User Interface 25
Overview 25
Temperature Readouts 26
Quick Info 27
Main Screen Area 27
Toolbar 27
Printing Screen 28
File 29
Temperature Control 30
Control (Filament) 30
Control (Preheat) 31
State 32
Motion 33
Motion (Extruder) 33
Motion (Bed) 34
Motion (Motor) 35
Motion (Drive Gear) 36
Self-test 37
Settings 38
Settings (Function) 38

InkSmith Makerforge User Manual
5
Settings (Network) 40
Settings (Firmware) 42
Settings (Language) 43
Settings (System) 44
Settings (History) 45
Power Failure Compensation Function 46
4. Printing 47
5. Maintenance 49
Maintenance of the Extruder 49
Disassembly of the Extruder Module 50
Extruder (Management) 52
1. Maintaining the Nozzle in Good Condition 52
2. Cleaning the Inside of the Nozzle using the Loading 53
3. Cleaning the Inside of the Nozzle Using the Nozzle Management Pin 53
4. Cautions regarding the Use of the Nozzle Management Pin 54
5. Cleaning the Outside of the nozzle 56
Replacing the Nozzle 57
Maintenance of the Heating/Printing Bed 58
Replacing the Exhaust Filter 60
Update 61
Using a USB Memory Stick 61
Automatic Update 61
6. Trouble Shooting 62
Defects of the Device 62
Filament Can’t Be Extruded through the Nozzle. 62
Data in a USB Drive Can’t Be Viewed. 63
Data in a USB Drive Can’t Be Printed. 63
The Print doesn’t start because the Auto Leveling Fails. 63
Printing Gets Interrupted. 64
The Filament sensor isn’t detecting properly. 64
The Model doesn’t stick to the printing bed. 64
Part of the print, mostly the bottom corners lift up from the base or bed. 65

InkSmith Makerforge User Manual
6
The middle of the print gets cracked. 65
The print won’t come off the printing bed. 65
Even though the Printer says it’s complete, only a part of the model has been printed, while
some parts haven’t been printed or were printed abnormally. 66
7. Product Specification 67

InkSmith Makerforge User Manual
7
1. Service & Safety
Service
If there is a problem that is not specified in this document, please contact us through:
Tech Support Page
www.inksmith.ca/pages/tech-support
Email
tech@inksmith.ca
Phone
1-844-465-7684 ext. 4
When requesting a warranty service, please write down the following information for smoother
and faster processing of the task along with the request.
●Customer (School/Company/Individual)
●Brief summary of the issue
(If you take a picture or a video of the situation when a problem occurs or the internal
LCD screen of the printer and sent it to us, it can be processed more promptly.)
●Serial No. → It can be found on the label on the rear of the product.
●Firmware Version: It can be viewed in Setting(System > Information)
●UI Version: It can be viewed in Setting(System > Information)
●Address
●Phone Number.
●Name of person to contact

InkSmith Makerforge User Manual
8
Safety Precautions
Before using the printer, be sure to read this ‘Safety Manual’ and follow these guidelines.
Following these instructions will prevent user injury, third-party harm, and damage of the printer.
Failure to comply with these instructions may result in a serious injury or damage to the printer.
Warning: Failure to comply may cause a serious injury or property loss.
Caution: Failure to comply may cause injury or property loss.
Note: Useful tips or additional information.
Connect the printer only to the power outlet with a ground connection.
Since high heat is generated while the printer is operating, there is a risk of burn if a
body part or an object is inserted into the printer while it is operating. If there is a need to
insert a body part or an object into the printer, make sure to fully cool it down after
stopping the operation completely.
Since high current power is applied to the heating bed, be cautious about an electric
shock when touching the bed (especially when touching the power supply module of the
bed).
The printer uses moving parts such as a motor, belt, gears, and fans. There is a risk of
injury due to jamming if a body part or an object is inserted into the printer while it is
operating.
Since there is a risk of fire or shock if water, other liquid, a piece of metal or other
conductive substance gets into the printer, be cautious. Also, since there is a risk of fire
or electric shock, do not operate it with a wet hand.
Since there is a risk of injury to children or pets by the printer, be cautious about where
the printer is set up. Adult supervision is required.
The printer and accessories include parts with sharp edges. Be cautious about potential
injury to yourself or damage to the printer.
Since filament, the material used in the printer, has a risk of fire or injury, do not attempt
to heat it with other devices or deform it. Also handle it with care since there is a risk of
choking on small parts, prints, or excess filament.

InkSmith Makerforge User Manual
9
Since there is a risk of fire/explosion if a volatile material is used in the printer, make
sure not to use it. Also, since there is a risk of fire if an ignitable or flammable substance
is left unattended around the printer, remove it.
Do not damage or deform the power cable, and do not supply power that is outside of
designated voltage.
When moving the printer, remove the power cord and cables while the power switch is
turned off after the printer operation is stopped and the temperature of the internal parts
cools down sufficiently.
Do not use the interior space as storage as this can damage the printer.
Do not turn off the power when the heating bed or the extruder is still heated. Since the
cooling fan can’t be operated, the device may break down or a fire may break out due to
the high temperature.
Since the printer uses a material after melting it, a peculiar odor may be generated during
the process. Therefore, be sure to install the printer in a well ventilated place.
Do not install the printer outdoor or in a place under direct sunlight or a place with a lot
of vibration, humidity, and dust.
Do not install the printer on an unstable surface. It is best practice to place the printer on
a sturdy, flat and level table. Also, remove anything around the printer which can be
damaged by the heat or vibration of the printer during operation.
If filaments or parts that are not supplied by our company are used in the printer, it may
cause damage to the printer, or the quality can’t be assured. Issues after modification to
the printer may not be covered by InkSmith’s warranties.
Do not arbitrarily disassemble or modify the printer on user’s own, except with parts that
have been approved in the user manual. Failure to comply may cause an injury or
damage to the printer, and problems that may occur are exempted from the free warranty
coverage.
Do not apply an excessive force or a shock to the printer.
There is a risk of breakdown, damage, or injury. Also, read all cautions in the user
manual carefully before using the printer.

InkSmith Makerforge User Manual
10
Location of Labels
Heating Bed and
Moving Parts
Warning
If the heated bed is touched during the operation, there is a risk
of burns due to the high temperature.
Hazardous moving parts may result in hand or finger injury.
ESA Information
Label
List’s the product specification according to the Safety Control
Act.
Caution Label
General cautions and best practices. Includes basic warranty
information.
ESAFE Label
The Makerforge is evaluated to the Model Code SPE-1000.
Since high current power is applied to the heating bed, be cautious about an electric shock
when touching the bed (especially when touching the power supply module of the bed).

InkSmith Makerforge User Manual
11
Cautions About Using the Printer
Before using the printer, please read this section and follow the instructions.
Filament
Use high quality filament, like PLA+ sold by InkSmith.
*If an issue were to occur because of 3rd-party faulty filament, it would not be
covered by the warranty.
After opening a roll of filament, use it up first unless taking the proper storage
practices. When storing filament, make sure to secure the filament so it doesn’t
unravel and is sealed away from moisture.
Mounting and
Unmounting the
Filament Spool
When mounting or unmounting the filament spool from the printer, be careful not to
let the filament unravel from the spool.
Filament
Replacement
Loading
When loading or replacing the filament, remember to let the extruder heat up fully.
*If the temperature is not set correctly, the extruder may clog, or the filament may
crack.
Be careful about the temperature setting and sufficiently remove the previous
filament inside the nozzle when replacing it with a new filament.
If the tip of the filament is bent or folded, trim the end on an angle so there is a point
and can be fed easier into the extruder.
*If the shape of the tip isn’t right, it may not load properly, making a ticking sound in
the feeder or extruder during feeding.
Heat the Extruder
and Heating Bed
Remember to set the correct temperature settings for the nozzle and heated bed to
the filament’s rating.
Attempting to print outside of the filament’s temperature range, either above or
below, may cause printer failures, low quality printing, and print failures such as
cracking or gaps.
The print should only be taken off when the bed has cooled down sufficiently. The
print will just pop off when the bed is cool enough so do not apply excessive force to
remove the print as this may damage the bed’s special coating.
Cleaning of the
Extruder Nozzle
Remember to regularly check the extruder and clean to nozzle.
*Replacement of a nozzle that has been worn out in due to regular use is not
covered by our free warranty.
Carefully clean the outside of the nozzle with the provided wire brush after heating
up the nozzle.
Repetition of cooling and heating of the nozzle while the filament is inside of it is
could cause a filament jam.
Assembly/disassembly must be completed only when the power is turned off (Power
OFF).

InkSmith Makerforge User Manual
12
Assemble/Disassem
bly of the Extruder
Module
Do not shut off the power while the extruder module is heated.
(If the extruder module is separated immediately after the power is turned off for
repair or replacement, that is allowed.)
Cleaning of the
Heating Bed
Clean the heating bed with a dry cloth and the careful use of a scraper.
*Replacement of a heating bed with a damaged coating from regular use is not
covered by the free warranty.
If the bed is quite dirty, only clean it with high purity acetone.
*Many cleansers (wet wipes) may contain a chemical that could dame the coating on
the bed, so it is best not to use them.
Auto Leveling
If an error occurs during Auto Leveling, check whether the nozzle accurately contacts
the heating bed, and retry after cleaning the heating bed and the tip of the nozzle
(Cleaning with a wire brush is recommended).
If the error continues to occur, refer to https://inksmith.ca/a/help or contact support.
Preparation for
Requesting a
Warranty Service
If an issue occurs, make note of the print file and take a photo or video of the part of
the printer with the issue and the LCD screen.
Insert a USB memory stick and save the recent logs. To do this, go to Settings ->
System -> System Log, and send it to InkSmith Tech Support if asked.
Saving System Logs
After inserting a USB drive, save the most recent logs by going to Settings -> System
-> System Log and send it together.

InkSmith Makerforge User Manual
13
2. Components & Preparation for the Use
Components and Accessories
3D Printer Main Body
User Manual
Power Cord
Filament
8mm Box Wrench
USB Memory Stick
Three Types of Wrenches
(Φ2, Φ2.5, Φ3)
Flat Pusher
Nozzle Kit
Spool Holder
Push Rod
PDF

InkSmith Makerforge User Manual
14
If filaments or parts other than the ones supplied by InkSmith are used, it may cause damage to the
machine. These issues are not covered by the Makerforge Warranty, so it is best practice to only
use InkSmith approved supplies.
•A filament spool and a clean filter are included in the box, but are packed separately without being
assembled in the printer.
•Types and specifications of the accessories that are included in the product can be changed
without prior notice for the purpose of improving the product.
•If you want to purchase additional accessories, visit our website or contact sales@inksmith.ca for
inquiry.
•Since the accessories (not the Makerforge 3D Printer) are provided for the user’s convenience,
accessories are not covered under the warranty.
•Nozzle/Heating Bed/Teflon tube among the printer’s parts that are normally worn down during use
are considered consumables.
•Material and color of the initially supplied filament are supplied in random.
•The manual and CuraForCubicon are contained in a USB memory stick. More resources can be
found online at InkSmith.ca

InkSmith Makerforge User Manual
15
Packaging Unboxing
When opening the packaging and setting up your printer, be careful not to apply too much
force or tear the packaging.
When opening the packaging, be careful not to damage any of the cables.
①Place the box on a flat surface like the floor, open the box, carefully remove the packing
material on the top. The glass printing bed is in this layer of material so do not throw it out.
②After removing the packaging, raise the lid and grab the frame of the printer from the top
to lift the printer out of the box. Either set the printer back onto the floor and lift again while
grabbing the bottom of the printer or place the machine directly in the place it’s going to
stay.
Since lifting the machine by holding the top frame, as shown below, may distort the
machine, try not to do so as much as possible, and move the product by holding bottom. If
lifting by the top, remember to reach farther in so you’re holding the frame and not just the
sheet metal.

InkSmith Makerforge User Manual
16
③Remove tape and the film that protects the acrylic during transit. (There may be tape
in places that are not shown in the picture.)
④Mount the extruder cable [if necessary].
①Assemble and fix the extruder cable
fixing holder by turning it clockwise as shown
in the picture below.
②After untightening fixing bolts (in two
locations) on the extruder cable cover by
using the 2mm hex-key wrench supplied as
an accessory, insert the cable and fix it with
the fixing bolts (in two locations).

InkSmith Makerforge User Manual
17
⑤Assemble the glass bed
①Pull the front clips so they rotate away
from the heating bed like the image below.
②Slide the glass bed into the back clips and
align to the heating bed. Push the front clips
to snuggly secure the beds.
⑥
Mount the filament spool
①Remove the filament spool from the
packaging and snip the bent filament on an
angle.
②Insert the spool holder into the mounting
hole on the right side of the printer.
Mount the spool with the end of the filament
heading up and when pulled on, the spool
will rotate counter-clockwise.

InkSmith Makerforge User Manual
18
•The filament spool is designed to rotate counterclockwise. If placed incorrectly on the
machine, the filament may not feed correctly and could cause print failures or issues.
•If others are using the printer, be sure to check the filament to confirm it is still loaded
correctly.
•If there are any objects around the spool or on the machine that could stop the spool’s
rotation, it can cause failures with both the print and the 3D printer.
•Clean or remove any residue on the spool holder so the filament spool may spin freely.
•If the filament is transparent, translucent, or flexible, an error may occur while trying to
detect the filament in the filament sensor. When using this kind of filament, best practice
is to turn off the Filament Detection function in software.
•If the tip of the filament is bent, folded, or thicker than the rest, loading the filament may
be difficult and there may be a ticking sound due to the filament jamming in the feeder or
extruder. To solve this, trim the tip of the filament on an angle.
•Don’t unravel the filament or let the filament unwind from the filament spool as it may
twist or break.
•Properly store your filament when not in use.
oIf the filament is left out to the external environment for a long time, the print quality
may suffer or prints may not adhere to the bed. In more severe cases, the filament
may fail to extrude.
If the printer is used without removing shipping cable ties, the fixing tape, or other packaging,
the machine may run into issues and/or break.

InkSmith Makerforge User Manual
19
Parts of the Printer
All printers get packed after a total inspection regarding the printing status. Therefore, the
heating bed or the nozzle may have a trace of use when received.
Front Exterior
[1] Top Lid
Lid hinges at the
back to allow access
to the top of the
printer.
[2] Front Doors
Main access point
for prints, controls,
filter replacement,
and prevention of
hand injury while
device is
operational.
[3] USB Port
Printing can be done
by inserting a USB
memory stick.
[4] Display
130mm display for
controlling the
printer
[5] Power Switch
and Power Plug
Port
Main power switch
for the printer.
Standard C13/14
plug for power.
1
2
3
4
5

InkSmith Makerforge User Manual
20
Right Exterior
[1] Spool Holder
Mounting Hole
A hole for
mounting the
included spool
holder.
[2] Spool Holder
A spool holder
mounted into the
hole.
Do not plug in the power cord with a wet hand. There is a risk of electric shock.
1
2
Table of contents
Other InkSmith 3D Printer manuals
