Inliten Sylvania V65360 User manual

Sylvania 7.5’ Pre-Lit Livingston Spruce Tree
Tree ID C21, Item # V65360
INSTRUCTION MANUAL
Thank you for purchasing this Pre-lighted Instant*Connect™ Tree. This tree assembles in
minutes and is decorated with UL listed miniature light sets. Please note this tree comes with
an on/off foot pedal switch for easy illumination.
For Indoor/ Seasonal Use Only.
This tree has been carefully constructed to insure many years of safe, seasonal use. In the
unlikely event that you experience problems with the tree or need assistance in assembly, Do
not return this tree to the place of purchase. Please call our customer service hotline at
(800) 681-3839. Agents are on call 24/7 to answer your questions. If you prefer you may
contact us via email at [email protected]
This tree features Staylit™ lights, the only miniature light sets that are guaranteed to stay lit
even if a bulb is loose, twisted, broken, or even missing. No more searching for that problem
bulb. Staylit™ lights allow you to enjoy your beautifully lit tree without worrying about full
strings of lights going out.
If you do need assistance, please provide us with the 2 digit Tree ID number from the original
carton or the 7 digit item number of the product purchased (located below the UPC code) as
well as information pertaining to the nature and description of the problem. If you no longer
have the original carton of this tree, the tree can also be identified by the 12 digit At Home
UPC code. The UPC code can be located on the sticker on the pole of the bottom section of
tree right above where the trunk enters the tree stand. Please do not remove this identification
sticker.
Extremely Important: Please retain your At Home sales receipt as proof of purchase.
Receipt is required for warranty service. Please note this warranty is non-transferable and
is good only for original purchaser of this tree. This warranty does not apply if tree is
purchased from a source other than At Home.
This 7.5’ Instant*Connect™ tree is pre-strung with 700 Clear lights:
CARTON INCLUDES:
3 Tree sections (C- Top, B- Middle, A- Bottom).
1 Sturdy metal tree stand
2 Screws for tree stand (one is for spare use)
28 Extra 2.5V replacement bulbs
3 spare replacement fuses (3-Amp) for mini light string (Exhibit A)
2 spare replacement fuses (5-Amp) for extension cord – Note: 1 spare fuse is already in extension
cord plug, slide access panel to open (Exhibit B)
Light bulbs usage instruction
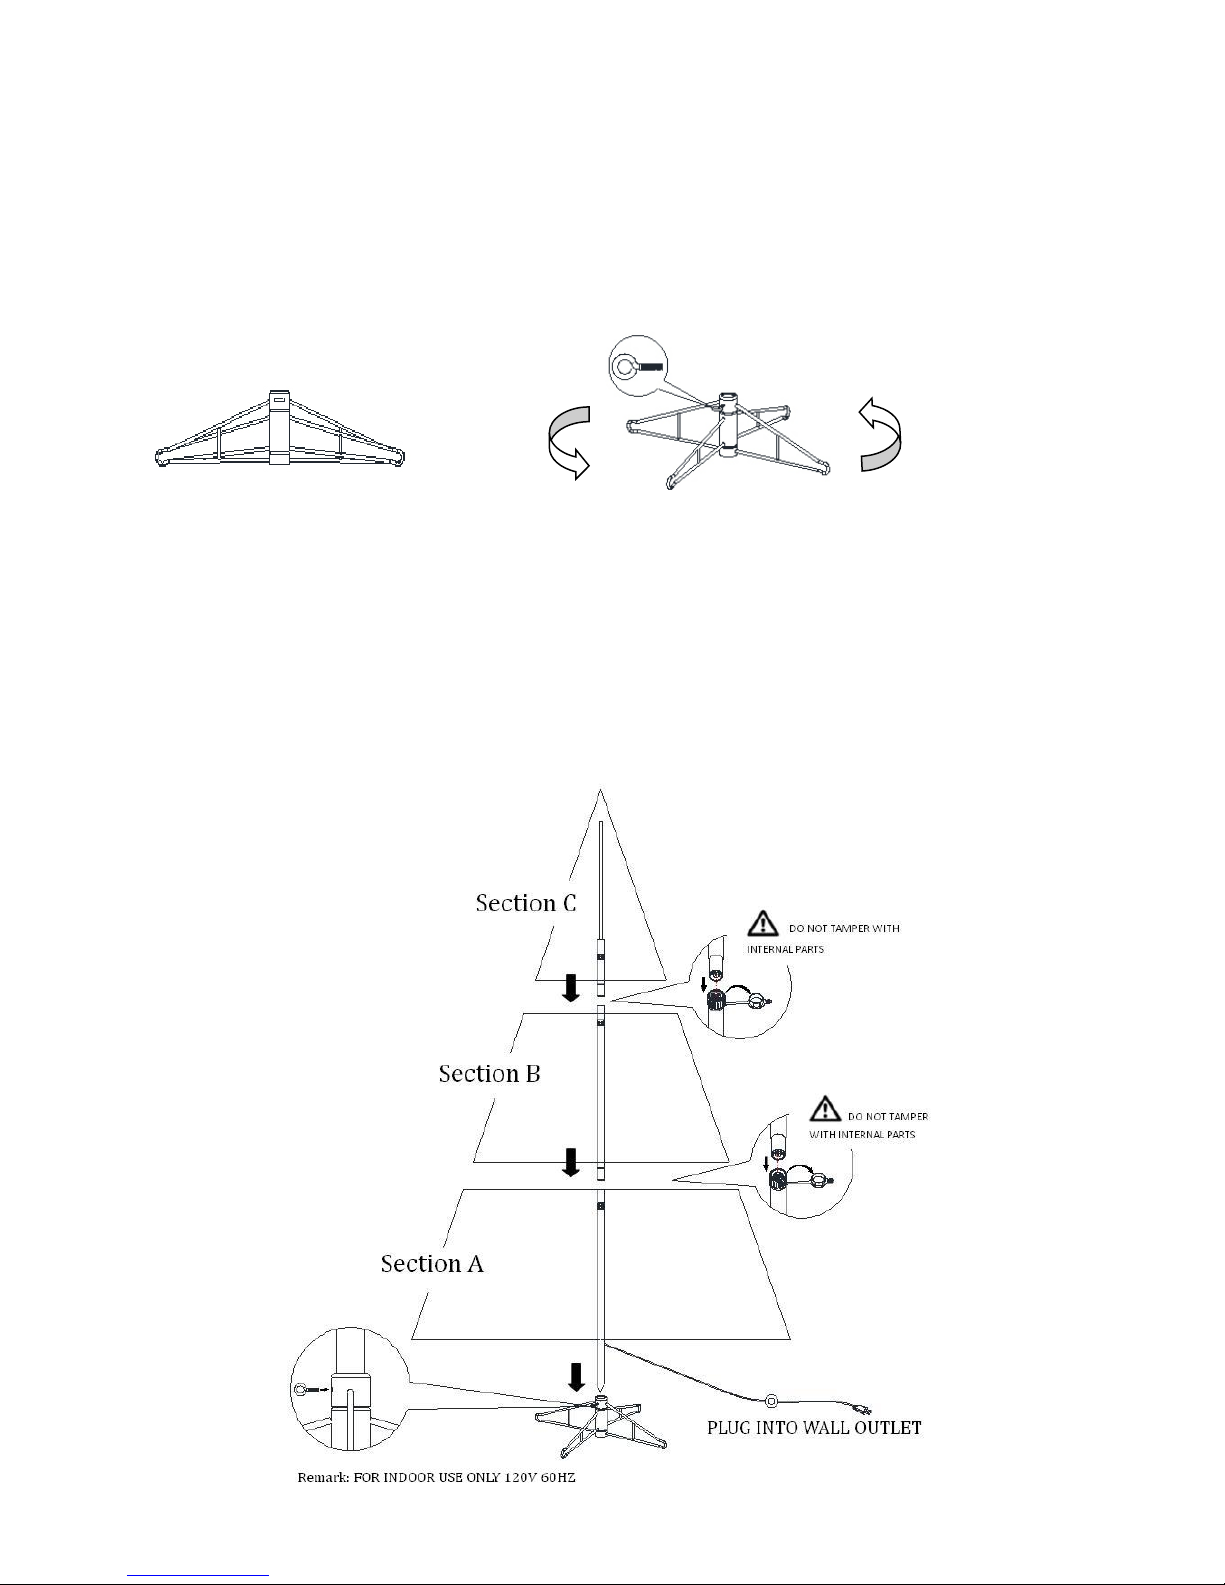
ASSEMBLY INSTRUCTIONS
Please remove plastic protective covers from the base of the pole for each section.
1. Assemble the tree stand and place on a level surface.
2. Insert the bottom (A) section into the assembled stand. Make sure the pole is firmly inserted and secured into the
stand.
3. Insert middle section (B) into bottom section (A).
4. Insert top section (C) into middle section (B).
5. The outlet in section (A) has a cord that hangs down. Position cord as near to the pole as possible. Locate
end of extension cord and plug into wall outlet. Please note this tree comes with an on/off foot pedal
switch for easy illumination.
IMPORTANT: Do not remove the tape wrapped around the outlets of the light set cords. The outlet you
need to plug into is not wrapped in tape and is clearly labeled. Only remove tape when inspecting fuses
(See Trouble Shooting section).
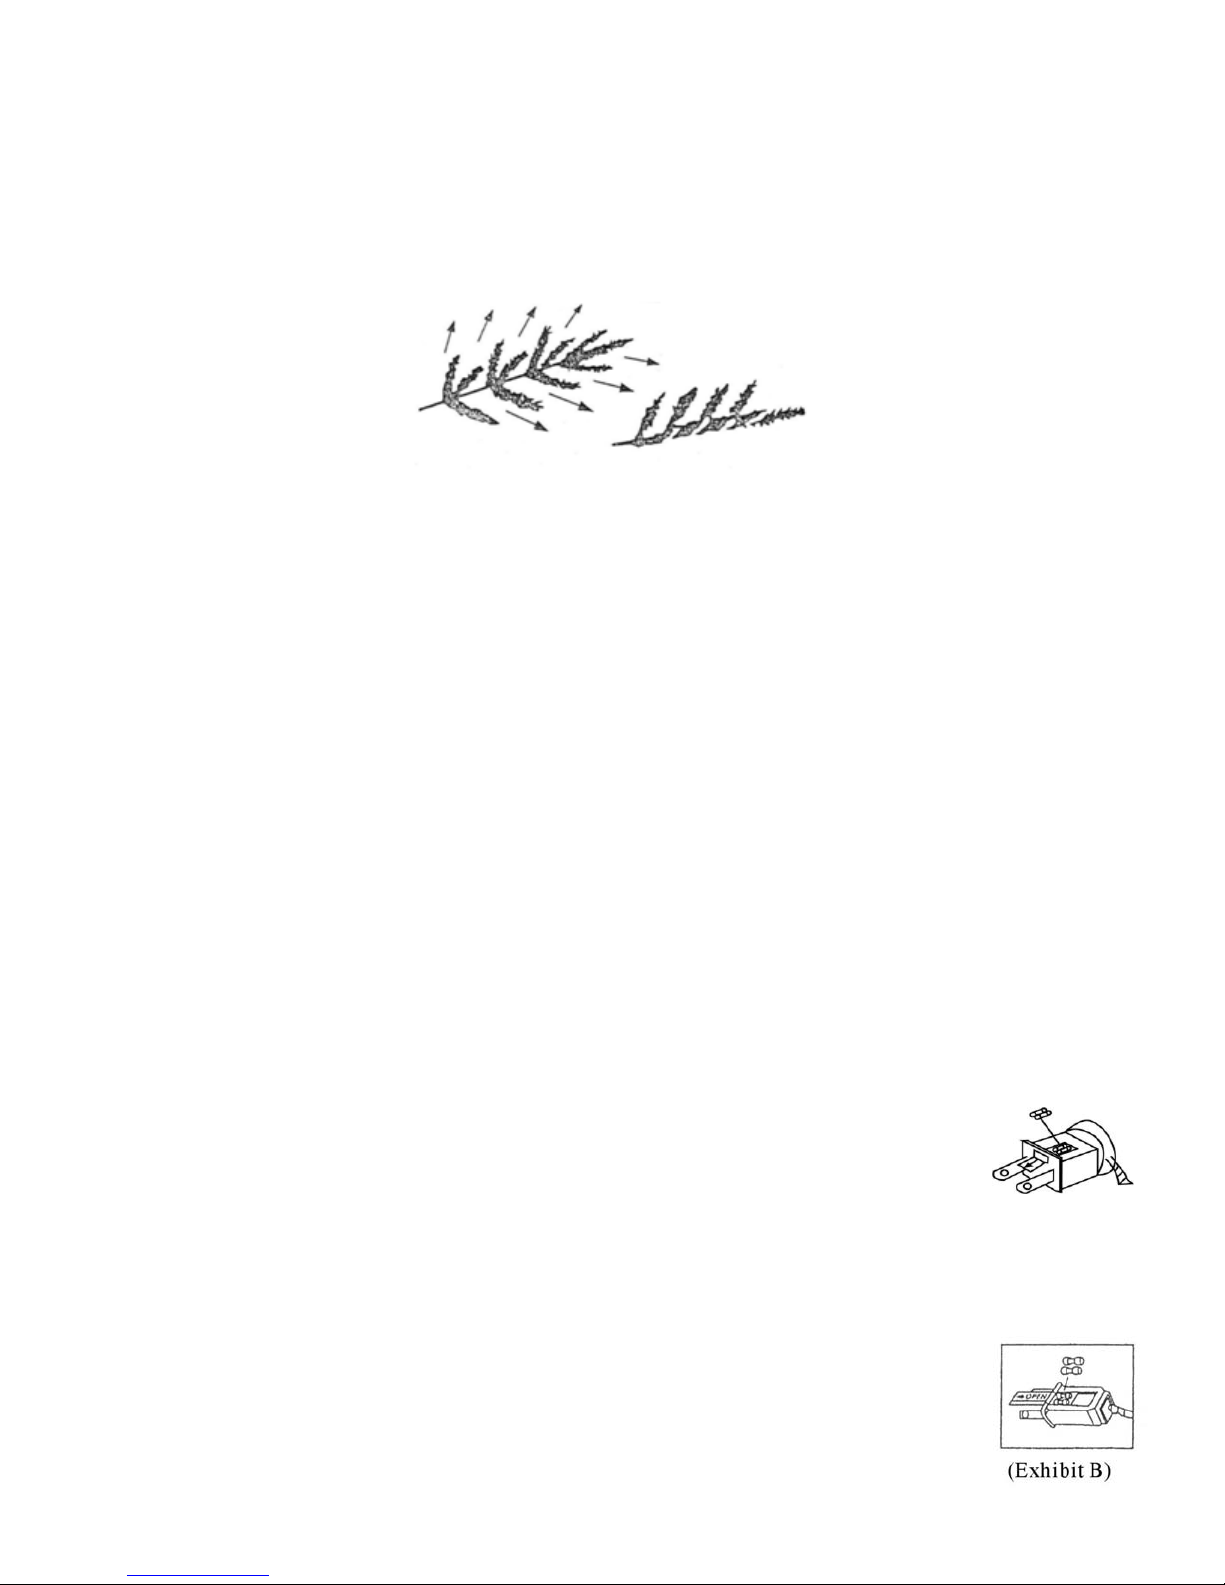
6. Gently pull all branches down and into place. When adjusting branches be sure that all wires are free of
branch hinges.
7. Shape the branches. Starting with tips closest to the pole - position one tip to the right, one to the left and
one at the center of the main stem as illustrated. Repeat pattern for each branch.
TROUBLE SHOOTING:
1. If entire tree does not light, make sure extension cord plug is securely inserted into a working
electrical outlet and that on/off foot pedal to insure it is in the “on” position..
2. If an entire section of the tree does not light:
a) Check to be sure that all plugs within the tree are securely connected.
b) Check fuse in the extension cord and replace if necessary (please note that the 5-Amp
extension cord fuse is different than the 3-Amp fuse used in the mini light sets).
IMPORTANT: This is the only time you are to remove the tape wrapping the outlets of
the light sets. Please remove tape to inspect fuses and replace tape to original condition
after inspecting.
3. Note: bulbs on this tree will burn out after normal use, please replace all burned out bulbs with
proper 2.5V mini replacement bulbs
CAUTION! – ALWAYS UNPLUG YOUR TREE FROM ITS POWER SOURCE BEFORE
ATTEMPTING EITHER FUSE OR BULB REPLACEMENT.
FUSE REPLACEMENT:
This product comes with overload protection (fuse). A blown fuse indicates an overload or short circuit. If a
fuse blows, unplug tree from wall outlet. Replace the fuse as per the fuse replacement instructions below
(follow product marking for proper fuse rating). If the replacement fuse blows, a short circuit may be present
and the product should be reviewed to determine the cause.
A) Light set fuse replacement (2 replaceable 3-amp 125V fuses are located in the plug)
1. Grasp plug and remove from its power source.
2. Locate blown fuse(s) by sliding access cover on top of plug towards prongs.
3. Remove blown fuse by turning the plug over. Fuse should fall into your hand
(Gentle tapping may be required). (Exhibit A)
4. Locate spare replacement fuses in spare parts bag.
5. Insert new fuses. Close fuse cover by sliding fuse access cover towards the cord.
CAUTION: To reduce risk of fire – replace fuse in extension cord with only 3-amp 125-volt fuse. Do not
replace attachment plug. Discard product if the attachment plug is damaged.
B) Extension cord fuse replacement (replaceable 5-amp 125V fuse is located in the plug):
1. Grasp plug and remove from its power source.
2. Locate blown fuse by sliding access cover on top of plug towards prongs.
3. Remove blown fuse.

4. Locate replacement fuse holder attached to cord near plug. Open holder and remove replacement
fuse.
5. Insert new fuse. Close fuse cover by sliding fuse access cover towards the cord.
CAUTION: To reduce risk of fire – replace fuse in extension cord with only 5-amp 125-volt fuse. Do not
replace attachment plug. Discard product if the attachment plug is damaged.
BULB REPLACEMENT:
1. Grasp plug and remove from its power source
2. Pull bulb AND plastic base straight out of socket. Do not twist bulbs while you are removing them.
3. Replace burned out bulb with 2.5-volt bulb ONLY. (Additional bulbs are included for your
convenience in spare parts bag).
IF PLUG DOES NOT FIT:
This product contains an extension cord with a polarized plug (one prong is wider than the other) as a feature
to reduce the risk of electrical shock. This plug will fit in a polarized outlet only one way. If the plug does
not fit fully into the outlet, reverse the plug. If it still does not fit, contact a qualified electrician. Do not use
with an extension cord unless the plug can be fully inserted. Do not alter or replace the plug.
BASIC PRECAUTIONS SHOULD BE FOLLOWED WHEN USING THIS PRODUCT:
(Inspect product carefully before using or re-using):
1. This is an electrical product – not a toy! To avoid risk of fire, burns, personal injury and electrical
shock it should not be played with.
2. Do not mount or place near gas or electric heaters, fireplaces, candles or other similar sources of heat.
3. Do not cover product with cloth, paper or any material when product is in use.
4. Do not hang ornaments or other objects from cord, wire, or light string. Hang ornaments only on the
tree itself.
5. For your safety, unplug the product when leaving the house, retiring for the night, or if left
unattended.
6. Do not let bulbs rest on the supply cord or on any wire.
7. Do not close doors or windows on the product or extension cords as this may damage the wire
insulation.
8. Do not remove tape on placed over mounted sockets. Any outlet you need to plug into is not wrapped
in tape. Only remove tape when inspecting fuses (see Trouble Shooting section).
9. Should you discover any of the following: a) cut, damaged, or frayed wire insulation; b) cracks in the
sockets; c) loose connections or exposed wires - please insure tree is unplugged and call 1-800-681-
3839 or email [email protected] for instructions.
STORAGE: Disassembled tree can be stored in its original box. Store tree in a cool dry place where the
temperature does not exceed 100 degrees Fahrenheit.
3 YEAR LIMITED WARRANTY
It warrants the original purchaser of this product against defects on the tree and the lights for 3 years. Original purchaser must retain proof
of such purchase in the form of an original store sales receipt and must produce such upon request. If you find defects on the product
within the warranty period, please call 800-681-3839 or email to athometrees@inliten.com for assistance.
This limited warranty is not valid if the product is found to have been consumer damaged or abused, used for commercial purposes, of it the
damage is caused by accident, acts of nature, consumer neglect, and failure to follow proper installation procedures or vandalism.
This manual suits for next models
1
Table of contents


