InnoMedia 6308SL User manual
InnoMedia
IP Phone 6308SL
Quick Install Guide
Introduction
The InnoMedia IP Phone 6308SL is an integrated device providing
telephony service over a broadband network. This guide will help
you to quickly install and congure your unit so that you can start
placing calls right away.
Package Contents
The InnoMedia IP Phone 6308SL comes with the following items:
1 IP Phone 6308SL
1 AC/DC Power Adapter
1 Ethernet Cable
1 Quick Install Guide
Note: Make sure you have received above items in the Package. If
anything is missing, please contact your network service provider.
Appendix A. LED Status Summary
LED Blinking State Description
Any LINE
Key
O The line has not been enabled or is not setup
Green Steady Thelinehassuccessfullyregisteredtotheserverand
is available for use
Amber Steady The line is not registered and is not available for use
GreenBlinking(.5sec
ON, .5 sec OFF)
The line is ringing with an incoming call
Green Blinking (1 sec
ON, 1 sec OFF)
The line has a voicemail message waiting
Red Steady The line is being actively used
Red Blinking (.5 sec
ON, .5 sec OFF)
The line is on HOLD
SPEAKER Green Steady Speakerphone is in use
O Speakerphone is not in use
VMWI Red Steady New voicemail is waiting
O No new voicemail
Specications
Network Interface Dual 10/100 Base-T Uplink/Downlink
PoE 802.11af
Display Interface 4 line character-based LCD Display
Visual Message Waiting Indicator (VMWI)
Dimension 2.14 in (H) x 6.10 in (W) x 8.12 in (D)
72 mm x 180 mm x 220 mm
Power Supply Input: AC 100-240V, 1.0A max., 50-60Hz
Output: DC 12V, 1.0A
Power Consumption Talk: DC 12V @ 0.26Amps (3.12W)
Idle: DC 12V @ 0.18 Amps (2.16W)
Weight Weight: 1.64 lbs (744g)
www.innomedia.com
©2008InnoMedia,Inc. Allrightsreserved.InnoMediaandtheInnoMedia logoaretrademarks ofInnoMedia,Inc.Allother
brand and product names may be trademarks of their respective companies.
Version 1.2; 03-09
FINDING A CONTACT
You can view the contents of the phonebook , and also dial a con-
tact directly from the phonebook.
1. Press the DIRECTORY button
2. Select 3. Browse, then press Enter
3. Press the >> button to browse the phonebook entries
4. Once you have found the contact you wish to call, press CALL to
connect to them
Troubleshooting
Problem:
I have no dial tone
Solution:
Your unit may not have successfully connected to the network.
1. Unplug the power of the unit
2. Check to make sure you connected the Ethernet cable from
your broadband modem to the WAN port on the back of the IP
Phone
3. Plug in the power of the unit and wait for a few seconds while
it initializes
4. When LED light stays solid green, you may try again to make a
phone call
Please contact the service provider if you are still having a problem
receiving dialtone.
*Picture shown is the IP Phone 6308SL
Installation
Before Starting the Installation:
Please wait about 5 to 6 seconds after you insert power cable, and wait for
LCD to show information.
1. Make sure your broadband Internet access device is powered on
and your connection is up. (See your service provider’s documen-
tation).
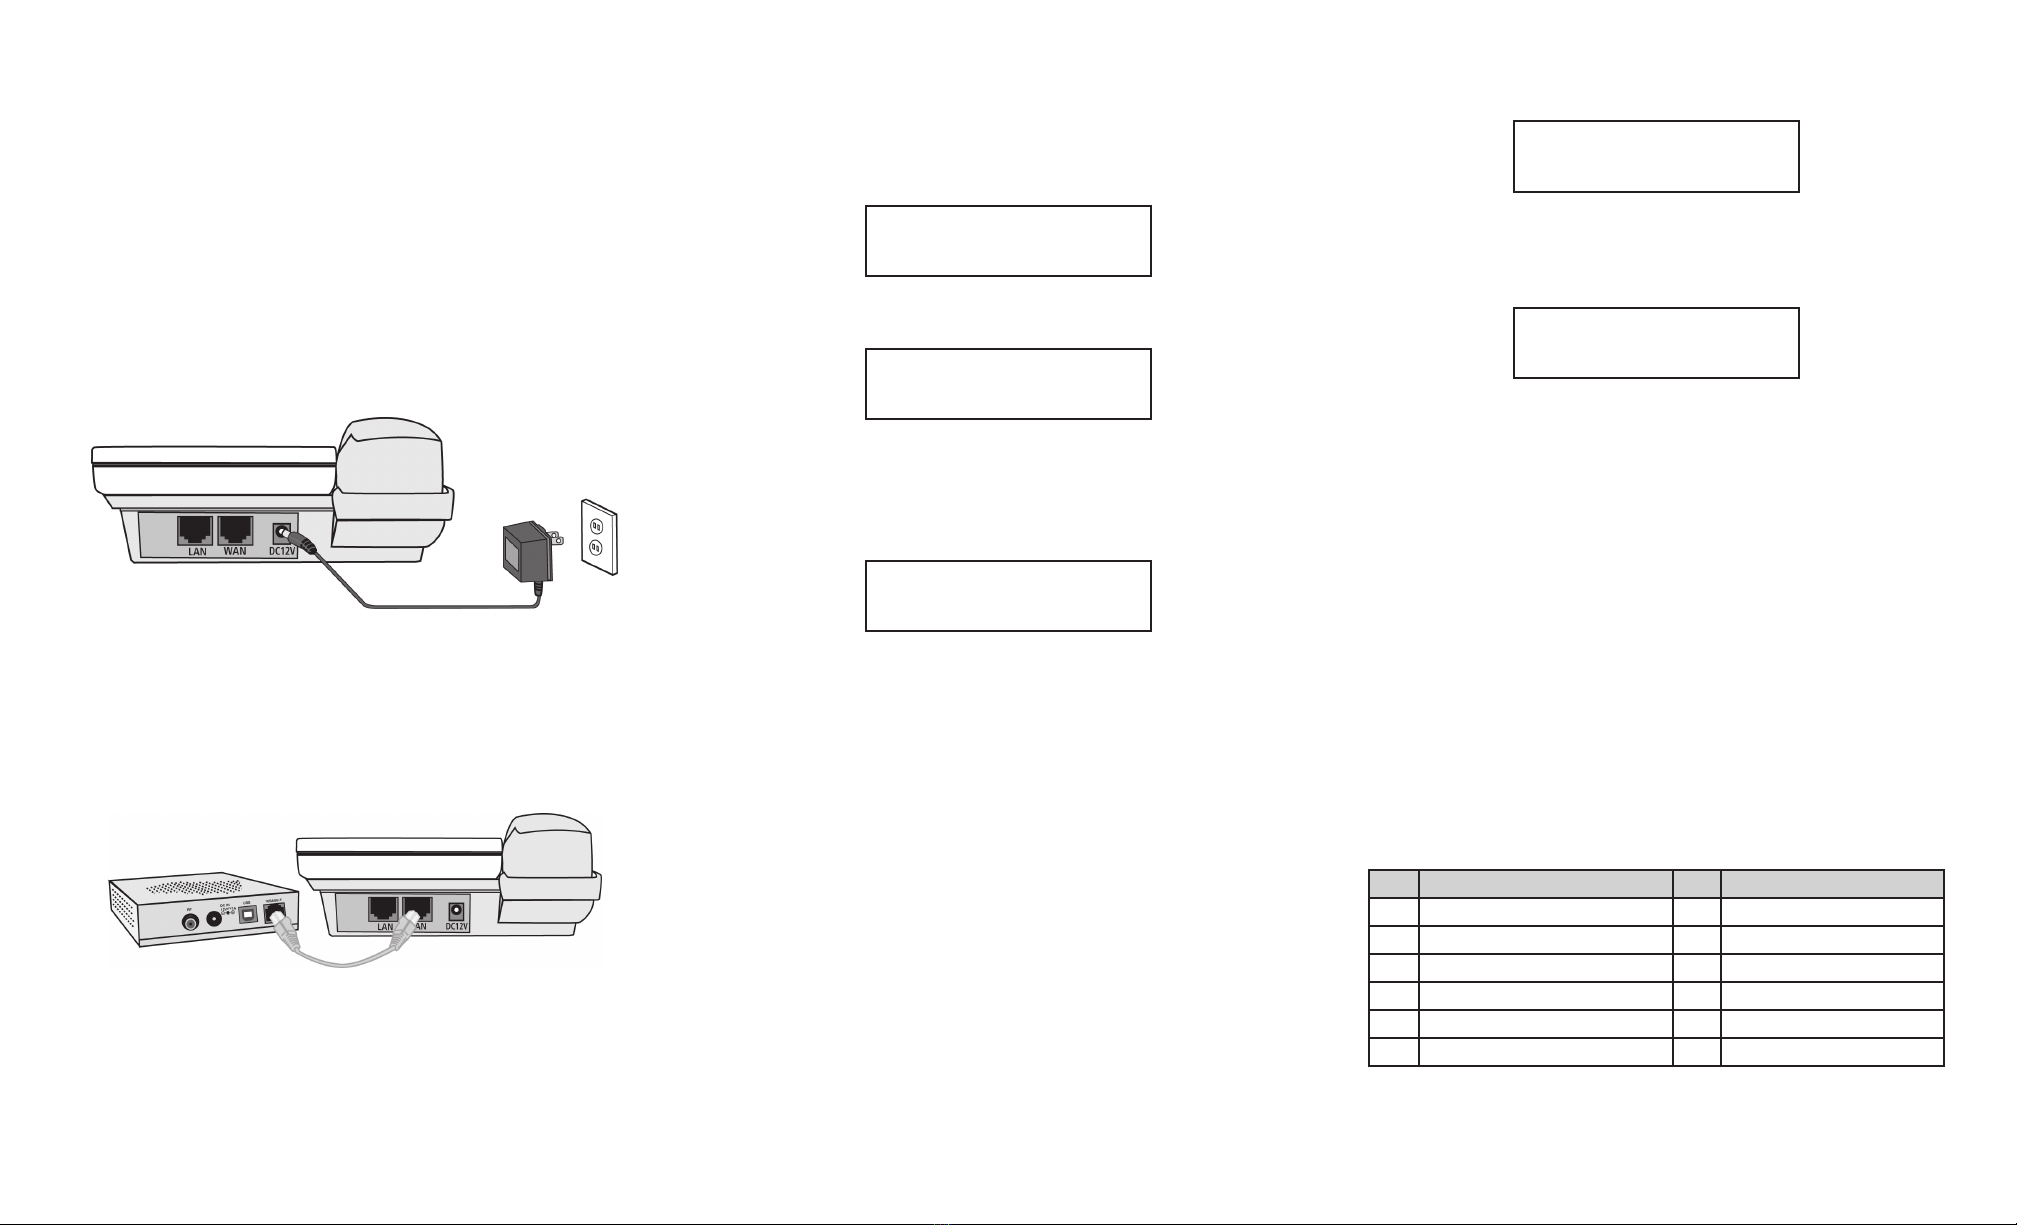
2. Connect included AC/DC power adapter to the electrical outlet
and its cable to the DC IN port on the back of the IP Phone (see
Figure 1).
3. Connect one end of the included Ethernet cable to the WAN
port on the IP Phone (see Figure 2) and the other end of the
Ethernet cable to the Ethernet port on your broadband Inter-
net access device (e.g., cable modem, ADSL modem, wireless
modem, etc).
NOTE: If you also want to use your PC to access the same broadband
IP network, connect one end of your PC’s Ethernet cable to the LAN
port on the IP Phone and the other end of the Ethernet cable to the
Ethernet connector on the back of your PC.
Operating the IP Phone
INITIALIZATION
• When the unit is powered on, the display will show the following
message for a few seconds:
Initializing...
Acquiring IP...
• When the unit has successfully connected to the network, you
will see the date and time displayed:
Jan 20 2:20AM
IP: 172.16.0.1
MAKING CALLS
• Pick up the handset or press the SPEAKER key
• You should hear a dial-tone and see the following on the display
when dialing:
Calling
14084325400
The number you dialed will be displayed.
• When your call is completed, simply hang up the handset and/or
click o the SPEAKER key
CALLER ID SERVICE
Your unit is compatible with Caller ID service oered by your service
provider. If you have subscribed to this feature, the calling party’s
information will be displayed after the rst two rings.
If the calling party has blocked its Caller ID, then the display will
show Anonymous Caller.
CALL LOGS
In conjunction with the Caller ID feature, your unit stores logs for up
to 10 calls, including the time and date.
The Call Log information is sorted by the most recent to the oldest
call. When the log has reached its maximum capacity, the oldest call
will be deleted as each new call is recorded.
If you have missed any calls while you were away, then your unit
will provide a visual indication:
3 missed calls
Enter for log
If you press Enter you will be immediately taken to the Missed Calls
log, where you can review the calls that you missed while you were
away.
1.John Doe
14085551212
Figure 1
Figure 2
To view additional log entries, simply press the << or >> buttons on
your unit.
Note: If you power o your unit, then all call logs will be cleared.
USING THE PHONEBOOK
The Phonebook feature allows you to store up to 10 contacts’ names
and phone numbers.
ADDING A CONTACT
You can add contacts to your phonebook by doing the following:
1. Press the DIRECTORY button
2. Select 1. Add, by pressing Enter again
3. Enter the contact’s name and press the SAVE soft key
4. Enter a phone number for the contact and press DOWN
5. The new contact is now stored in your phonebook.
To enter characters and symbols while in the phonebook, simply
use the dialing pad on your unit. The following table describes the
characters available with each press of the keypad:
Key Characters Key Characters
1 @ & ‘ ( ) , - . / 1 7 P Q R S p q r s 7
2 A B C a b c 2 8 T U V t u v 8
3 D E F d e f 3 9 W X Y Z w x y z 9
4 G H I g h i 4 0 0
5 J K L j k l 5 * *
6 M N O m n o 6 # #
When entering characters, you may press DELETE if you need to
erase a mistake. Press >> to enter a space.
Other InnoMedia IP Phone manuals


