InnoMedia MTA 3368 User manual

InnoMedia
MTA 3368 IP VideoPhone
Version 1.05
QuickStart Guide
H.323, SIP and MGCP

I. Introduction
InnoMedia MTA 3368 IP VideoPhone is a compact, all-in-one desktop
phone that takes the complexity out of videoconferencing and enable easy
to use and real-time face-to-face video calls anywhere in the world over a
broadband IP network.
II. Usage Environment
Design to suit both residential and enterprise environment, the InnoMedia
MTA 3368 IP VideoPhone achieves best performance when it is being
deployed in a broadband network with the following conditions:
QoS LAN or cable modem connections
Network that supports 10/100 BaseT equipment
Managed network that guarantees a minimum bandwidth of 64 kbps
Ethernet connections offering minimum bandwidth requirement of 64 kps
NO Firewall configured within the LAN environment
Network that is NOT operating behind Network Address Translation (NAT)
III. Installation & Setup Requirements
The following system settings have to be configured before making any calls.
You can either manually assign a fixed setting or leave the setting as 0.0.0.0
to enable auto provisioning by DHCP server
H- settings for Videophone to register to a H.323 Gatekeeper
S- setting for Videophone to register for a SIP Call Agent/Proxy
IP Address
Netmask
Default GW
Gatekeeper H (optional) – To enable calling via Phone number / Ext
number
Call Agent S(compulsory) – To enable calling via phone number
Phone number (min. 3 digits) – Have to ensure the assigned phone
number is configured into the GateKeeper/Call Agent as well
Network BW – select operating bandwidth between 64 kbps – 768 kbps

IV. Setting up MTA 3368 IP VideoPhone
Below is an illustration of the overall setup of the MTA 3368 IP VideoPhone.
Figure 1.1 Overall connection
A. Connecting IP VideoPhone
1. Connect up the accessories, which include the CCD camera, telephone
handset and cord to the videophone main body.
2. Please ensure CCD camera is compatible to the wall socket frequency
before connecting the camera to the videophone main body, refer to the
table below
Frequency Camera
50Hz PAL
60Hz NTSC
3. Plug your network cable (RJ45) into the 'UPLINK' connector at the back of
the unit.
4. Connect one end of the power adapter* to the '12V DC 1.5 A' power
connector at the back of the videophone unit and the other end to the wall
power supply.
Power Supply
Ethernet
Switch/ Hub

5. Switch on the videophone. During boot up, the ring indicator will be lighted
up in green and a series of diagnostics will be conducted by the
videophone
6. Once the boot-up process is successfully completed and the videophone
is ready, the ring indicator light goes off and the orange power light
changes to green. A local view will appear on the LCD screen. The main
menu will appear on the LCD screen, beneath the images.
* Check that you have the correct power rating for your power adapter.
B. Configuring the System Settings
Once the hardware connection is successfully completed and powered up, the
next step would be to configure the IP VideoPhone System settings before
calls can be made.
The four softkeys (yellow tabs) on the screen can be accessed using the
corresponding function buttons F1, F2, F3 and F4 on the videophone unit.
H,M SoftKeys
SSoftKeys
Buttons
For example to select view of , press
Below are the basic settings necessary for making a video call. Please
consult your system administrator for the correct settings.
[Note] To access the System Settings, please enter the password
8888 at the prompt
Basic settings for H.323, SIP and MGCP software
Fields Remarks
IP address ^ ** Either
Static IP – Manually enter the IP address of the
videophone.
or
Dynamic IP – DHCP server will assign the unit with an
F1
Phonebook
F2 F3 F4
AboutSettingsCall History
F1
Phonebook
Phonebook InfoDisconnectCall History

Fields Remarks
IP address, when the field is left blank or configured as
0.0.0.0
Netmask ^ ** Either
Manually enter the Netmask of the network
or
DHCP server will assign the unit with a Netmask, when
the field is left blank or configured as 0.0.0.0
Network BW Select the preferred video bandwidth setting for your
video call depending on your network bandwidth
availability
For optimum performance set BW at 128kbps.
Default GW ^ Either
Manually enter the Gateway IP in the network or
or
DHCP server will configure the Gateway IP of the unit,
when the field is left blank or configured as 0.0.0.0
GateKeeper H
(optional)
IP VideoPhone will register with a GateKeeper iff the
settings is configured
Call Agent S
(compulsory)
IP VideoPhone will register with a SIP Call Agent iff the
settings is configured
User name
(optional)
The assigned name will be used as the caller ID when
device is making outgoing calls
Phone number
(H.323 - optional)
(SIP -
compulsory)
The assigned phone number/ext is used to make calls
via phone number/ext between devices. It is
compulsory that both devices are registered to the
same gatekeeper
FQDN[M] Manually enter the Domain Name or IP address
assigned e.g. Videophone@innomedia.com
EndPoint ID[M] Manually enter the assigned setting, whose formats
include phone number or username or customized ID
e.g. aaln/1
MGCP variant [M]
Depending on the MGCP Call Agent type, select
between Telcordia and MGCP 1.0/NCS variant
^ Compulsory Settings
** The settings obtained can be viewed in Info -> About menu.
[M] MGCP settings only

H.323 , SIP and MGCP optional Settings
Fields Remarks
Menu Password Default Password is 8888, for subsequent PW changes
Go to Settings -> System page
Enter new password in Menu Password settings or
Leave the settings blank to disable the feature
GK Password The feature supports MD5, RAS authentication.
Enter a password (can be both alphanumeric) which is
used for authentication when Videophone registers to a
GateKeeper
IVAS Address The Upgrade server provides new firmware notices to
all registered end devices and also supports firmware
upgrade process
Enter the IP address of the Upgrade server.
SNTP Address The server provides the time settings in Videophone
Enter the IP address of the Time server.
Timezone GMT Scroll and select one out of the 29 pre-configured time
zones
Auto answer Select 1 ring,2 rings,3 rings,4 rings or 5 rings.to
enable Videophone to auto answer mode. Select Never to
disable feature
Screen saver This feature enables LCD to power down when
VideoPhone is in a power save mode.
Select either 5s, 10s, 30s, 1 min, 2 mins, 10 mins,
30 mins, 1 hour or never
Language Select English or Chinese for the preferred language
display in Menu and LCD messages
PPPoE Select On or Off to control the activation of the feature to
support PPPoE deployment
Audio codec Select either G.711 A-law, G.711 u-law or G.723.1 and
G.729 for the preferred audio codec standard
Video size Select either CIF for resolution at 352 x 288 pixels or QCIF
for resolution at 176 x144 pixels
Video quality Select either High, Average or Low for the preferred video
quality settings
Please reboot your videophone after configuring the above settings.

Example:
To configure the system settings:
Press <SETUP> Sbutton or for Settings, then press to enter
the System menu
Case 1 - DHCP mode or PPPoE mode
IP - 0.0.0.0
Netmask - 0.0.0.0
Default GW - 0.0.0.0
Network BW - 128 kbps
Case 2 – Static IP mode
IP - 192.168.0.1 (virtual) or 202.79.82.122 (real)
Netmask - 255.255.255.0
Default GW - 202.79.82.121 (Determined by your network
administrator)
Network BW - 128 kbps
[Note]
PPPoE, DHCP and Static IP are mutually exclusive modes
PPPoE is enabled when PPPoE is set to On, IP address, Netmask and
Default GW settings are invalid
DHCP mode is enabled, when PPPoE is set to Off, IP address is set to
0.0.0.0
For DHCP and PPPoE mode, press to
with the network
Static IP mode is enabled when PPPoE is set to Off, and IP address,
Netmask and Default GW are configured accordingly
Your network administrators usually configure these system settings.
Please refer to your network administrator for more details.
F2
F3
F3 Disconnect/Connect
V. Quick Feature References
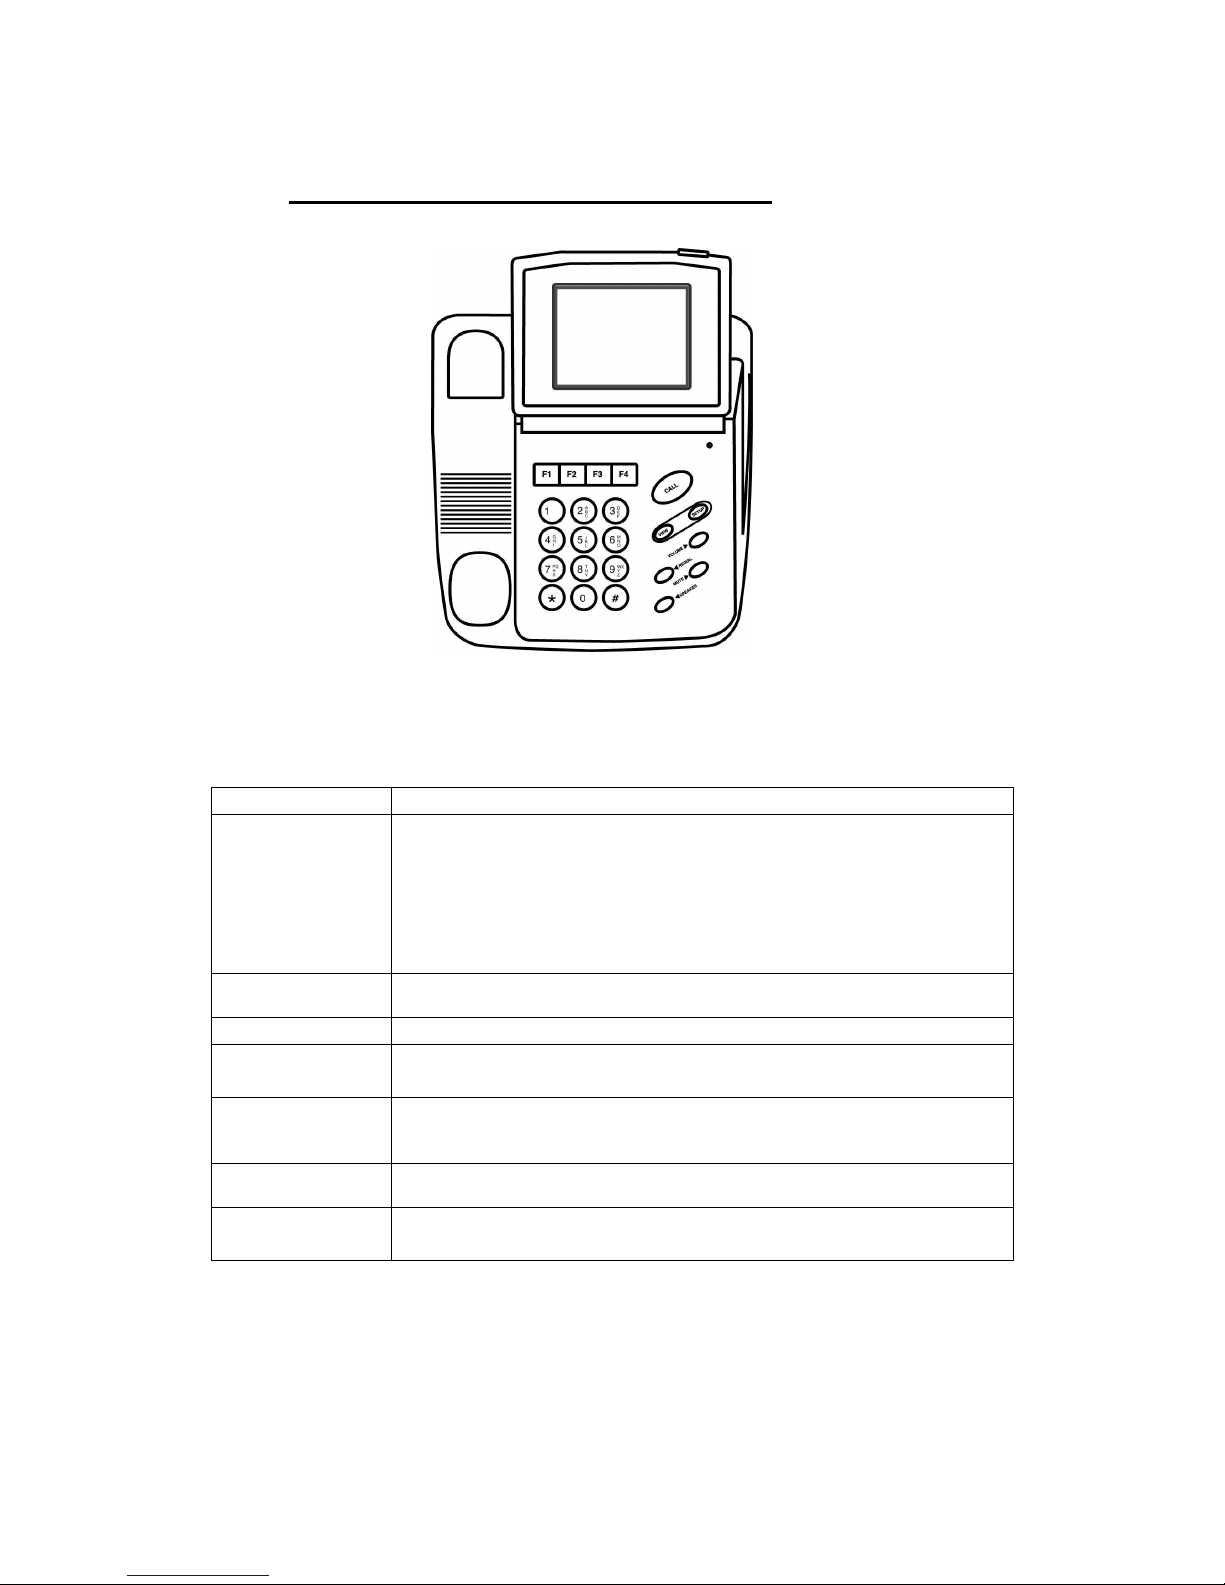
Figure 1.3 InnoMedia MTA 3368 IP VideoPhone main body
A. Key Panel User Interface
Hard Keys Functions
<CALL>
1. Direct Dialing
• Enter either the IP address or the phone number to call, then
press <CALL>M.
2. On-screen PhoneBook and Call History auto-dialing
• Press <CALL> to display the on-screen phone book. Scroll to
the name of the person you wish to call and press <CALL>
again.
<VIEW> Press to toggle between SELF view, REMOTE view or BOTH views
during videoconferencing.
<REDIAL> Press to call the last number dialed.
<SPEAKER>
Press to activate speakerphone mode. Pressing this button again
deactivates the speakerphone mode unless the handset is picked up.
<VOLUME> Press to adjust the volume during conversation in speaker or handset
mode, as well as to adjust the ringer volume when the videophone is in
idle mode.
<MUTE> Press to activate audio mute so that the remote user is unable to hear
you.
<SETUP>
Press to configure the System Settings and view the system component
information.
MFor MGCP version, direct dial only requires the entry of the phone numbers

Navigation Menu [H.323]
The following chart is an overview of the Navigation Menu of the MTA 3368 IP
VideoPhone [H.323]
VI.
VII.
VIII.
IX.
* For Videophones with SIP software, Detail setting is replaced by Clear All –
this enables videophone to Clear All the existing records in the end devices
8 IP Address
8 Netmask
8 Default GW
8 OS version
8 FW version
8 SW version
8 Protocol**
8
Incoming
➥ Up
Scroll on existing list
➥ Down
➥ Details *
User Name
Phone Number
Start Time
Duration
Status
➥ Back
8 Outgoing
8 Exit
F1
F2
F4
8 Up
➥ Scroll on existing list
8 Down
➥ Scroll on existing list
8 New
➥ Create new entry
8 Exit
➥ Return to Default Menu
Phonebook
About
8
System
➥ Up
➥ Down
➥ Change
➥ Exit
8 Vsource
➥ Internal
➥ External
➥ Exit
8 Privacy
➥ On/Off
8 Exit
F3
Settings
Call History
8
Username
8 Menu PW
8 Phone number
8 IP address *
8 Netmask *
8 Default GW *
8 Gatekeeper 1
8 Gatekeeper 2
8 Gatekeeper Password
8 IVAS address
8 SNTP address
8 Network BW
8 Timezone GMT
8 Auto Answer
8 Screensaver
8 Language
8 PPPoE – On/Off *
➥ PPPoE user
➥ PPPoE password
8 Audio Codec
8 Video size
8 Video quality
System
F1

B. Navigation Menu [SIP]
The following chart is an overview of the Navigation Menu of the MTA 3368 IP
VideoPhone [SIP]
* When PPPoE is set to On, IP address, Netmask and Default GW settings
will not be available
8 About
➥ Phone number
➥ IP Address
➥ Netmask
➥ Default GW
➥ Mac Address
8 Version
➥ OS version
➥ Video version
➥ Audio version
➥ SW version
8
Incoming
➥ Up
Scroll on existing list
➥ Down
➥ Details *
User Name
Phone Number
Start Time
Duration
Status
➥ Back
8 Outgoing
8 Exit
F1
F2
F4
8 Up
➥ Scroll on existing list
8 Down
➥ Scroll on existing list
8 New
➥ Create new entry
8 Exit
➥ Return to Default Menu
Phonebook
Info
8
Username
8 PPPoE * - On
➥ PPPoE user
➥ PPPoE password
8 IP address *
8 Netmask *
8 Default GW *
8 Pri DNS address
8 Sec DNS address
8 Timezone GMT
8 Auto Answer
8 Screensaver
8 Video source
8 Language
8 Time
User
Call History
F1
8
Username
8 Phone number
8 Acc password
8 PPPoE * - On/Off
➥ PPPoE user
➥ PPPoE password
8 IP address *
8 Netmask *
8 Default GW *
8 Pri DNS address
8 Sec DNS address
8 Call agent 1
8 Call agent 2
8 IVAS 1 address
8 IVAS 2 address
8 SNTP address
8 Network BW
System F2

C. Navigation Menu [MGCP]
The following chart is an overview of the Navigation Menu of the MTA 3368 IP
VideoPhone [MGCP]
8 IP Address
8 Netmask
8 Default GW
8 OS version
8 FW version
8 SW version
8 Protocol**
8
Incoming
➥ Up
Scroll on existing list
➥ Down
➥ Details *
User Name
Phone Number
Start Time
Duration
Status
➥ Back
8 Outgoing
8 Exit
F1
F2
F4
8 Up
➥ Scroll on existing list
8 Down
➥ Scroll on existing list
8 New
➥ Create new entry
8 Exit
➥ Return to Default Menu
Phonebook
About
8
System
➥ Up
➥ Down
➥ Change
➥ Exit
8 Vsource
➥ Internal
➥ External
➥ Exit
8 Privacy
➥ On/Off
8 Exit
F3
Settings
Call History
8
FQDN
8 Endpoint ID
8 IP address
8 Netmask
8 Default GW
8 Call Agent
8 SNTP address
8 Network BW
8 Timezone GMT
8 Daylight Savings
8 Auto Answer
8 MGCP Variant
System
F1

MakingCalls
A. Calling Methods
There are 4 simple ways to call another IP Videophone user.
Method 1 - Direct dial via IP address Hor phone number H,S or
extension H,S
Method 2 - Phonebook H,S
Method 3 –Call History H,S
Method 4 - Redial H,S
Method 1a – Direct Dial (via IP address) H only
1. Enter the number you wish to dial. The videophone allows user to call
using the IP address or phone or extension. If you are entering a remote
IP address, please use '✶' to enter the dot delimiter.
E.g 202 ✶79 ✶82 ✶122 for the IP address 202.79.82.122
2. Once the telephone number or IP address is entered, press <CALL> to
start dialling. You will see the message 'Dialling (IP address)' followed by
'Ringing…' once the call is successful. Wait for the remote user to pick up
the call to begin your videoconferencing session. To end the call, simply
hang up the phone.
Method 1b - Direct Dial (via phone number or ext. to a Gatekeeper) H,S,M
MTA 3368 IP VideoPhone is require to register to a H.323 gatekeeper/ SIP
Call Agent for direct dialling of phone number or extension number
1. Enter the phone number/ extension number of the remote videophone,
then press <CALL>.
2. You will see a message similar to ' Dialing (phone number /
extension)'…. Wait for the call to be picked up.
[Note] For MGCP version, making an out going call via Direct dial requires
the user to enter the phone number without pressing the button
CALL

Method 2 – Phonebook H,S, M
1. Press <CALL> or press to access the PhoneBook. Scroll to the
name of the person you wish to call using the Up and Down function keys
(F1 and F2).
2. Once the name of the person whom you wish to call is selected, press
<CALL> to start dialing. You will see a message similar to ' Dialing
(name)…' Wait for the remote user to pick up the call to begin your
videoconferencing session. To end the call, simply hang up the phone.
Method 3 – Call History H,S,M
1. Select to enter either incoming / outgoing calling records
2. Scroll through the call records and select phone numbers to call
3. Press <CALL> to activate dialling function
Method 4 – REDIAL H,S,M
If you wish to re establish the video call with the person whom you have just
finished calling, you will find the Redial feature useful.
1. Pressing <REDIAL> while the handset is on-hook will initiate the call
connection to the last dialled number.
2. You will see a message similar to ' Dialing (name)…' Wait for the remote
user to pick up the call to begin your videoconferencing session. To end
the call, simply hang up the phone.
B. During video conversation
Once the video call is successfully connected, you will immediately see the
image of the person you are talking to. There are some features that you can
tune or adjust to optimise your videoconferencing experience:
i) Volume level
The <VOLUME> button allows the loudness of the audio source to be
adjusted.
F1

ii) Audio mute
Press <MUTE> to block your voice from being transmitted if you do not
wish to be heard by the remote user.
iii) Privacy mode
Pressing <PRIVACY> blocks your image from being transmitted so that
the remote user sees only a blue screen.
iv) Brightness & Contrast
The brightness and contrast can be controlled using the respective
buttons by the right side of the videophone.
C. Receiving calls
a. Manual answering using handset or speakerphone
When there is an incoming phone call, the phone will ring and the ring
indicator will start flashing. At the same time, the LCD screen will display the
name or the IP address of the caller. To answer the call, simply pick up the
handset or press <SPEAKER> to answer in speakerphone mode.
b. Auto answer mode
You may also enable the auto answer feature so that your videophone will
automatically pick up the call as soon as it detects an incoming call. To enable
this feature,
HGo to <Settings> ➔<System>
S Go to <SETUP> ➔<User>
Scroll to Auto Ans then set it as 1 ring,2 rings,3 rings,4 rings or 5 rings.

D. Summary of Features / Functions
Videoconferencing
4” TFT Colour LCD
High frame rate - max at 30 fps
CIF resolution (352 x 288 pixels)
QCIF resolution (176 x 144 pixels)
Privacy mode to block local image, i.e. no local view for remote party
• Can switch between Remote and Self View PIP
• Video out connectivity to TV, VCR or projector
• Video input for external camera, camcorder, VCR, DVD, or digital camera
• PAL and NTSC format support for input; NTSC only for output
• High Quality CCD
• Adjustable focus
Remote web management (videophone upgrade, system configurations &
password customisation)
Multi-party conferencing with external MCU
Telephone
• Speakerphone
• Full digital volume control for Speakerphone, handset and ringer
• Last number redial
• Speakerphone and handset mute
• Build-in phonebook unlimited means of storing IP address/Phone number
• Incoming Caller ID
• Call to PSTN (via Gateway)
• Auto-answer option for remote surveillance
* Specifications subject to change without notice.
Table of contents
Other InnoMedia IP Phone manuals


