Innoquest SpotOn FM-15 User manual
Innoquest Item # 26060
Product Manual
1
Table of Contents
1.0 Introduction………………………………..2
1.1 Meter Diagram………………………..2
1.2 Features……………………………….2
2.0 Specifications…………………………….. 3
3.0 General Meter Operation……………….. 4
3.1 Nozzle Boot Use……...………………4
3.2 Taking a Measurement……………... 5
3.3 Setting Display Units.……………….. 5
3.4 Turning Meter Off………..……..…… 6
3.5 Installing Batteries…………………... 6
4.0 Troubleshooting………………................ 6
5.0 Warranty & Service……….………………7
2
1.0 Introduction
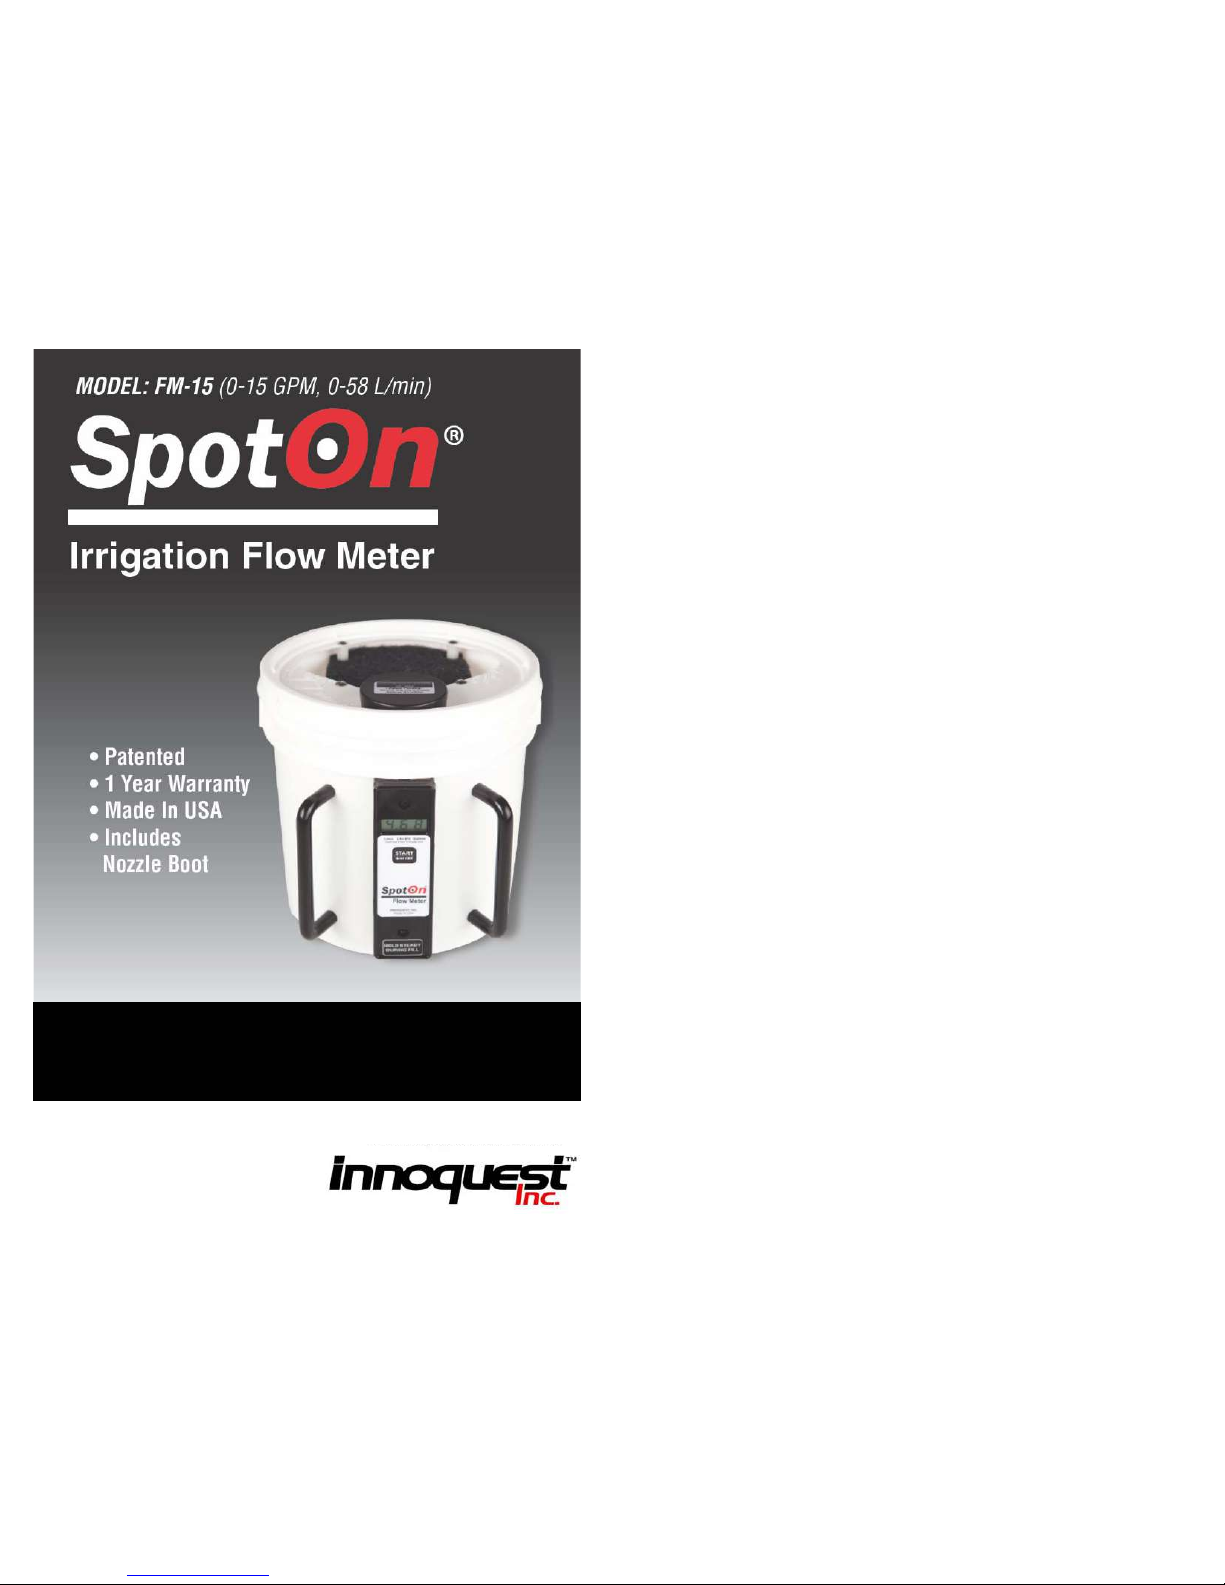
1.1 Meter Diagram
1.2 Features
•Measures up to 15 GPM (58 Liters/min)
•Test for worn/plugged nozzles as well as regulator problems
•Simple waterproof design has no moving parts
•Digital readings in either GPM, Liter/min, or Liter/hr
•Just place under flow until reading is displayed
•Patented Design US # 8,297,131
LCD Display
Diffuser Pad
START Button
Battery Cover
3
2.0 Specifications
Measurement Range: .08-15.0 GPM, .30-58 L/min, 20-3480 L/hr
(Gallons are US Gallons)
Accuracy: Greater of +/- 4% or one digit (Meter must be held steady
during fill for best accuracy)
Resolution: 0.01 GPM (.08 – 9.99 GPM) or 0.1 GPM (10.0 – 15.0 GPM)
0.01 L/min (0.30 – 9.99 L/min) or 0.1 L/min (10.0 – 58.0 L/min)
10 L/hr (20 L/hr – 3480 L/hr)
Battery: Two (2) “N” size alkaline batteries (included)
Battery Life: 2 years, meter has low battery indicator
Size: 8.0 in (20.3cm) tall by 8.0 in (20.3 cm) diameter
Weight: 1.2 lbs (545 g) weight
Construction: Break resistant plastic & Stainless Steel
Environmental: 35-120°F (2-49°C) / up to 100% RH temporary use with
a period to allow meter to dry out. Do not use meter then place
in air tight container while still wet.
Fluid Compatibility: Water and water based solutions only
Country of Origin: Made in USA
4
3.0 General Operation
Note: See Demo Video on www.YouTube.com
(Search SpotOn Irrigation Flow Meter)
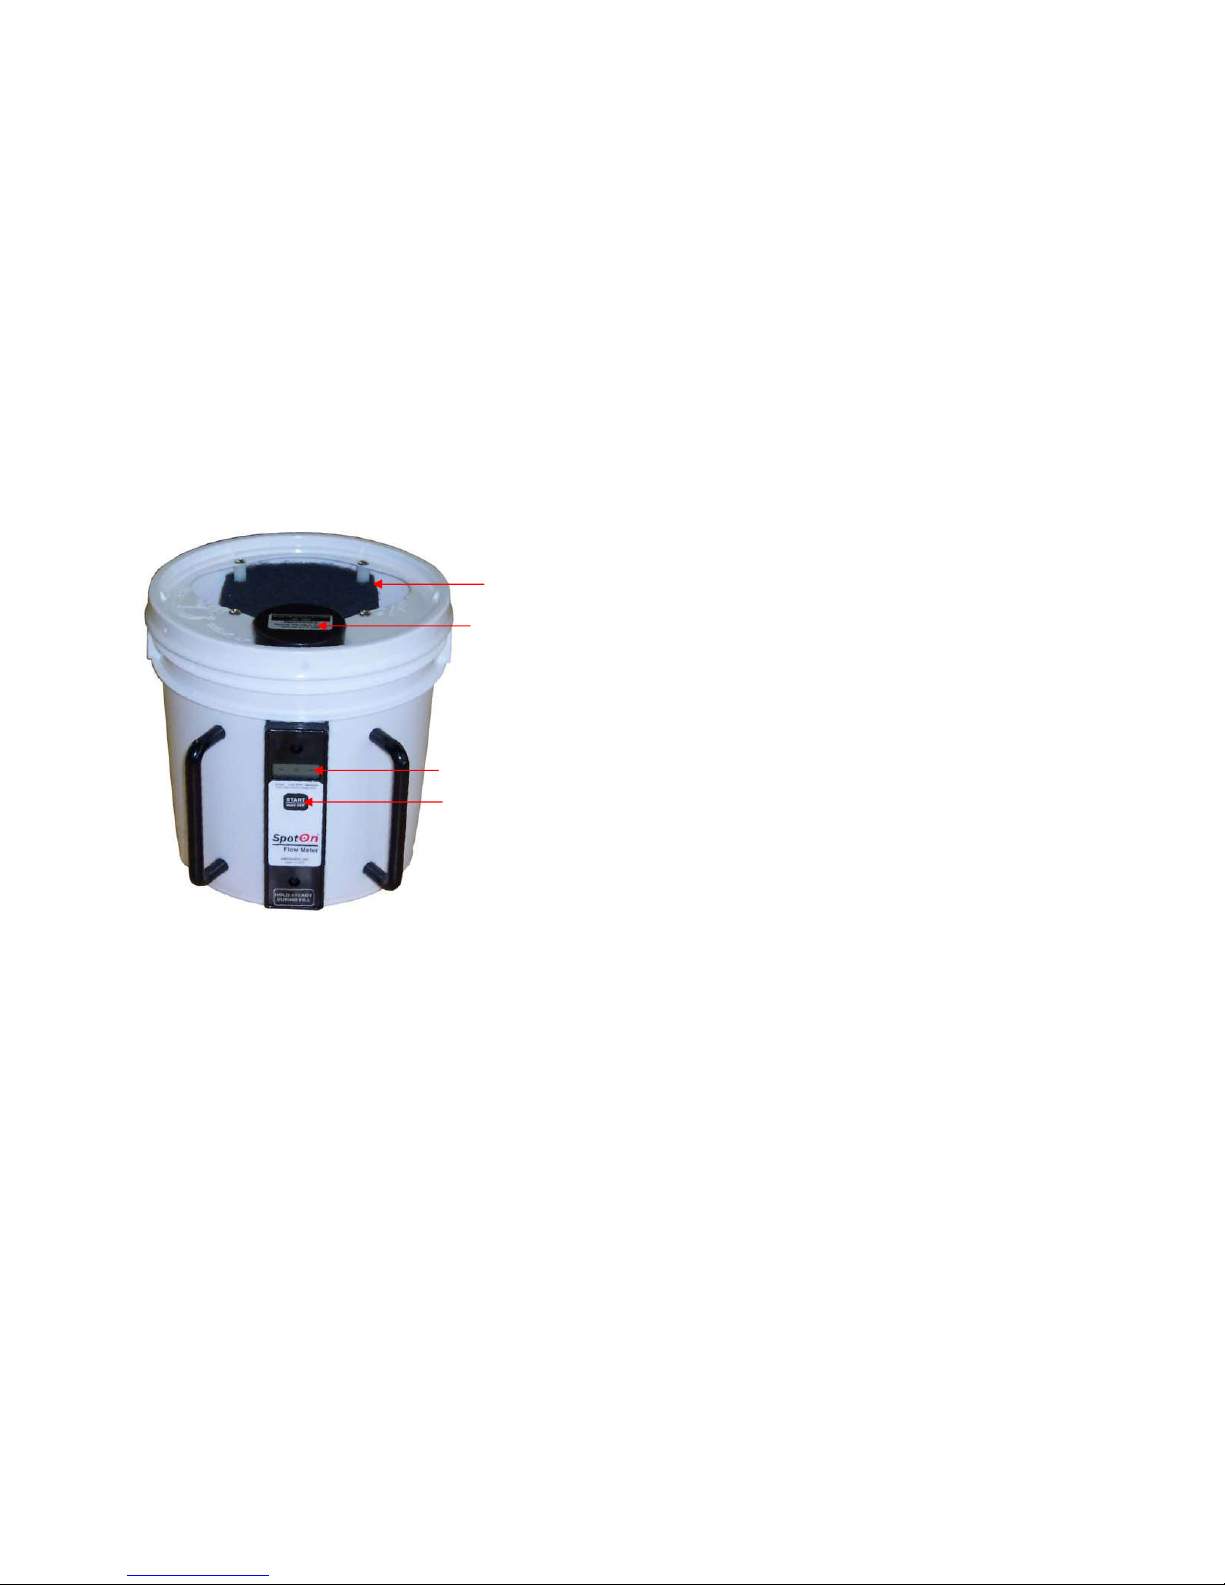
3.1 Nozzle Boot Use
The meter comes with a reuseable “Nozzle Boot” to facilitate taking
readings on irrigation nozzles. (See Fig. 1 and Fig. 2 above)
Additional nozzle boots can be ordered from Innoquest by specifying
Item # 26350.
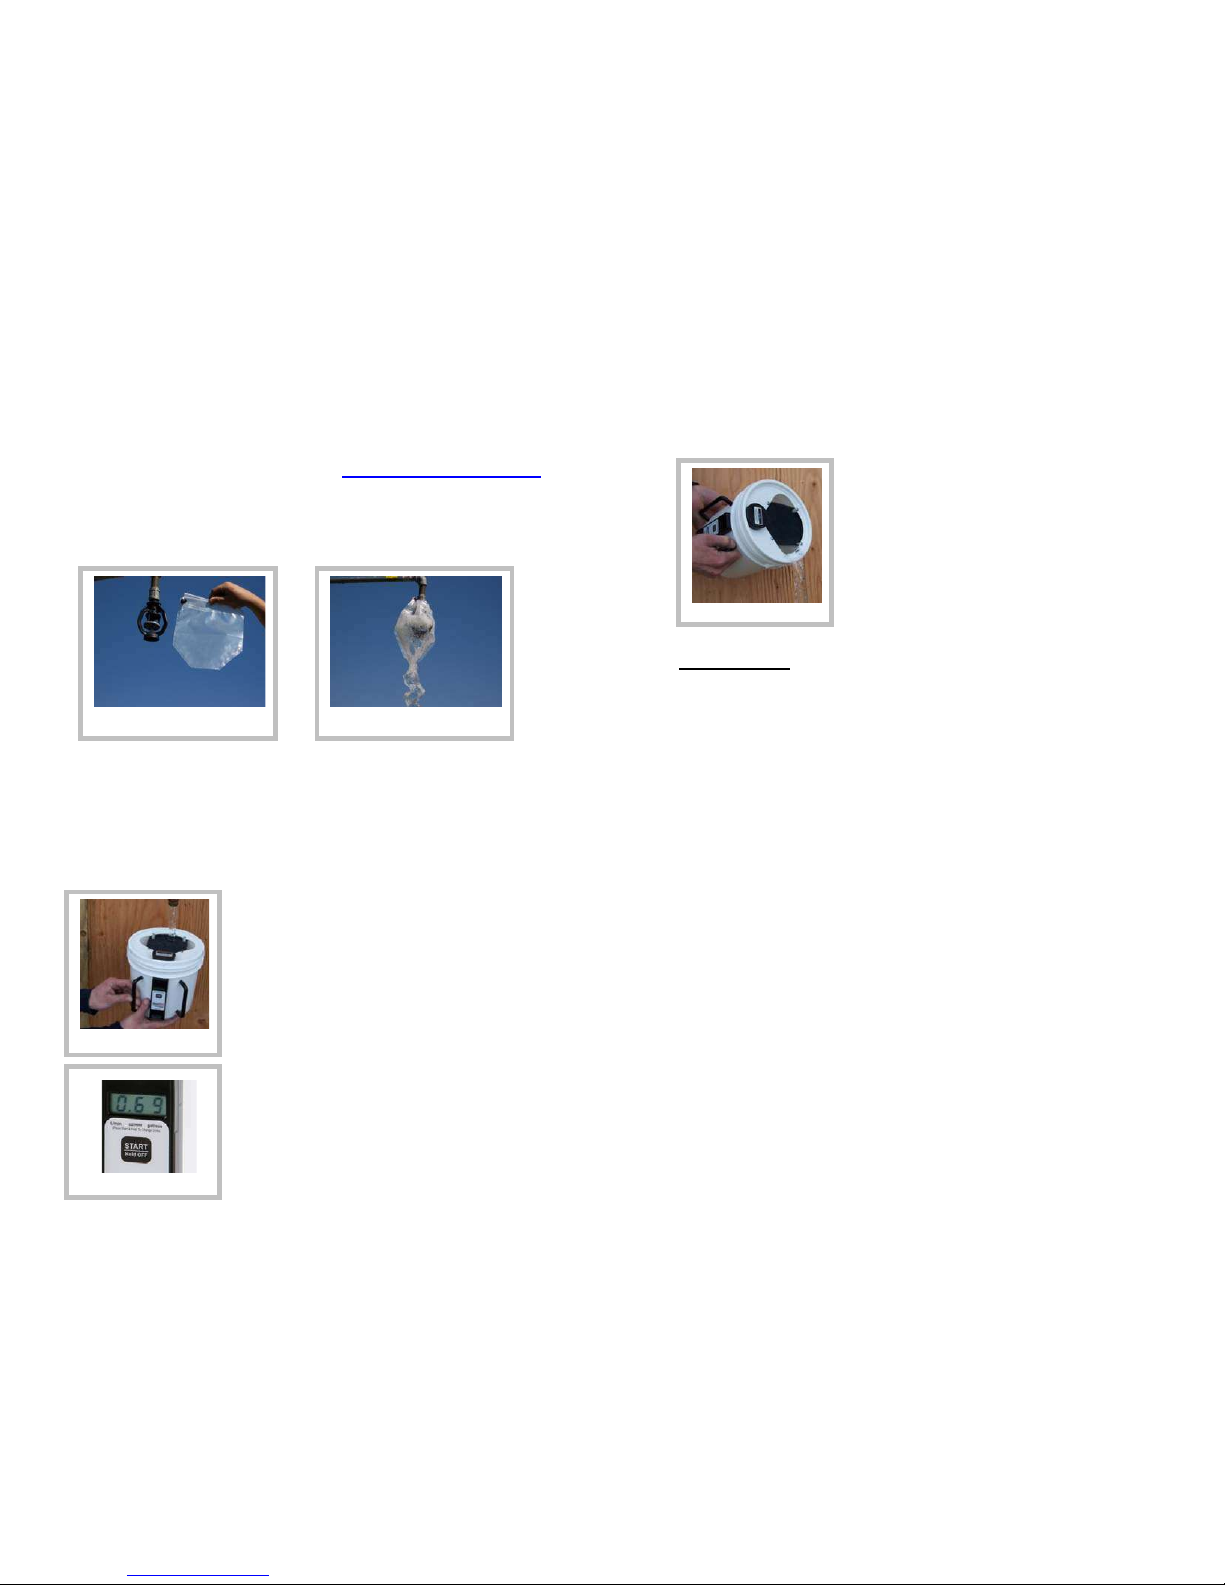
3.2 Taking a Measurement
Press the START button to turn the meter
on. The LCD will flash “000” momentarily
indicating it is working properly. The LCD
will then show a “_” marker to indicate the
type of measurement units the meter will use
when displaying readings. The meter will
then show “- - -“ on the LCD indicating the
meter is ready to take a new measurement.
Once the meter shows “- - -“, it can be
placed under the nozzle or pipe to be tested
(you have 60 seconds to place the meter
under the flow). Placement of the meter
under the flow should be brisk and certain so
that all the flow from the nozzle is transferred
quickly to the meter (See Fig 3). As the
meter fills with water, the display will start
Fig. 3
Fig. 4
Fig. 1 Fig. 2
5
flashing “- - -“; this indicates that the reading is in progress. As soon
as water reaches the meter’s upper sensor, the flashing stops and the
flow rate is displayed on the LCD (See Fig 4). This flow rate will
continue to be displayed on the meter for 90 seconds or until the
START button is pressed to start a new
reading. Once the reading has been
displayed, the water can be poured out of
the meter (See Fig 5). Pouring out the
contents of the meter will not affect the
reading being displayed on the LCD. If a
reading must be re-started for some reason,
simply empty the meter and re-press the
START button to ready it for a new
measurement.
PLEASE NOTE: For accurate measurements the meter must be
held still during the filling period. It is ok if the meter is held at an
angle, but must be held at this angle during the whole fill period.
Note: The diffuser pad installed in the opening at the top of the meter
is important for producing accurate readings. The purpose of this
diffuser pad is to keep strong flows or sprays from directly impacting
the surface of the water inside the meter during a reading.
3.3 Setting Display Units
The meter can be configured to display readings in either gallons per
minute (GPM), liters per minutes (L/min), or liters per hour (L/hr). To
change the display units, the user must first turn the meter off. Then
press and hold the START button. Keep holding the START button
until the display shows “_ _ _” (about 3 seconds). When the display
shows “_ _ _” release the START button and the display will start
flashing “_” above the unit type that is currently selected. Press the
START button to change this selection. Once the correct unit type is
selected, wait without pressing the START button for 5 seconds.
The meter will then enter the new setting and shut off. From that
point forward, the meter will always display readings in the new units.
Fig. 5

6
3.4 Turning Meter Off
The meter will turn on any time the START button is pressed. The
meter can be turned off in two ways:
1. The meter can be shut off by pressing and holding the START
button for several seconds (about 3 seconds). As soon as the
LCD goes blank, release the START button.
2. The meter will automatically shut off after 90 seconds of
inactivity. This means that the user does not have to shut off
the meter after use since it will eventually shut itself off.
3.5 Installing New Batteries (use N size 1.5 volt only)
The batteries are housed
under the black cap on the top
of the meter. This black cap
can be removed by pulling it
straight up while twisting
slightly. The cap is just a
press fit onto the meter. The
meter requires two (2) N size
alkaline batteries which are
available at any drug store. Place both new batteries in the battery
holder following the polarity indication marked on the holder (negative
ends towards the springs). Place the rubber retaining ring around the
batteries once they are in the holder as shown in Fig. 6. Then place
the battery holder back into the tube on the meter and replace the
black cap and press it firmly back onto the meter. When the meter’s
batteries need replacing, the meter will show “Lo b” on the LCD
display when the meter is turned on. If this message is displayed, the
batteries should be replaced as described above.
4.0 Troubleshooting
The Flow Meter measures the flow rate by measuring the time it takes
to fill the meter’s container. The rising water level is sensed by 3
electrodes in the meter. The meter will only function with fluids that
conduct electricity, such as water. In the case of distilled water, the
conductivity may be too low for proper meter operation. All tap water
will work very well with the meter. Any substance that coats or covers
the exposed metal on the electrodes will hinder their ability to sense
the water level. Care should be taken to rinse the meter inside and
out with clean tap water when measurements are complete.
Fig. 6
7
5.0 Warranty & Service
One Year Warranty
Innoquest, Inc. warrants this product to be free from defects in
materials and workmanship under normal use and service for a period
one (1) year from date of purchase. This warranty extends only to the
original purchaser and shall not apply to any product which, in
Innoquest’s sole opinion, has been subject to misuse, alteration,
abuse, or abnormal conditions of operation or handling. Innoquest’s
obligation under this warranty is limited to repair or replacement of the
product which is returned to Innoquest. Innoquest accepts no liability
for whatever damages may be caused by a malfunctioning product.
Repair & Service Policy
Product returned to Innoquest for repair or service must follow the
guidelines set forth as follows: Return of the product for warranty or
service repair will be the responsibility of the purchaser (Innoquest
does not pay inbound shipping charges). All returns must receive an
RMA number by calling Innoquest prior to return of the product. The
RMA number must be clearly marked on the outside of the shipping
carton. If the customer is returning product for non-warranty related
repair or service, a minimum charge will apply for accessing the
product’s repair needs and further work will not be completed without
the customer’s approval.
910 Hobe Road
Woodstock, IL 60098
Toll Free: 800-637-1623
Phone: 815-337-8555
Fax: 815-337-8556
www.InnoquestInc.com
© 2012 Innoquest, Inc. USA P/N 23750 Rev. 2 (Revised 11/16/12)
Table of contents
Other Innoquest Measuring Instrument manuals


Popular Measuring Instrument manuals by other brands


Kobold
Kobold MAS operating instructions

SBC
SBC Saia PCD ALE3B5FS00 Assembly and operating instructions

GWL
GWL M-YR1035P quick start guide

Endress+Hauser
Endress+Hauser StamoLys CA 71 HY operating instructions

TSI Instruments
TSI Instruments 3080 Series Operation and service manual

ECOTEST
ECOTEST DoseG operating manual