InnoSenT IMD-3101 User manual

Experience and Reliability in Radar Technology
CONFIDENTIAL AND PROPRIETARY
The informaon contained in this document shall remain the sole and exclusive property of InnoSenT GmbH and shall not be disclosed by
the recipient to third pares without prior consent of InnoSenT in wring.
Page 1 QUICK START GUIDE IMD-2000
STEP 1: Install the IMD-3101 Target Viewer
The soware package can be downloaded from our website at
hps://www.innosent.de/en/downloadportal/
Open the setup le of the IMD-3101 Target Viewer soware package:
IMD-3101 -> GUI -> TargetViewer - IMD3101_V1.xxx.exe and follow the instrucons of the installaon on your
Windows PC.
STEP 2: Mount the IMD-3101 sensor in a staonary posion, e.g. on a tripod
Align the sensor in one direcon.
Check the correct orientaon and mounng angle of the sensor for your required Field of
View (FOV).
STEP 3: Connect the module to your PC
To connect the sensor to your PC via USB-port, use a TTL-232R-3V3 cable from FTDI. The
connector is compable with the UART-USB-Converter. The cable is not included in the
evaluaon kit.
The orientaon must be according to this picture.
You can nd informaon about the sensor’s pinout in its data sheet.
Congure cable latency in Windows device manager to 1ms. Pay aenon to the COM-Connecon-Port
you placed the sensor.
Experience and Reliability in Radar Technology
CONFIDENTIAL AND PROPRIETARY
The informaon contained in this document shall remain the sole and exclusive property of InnoSenT GmbH and shall not be disclosed by
the recipient to third pares without prior consent of InnoSenT in wring.
Page 2 QUICK START GUIDE IMD-2000
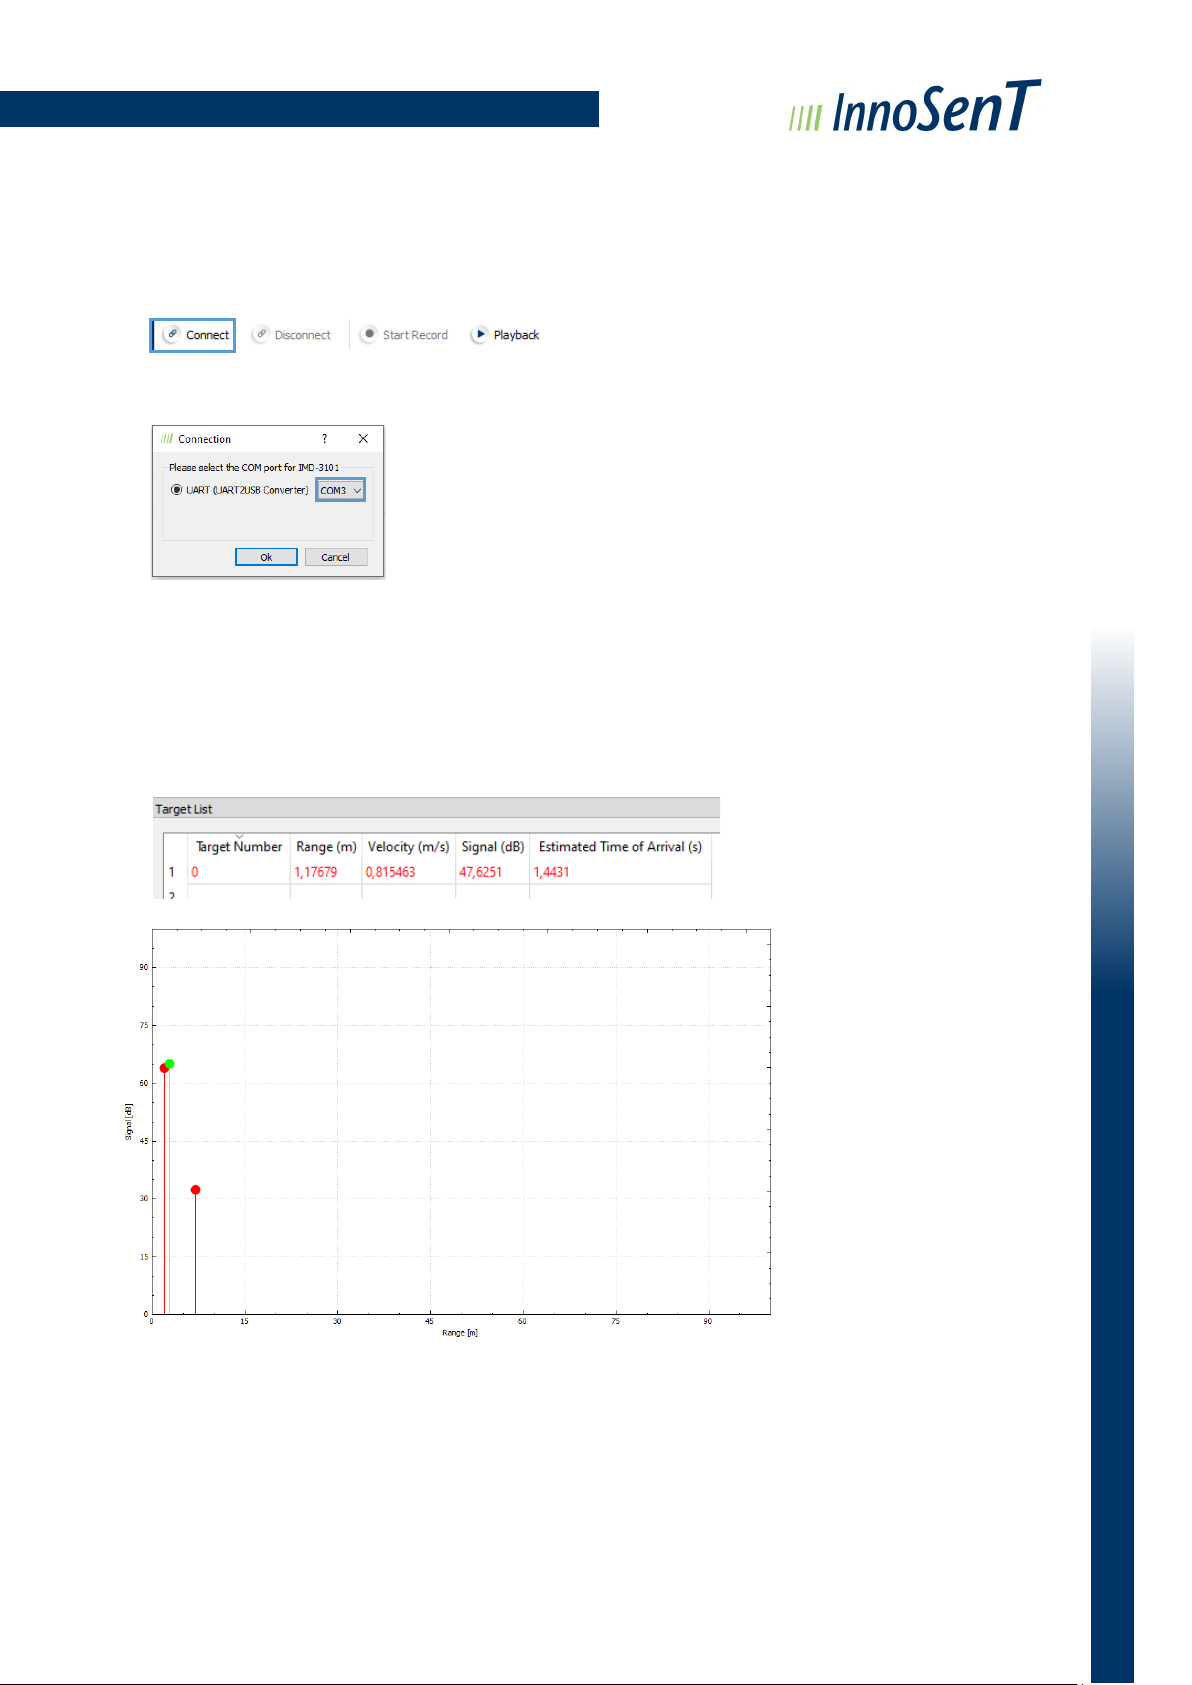
STEP 4: Connect the TargetViewer to the sensor
Press the connect-buon in the top le corner
Choose the correct COM Port and click OK
STEP 5: Observe moving detecons
Detecons are output in a target list via UART
Detailed informaon about a target is displayed in the target list in the lower area of the soware
- Red indicates targets moving toward the sensor
- Green indicates targets moving away from the sensor
The environment is set up properly and ready for operaon.
The sensor provides further lter sengs. If you want to take advantage of them progress with the next steps.

Experience and Reliability in Radar Technology
CONFIDENTIAL AND PROPRIETARY
The informaon contained in this document shall remain the sole and exclusive property of InnoSenT GmbH and shall not be disclosed by
the recipient to third pares without prior consent of InnoSenT in wring.
Page 3 QUICK START GUIDE IMD-2000
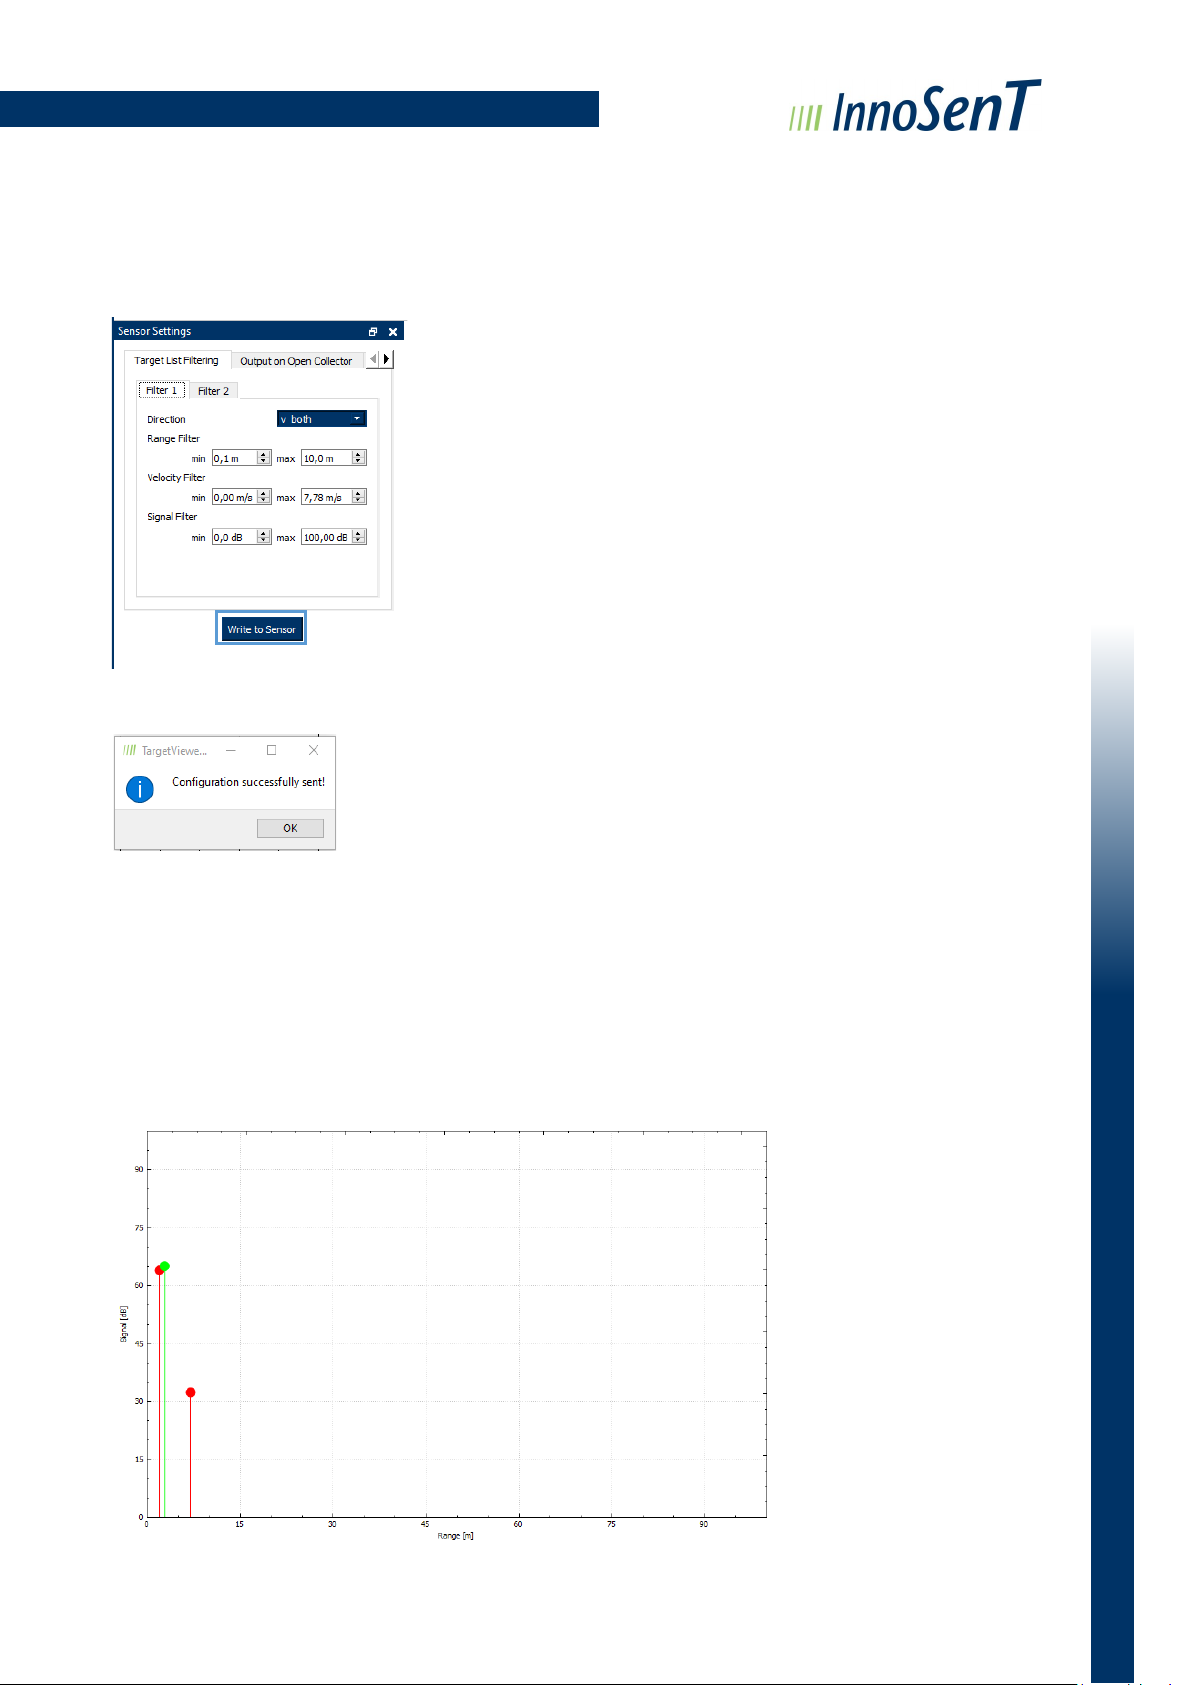
STEP 6: Sensor sengs
The sensor sengs are placed on the le side right below the toolbar.
If you close the window unintendedly you can open again via
“View —> Parameter”.
You have the possibility to set 2 lters to create dierent types of alarm
zones. The seng opons for Filter 1 and Filter 2 are the same:
Velocity Filter: Targets in-between min and max velocity thresholds
pass this lter. The velocity Filter can be set 0 up to 7,80 m/s.
Range Filter: With the range lter you can create “alarm zones” were
the detecon is acve. Only targets in-between min and max range
thresholds pass this lter.
Signal Filter: Congure min and max signal strength. Targets in-between min and max signal strength thresholds pass
this lter. This Filter depends on RCS of targets. Note: This value is not corrected by distance
Direcon: The direcon selector lets you determine how the velocity lter should be applied. Therefore you have three
opons:
v_both (Standard): Choose v_both and both parameters (v_neg and v_pos) will be traced. E.g. if you set the velocity
lter 2m/s to 5m/s the negave (-2m/s to -5m/s) and posive (2m/s to 5m/s) values will be considered.
v_neg: Choose v_neg and only negave values (coming) will be considered.
v_pos: Choose v-pos and only posive values (leaving) will be considered.
Trigger Filter for Target List Filtering: Set Counter n/m to trigger the
number of detecons in a specic range.
n = Counter of acons that sasfy the lter sengs
m = Counter of measurement cycles. Update me for 1 cycle is 100ms. If
the sensor detects n acons within m cycles, the open collector is acve.
The standard seng is n=2 acons within m=5 cycles.
Turn o delay: This seng turns o the open collector and set the sta-
tus to inacve.
Frequency Channel: Choose a frequency channel if operang several
sensors to prevent interference.
False Alarm Supression: Enable false alarm suppression to lter out
spurious detecons occurring randomly. This is another possible way to
decrease false alarms, addionally to threshold SNR.
Sensivity Threshold: To decrease false alarm rate, set the threshold.
Targets must exceed this value to be provided in target list.
Note: The higher this value, the more the sensivity / possible detecon
range decreases. This value sets the parameter threshold.
Advanced Features

Experience and Reliability in Radar Technology
CONFIDENTIAL AND PROPRIETARY
The informaon contained in this document shall remain the sole and exclusive property of InnoSenT GmbH and shall not be disclosed by
the recipient to third pares without prior consent of InnoSenT in wring.
Page 4 QUICK START GUIDE IMD-2000
Combinaon of Filter:
Target List Filtering: Filter 1 and Filter 2 can be combined.
But please consider all ltered values will inuence the target list.
1. Alarm Zones: You can create dierent Alarm Zones by using Filter 1 and Filter 2 together. E.g. range lter in
Filter 1 ist set min. 2 m and max. 15 m. Range Filter in Filter 2 could be set from min. 15m to max. 30m or
more.
2. Use Velocity Filter to set detecon of targets with dierent velocies. E.g. Detecon of targes in Alarm
Zone 1 with a velocity between 2 m/s up to 4 m/s and in Alarm Zone 2 between 4 m/s up to7,8 m/s.
Together with the direcon selector you can determine the exact applicaon. Therefore you have three
opons:
v_both (Standard): Choose v_both and both parameters (v_neg and v_pos) will be traced. E.g. if you
set the velocity Filter 2m/s to 5m/s the negave (-2m/s to -5m/s) and posive (2m/s to 5m/s) values
will be traced
v_neg: Choose v_neg and only negave values (coming) will be traced
v_pos: Choose v-pos and only posive values (leaving) will be traced.
3. Use Signal Filter to detect targets by RCS. The signal lter can be used similar to the velocity lter.
Note: The Signal Filter depends on RCS of target.
Note: If you do not want to use 2 Filters, the values of Filter 2 must be the same as set in Filter 1.
Alarm Zone 1 Alarm Zone 2
2m 30m 45m15m 60m
Experience and Reliability in Radar Technology
CONFIDENTIAL AND PROPRIETARY
The informaon contained in this document shall remain the sole and exclusive property of InnoSenT GmbH and shall not be disclosed by
the recipient to third pares without prior consent of InnoSenT in wring.
Page 5 QUICK START GUIDE IMD-2000
STEP 7: Write sengs to sensor
Aer you set the conguraon, send the conguraon to the sensor:
If the conguraon has been sent successsfully, the following message appears:
STEP 8: Verify your conguraon
Aer seng the conguraon, you can verify it by checking the plot.
Only targets within the chosen limits of the lters will be processed and output by the sensor. The
sensor outputs a maximum of 20 targets.
Targets will be shown in the plot:
Experience and Reliability in Radar Technology
CONFIDENTIAL AND PROPRIETARY
The informaon contained in this document shall remain the sole and exclusive property of InnoSenT GmbH and shall not be disclosed by
the recipient to third pares without prior consent of InnoSenT in wring.
Page 6 QUICK START GUIDE IMD-2000
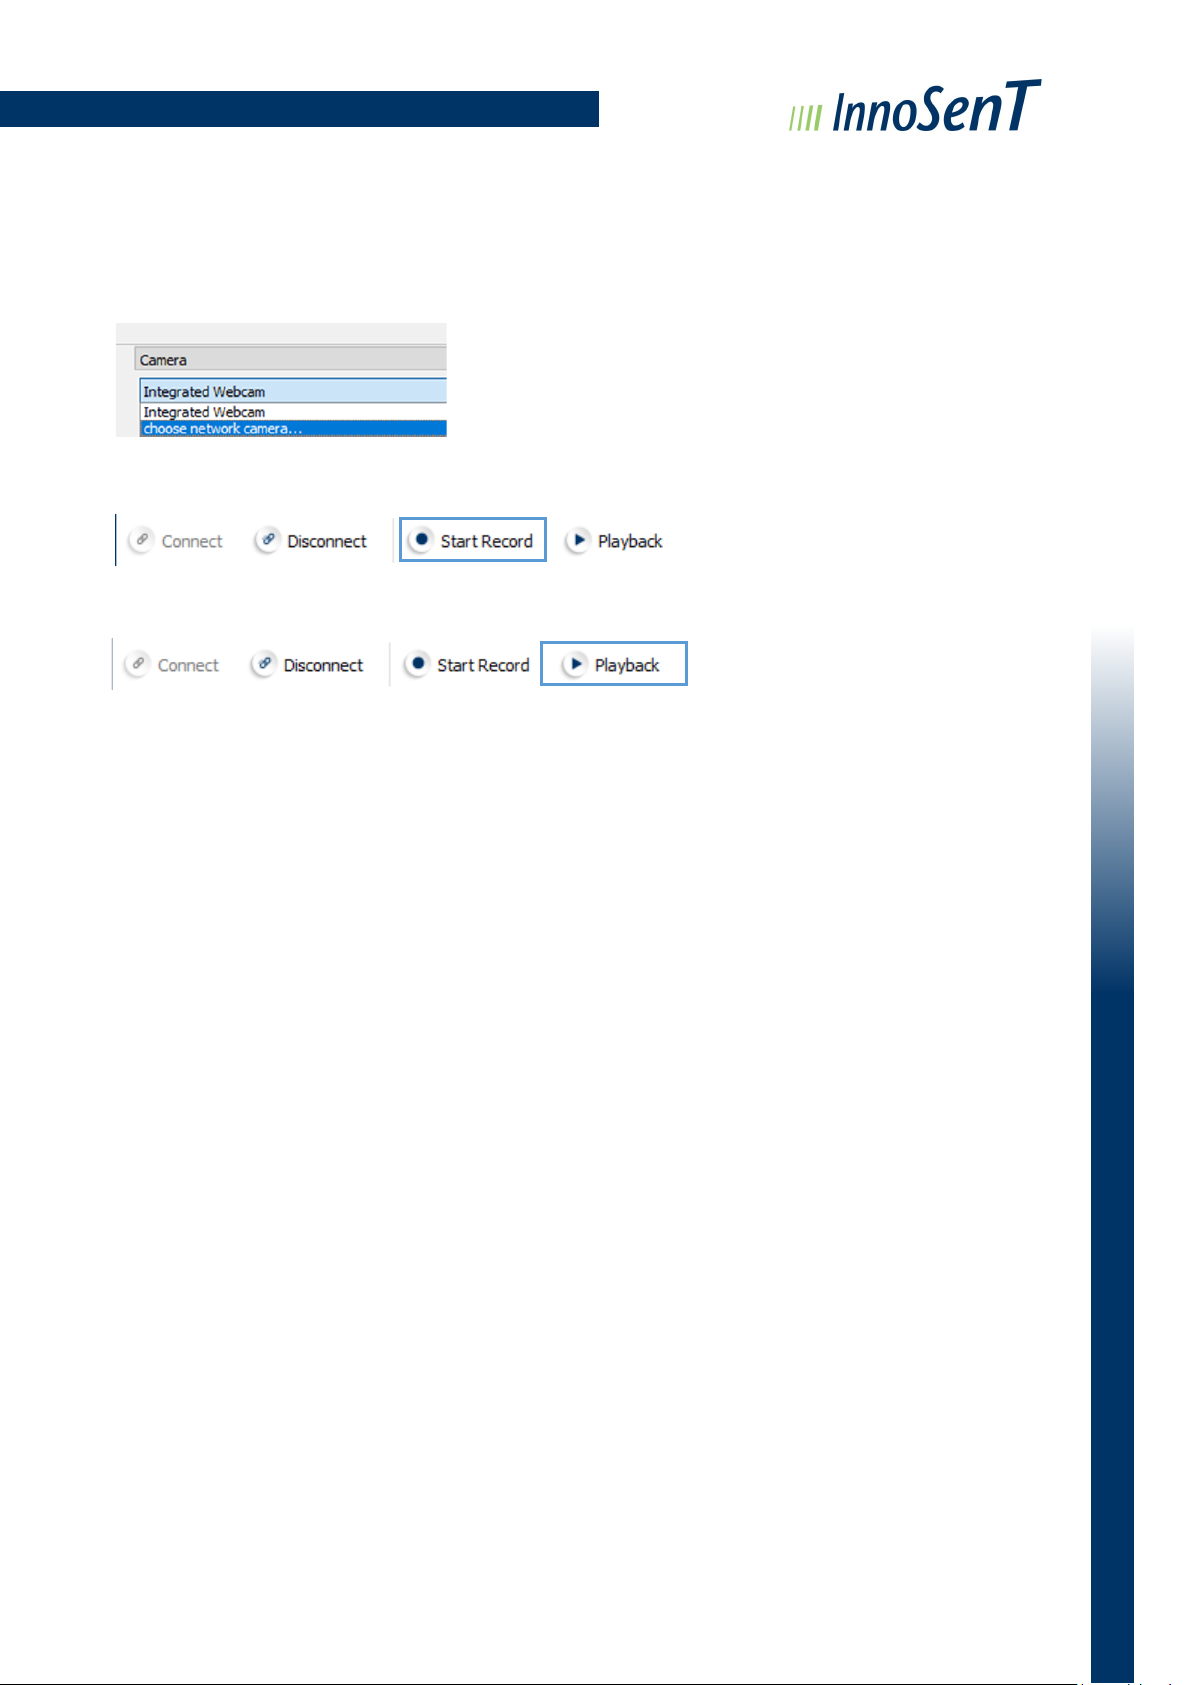
STEP 9: Evaluate the sensor
Choose a camera if you would like to record a video with the radar data.
Press ‚start record‘ for recording the scene.
Recordings can be viewed by pressing ‚playback‘.

Experience and Reliability in Radar Technology
CONFIDENTIAL AND PROPRIETARY
The informaon contained in this document shall remain the sole and exclusive property of InnoSenT GmbH and shall not be disclosed by
the recipient to third pares without prior consent of InnoSenT in wring.
Page 7 QUICK START GUIDE IMD-2000
InnoSenT GmbH
Am Roedertor 30
97499 Donnersdorf
GERMANY
VERSION DATE COMMENT
1.0 01.04.2022 Inial release
Tel.: +49 (0) 9528—9518—0
E-Mail: [email protected]
URL: www.innosent.de
Table of contents
Other InnoSenT Security Sensor manuals


