INNOVATIVE SLEEP SOLUTIONS SLEEPTRACKER Elite User manual

SleepTracker® Elite Product Manual


1
What is SLEEPTRACKER®? 1
About the Sleep Cycle 2
Getting Started 4
Overview of Buttons 5
Setting the Time, Day and Date 7
Setting the ALARM 8
Setting the ALARM WINDOW 10
Setting the TO BED Time 12
Reviewing Your Sleep Data 14
Using SleepTracker Analytics 18
Warranty, Return and Battery Information 19
Precautions and Warnings 20
TABLE OF CONTENTS

1
Why is it so hard to wake up to a normal alarm clock? Because a normal alarm clock can’t detect where you are in your
sleep cycle — a continuous cycle from deep sleep, to brief interrupted sleep moments, and back to deep sleep again.
Occasionally, your alarm may catch you at an optimal, interrupted sleep moment, and you wake up feeling refreshed,
but usually you may find yourself waking up tired and groggy, groping for the snooze button.
SLEEPTRACKER® puts an end to that tired feeling. Once you set its ALARM WINDOW, it monitors your body and
continuously looks for your optimal waking times so it can wake you at just the right moment. Imagine not feeling
tired in the morning and getting a few extra minutes out of your day.
SLEEPTRACKER® can also help you discover how well you sleep at night, so you can adjust your habits to get better
rest. Using an accelerometer, SLEEPTRACKER® monitors for brief moments of movement (typically lasting less than
30 seconds) during your lighter stages of sleep and records them. The next morning, you can review this data to see
how restfully you’ve slept. (For more information on this, see the “Reviewing Your Data” section on page 14.)
SLEEPTRACKER® is ideal for anyone who wants to wake up alert and ready to start the day, such as frequent travelers
across time zones, business people looking for that extra edge, students with fluctuating schedules, or busy moms
who need to wake up easily. When you set the ALARM WINDOW, SLEEPTRACKER® wakes you when you feel like
you’re already awake — at one of those frequent times during a night’s sleep when you’re almost awake but usually
drift back to sleep.
WHAT IS SLEEPTRACKER®?

When you sleep, your body goes through a series of sleep cycles. No two people have the same sleep cycles, and
nobody has the same cycle twice. Many factors can influence sleep cycles, including diet, exercise, medications, drugs
or alcohol, stress, sleep disorders, and sleep deprivation. Age and gender can play a role, too. Women tend to sleep
more soundly than men, and as we age, we sleep more restlessly.
The average adult experiences 4-5 full sleep cycles over an 8-hour period. A typical cycle lasts about 90-110 minutes
and has five different stages. During Stage 1, you sleep lightly; in Stage 2, your sleep gets progressively deeper. At
Stages 3 and 4, also known as “Delta sleep,” you sleep most heavily; this is when your body rebuilds itself. Stage 5
of sleep, also known as REM (rapid eye movement) sleep, is marked by extensive physiological changes, such as
accelerated respiration, increased brain activity, rapid eye movement, and muscle relaxation. People dream during
REM sleep.
In the first third of the night, Delta sleep stages last longer than REM stages, but as the night progresses, Delta sleep
becomes briefer. By the last third of the night, Delta sleep usually ceases while REM stages lengthen.
ABOUT THE SLEEP CYCLE
2
ABOUT THE SLEEP CYCLE (CONT.)
3
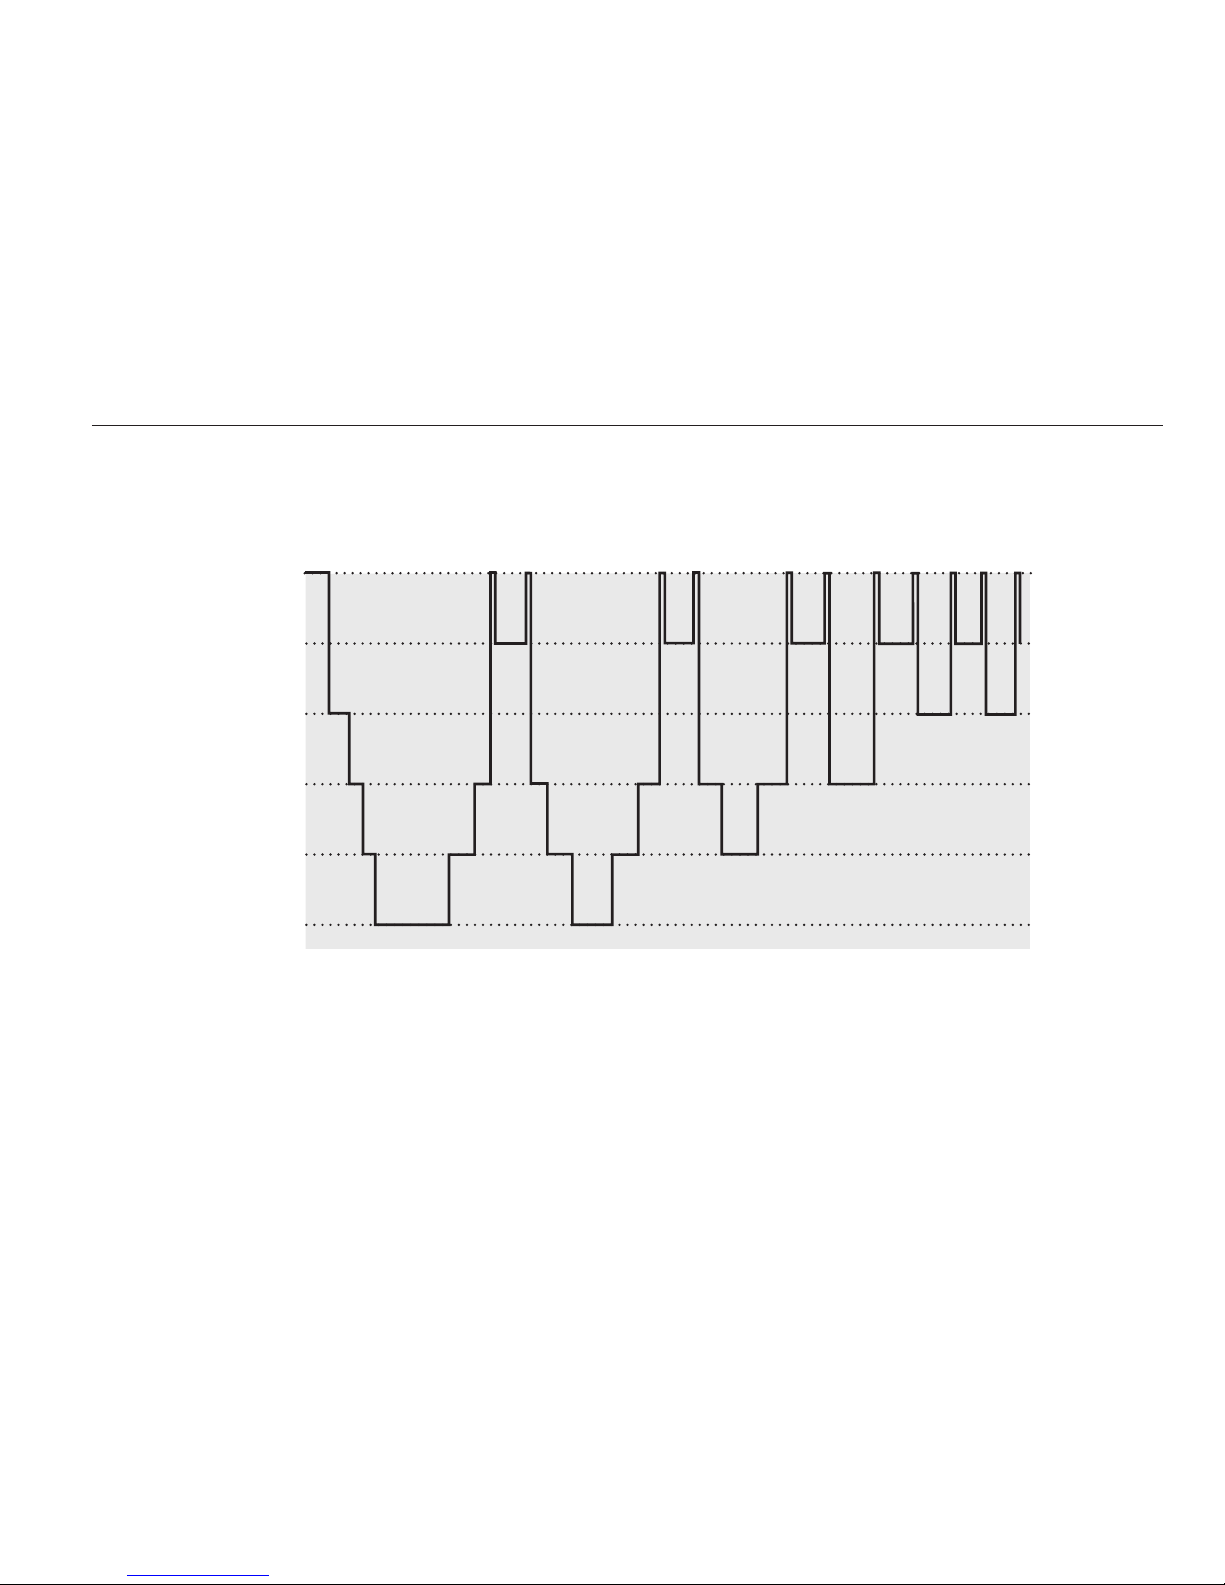
Shown below is a typical adult sleep pattern.
As the chart indicates, several interrupted sleep moments occur during each sleep cycle. These moments vary in
frequency throughout the night. During the ALARM WINDOW that you preset, SLEEPTRACKER® monitors your
sleep cycles for optimal waking moments so that it can gently wake you when you’re most alert. The result?
You wake up refreshed instead of groggy. Waking up has never been easier.
Awake
REM
Stage 1
Stage 2
Stage 3
Stage 4
Hours 0 1 2 3 4 5 6 7 8

HOW TO WEAR SLEEPTRACKER®
Wear SLEEPTRACKER® with the face on top of your wrist and with the band tight enough to maintain contact with
your wrist. SLEEPTRACKER® can be worn anytime, but it only needs to be worn at night to be effective.
READING AND SETTING YOUR SLEEPTRACKER®
SLEEPTRACKER®’s four simple, easy-to-read buttons allow you to read SLEEPTRACKER® in the dark, to set it to wake
you at the best time, to record your sleep cycles, and to tell the time, day, and date.
Throughout this manual, the steps for setting SLEEPTRACKER® are shown numerically (1, 2, 3, etc.). Following these
steps in order makes setting SLEEPTRACKER® as easy as setting any typical wristwatch.
NOTE: SLEEPTRACKER® does not change your body’s need for a full night’s rest. It alerts you to your best opportunity for
waking up, but it will not keep you from going back to sleep if your body has been deprived of the minimum hours of rest
that it needs. If you get enough sleep, and if you get up when SLEEPTRACKER®’s alarm rings, you will wake up refreshed
and ready to start your day.
GETTING STARTED
4

Press GLO to backlight the
screen. This button is also used
to adjust SLEEPTRACKER®’s
settings.
Press MODE to scroll through
SLEEPTRACKER®’s functions: Time,
Alarm, Alarm Window, To Bed, and
Data Review. Use the buttons on the left
to change the settings in each function.
Press MODE until the screen stops
blinking to save your updated settings.
Use the DOWN button to
adjust SLEEPTRACKER®’s
settings after pressing SET.
Press SET until the screen blinks
to adjust SLEEPTRACKER®. Use the
buttons on the left to change the
settings. Press SET again to move
from hours to minutes to seconds.
Please note: The SET button may seem slow to activate.
That is by design so it will be more difficult to inadvertently depress while you are sleeping.
OVERVIEW OF BUTTONS
5

There are a few things to remember about the buttons:
1) , , or both must be on for SLEEPTRACKER® to record data or for the alarm to be activated.
2) If no button is pushed for 60 seconds, SLEEPTRACKER® will default to the time/day/date screen. (Exception: When
in DATA mode, SLEEPTRACKER® waits two minutes before defaulting to the time/day/date screen.)
3) The beeping that occurs when changing SLEEPTRACKER® ‘s settings can be shut off by setting the alarm on
“vibrate.” See page 8 for instructions on setting the alarm.
4) Excessive use of the GLO backlight reduces battery life.
OVERVIEW OF BUTTONS (CONT.)
6

SETTING THE TIME, DAY AND DATE
7
To set the Time, Day, and Date, press and hold SET until the date digit blinks. Press the upper-or lower-left buttons
to scroll to the correct date. (Hold the buttons down to scroll more quickly.) Then, press SET again to go to minutes,
seconds, AM/PM/24hour, day, or date. To store your new settings, press MODE until the screen stops blinking.
2) Press these buttons to adjust
SLEEPTRACKER®’s settings.
4) Press MODE until the screen
stops blinking to save your
changes.
1) To set the Time, Day, or Date,
press SET until the digits blink.
3) Press SET again to go to year,
month, date, day, minute, hour,
seconds, or AM/PM/24-hour.

To set the ALARM, press the MODE button until you reach the ALARM screen, and then press and hold SET until the
hour digit blinks. Adjust to the desired hour by pressing the buttons on the left. Next, press SET to adjust the minutes
using the same buttons. Then press SET to select AM, PM or 24-hour format. To store these settings, press MODE until
the digits stop blinking. Then press and hold the top left button (GLO) until . To set the alarm on vibrate, press the
GLO button twice until appears. Press GLO three times to set the alarm to both vibrate and ring . Press
GLO four times to turn the alarm off. Note: The beeping that occurs when adjusting SLEEPTRACKER®’s settings can be
shut off by setting the alarm on “vibrate.”
, , or both must be on for SLEEPTRACKER® to record data or for the alarm to be activated.
TURNING OFF THE RINGING/VIBRATING ALARM
The alarm will ring and/or vibrate for 30 seconds. To turn it off, press and hold the DOWN button. Press and hold
the GLO button to activate snooze until the default alarm time. (For example, if the ALARM time is 7:00 AM with
a 20-minute window, the alarm might ring at 6:52 AM, when an interrupted sleep moment occurs. Pressing GLO
causes the alarm to snooze until 7:00 AM.)
SETTING THE ALARM
8

CONFIRMING THAT THE ALARM IS SET
When the alarm is set, , or both and appear on the screen.
Note: GLO will not backlight the screen in the ALARM mode.
1) Press MODE to go to the
ALARM screen.
4) Press MODE until the digits
stop blinking to save your
new settings.
2) Press and hold SET until
the hour digit blinks.
3) Use these buttons to
set your alarm time.
Once you’ve adjusted
the hour, press SET
again to move from
hour to minutes to AM/
PM/24-hour format.
SETTING THE ALARM (CONT.)
9

Set WINDOW so that SLEEPTRACKER® can wake you at your optimal moment during a specified window of time.
First, press MODE to go to the WINDOW screen. Then press and hold SET until WINDOW display digits blink. Using the
left buttons, decrease this setting to zero for a standard alarm, or increase it to a maximum of 90 minutes to widen
the window of time during which SLEEPTRACKER® can wake you. A 20-minute window is typically adequate on a
full night’s sleep. Press and hold MODE until the display stops blinking to save your new setting. Note: You can turn off
the beeping that occurs when setting the alarm window by setting the alarm on “vibrate.”
Note: There may be times when no interrupted sleep moment occurs during the alarm window. When this happens,
SLEEPTRACKER®’s alarm is triggered at the default alarm time. The longer the window’s duration, the more likely
SLEEPTRACKER® is to detect the optimal moment at which to trigger the alarm.
SETTING THE ALARM WINDOW
10
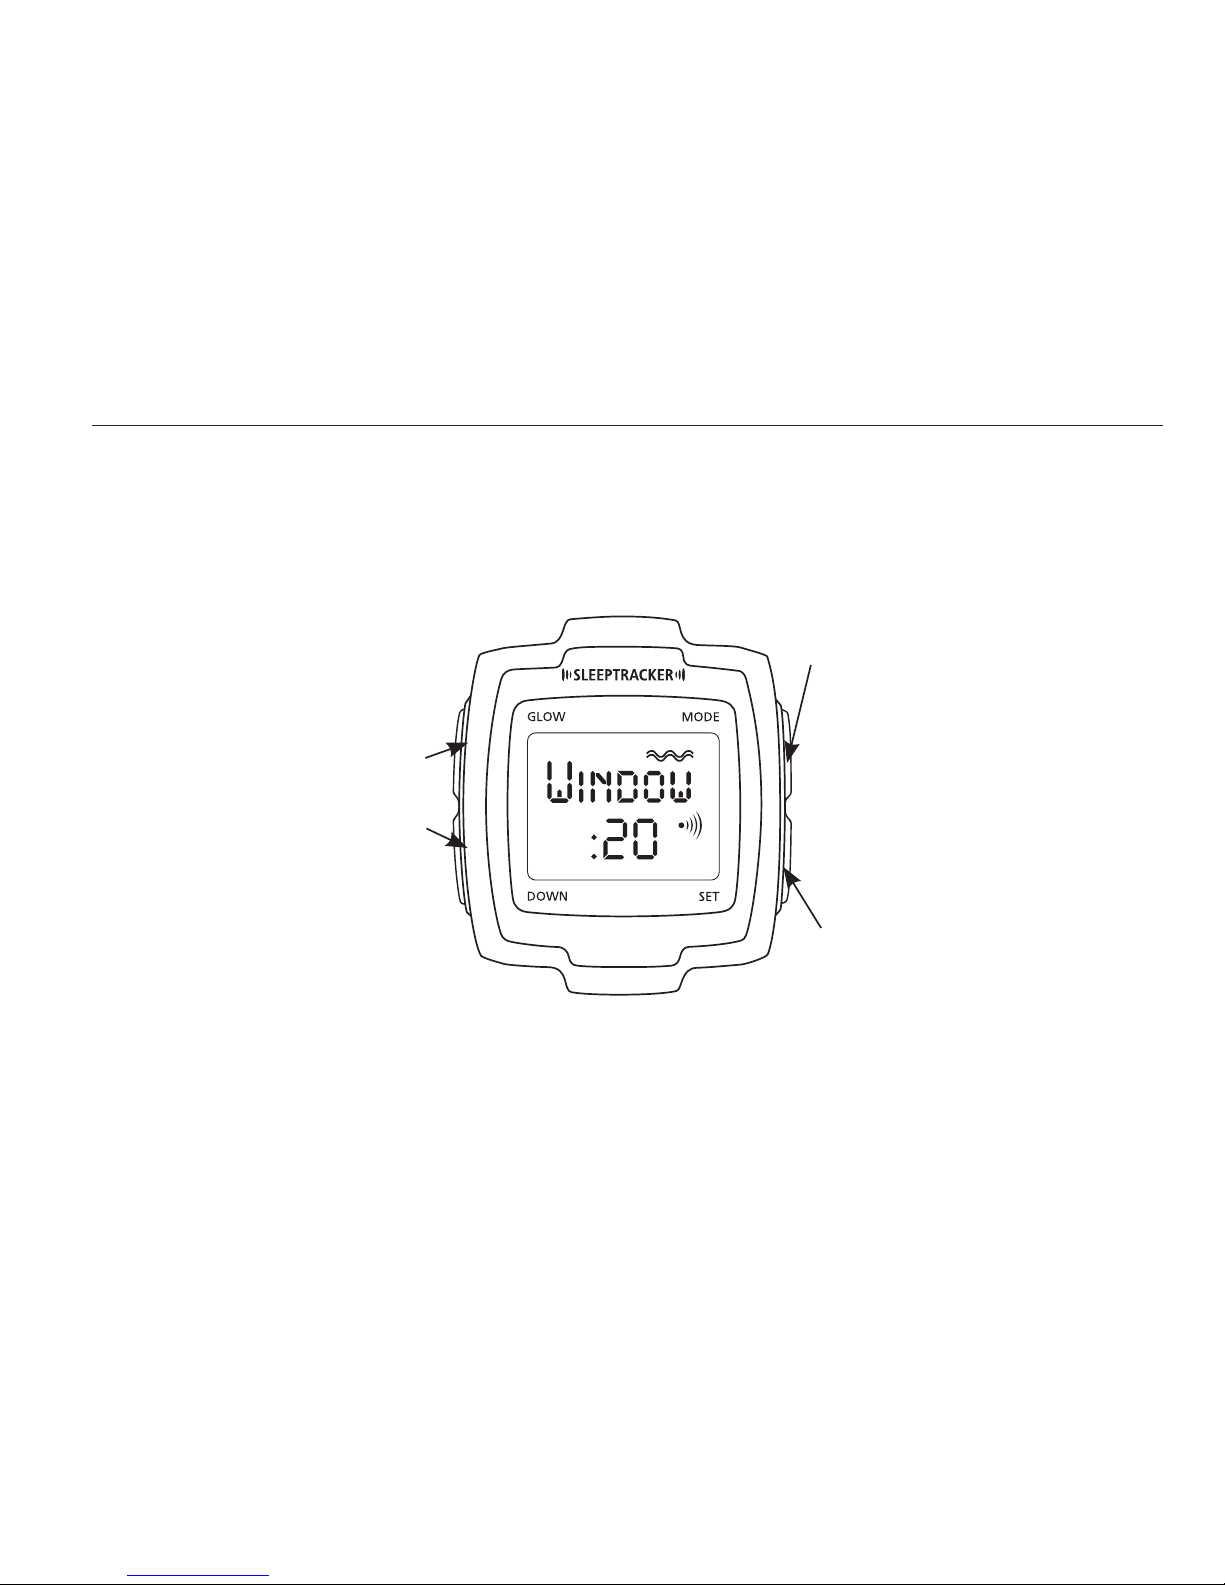
3) Press these buttons to increase
or decrease the window during
which SLEEPTRACKER® monitors
for your optimal wake-up time.
1) Press MODE to go to
WINDOW screen.
4) Press MODE until the digits
stop blinking to save your
updated settings.
2) Press SET until the
digits blink.
SETTING THE ALARM WINDOW (CONT.)
11

Setting the TO BED feature on your SLEEPTRACKER® lets it record your sleep data during the night so that you can
learn about your unique sleep patterns. To accurately record your data, set TO BED at 30 minutes after you anticipate
being asleep. You can also set the TO BED time using the “one touch” feature. If you stay awake later than the time
set in TO BED, the data recorded will not be accurate until you are fully asleep, but going to sleep after your
anticipated TO BED time will not affect SLEEPTRACKER®’s ability to find your optimal waking moments within the
ALARM WINDOW. SLEEPTRACKER® can collect data for a maximum of 12 hours.
To set your TO BED time, press MODE until you reach the TO BED screen. Then press and hold SET until the hour digit
blinks. Press the top or bottom buttons on the left to reach the desired hour. Then press SET to go to minutes, then
AM/PM/24hour, and adjust accordingly. To store your new settings, press MODE until the screen stops blinking.
You can also set the TO BED time using the “one touch” feature. While in TO BED screen, press and hold DOWN
for 3 seconds. SLEEPTRACKER® will automatically assign the TO BED time at 30 minutes from the current time. If
you decide to go to bed later, go to the TO BED screen press and hold DOWN for another 3 seconds to automatically
advance another 30 minutes.
SETTING THE TO BED TIME
12
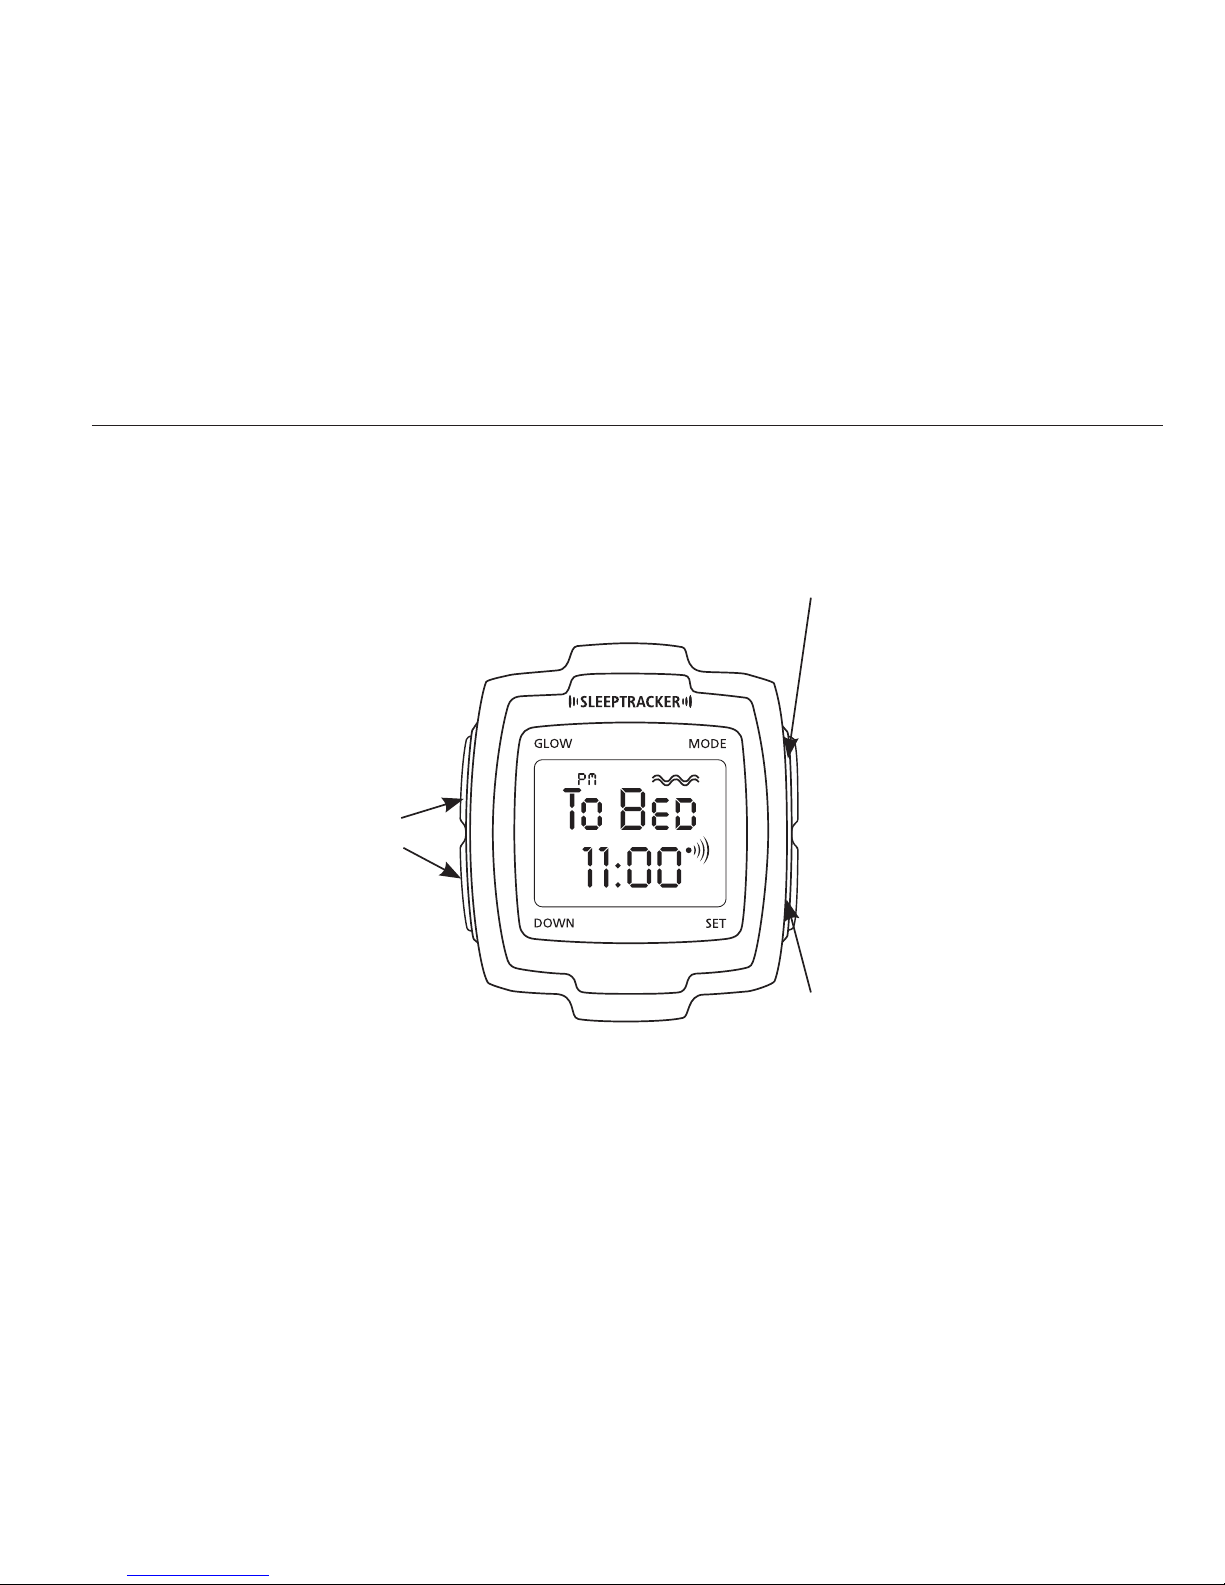
3) Use these buttons to change
the hour, minute, and format
of your anticipated TO BED
time so that SLEEPTRACKER
can record your data. Once
you’ve adjusted the hour, press
SET again to move from hour
to minutes to AM/PM/24-hour
format.
1) Press MODE to go to TO BED
screen.
4) Press MODE until the screen
stops blinking to save your
updated settings. (If your
anticipated TO BED time changes,
just press and hold DOWN once
to automatically advance the
time another 30 minutes.)
2) Press SET until the hour
digit blinks.
SETTING THE TO BED TIME (CONT.)
13

To review your sleep data, press MODE to go to the DATA REVIEW screen. Use the left buttons to review your
interrupted sleep moments.
While you are asleep, SLEEPTRACKER® records your interrupted sleep moments so that, in the DATA REVIEW mode,
you can see when those moments occurred and the average time between them. Each interrupted sleep moment is
displayed in chronological order as “Data 1,” “Data 2,” etc. At the end of this series of times, SLEEPTRACKER® displays
“Data A,” the average time between your interrupted sleep moments.
ABOUT DATA A
Data A can help you determine how soundly you’re sleeping. If the average time between your interrupted
sleep moments is lengthy compared to other nights, you’ve slept more restfully than usual; if it is brief, you’ve slept
more poorly. If you go to bed and get up at the same times most days, your sleep patterns should be consistent —
and Data A should be, too.
Remember that individual sleep patterns differ and thus so does each person’s Data A. Interrupted
sleep moments may be frequent or occasional, sporadic or regular. Moreover, multiple interrupted sleep
moments can occur within one sleep cycle. On a typical night’s sleep, the average person’s Data A spans
20-35 minutes, but Data A can last longer. The longer the Data A, the fewer interrupted sleep moments you
have experienced, and the better you have slept.
REVIEWING YOUR SLEEP DATA
14

Here is an example showing how SLEEPTRACKER® records sleep data:
REVIEWING YOUR SLEEP DATA (CONT.)
15
To Bed time: 11:15 pm
Alarm time: 7:00 am
Alarm Window: 20 minutes
Data 1 11:21 pm
Data 2 11:48 pm
Data 3 12:15 am
Data 4 12:50 am
Data 5 1:35 am
Data 6 2:15 am
Data 7 2:27 am
Data 8 2:59 am
Data 9 4:01 am
Data 10 4:36 am
Data 11 4:57 am
Data 12 5:24 am
Data 13 6:10 am
Data 14 6:22 am
Data 15 6:37 am
Data 16 6:53 am—alarm goes off at
the optimal time within the window
Data A 29:56 (29 minutes and 56 seconds,
the average time between your
interrupted sleep moments)

REVIEWING YOUR SLEEP DATA (CONT.)
16
To best assess the quality of your sleep, look to see whether your Data A lengthens as you continue to use
SLEEPTRACKER®, and as you adjust your lifestyle to get better sleep. An increasing Data A means that you are
getting more restful sleep overall. A short Data A, however, may be no cause for concern if your data shows
that you are experiencing occasional extended periods of deep sleep (i.e., sleep uninterrupted by interrupted
sleep moments) amidst numerous short periods.
To establish your personal baseline, keep track of Data A for 7-10 nights so you can find out how restless each night’s
sleep was relative to the others. The more interrupted sleep moments detected (based on your individual norm),
the less restful your night’s sleep has been. If your sleep is consistent, Data A may only vary by a few minutes from
one night to the next. If, however, Data A deviates significantly from your normal baseline during a given night,
consider what you did before going to sleep that might have affected your sleep pattern. Factors like alcohol,
nicotine, caffeine, late evening exercise, eating late, spicy foods, stress, temperature, lighting, and external sounds
can all influence your Data A.
After SLEEPTRACKER® records an interrupted sleep moment, it will ignore any subsequent events for a period
of eight minutes. This prevents SLEEPTRACKER® from recording multiple interrupted sleep moments if you should
get up briefly in the middle of the night. If you remain out of bed for an extended period, SLEEPTRACKER®
will record awake moments every eight minutes until you go back to sleep. This artificial data, however,
will not affect SLEEPTRACKER®’s alarm function, since SLEEPTRACKER® simply triggers its alarm at your first
interrupted sleep moment within the alarm window. If you wish, you can delete or edit this data in the
SLEEPTRACKER software after you have downloaded your sleep data.
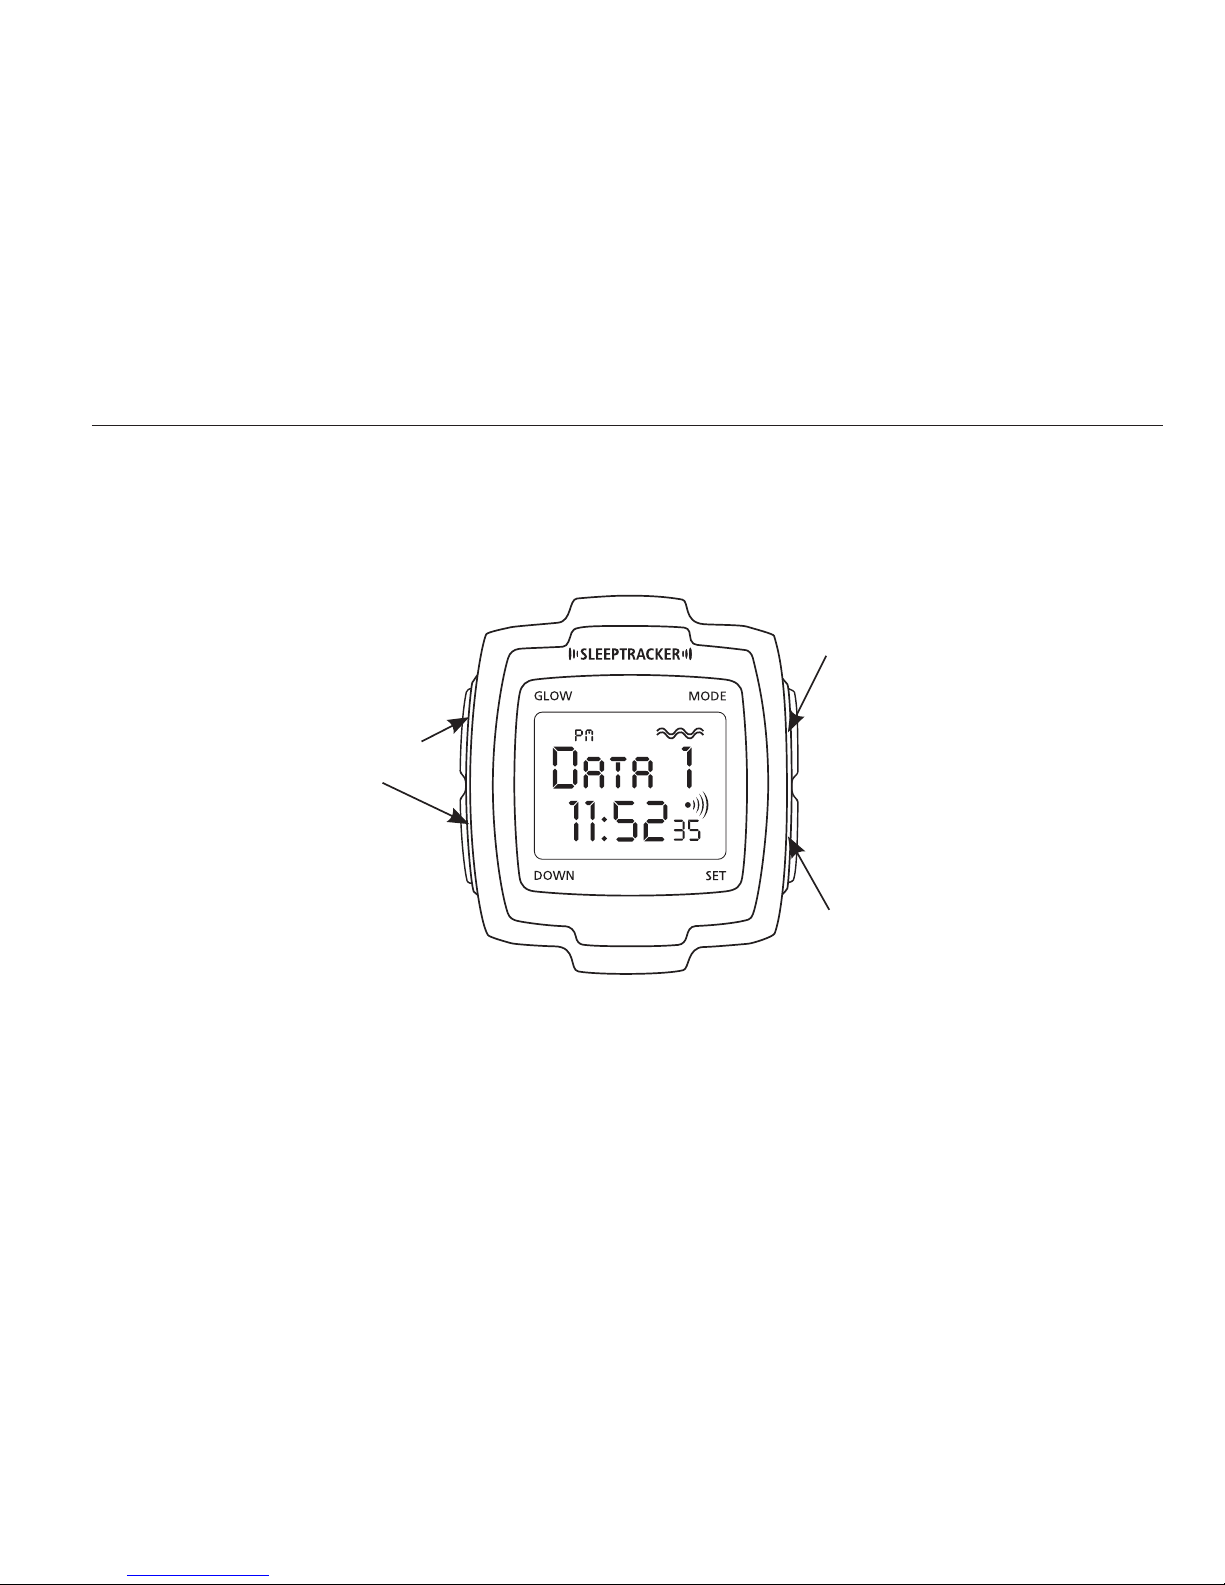
2) Press these buttons to
review data.
1) Press MODE to go to DATA
REVIEW. “Data 1” and a recorded
time will appear. This is the first
“interrupted sleep” moment that
was recorded during your sleep.
3) To erase your sleep data
manually, press and hold
SET for 3 seconds while in
the DATA REVIEW mode.
Note: Because the GLO button is performing multiple functions in the DATA REVIEW mode,
the backlight does not appear.
REVIEWING YOUR SLEEP DATA (CONT.)
17
Table of contents


