Innovatronix Tronix Explorer Mini User manual

User's Guide
Explorer Mini User's Manual | © Innovatronix Inc. | www.innovatronix.com | Revision Date: March 10 2015

Foreword
“Shoot in more locations than one”
TRONIX EXPLORER by Innovatronix
Congratulations on your purchase of the Tronix Explorer Mini!
The Tronix Explorer Mini rated at 400 Watts continuous and at 1200-Watts peak power is designed to provide
power to most flash and power pack units. It makes your studio lights work on location or when power is not
available - with faster recycling time more power better performance and a much lighter set up compared to
previous Tronix Explorer models.
•Power and Reliability
400 W continuous 1200Ws peak power inverter
Provides a clean sine wave from a 12V source
Efficient circuit design that generates hundreds of pops for a 500ws lighting set up
•Portability and Flexibility
A very light yet powerful battery pack for about 5 kilos
Compatible to a wide range of bi-voltage digital and analog flash units
Auto-volt/Global charging feature (100V-240VAC)
Comes with Tronix Explorer Mini Carrying Case
It can also be used for powering battery chargers laptops printers etc.
•Safe and Easy to Use
Plug and play
Battery power and charging indicators
Explorer Mini User's Manual | © Innovatronix Inc. | www.innovatronix.com | Revision Date: March 10 2015

Service and Warranty
The Tronix Explorer Mini is covered by a one-year warranty starting from the date of
purchase. From that date the product should be free of any defect in material and
workmanship and it will function in accordance to its stated performance.
Within this period Innovatronix Inc. will repair or replace defective parts. This warranty
only covers failures due to manufacturing defects and workmanship. Hence breakdown of the
product due to gross abuse use with non-recommended equipment or devices and normal
wear and tear is not covered in this warranty.
There are no warranties by use except as stated therein. For unsafe and/or faulty
repairs Innovatronix Inc. and/or sellers shall not be liable by such cases. Any alternation
made to this product by unauthorized service technicians are the sole responsibility of the
owner. Maximum liability for any breach of this agreement or other claim to the use of this
product shall not exceed the purchase price of the product by the customer.
Warranty registration is not required. Warranty is applicable if and only if the product is
used under normal conditions and for its intended purpose.
IMPORTANT!
Limited Warranty on SLA (Sealed-Lead) atteries
Only items with manufacturing defects should be returned for repair replacement or
refund. If the product returned was found opened altered or modified in any way the product
warranty is voided.
SLA battery set is not included in the warranty. Battery performance depends on
charge discharge cycle under the customer's use. In addition SLA batteries must be properly
maintained by keeping it charged or charging every after usage. Otherwise if the battery gets
dried up or diminished hence the product warranty on battery is voided.
Product returns and/or refund policies may differ on every vendor. Contact your vendor
for their customer satisfaction guarantee and warranty programs.
Explorer Mini User's Manual | © Innovatronix Inc. | www.innovatronix.com | Revision Date: March 10 2015

Contents
Important Safety Instructions ...................................................................1
•General Safety
•Electrical Safety
•Battery Safety ...................................................................2
Getting Started ...................................................................3
•hat's in the box?
Installation ...................................................................3
Operation ...................................................................4
Charging ...................................................................5
Maintenance
Battery Replacement ...................................................................6
Troubleshooting ...................................................................7
Frequently Asked Questions ...................................................................8
Technical Specifications ...................................................................10
Service and arranty Contact Information .................................................................11
Explorer Mini User's Manual | © Innovatronix Inc. | www.innovatronix.com | Revision Date: March 10 2015

Important Safety Instructions
Save this User’s Guide. Contents of this user's guide should be followed during installation operation and maintenance of Explorer Mini.
General Safety
•Do NOT expose the Tronix Explorer Mini to dust moisture liquids rain or snow.
•Do NOT block ventilation openings of the Tronix Explorer Mini; Overheating may occur.
•Do NOT place the Tronix Explorer Mini in a compartment with zero clearance.
•Not recommended attachments when used with Tronix Explorer Mini may result in risk of fire electrical
hazard or injury.
•Periodically observe the status of the LED indicators to make sure that Tronix Explorer Mini works as
intended.
Electrical Safety
•Always connect Tronix Explorer Mini to a grounded outlet. The socket outlet to which the product is
connected must be in close proximity and must be easily accessed.
•Flash units and other supported equipment must be properly connected to Tronix Explorer Mini. Secure
working connection and socket from outlet to the inverter.
•Always turn OFF and unplug Tronix Explorer Mini before doing any maintenance.
•Tronix Explorer Mini incorporates multiple power sources. Connect only ONE of these sources at a time.
Though not posing any danger simultaneous connection of any of these sources is NOT recommended.
Disconnect ALL power cords to completely remove power from the unit.
1
Explorer Mini User's Manual | © Innovatronix Inc. | www.innovatronix.com | Revision Date: March 10 2015

Battery Safety
Warning!
Contains potentially hazardous voltages. Do NOT make any changes or modifications to Tronix Explorer Mini
unless otherwise specified. Except for the batteries Tronix Explorer Mini has no serviceable parts.
•CAUTION: Do NOT place the battery near open flame or heat. Explosion may occur.
•CAUTION: Do NOT open the battery. It contains chemicals that are harmful to the skin and eyes. The
battery may also emit dangerous and explosive gas.
•CAUTION: To avoid injury due to electrical hazard remove metal accessories such as wristwatch and
jewelry when replacing battery. Use properly insulated tools and handles.
•CAUTION: Tronix Explorer Mini uses one (1) 12 Vdc/ 9 Ah Sealed Lead-Acid battery pack. Replace with
the same type as originally installed in Tronix Explorer Mini.
•CAUTION: Observe proper polarity when connecting the battery. Incorrect polarity will cause electrical
hazard or damage to Tronix Explorer Mini.
Dispose replaced battery properly. Deliver the battery to its manufacturer for recycling.
I portant!
Innovatronix Inc. does not reco end Explorer Mini for use in life support equip ent, where
alfunction of the product will significantly degrade effectiveness of such equip ent.
Exa ples of life support equip ent are, but not li ited to, the following:
pace akers, blood pu ps, ventilators and dialysis syste s.
2
Explorer Mini User's Manual | © Innovatronix Inc. | www.innovatronix.com | Revision Date: March 10 2015

Getting Started
What's in the box?*
1 x Tronix Explorer Mini Main Inverter unit
1 x Power Cord
1 x Universal Adapter (only for 115 – 60 models)
1 x Car Battery Charger
1 x Carrying Case
1x Tronix Explorer Mini User's Manual
*Contact Tronix customer care service (or seller) if package is deemed incomplete.
Installation
Always place the Tronix Explorer Mini in an environment there is no excess of heat dust and moisture.
1. Make sure that the Tronix Explorer Mini Inverter is switched OFF.
2. Connect the charger plug of battery charger unit to the charging port (14Vdc) located on the front top
panel of the Tronix Explorer Mini Inverter Unit. Make sure that connector is securely plugged in.
3. Plug the power cord to the 100-240 Vac socket of the battery charger unit and plug the power cord to the
100-240 Vac convenience socket or main supply.
4. The red LED (Power indicator) should be ON. When the battery is fully charged the red LED and the
green LED are both turned ON.
If Tronix Explorer Mini is being charged the first time charge the unit for 12 to 15 hours. This step ensures
optimum battery performance. Succeeding charges would only take 4 to 6 hours.
NOTE: The socket outlet to which Tronix Explorer Mini is connected must be in close proximity and must be
easily accessed.
3
Explorer Mini User's Manual | © Innovatronix Inc. | www.innovatronix.com | Revision Date: March 10 2015

Operation
1. Make sure that Tronix Explorer Mini is charged as instructed in Installation. Set up the necessary lighting
equipment.
2. Connect the plug of the flash unit being used to one of the Tronix Explorer Mini's sockets.
Note: The connections between the flash units and Explorer ini ust be in close proxi ity and ust be easily accessed.
3. Turn on Tronix Explorer Mini by switching the power switch to “|” position. There are two (2) battery level
indicators (Green LED for Battery Full and Red LED for Battery Low).
4. The Tronix Explorer Mini is now supplying power to the flash units. Test the flash units. If desired lighting
requirements are set proceed with the photo shoot.
NOTE: Using odeling la ps in the flash units will prolong recycling charging ti e and will easily discharge the battery.
Therefore, it is advised not to use odeling lights when using the Tronix Explorer Mini as a power source.
5. Observe proper positioning of Tronix Explorer Mini air vents should not be obstructed to avoid
overheating.
Below is a table of Tronix Explorer Mini LEDs’ status and its corresponding indication:
Status Indication Voltage Output
Battery Full Green LED indicator stays lit Yes
Battery Low (Warning) Red LED indicator is blinking with two
times beeping sound.
Yes
Battery Low (Shutdown) Red LED indicator is blinking with three
times beeping sound.
No
Overload Condition Green and Red LED is lit off with
beeping sound.
No
Thermal Shutdown Green LED is blinking and Red LED is
off with pulsating beep
No
I portant: Make sure that the air vents (a) at the back of the unit are not obstructed. You can operate the unit
while inside the bag given that the unit is as demonstrated in figure (b) it may also be in a different position as
long as the vents are unobstructed. Positioning the unit as demonstrated in figure (c) (upright) may cause the
Mini to overheat.
4
Explorer Mini User's Manual | © Innovatronix Inc. | www.innovatronix.com | Revision Date: March 10 2015

Charging
•Make sure that the Tronix Explorer Mini is switched OFF.
•See Installation procedures above.
REMINDER: DO NOT STORE THE UNIT FOR MORE THAN A MONTH WITHOUT CHARGING. CHARGE IT AT
LEAST ONCE A MONTH FOR OPTIMUM BATTERY PERFORMANCE.
When the unit is accidentally discharged in full (unit was left-on for a long time even after low battery shut down) slight
abnormality may be observed when trying to recharge the unit. When charged unit may falsely show that battery is full. Just
repeatedly plug and unplug the unit every 30 minutes until battery recovers and the indicator starts to blink.
Charging Guide
Status Indication
Not Connected Red LED is on
Charging Red LED is on Green LED is blinking
Battery Full Red LED is on and Green LED is on
Maintenance
•For optimum performance keep the battery fully charged. A lit Green charging LED indicates a fully
charged battery. On the other hand when the inverter gives three (3) beeps prior to shutdown the
batteries are discharged.
•Turn off the unit when not in use. Leaving Tronix Explorer Mini on when unused will severely drain the
battery.
•Use a dry cloth when cleaning the unit. Do not use any liquid or detergents.
•Coil cables when not in use. Loose cables may cause accidents.
5
Explorer Mini User's Manual | © Innovatronix Inc. | www.innovatronix.com | Revision Date: March 10 2015

attery Replacement
Caution!
Risk of electric shock. Extre e caution should be observed at all ti es. Before replacing the
batteries, disconnect all cords and wait 30 inutes before proceeding with the repair. Re ove all
etal objects attached to the body such as jewelry, wristwatch, and the like. Use properly insulated
tools and handles. Strictly follow the instructions to avoid further da age and injury.
1. Make sure Explorer Mini is switched off.
2. Remove the screws on the side of the top plastic cover.
3. Remove the plastic cover. Remove the screws on the side of the top metal cover.
4. Remove the metal cover. Lift the battery and carefully disconnect the wires on the battery terminals.
5. Connect a new 12 V/9 Ah SLA battery
6. Connect the red wire to the positive (+) terminal
7. Connect the black wire to the negative (–) terminal.
8. Place the battery back to its position.
9. Place back the metal cover. Tighten all screws.
10. Place back the plastic cover. Tighten all screws.
Dispose replaced battery properly. Deliver the battery to its manufacturer for recycling or observe proper battery
disposal.
Note:
Do not interchange the polarity of the wires. Black wire is for the negative (–) terminal and red wire is for the
positive (+) terminal.
6
Explorer Mini User's Manual | © Innovatronix Inc. | www.innovatronix.com | Revision Date: March 10 2015

Troubleshooting
Refer to the table below to address minor problems regarding installation and operation of Tronix Explorer Mini.
For problems that cannot be solved using the table contact Innovatronix Customer Service (see Contact
Information)
Proble Possible Cause Solution
No power Battery empty Plug Tronix Explorer Mini to a 100
to 240V AC outlet through its battery
charger unit.
Not charging Not plugged to supply
No power from supply
Charge Battery; Plug Tronix
Explorer Mini to a 100 to 240V AC
outlet through its battery charger
unit.
Ensure power is in the main supply
to utlet. Use other power cord other
than what is initially provided.
If Tronix Explorer Mini still does not
charge contact Innovatronix
Customer Service (see Contact
Information)
Lighting equipment not working Battery not charged
Light equipment malfunctioning
Incompatible equipment
Plug Tronix Explorer Mini to a 100
to 240V AC outlet through its battery
charger unit.
Contact manufacturer of the
equipment
Lighting equipment not compatible
with Tronix Explorer Mini (see
attached Compatibility Chart for
compatible equipment)
Battery draining fast Battery not fully charged
Modeling lamps in flash units
Battery nearing end of its useful life
Charge Tronix Explorer Mini for 4 to
6 hours (12 to 15 hours if charging
for the first time)
Modeling lamps when used with
flash units drains the battery faster.
It is not advised to use modeling
lamps with Tronix Explorer Mini as
power source.
Battery performance decreases with
time. Also batteries age
prematurely when placed in places
with high temperatures. Replace
battery. See Battery
Replacement
7
Explorer Mini User's Manual | © Innovatronix Inc. | www.innovatronix.com | Revision Date: March 10 2015

Frequently Asked Questions
There are 2 models. How do I know which one will I need?
The model denotes the voltage output of the Tronix Explorer Mini. Select the model which matches the input voltage
of your studio flashes or power packs (or other equipment).
For example Tronix Explorer Mini 120-60 models are used by photographers in North America (Mexico USA and
Canada) and other countries such as Japan where the convenience sockets give 100-110V. Tronix Explorer Mini 240-50
models are used by photographers in Europe Middle East Africa South and Central America Australia New Zealand and
most parts of Asia and Asia Pacific regions.
How do I know if my strobe or power pack is compatible with Tronix Explorer Mini? Why not all strobes and power
packs are compatible with Tronix Explorer Mini?
Tronix Explorer Mini is compatible to more digital strobes including bi- voltage strobes compared to previous Tronix
Explorer models. However compatibility to all strobes and power packs in the market is not guaranteed due to differences in
design of strobes and power packs between brands. For more information on compatibility of studio flashes:
http://www.innovatronix.com/compatib.asp
In a few cases digitally controlled strobes will not be compatible with Tronix Explorer Mini. This is because after a
flash is fired the capacitors inside the strobe will draw a large inrush current. Tronix Explorer Mini cannot adequately provide
such current. Thus for a few seconds the voltage output will be less than adequate. This is not a problem for analog flash
however. Analog flash can tolerate this voltage drop. For digital flash units this will probably cause a reset of its settings to
power up stage. Though this case is not damaging to the flash or Tronix Explorer Mini the flash will just not work properly.
For incompatible bi-voltage strobes due to voltage drop of the inverter when the flash is fired and during recycling
time the bi-voltage strobe is unable to find its working voltage either 110V range or 230V range thus causing the relays to
flip over which can damage the flash overtime. Some bi-voltage strobes are compatible because Tronix Explorer Mini is able
to charge the flash before its software can detect the abnormality or voltage drop.
How do I charge the Tronix Explorer Mini?
Using the battery charger unit connect the charger to the inverter unit. Then plug in the charger to the convenience
socket 100V to 240VAC For a fully discharged battery except for the initial charging charging can take about 4 to 6 hours.
How many pops can I expect with one full charge?
The number of pops will depend on the type of flash unit and the power loaded to Tronix Explorer Mini. Small loads
will produce greater number of pops and faster recycling time compared to large power loads.
Even at same power rating for example a 500ws bi-voltage flash and a 500 ws analog flash and connected to the
same fully charged Tronix Explorer Mini these flashes will give different number of pops. In most cases the analog flash will
give more pops than the bi-voltage flash.
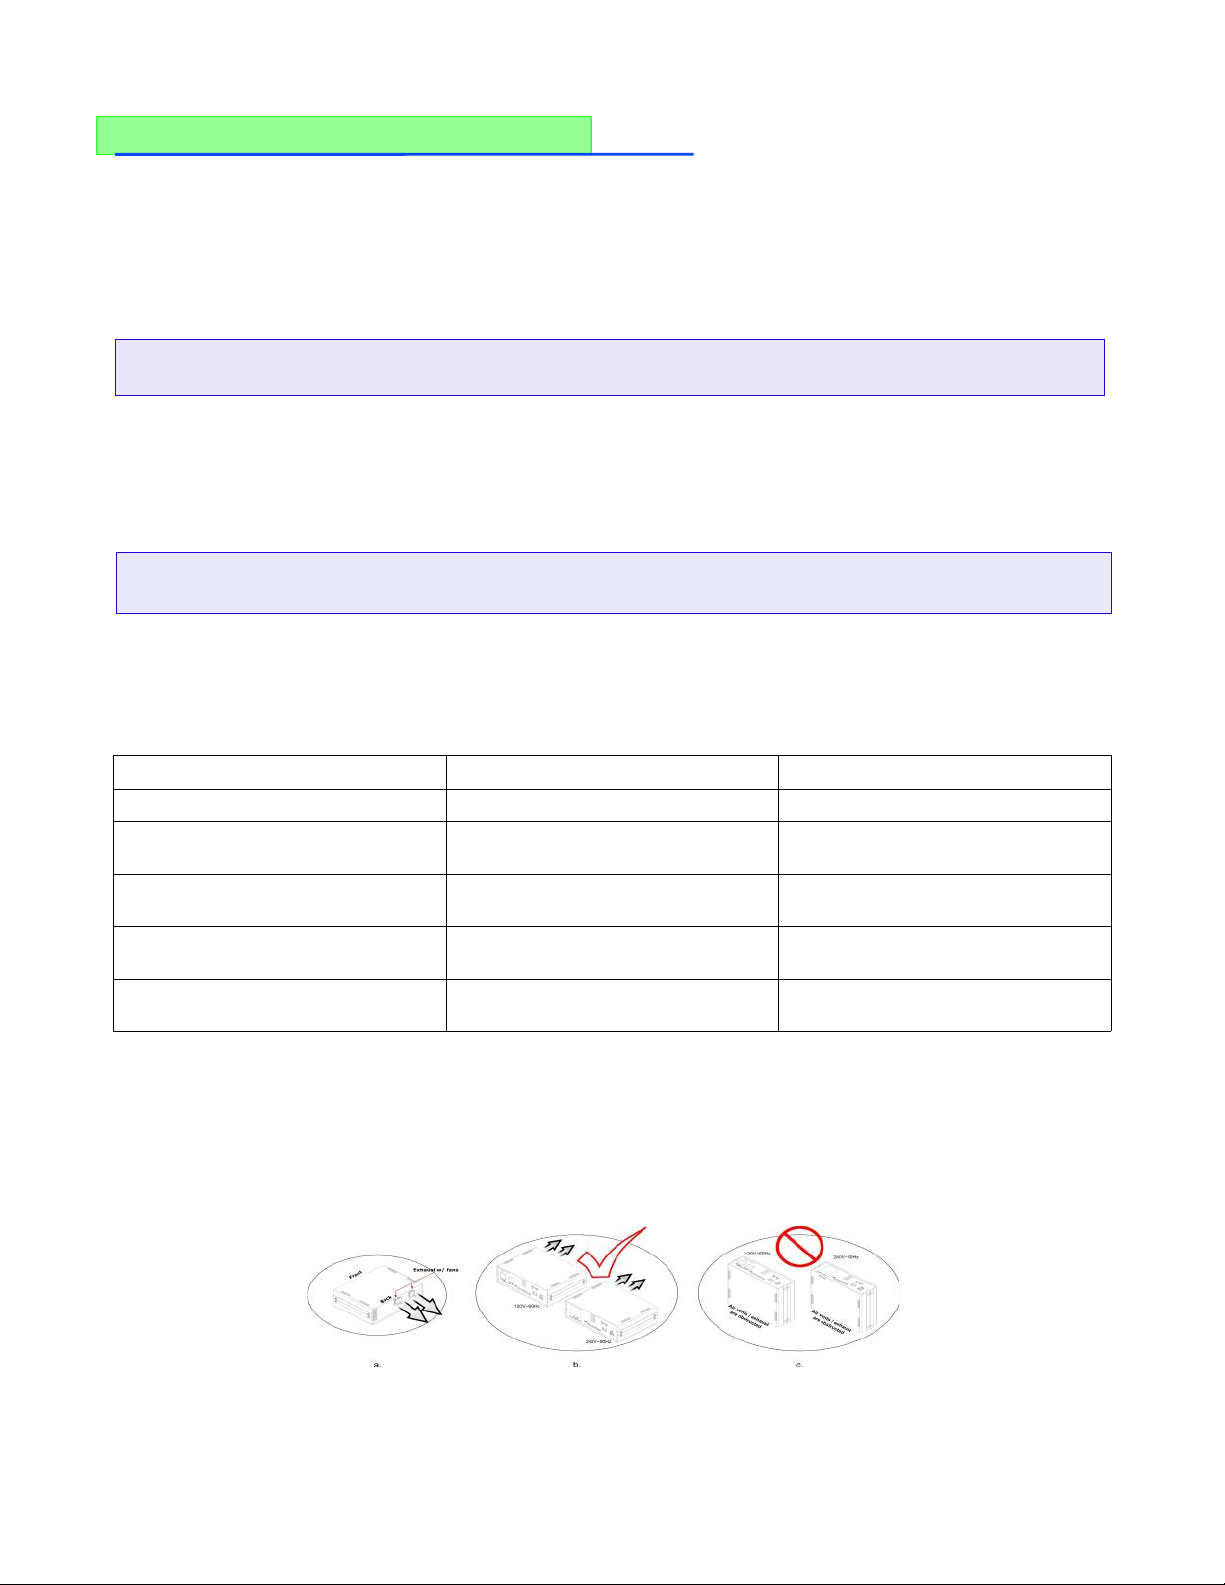
What are the things to watch out when using Explorer Mini?
Just like any portable power source from batteries the recycling time of Tronix Explorer Mini for flash units and
power packs can never be faster than the recycling time when a flash unit or power pack is plugged directly from a
convenience outlet or power line. In addition modeling lights should be switched OFF as continuous load drains the battery
at a higher rate.
8
Explorer Mini User's Manual | © Innovatronix Inc. | www.innovatronix.com | Revision Date: March 10 2015

Are there any maintenance tips on storing Tronix Explorer Mini?
The unit should be switched OFF when not in use. Leaving Tronix Explorer Mini ON and not in use will severely
damage the battery. Its battery can be left plugged even after it is fully charged. The product uses trickle-charging technique
so the battery would not be over charged. This practice also maintains the battery's optimum life span.
What is the expected life span of the Tronix Explorer Mini battery? How much would be the replacement battery?
Tronix Explorer Mini batteries are rated at 300 charge-discharge cycles or about a year of everyday use or the
battery's actual usage. Should the batteries be needed to be replaced use only batteries provided by Tronix or with the same
specification (see Technical Specifications). Tronix Explorer Mini uses one (1) 12V/ 9Ah Sealed Lead-Acid battery. Other
batteries may not be suitable to Tronix Explorer Mini and can cause electrical hazard or injury
What are the Customer Satisfaction Guarantee and/or Warranty?
Only items with manufacturing defects should be returned for a full refund if purchased within the last 30 days and
will be replaced in about 10-15 days. All costs are charged to Innovatronix Inc. It also carries a 30-day satisfaction guarantee.
This program applies only to units directly purchased from Innovatronix. For units purchased from a retailer or third party
vendor refer to their guarantee and warranty programs or contact us for authorized service centers in your country.
10
Explorer Mini User's Manual | © Innovatronix Inc. | www.innovatronix.com | Revision Date: March 10 2015

Technical Specifications
Feature Specifications
Models 120 - 60 240 - 50
Inverter Output
Power Capacity 500 VA 350 W max. at 0.8 pf
Voltage 120 V ± 5% ~ 240 V ± 5% ~
Frequency 60 Hz 50 Hz
Current 3.3 A 1.6 A
Waveform Pure Sine Wave
Socket NEMA-5 (x2) Schuko (x1) / Universal (x1)
Inverter Input
Voltage 100 V – 240 V ~
Current 460 – 220 mA (drained battery)
40 – 20 mA (full battery)
Connector IEC C14
Inverter attery
Type Maintenance-free Valve regulated lead acid (x1)
Voltage 12 V (per battery)
Capacity 9 Ah
Charging Time 4 to 6 hours
Run Time On-line (6 – 8 hours at no load)
Inverter Indicators
Visual Green LED for power
Red LED for battery status
Inverter Physical Characteristics
Dimensions 8 cm X 19 cm X 25 cm
Net Weight 5 Kg. (18 lb.)
IP Rating IP20
Operating Temperature -15 °C – 70 °C (5 °F – 158 °F)
Charger Output
Voltage 14 Vdc
Current 1.5 A
Connector Coaxial
Charger Input
Voltage 100 V to 240 V
Current 50/60 Hz
Frequency 222 mA to 93 mA
Connector IEC C14
Charger Indicators
Visual Red LED for POWER
Green LED for battery full
Charger Physical Characteristics
Dimensions 5 cm x 7 cm x 13 cm
Net Weight 5 kg
IP Rating IP20
Operating Temperature -15 °C – 70 °C (5 °F – 158 °F
Explorer Mini User's Manual | © Innovatronix Inc. | www.innovatronix.com | Revision Date: March 10 2015

Manufactured in the Philippines by:
Telephone Nu ber: +(632) 661-4108
E ail: [email protected]
Website: www.innovatronix.co
All rights reserved. No part of this publication may be copied, duplicated, or transmitted in any forms, or by any means, or
otherwise without written permission from Innovatronix Inc. The information contained herein is designed for the use of the
Tronix Explorer Mini. Innovatronix is not responsible for any use of this information as applied to other portable power
supplies and other related products.
Copyright 2015 by Innovatronix Inc.
Explorer Mini User's Manual | © Innovatronix Inc. | www.innovatronix.com | Revision Date: March 10 2015
Table of contents
Popular Inverter manuals by other brands

Mitsubishi Electric
Mitsubishi Electric FR-HEL-0.4K instruction manual

Huawei
Huawei SUN2000-55KTL quick guide

Huawei
Huawei SUN2000P-450W-P quick guide

Zeversolar
Zeversolar Zeverlution Pro 33K. Installation and operating instructions

WEICHAI
WEICHAI WPG13.5 Operation manual

Goodwe
Goodwe SDT G2 Series Quick installation guide