Inoksan FBE006 User manual

KULLANIM KILAVUZU
INSTRUCTIONS MANUAL
BEDIENUNGSANLEITUNG
РУКОВОДСТВО ПО ЭКСПЛУАТАЦИИ
TR
GB
DE
RU
ELEKTRONİK / ELECTRONIC / ELEKTRONISCHE/ ЭЛЕКТРОННАЯ
KONVEKSİYONLU BUHARLI FIRIN
STEAM CONVECTION OVEN
DAMPF UMLUFTOFEN
КОНВЕКЦИОННАЯ ПАРОВАЯ
ПЕЧЬ
MODEL : FBE006 ( setüstü )
FBE010 ( setüstü)
FBE022
FBE042
Revizyon No : 06
Yürürlülük Tarihi : 13.01.2014

2
TEKNİK ÖZELLİKLER / TECHNICAL DATA / TECHNISCHE DATEN
FBE006
FBE010

3
FBE022
FBE022

4
FBE042

5
MODEL / МОДЕЛЬ
FBE 006
FBE 010
FBE022
FBE 042
Tepsi / Tray / Tablet/ Противень
GN 1/1*6
400*600m
m
GN 1/1*10
400*600mm
GN 1/1*20
GN 2/1*10
GN 1/1*40
GN 2/1*20
Genişlik / Width / Breite/
mm
981.5
982.5
1207
1207
Derinlik / Depth / Tiefe
mm
886
886
1129
1125
Yükseklik / Height / Höhe
mm
760
975.5
1629
1680
Fırın Isı Kapasitesi / Heat Capacity /Heizleistung
kW
10
14,5
25
38
Boyler Isı Kapasitesi/Boiler Heat Capacity
/Boiler- Heizleistung
kW
8
8
16
24
Fan Motor Gücü / Fan Motor Power / Motorleistung
W
850
850x2
Su Girişi / Water Inlet / Wasseranschluss
Inch
3/4"
Su Basıncı / Water Pressure / Wasserdruck
bar
kPa
2 - 4
150 - 200
Boyler Kapasitesi / Boiler Capacity / Boilerkapazität
Lt
6
6
10
15
Max. Elektrik gücü/max electric power/max elektrische
Leistung/макс электроэнергии
Kw
10
14,5
25
38
Faydalı iç hacim/useful internal volume/nützlich
Innenvolumen/полезно внутренний объем
m³
0,12
0,22
0,45
0,87
Max. Su Tüketimi / Max. Water Consumption /
Maximaler Wasserverbrauch
Lt/h
1-2
1-2
3-4
6-8
Elektrik Girişi / Electric Inlet / elektrischer Anschluss
V
380-400V 3N AC 50 Hz
Kablo Kesiti / Cable Cut / Leitungsdurchmesser
mm2
5x6
Net Ağırlık / Net Weight / Netto Gewicht
Kg
128
158
235
347
T1
Tepsi / Tray /
Tablettyp(GN1/1)
FBE 006
FBE 010
FBE 022
FBE 042
Fırın arabası max. taşıma kapasitesi ( kg.)
Kiln cars max. Capacity
Ofenwagen max. Kapazität
Печных вагонеток макс. Мощность
1 tepsi 10kg.
alınmıştır
(Tepsi dolu iken.)
60
100
200
400
Bisküvi-kurabiye / Biscüits-Cookies / Kekse/
печенье
10mm
6 ad/pcs/
stück
10 ad/pcs/
stück
20 ad/pcs/
stück
40 ad/pcs/
stück
Mayalı hamur türleri / Different yeast dough /
verschiedene Hefeteige/ виды дрожжевого
теста
20mm delikli /
Perforated / gelocht
3 ad./pcs/
stück
5 ad./pcs/
stück
10 ad./pcs/
stück
20 ad./pcs/
stück
Börek türleri / Different flaky pastry /
verschiedene Blätterteige/ типы кондитерские
20mm düz / flat /
glatt
3 ad./pcs /
stück
6 ad./pcs /
stück
10 ad./pcs /
stück
20 ad./pcs /
stück
Fırın yemekleri / Oven-cooked dishes / zu
kochende Speisen/ печь блюда
40-65mm düz / flat
/ glatt
3 ad./pcs /
stück
6 ad./pcs /
stück
10 ad./pcs /
stück
20 ad./pcs /
stück
Sulu yemek(ısıtma) / Dishes in their own juices
(warming up meals) / Speisen in ihrer eigenen
Soße (Speisen zum aufwärmen)/ сочная еда
(нагрев)
65mm düz / flat /
glatt
2 ad./pcs /
stück
3 ad./pcs /
stück
6 ad./pcs /
stück
14 ad./pcs /
stück
1
2
3
4
5
1
2
3
4
5

6
KONTROL PANELİ / CONTROL PANEL / BEDIENFELD
TR
UYARI: Eğer, cihazda frekans inventörü kullanılıyorsa, cihaz enerji girişinden önce ( giriş
klemensinden) AC/DC hassasiyetli TYPE B RCD ( kaçak akım rölesi) kullanılmalıdır.”
Cihazı kullanmaya başlamadan önce
kullanım kılavuzunu mutlaka okuyunuz ve
ihtiyaç duyduğunuzda başvurmak üzere
saklayınız.
1. MONTAJ
Cihaz üzerindeki koruyucu naylonu soyunuz,
yüzey üzerinde yapışkan kalırsa uygun bir çözücü
ile temizleyiniz.
Cihazı, pişirme işlemi esnasında oluşan duman,
koku ve buharın çıkışını sağlayacak şekilde bir
davlumbaz altına yerleştiriniz veya "1" nolu
duman çıkışını doğal emişli bacaya bağlayınız.
Çıkan dumanlar cebri olarak dışarı atılacaksa
aspiratörün elektrik bağlantısı cihazla müşterek
olmalıdır. Havalandırma yapılmadığında cihazın
çalışması durmalıdır.

7
Cihazı, düzgün ve sert bir zemin üzerine
ayarlanabilir ayakları yardımı ile teraziye alarak
yerleştiriniz.
Montaj ve bakımın rahat yapılabilmesi için,
cihazın yerleştiği yerin sol tarafı yaklaşık 60cm
boşluk olmalıdır. Bu motorun hava emişini de
rahatlatacaktır. Yine hava sirkülasyonu açısından
arkada da yaklaşık 10 cm boşluk bırakılmalıdır.
Cihazı, yerleştirirken yükleme, ve boşaltmanın
rahat yapılabilmesi için fırın kapısının en az 1100
açılabilecek şekilde olmasına dikkat ediniz.
SU BAĞLANTISI
Cihaz su girişine 3/4" tesisat çekiniz ve uygun bir
yere 3/4" küresel vana bağlayınız.
Cihaz 70Fh sertliğinde, 2-4 bar su ile
beslenmelidir. Böylece boyler ve buhar tesisatının
kireçlenmeden dolayı tıkanması önlenmiş olur.
Cihazın su tahliyesini Ø30mm hortumla "4" nolu
gidere bağlayarak yapınız.
ELEKTRİK BAĞLANTISI
Cihaz DIN VDE 0100 elektrik tesisat
standartlarına uygun bir şebekeye bağlanmalıdır.
Cihaz 380-400V 3N AC 50-60Hz şebeke
geriliminden beslenmelidir.
Elektrik bağlantı hattı için H07 RN-F kalitesinde
5x6 mm2kesitinde kablo kullanılmalıdır.
Voltaj toleransı ± % 10’u geçmemelidir.
Cihaz mutlaka topraklanmalıdır. Bunun için DIN
VDE 0100 madde 540 göz önünde
bulundurulmalıdır. Topraklama vidası " "
etiketi ile belirtilmiştir.
2. KULLANICI TALİMATI
Cihaz profesyonel kullanım için tasarlanmıştır ve
sadece bu konuda eğitim almış kişiler tarafından
kullanılmalıdır.
Cihazla çok değişik yiyecek türlerini pişirebilir,
önceden pişirilmiş yiyecekleri ısıtabilirsiniz. Daha
sağlıklı pişirme için Tablo-1’deki bazı
yiyeceklerle ilgili pişirme koşullarına bakınız.
Pişireceğiniz malzemeye uygun olmak kaydıyla
en sığ tepsiyi seçiniz. Örneğin mayalı hamur
türlerinde delikli ve 20mm, börek türlerinde
normal deliksiz ve 20mm, sulu ve soslu yemek
türlerinde ise yemeğin özelliğine göre 40-65mm
derinlikte tepsileri seçiniz. 65mm’den derin
tepsileri kullanmamanızı tavsiye ederiz.
Tepsi ray aralıklarına pişirilecek mamüle göre
tepsiler yerleştirilmelidir. Sık sık dizilmiş tepsi
aralarından hava sirkülasyonu tam
sağlanamayacağı için pişmede farklılıklar
oluşacaktır. Örneğin patisseri hamurlarından olan
sable bisküvi, Torba Hamuru, Amerikan Bisküvi,
İtalyan kurabiye gibi yapılacak uygulamalarda
pastacı tepsisi denilen 10mm derinliğindeki
tepsilerden tüm ray aralıklarına yerleştirilebilir.
Fakat diğer mamüllerin pişirilmesinde tepsi
derinliği 20mm veya daha üstünde ise tepsilerin
birer ray boş bırakarak dizilmesi hava
sirkülasyonunun ve dolayısıyla pişmenin daha
sağlıklı olmasını sağlayacaktır.
Fırında börek, sulu ve soslu yemek pişirmek
istediğinizde kullanılması gereken tepsi
derinlikleri 20, 40 veya 65mm olmalıdır. Bu
durumda tepsi kapasitesi aşağıdaki gibi olacaktır.
FBE006
FBE010
FBE022
FBE042
GN 1/1
3
6
10
20
GN 2/1
-
-
5
10
400*600
3
6
5*
10*
*: Cihazla birlikte verilen ızgaralara konur.
Fırında haşlama işleri dışında ne pişirirseniz
pişirin fırına pişirilecek malzeme yüklenmeden
önce mutlaka pişme derecesinden en az 600C
(140F) üstünde ön ısıtma yapınız. Örneğin
1700C'de (338 F) bir ürün pişirecekseniz fırın
sıcaklığını 2300C'ye (446 F) ayarlayınız. Çünkü
fırına girecek malzemelerin (araba, tepsi,
pişirilecek ürün) soğuk olması ve yükleme
sırasında fırın kapısının açılıp kapanması fırın içi
sıcaklığını düşürecektir. Fırın içi sıcaklığının
istediğiniz ısıya ulaşıp ulaşmadığını kontrol
panelinden izleyebilirsiniz. Fırın seçilen ısıya
ulaşmadan timer(saat) geri sayım işlemine
başlamaz. Fırın belirlenen sıcaklığa ulaştığında
ürünü yerleştiriniz. Eğer belirlenen değerden önce
yada ön ısıtma yapmadan ürününüzü fırınlarsanız
tepsiler arasında farklı pişirmeler meydana
gelebilir.
Haşlanma tehlikesine karşı tepsiler maksimum
seviyede doldurulmamalı
Tavuk ızgara, Balık ızgara ve Kuru köfte gibi
uygulamaların tepsiler yerine fırın içersinde
verilen tel ızgaralar üzerinde yapılması daha
uygun olacaktır.
(FBE022 ve FBE042 için) Tepsileri fırın
arabasına yerleştirirken aynı hizada olmasına ve
tepsilerin tam olarak fırın rayları sonuna kadar
gitmesine dikkat ediniz. Aksi takdirde farklı
pişmeler olacaktır. Ayrıca fırın arabasını fırın
kabini içerisine yerleştirirken son dayama
noktasına kadar sürülmesi gerekir.
Boylerdeki suyu boşaltmak istediğinizde "5" nolu
topuzu çekiniz. Bu durumda boylerdeki su "4"
nolu giderden boşalacak, ilk çalıştırmada cihaz
suyunu yenileyecektir.

8
Bu fırınlar (Combi Steam) normal konveksiyonlu
fırınlar gibi kullanılmanın yanında buhar enerjisi
kullanılarak (buharlı fırın olarak) hertürlü
HAŞLAMA İŞLEMLERİ'ni veya konveksiyon
akımı ile buhar enerjisini birlikte kullanarak
Combi fırın (konveksiyon+buhar) olarak daha
yumuşak kurutmadan yapılacak pişirmeleri
yapabilmek mümkün olmaktadır.
Haşlama işlemlerini yaparken fırın ön ısıtması
önemli değildir. Fırın digital göstergesinde sadece
timer(saat)'ı ayarlamanız ve start etmeniz
yetecektir. Isı seçimi orjinal olarak set edilmiştir.
Daha üst bir sıcaklığa çıkamassınız ancak daha
düşük değerlerde haşlama işlemini yapabilirsiniz.
Fırını COMBI olarak kullanmak istediğinizde
buhar veya konveksiyon oranlarını belirleyebilir
ve çok daha farklı lezzetler yaratabilirsiniz. Fırın
digital göstergesi üzerinde yer alan Combi çevrim
panosunda mavi renk buhar oranını kırmızı renk
konveksiyon oranını göstermektedir. İstediğiniz
oranları (set edilmiş değerlerde) girebilirsiniz.
Ancak burada doymuş buhar ile nemlendirmeyi
birbirine karştırmamak gerekir. Bu fırınlarda
(Combi Steam) buhar, boylerde üretilerek kabin
içerisine püskürtülür. Oysaki nemlendirme sadece
fırın kabini içersine su püskürtülmesi ile sağlanır.
Yinede Combi Steam fırınlarda nemlendirme de
ayrıca bulunmaktadır.
Combi sistemin çok sayıda yararları vardır. En
başta bize lezzetli yiyecekler sunmayı sağlar.
Combi sayesinde (oranlar doğru girildiğinde)
pişirdiğiniz tüm mamuller kendi öz sularını
kaybetmezler, hacim olarak küçülmezler, şekilleri
değişmeden, parlaklıklarını kaybetmeden pişerler.
Combi Steam Fırınlarda alışmamış olduğumuz bir
yöntemdir ama pilav gibi Türk mutfağının
vazgeçilmez bir yiyeceğini bile pişirebilmek
mümkün olmaktadır. Pilav yapımı sırasında
1800C sıcaklık % 50 buhar ve % 50 konveksiyon
akımı ile (önceden 1500C ön ısıtma yapılmış
fırında) 15 dakika gibi bir zamanda 15 Kg.
pirinçten pilav yapabilmek mümkün olacaktır.
Buda dünya standartlarındaki Cost hesabı ile
60gr/kişi üzerinden hesap edildiğinde 250 kişilik
pilav demektir. (FBE022 için)
Bu cihaz ile her tür makarnayı haşlayabilmek,
kuskus, bulgur pilavı gibi Türk mutfağının
vazgeçilmezlerini yapabilmek, farklı tatlar
sunabilmek mümkündür. Yine kurallarına uymak
koşulu ile bazı yiyecekleri ciğ olarak
pişirebilmekte mümkün olmaktadır. Örneğin
Biber Dolma gibi.
Haşlama konumunda ise her türlü sebze ve
meyveyi haşlayabilmek mümkündür. Ancak
burada dikkat edilmesi gereken en önemli kural
haşlanacak sebzeleri doğru yerleştirmek. Bilindiği
üzere bazı sebzeler haşlandığında aşırı renk
maddesi salarlar. Bu nedenle fazla renk veren
sebzeler fırın kabininin en altına, daha üste ise
regini fazla kaybetmeyen sebzeleri yerleştiriniz.
Nedeni ise fazla renk salan sebze üstte olur ise
akan renkli su alttaki sebzeyi boyayabilir. Örneğin
ıspanak diğer sebzeler ile birlikte haşlanacak ise
mutlaka en altta olmalıdır.
Bu cihazlarda hız kontrol ünitesi kullanılarak
önemli bir farklılık ve avantaj sağlanmıştır.
Kullanıcı fan hız konumunu 400 devir/dakika ile
1400 devir/dakika arasında seçme şansına
sahiptir. Bilindiği gibi BAKLAVA ve KADAYIF
Türk mutfağının müthiş bir lezzetidir ve taban
fırında pişirilmesi gerekir. Oysaki devir ayar
özelliği sayesinde baklava ve kadayıf bu fırınlarda
pişirilebilmektedir. Yapılması gereken tek şey
fırını %0 buhar ve %100 konveksiyon enerjisine
ayarlayıp fan hız kontrolünden de 2. kademeyi
(600 d/dk.) seçmek ve 1700C de (338 F) 45-50
dakikada pişirmek olacaktır.
3. CİHAZIN KULLANIMI
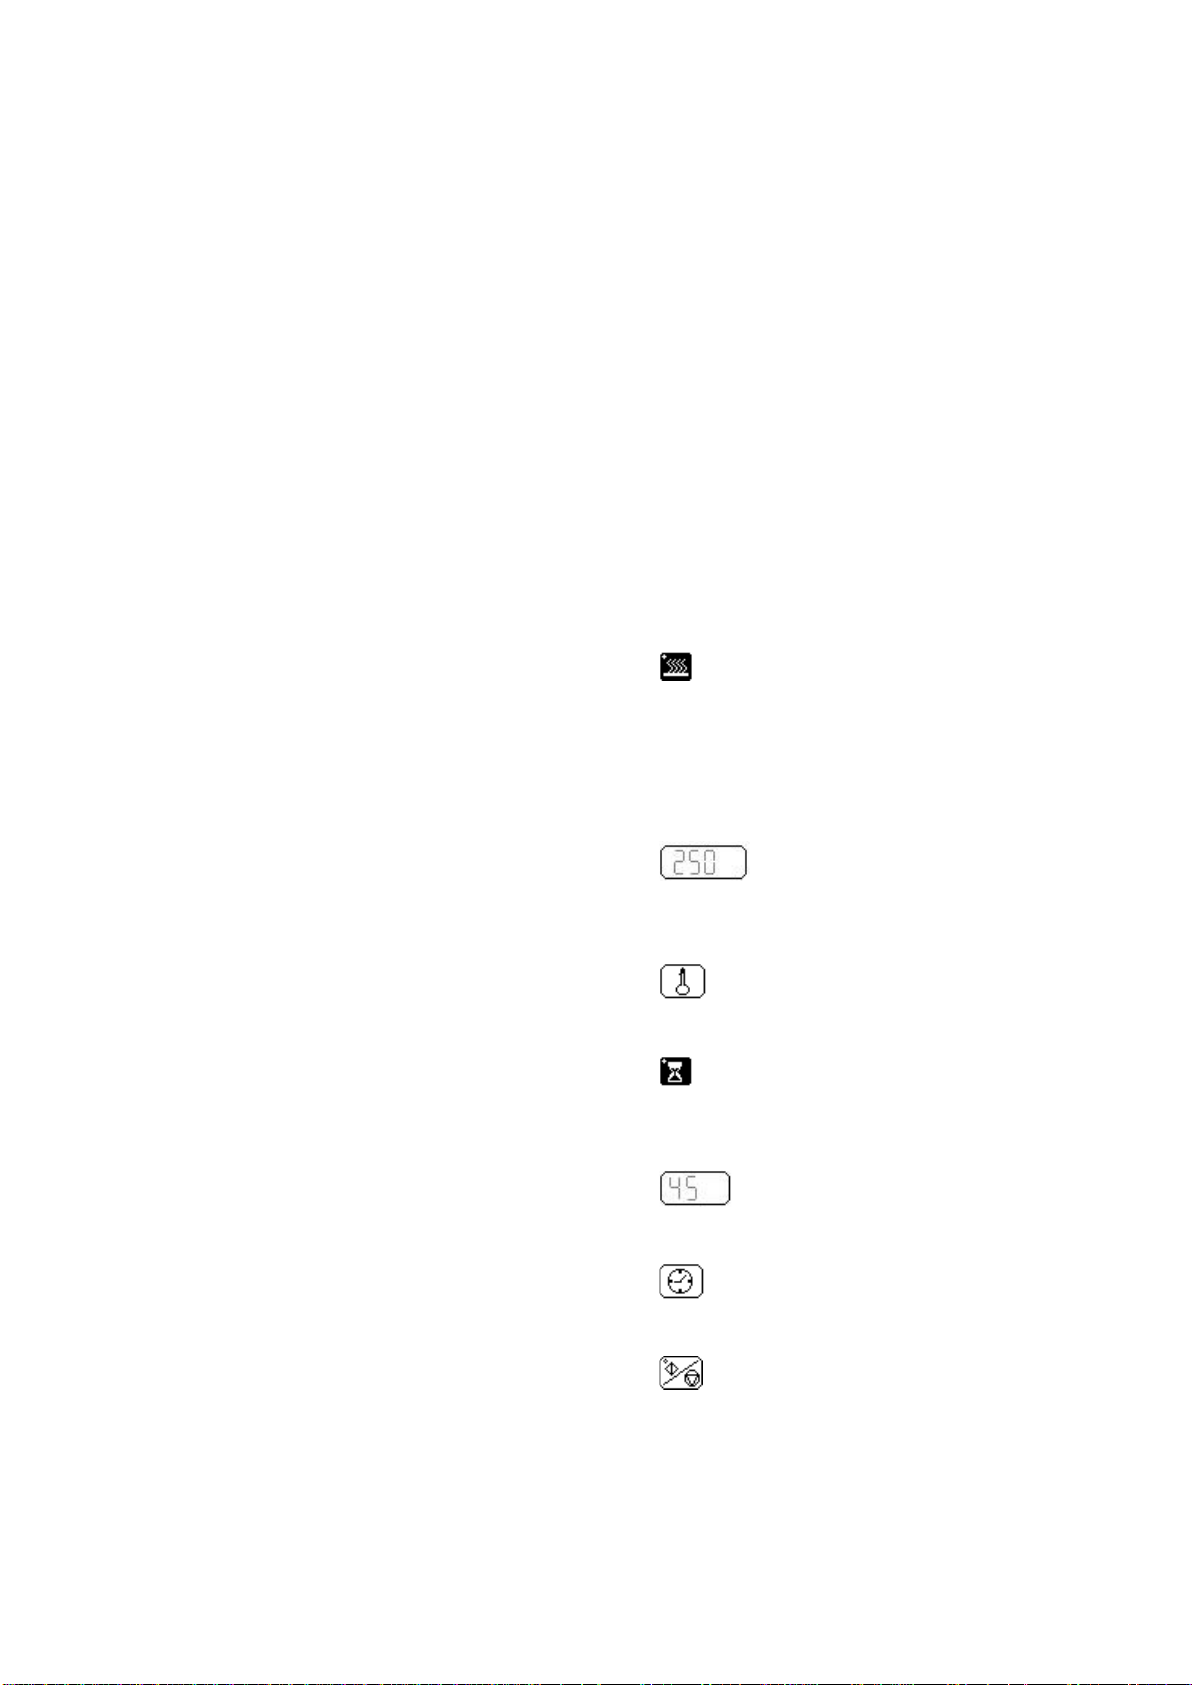
3.1 - Tuş Fonksiyonları
Isıtıcı Ledi: Isıtıcıların devrede olduğunu
gösterir. Sıcaklık set edilen değere ulaşana kadar
ısıtıcılar devrededir. Set edilen değere
ulaşıldığında devreden çıkar ve ışık söner. Kabin
içerisinde 8-10 derecelik ısı düşmesinde tekrar
ışık yanarak istenilen değere kadar ısıtıcıları
devrede tutar.
Sıcaklık Göstergesi: Ölçülen sıcaklık
değerini gösterir. Set tuşuna basıldığında set
edilen sıcaklık değeri görülür. Arıza durumunda
uyarının türünü gösterir.
Sıcaklık Set Tuşu : Sıcaklık set değerini
görmek için kullanılır. Basıldığında set edilmiş
değer göstergede belirir ve yanıp sönmeye başlar.
Zaman Sayma Ledi : Zaman saymanın
devrede olduğunu gösterir. Sıcaklık set
değerine ulaştıktan sonra zaman saymaya ve led
yanıp sönmeye başlar.
Zaman Göstergesi: Ayarlanan zaman
değerini gösterir. Set tuşuna basıldığında set
edilen zaman değeri görülür.
Zaman Set Tuşu:Zaman set değerini
görmek için kullanılır.Basıldığında set edilmiş
değer göstergede belirir ve yanıp sönmeye başlar.
Start Stop Tuşu: Belirlenen programı
çalıştırır. Tekrar basıldığında durdurur. Cihaz
start konumunda iken sol üst köşedeki led yanar,
stop konumuna geçtiğinde ise söner. Start
konumunda set değerleri değiştirilemez. Start
verildiğinde seçilmiş programı oluşturan 3 ayrı
modu arka arkaya işlemeye başlar. t3 modu
işlendikten sonra cihaz stop konumuna geçer.

9
Program Göstergesi: Sıcaklık, zaman,
zaman modu ve kombi oranlarının kaydedildiği
programların numarasını gösterir.
:Manuel Program
Arttırma Tuşu: Bulundukları gruplara göre
sıcaklık, zaman ve program değerlerini bir artırır.
Basıldığı sürece otomatik olarak arttırır.
Azaltma Tuşu: Bulundukları gruplara göre
sıcaklık, zaman ve program değerlerini bir azaltır.
Basıldığı sürece otomatik olarak azaltır.
NOT : Tüm arttırma ve azaltma tuşları sadece
STOP konumunda çalışır.
Mod Seçme Tuşu: Her bir programı
oluşturan modlarının (t1,t2,t3) sıcaklık, zaman ve
kombi oranlarının girilebilmesi için seçilmesini
sağlar. Her basışta mod 1 artar. t3'ten sonra tekrar
basılırsa başa (t1'e) döner. Her bir modda sıcaklık,
zaman ve kombi oranı ayrı ayrı girilebilir. Start
konumunda iken basılırsa, cihaz bir sonraki
modda belirlenen set değerlerine göre çalışmaya
devam eder.Zaman Modu Göstergesi: Cihazın o
an işlediği yada ayarlarının yapıldığı modu
gösterir. Her program bu 3 moddan oluşur. Start
verildiğinde önce t1, sonra t2 ve t3 modları
işlenir. İşlenmesi istenmeyen modun zaman set
değerine "00" girilir. Bu durumda cihaz o modu
işlemeden bir sonrakine geçer.
Kombi Seçme Tuşu: Konveksiyonlu,
buharlı yada kombine (buhar + konveksiyon)
pişirme oranlarını seçme tuşudur. %100
konveksiyonda sadece ısıtıcılarla; %100 buharda
ise sadece buharla; diğerlerinde ise 1 dk.'lık
periyotlarda ısıtıcı ve buhar % oranlarına göre
pişirme yapılır. Tuşa her basışta oran bir sağa
kayar. %100 buharlıdan sonra tekrar basılırsa
başa döner. Bu bütün programlardaki modlar için
ayrı ayrı girilebilir.
Kombi Oranı Göstergesi: Kombi
seçme tuşuyla seçilen buhar/konveksiyon oranını
gösterir. % kırmızılar konveksiyonu, % maviler
buharlı pişirme oranlarını gösterir.
Manuel Buhar Verme Tuşu:
Konveksiyonlu pişirme esnasında fırına buhar
vermeyi sağlayan tuştur. Basılı kaldığı sürece
fırına buhar verir. Fırın iç sıcaklığı 100 0C nin
altında ise, basıldığında buhar vermez. Sıcaklık
göstergesinde A-2 belirir, cihaz sesli uyarı verir.
ON / OFF Tuşu: 1 sn. süreyle
basıldığında, cihazı enerjilendirilip çalışmaya
hazır hale getirir. Bu durumda sol üst köşedeki
led yanık kalır. Tekrar basıldığında cihazın
enerjisini keser ve led söner. OFF konumuna
getirildiğinde fırın sıcaklığı 100 0C 'nin üstünde
ise, bütün işlemleri durdurur, göstergeleri kapatır
ve fanı devreye sokarak soğutma rejimine
girer.Bu durumda sadece sıcaklık göstergesi fırın
sıcaklığını gösterir.
Lamba Tuşu:Fırının iç aydınlatmasını
sağlar.Lamba devrede iken sol üst köşedeki led
yanar. Tekrar basıldığında lamba ve led söner.
Fan Tuşu:Fanın devreye girip çıkmasını
sağlar.Isıtıcılar devredeyken yada kapanma
rejiminde otomatik olarak devreye girer. Stop
konumunda yada buharlı pişirme esnasında bu
tuşla devreye alınır veya çıkarılır. Fan devrede
iken sol üst köşesindeki led yanar.
Fan Hız Ayar Tuşu: Fanın
çalışma devrinin 6 kademeli olarak ayarlanmasını
sağlar. 1. kademede 400 dev/dk. 2.'de 600, 3.'de
800, 4.'de 1000, 5.'de 1200 ve 6.'da 1400
dev/dk'dir. Açılışta 6. kademeden(1400dev/dk)
başlar. Basıldığında 1.kademeye geçer. Her
basışta kademe 1 artar.
Hız Ayar Göstergesi:Fanın o andaki hız
kademesini gösterir. Fanın çalışmasından
bağımsızdır ve hangi devirde çalışacağını belirtir.
NOT:Fan hız ayarı programlarından
bağımsızdır. Proglamlar işletilmeden önce
tekrar ayarlanmalıdır.
3.2 - Cihazın Çalıştırılması
Su giriş vanasını ve cihazı besleyen elektrik
şalterini açınız.
ON/OFF tuşuna 1 sn. kadar basarak cihaza enerji
gelmesini sağlayınız.
Cihaz 10 programlıdır. Her program için üç ayrı
modda(t1, t2, t3) sıcaklık, zaman ve pişirme türü
belirlenebilir. Pişirme programları Tablo-1'deki
listeye göre yapılabilir.
3.2.1 - Programlama
1 - Program Seçme
Manuel programın yanında,
üç ayrı mod için sıcaklık, zaman, kombi oranın
girilebildiği 10 adet program bulunmaktadır. Bir
kere parametreler girildikten sonra program
çağırılınca otomatik olarak saklanan değerler
yüklenir. Pişirme işlemi için kaydı yapılmak
istenen ürünün parametrelerinin (sıcaklık, zaman,
kombi oranı vs.) saklanacağı program numarası
program bölümündeki arttırma ve azaltma tuşları
yardımıyla seçilir. Eğer daha önceden bir kayıt
yapılmışsa bu değerler ilgili göstergelerde belirir.

10
2 - Zaman Mod Ayarı:
Zaman modlarından "t1" modu
seçilir. Şimdi bu mod için zaman, sıcaklık ve
kombi oranları girilebilir.
3 - Zaman Ayarı :
Seçilen zaman modu için kaç
dakika pişirme yapılacağı zaman bölümünden
ayarlanır. Eğer bu zaman modu
kullanılmayacaksa zaman değeri "00" girilir. Bu
durumda start verilince cihaz bu modu işlemeden
bir sonraki moda geçer.
4 - Sıcaklık Ayarı:
Pişirme sıcaklığı da sıcaklık
tuşlarıyla istenilen değere ayarlanır.
5 - Kombi Oranı:
Pişirme işleminin;
kuru(konveksiyonlu), haşlamalı(buharlı) yada her
ikisinin birlikte belirli bir oranda seçilebilir.
Göstergenin üstündeki kırmızı oranlar kuru
(konveksiyonlu) pişirme, altındaki mavi oranlar
da haşlamalı(buharlı) pişirme oranlarını
göstermektedir. Tekrar 2.bölüme dönüp t2 ve t3
zaman modları için 3., 4. ve 5. adımlar
uygulandıktan sonra belirlenen program
numarasına kayıt yapılmış olur. Başka bir
program daha yapılmak istendiğinde 1. adıma
dönülür ve yeni program numarası seçilerek diğer
adımlar tekrarlanır.
6 - Fan Hızı Ayarı:
Bu özellik programlardan
bağımsızdır. Manuel olarak ayarlanması gerekir.
Hafızaya kaydedilmez. Fan devreye girdiğinde
fanın çalışacağı devri belirler.
3.2.2 - Program Parametrelerinin Kontrol
Edilmesi ve Çalıştırma
1 - Program Seçilir:
Arttırma ve azaltma tuşları ile parametreleri
kontrol edilecek program seçilir. (Manuel
program dahil). Bu durumda sıcaklık, zaman,
zaman modu ve kombi oranları ilgili
göstergelerde belirir ve yanıp sönmeye başlar.
Zaman modu "t1" dedir.
2 - Sıcaklık Set Değerleri:
Sıcaklık göstergesinde, set edilen sıcaklık değeri
okunur;
3 - Zaman Set Değeri :
Zaman göstergesinde, set edilen zaman değeri
okunur.
4 - Kombi Oranı:
Kombi oranı göstergesinde, set edilen kombi
oranı okunur. Diğer "t2" ve "t3" modları için
zaman modu tuşuna basılır. 2., 3. ve 4. işlemler,
her bir zaman modu için tekrarlanır. En son
basılan tuştan 5 sn. sonra cihaz ayar konumundan
çıkar.
5 - Fan Hız Ayarı:
Bütün ayarlanan değerler görüldükten sonra fan
hız ayarı yapılır. Fan hız ayarı programdan
bağımsızdır. Her çalıştırmadan önce pişirilecek
ürünün cinsine göre hız ayarı yapılmalıdır.
6 - Çalıştırma:
Start tuşuna basılır. Fırın ayarlanan değerlere göre
çalışmaya başlar.
7 - Çalışırken Kontrol:
Fırın start aldıktan sonra set değerleri
değiştirilemez. Ancak kontrol için görülebilir.
Zaman set tuşuna basarak set edilen zaman
görülebilir. Sıcaklık set tuşuna basarak set edilen
sıcaklık değeri görülebilir.
3.2.3 - Çalışma İlkeleri
MANUEL START:
Sıcaklık, zaman ve kombi oranları girildikten
sonra, start/stop tuşuna basarak fırın çalışmaya
başlar. Bu durumda zaman modu geçersizdir.
Ayarlanmış değerler ilgili göstergelerde belirir.
Bir süre yanıp sördükten sonra aktüel (o an
ölçülen) değerleri göstermeye başlar. Sıcaklık
ayarlanan (set edilen ) değere ulaştığında zaman
saymaya başlar. Set edilen zaman değeri her
dakika sonunda bir azalır. Zaman geri sayarken
fırın kapısı açılırsa, cihaz sürekli uyarı sesi ve
zaman sayma durur. Kapı kapandığında uyarı
kesilir ve zaman kaldığı yerden geri saymaya
devam eder. Zaman sıfırlanınca kesikli uyarı
vererek ısıtıcıları ve fanı durdurarak stop
konumuna geçer. Zaman bitmeden çalışma
durdurulmak istenirse START/STOP tuşuna
tekrar basılır.
PROGRAMLI START:
Daha önceden sıcaklık, zaman, zaman modu ve
kombi oranları girilmiş program numarası
program arttırma azaltma tuşuyla seçilir.
Ayarlanmış değerler ilgili göstergelerde belirir.
Bir süre yanıp söndükten sonra aktüel (o an
ölçülen)değerleri göstermeye başlar. Start/stop
tuşuna basıldığında "t1" için girilen sıcaklık,

11
zaman ve kombi oranı hafızadan yüklenerek fırın
çalışmaya başlar. Sıcaklık, ayarlanan(set edilen)
değere ulaştığında zaman saymaya başlar.
Göstererilen zaman değeri her dakika sonunda bir
azalır. Zaman sıfırlandığında, cihaz "t2" modu
için girilmiş zaman set değerini (bununla birlikte
sıcaklık set değerini ve kombi oranını) yükler ve
bu yeni değerlere göre çalışmaya devam eder. "t2"
ve "t3" modu işlendikten sonra cihaz sesli uyarı
vererek çalışmasını durdurur. Zaman modu bu
durumda "t1" e döner.
KURU PİŞİRME:
Start verilmeden önce, kombi seçme tuşuyla
%100 konveksiyon(%0 buhar) oranı seçilir. Bu
durumda sadece ısıtıcılar devreye girer. Fan
otomatik alarak çalışmaya başlar. Isıtıcılar
devrede iken fan durdurulamaz. Ancak hız ayarı
değiştirilebilir. Sıcaklık ayanlanan(set edilen)
değere ulaştığında zaman saymaya başlar. Set
edilen zaman değeri her dakika sonunda bir
azalır. Zaman geri sayarken fırın kapısı açılırsa,
cihaz sürekli uyarı sesi verir ve zaman sayma
durur. Kapı kapandığında uyarı kesilir ve zaman
kaldığı yerden geri saymaya devam eder. Pişirme
işlemi sırasında fırına buhar verilmek istenirse
"Manuel Buhar Tuşu"na basılır. Basılı kaldığı
sürece fırın içine buhar verilir. Zaman sıfırlanınca
sesli uyarı vererek ısıtıcıları ve fanı durdurarak
stop konumuna geçer. Zaman bitmeden çalışma
durdurulmak istenirse START/STOP tuşuna
tekrar basılır.
BUHARLI PİŞİRME (HAŞLAMA) :
Start verilmeden önce, Kombi seçme tuşuyla %0
konveksiyon(%100 buhar) oranı seçilir. Bu
durumda boyler devreye girer, fırına buhar
vermeye başlar. Set edilen(ayarlanan) sıcaklık
değerine ulaşınca zaman saymaya başlar. Kuru
pişirmeden farkı ısıtıcılar yerine boilerin devreye
girmesidir. Fan istenildiğinde çalıştırılıp
durdurulabilir.
NOT: Bu konumda 85 0C'nin üstünde set değeri
girmeyiniz.
KOMBİ PİŞİRME:
Start verilmeden önce, Kombi seçme
göstergesindeki %100 konveksiyon yada %100
buhar oranı dışındaki diğer tüm oranlarda KURU
ve BUHARLI pişirme işlemi birlikte yapılır. 1
dakikalık periyotlarla kombi oranlarına göre, önce
ısıtıcı ve sonra boyler devreye girer.Isıtıcılar
devredeyken fan durdurulamaz, ancak boyler
devredeyken fan manuel olarak çalıştırılıp
durdurulabilir.
DİKKAT:
1-START verildikten sonra;
Sıcaklık, zaman ve kombi ayarları
değiştirilemez...
Zaman Mod Tuşuna basılırsa, o an işlenen
mod bitirilip bir sonrakine geçer..("t3"
modunda basılırsa zaman sonu uyarısı verir ve
STOP konumuna geçer.)
Ayarlanan sıcaklığa ulaşmadan zaman sayma
başlamaz...
2-Isıtıcılar devrede iken Fan durdurulamaz...
3-Konveksiyonlu pişirmede, sıcaklık 100 0C'nin
(212 F) altındaysa Manuel Buhar vermez. A-2
arıza uyarısı Sıcaklık göstergesinde belirir ve
sesli ikaz duyulur...
4-Buharlı pişirmede, set değerini 1000C nin (212
F) üstünde ayarlamayınız...
5-Sıcaklık sensöründe bir arıza meydana gelirse,
A-1 arıza uyarısı Sıcaklık göstergesinde belirir
ve sesli ikaz duyulur.
6-Ön ısıtma yaparken Fan hız ayarını 6.
kademeye alınız...
7-Fırın, iç sıcaklığı 100 0C'nin (212 F) altına
düşmeden kapanmaz...
8-Fırın kapatılırken sıcaklık 1000C'nin (212 F)
üstündeyse; Sıcaklık göstergesi hariç bütün
göstergeler söner, Fan devreye girer...
9-Kapanma rejiminde ON/OFF tuşu hariç, hiç bir
tuş çalışmaz...
10-Kapı açıkken fanın çalışması isteniyorsa
STOP konumunda Fanı çalıştırınız...
3.3 - Kapatma
Pişirme işlemi sona erdiğinde cihaz sesli ikazla
birlikte stop konumuna geçer.
On/Off tuşuna basınız.
Su vanasını ve cihazı besleyen elektrik şalterini
kapatınız.
4. EMNİYET TEDBİRLERİ
Cihazın fan motorunda herhangi bir arıza
meydana gelirse hız kontrol ünitesi içindeki
termik röle bütün devreyi otomatik olarak keser.
Cihaz çalışırken kapı açıldığında ısıtıcılar ve fan
devre dışı kalır. Kapı tekrar kapandığında kaldığı
programdan pişirme/ısıtma işlemine devam eder.
Boylerdeki buhar basıncının aşırı yükselmesi
durumunda “3” nolu emniyet sübabı açılarak
emniyet sağlar.
Fırın içindeki sıcaklık 3000C’yi (572 F) geçerse
(elektronik karttaki herhangi bir arızadan dolayı)
limit termostat ısıtıcıları devde dışı bırakarak
emniyetli kullanım sağlar.
Cihaz giderinden çıkan su sıcaklığının 600C’nin (
140 F) üzerine çıkmasını engelleyen termostatik
kontrol sistemi vardır. (Su sıcaklığının yüksek
olması, aynı şebekeye bağlı diğer cihazları
olumsuz etkiler)
Tazikli su ile temizlenmemeli.

12
Fırın kapı kolu, ani açılmalarda sıcaktan
kullanıcıya zarar gelmemesi için çift kademeli
olarak açılmaktadır.
Fırın arabası yalnızca taşıma arabası ile
kullanılmalıdır
Fırın ve Fırın arabası, kullanım esnasında ve/veya
kullanımdan hemen sonra sıcak olacağından
çıplak el ile dokunmak kesinlikle
yasaktır. Fırın ve fırın arabası üzerinde
“Haşlanma tehlikesi vardır” sembolü
mevcuttur.
5. TEMİZLİK
Temizliğe başlamadan önce cihazın elektriği
kesilmiş olmalıdır.
Cihazı her çalışma gününün sonunda tam olarak
soğumadan yağ sökücü ile temizleyip, sabunlu su
ile son temizliğini yaptıktan sonra muhakkak
kurulayınız.
Dokumantik ön paneli temizlerken ılık sabunlu su
kullanınız. Kesinlikle tiner, benzin, aseton
vb.çözücüleri (solventleri) kullanmayınız.
Cihaz yüzeyi temizlenirken aşındırıcı içeriği olan
deterjanlar, tel fırçalar vb. yüzeylerde çizik
yapabilecek malzemeler kullanmayınız.
Fırın içindeki delikli perdeler kolaylıkla
çıkartılabilmektedir. Bu perdeleri hergün yerinden
çıkartarak bol sabunlu su ile yıkayınız ve
kuruladıktan sonra yerine takınız.
Buhar püskürtme fıskiyesini kullanım ve suyun
sertliğine göre kireçlenmeden korumak için
yaklaşık 4÷6 ayda bir temizleyiniz.
Fırın tabanındaki boşaltma deliğini ve sürgülü yağ
toplama kabını her çalışma günü sonunda
temizleyiniz.
UYARI : Cihazı, elektrik-elektronik aksamına
zarar vermemek için direkt yada yüksek
basınçlı su ile temizlemeyiniz.
6. BAKIM
Fırının TOPRAKLAMA bağlantısının
yapıldığından emin olunuz...
Herhangi bir arıza durumunda;
Fırının elektrik enerjisini kesiniz...
Kesinlikle elektrik panosunu açmayınız...
Arızanın ayrıntılı açıklamasını, olanaklı
ise yazılı olarak yetkili servise bildiriniz...
Cihazda tehlikeli bir durum görülmesi halinde
yetkili servise haber vereniz. Ehliyetsiz kişilerin
cihaza müdahale etmesine izin vermeyiniz.
ÜRÜNLERİN KULLANIM ÖMRÜ 10 YILDIR.
GB
WARNING: If, frequency inventor is being used in the equipment, TYPE B RCD (residual
current relay) with AC/DC sensitivity must be used before the equipment power inlet (from
the mains block terminals).
WARNINGS
Installation, modifications and maintenance of the
appliance must be carried out by authorised
personnel in compliance with current safety
standarts.
The manufacturer declines all responsibility
for failure to comply with these obligations.
The instructions contained in this manual give
important regarding security for installing and
maintaining the appliance. The manufacturer
recommends that this manual be carefully stored
in the work zone where it can be consulted by
technicians and workers.
Electric connection of the appliance must be
according to the instructions given on the
technical data table and electric scheme.
Disrespect of the instruction given by producer
with the appliance (Use, maintenance, electric
connectin, technical data table and data plate)
may compromise the appliance safety and will
result in immediate loss of the warranty. The
manufacturer declines all responsibility for injury
or damage to persons or things, due to disrespect
of the instructions.
1. INSTALLATION
Rip off the protective nylon. If any sticky material
remains on, clean it with a suitable solvent. (e.g.
Henkel - Helios)
Connect the appliance to a natural absorbent flue
or under a chimney hood as to outlet the smoke,
smell and the steam that come out during the
cooking.
If the smokes will forcedly be thrown out the
electrical connection of the aspirator should be
common with the appliance. If there is no
ventilation the appliance should be stopped.
Settle the appliance on a smooth and hard ground
with the help of its adjustable bases.

13
There should be a space of 60cm. at the left side
of the appliance as to easily make the assembling
and maintenance. There should also be a space of
10cm. at the back side for the air circulation.
While setting the appliance, pay attention that the
door of the appliance should be opened minimum
1100for an easy load and discharge.
Water Connection
Make a water installation of 3/4" to the place
where the machine is and connect a spherical
valve.
The machine should be feed by 2-4 bar water at
70Fh. So, boiler and steam installation will be
prevented to be limed in a short time.
Use Ø30mm. hose for discharge of water and
connect the hose to the outlet numbered 4.
Electrical Connection
Connect the machine to a network proper to the
electric installation standards DIN VDE 0100.
The machine should be fed by 380V 3N 50-60Hz
network voltage.
Use cable of quality H07 RN-F and of crosscut
5x6mm2
Voltage tolerance should not be more than 10%.
The machine must be earthed as DIN VDE 0100
clause 540.
2. USER INSTRUCTION
This appliance is designed for professional use
and must only be used by trained personel.
The aim of the machine is to cook all the foods
given at the table-1. Besides, you can make warm
the foods which are previously cooked of frozen.
Choose the most shallow tray according to the
material you are going to cook. For ex., you have
to choose a holey tray with a depth of 20mm for
the kinds of yeasted dough, a normal tray with no
hole and depth of 20mm for pastry kinds and a
tray with a depth of 40-65mm in accordance with
the meal for the juicy and saucy meals. It is
recommended not to use the trays with a depth of
over 65mm.
Trays that are appropriate to the dish going to be
cooked must be placed in tray rails. Because if
you tightly replace the trays the cooking will
show differences because of the air circulation
between the trays. For ex., you can replace in
every tracks the trays with a depth of 10mm,
which is called as baker tray, for the applications
like sable biscuits, Bag Dough, American Biscuits
and Italian cookies. But in the other applications,
you should replace the trays with intervals for the
air circulation and for a better cook.
When you wish to bake flaky pastry or to cook
dishes to be prepared in their own juice or with
sauces, the tray to be used must be 20, 40 and
65mm deep, respectively. In this case, the
maximum tray capacities will be as follows:
FBE006
FBE010
FBE022
FBE042
GN 1/1
3
6
10
20
GN 2/1
-
-
5
10
400*600
3
6
5*
10*
*: Place on the grills
No matter what you wish to cook or bake in it,
apart from those dishes which are be scalded,
preheat the oven at a temperature which
absolutely must exceed the foreseen cooking
/baking temperature by a temperature over at least
60°C, before loading the prepared trays. For ex.,
if you will cook a food at 1700C, (338 F)the heat
of the oven should be 2300C. (446 F) Because the
coldness of the food of tray that will be put in the
oven will decrease the heat of the oven. You can
control the heat of the oven with control panel.
For the Chicken grill, Fish grill and Meatball it
will be more appropriate to use the grills instead
of trays.
Especially during the cooking of yeasted dough
and pastry kinds, the getting dry and forming
crust of the food should be prevented by
periodically steaming the oven.
Pay attention that the trays should be at the same
level and properly replaced in the oven.
Otherwise, the cooking will be different.
In case you want to discharge the water in the
boiler pull the rod “5” towards you. In this case,
the water in the boiler will be discharged through
discharging hole “4” and at the first operation the
appliance will refill the water.
Besides their use as normal ovens operating with
convection current, these ovens (Combined
Steam) also may perform all kinds of SCALDED
COOKING (as a steam oven) by using steam
energy, or using the convection current together
with the steam energy, in order to work as a
Combined Oven (convection-steam), performing
even smoother cooking without drying the
ingredients used.
For scalded cooking, it is not important if the
oven is preheated or not. It will be enough to only
adjust the timer on the digital display, and to start
the oven. The temperature setting is preset. It is
not possible to exceed this temperature, but you
can do scalding at lower temperatures.
To avoid scalding, do not use loaded containers
with liquids or cooking goods wich becomes fluid
by heating in higher levels than those wich can be
easily observed.
When you wish to use the oven as a COMBINED
OVEN, you can create very different tastes by
setting the steam and convection ratios. The blue
and the red display on the Combined Oven's cycle
panel show the steam and the convection ratio,

14
respectively. You can enter the required ratios
choosing among the preset values. However, you
should not confuse saturated steam with
moistening. In these Combined Steam Ovens, the
steam is generated in a boiler, and injected into
the oven's interior, whereas moistening is
performed by injecting only water into the oven's
interior. But Combined Steam Ovens are
equipped with an additional moistening function
too.
When the oven is set to scalding position, it is
possible to scald all kinds of fruits and vegetables.
However, you are required to stick to the most
important cooking rule which is to fill the trays
correctly with the vegetables to be scalded. As
you know, some vegetables release extreme high
quantities of pigments while scalding. Such
vegetables have to be put right to the bottom of
the oven's interior, while those that do not release
such high quantities of pigments, have to be put
into the upper parts. The reason for this is that, if
those vegetables which release high quantities of
pigments are put into the upper part, the dripping
pigment juice may colour the vegetables in the
lower part. If you wish to scald spinach together
with other vegetables, it must absolutely be put
right to the bottom.
Using ovens guarantees important differences and
advantages, due to their speed control units. You
have the opportunity to set the fan speed position
to between 400 and 1400rpm. As you know,
BAKLAVA and KADAYIF are delicious tastes
of the Turkish cuisine, and this type of pastry has
to be baken at the bottom of the oven. But from
now onwards, baklava and kadayif may be baken
in the ovens, because of their revolution
adjustment feature. The only thing you have to do
is to set the oven to 0 per cent steam and 100 per
cent convection energy, to choose level 2 at the
fan speed control (600rpm), and to let the trays
bake during 45-50 minutes at 170°C.
3. USE OF THE MACHINE
3.1 - Key Explanations
Heater Led: It means that the heaters are
engaged. The heaters will be engaged till the
temperature reaches the set value.
Temperature Indicator: It shows the
measured temperature value. When the set button
is pressed, the set temperature value is indicated.
In case of failure, it displays the type of warning.
Temperature Set Button: It is used to see
the set value of temperature. When it is pressed,
the set value appears on the indicator and starts to
flash.
Time Count Led: It means that the time
count is engaged. After that the temperature
reaches the set value, time count starts and the led
starts to flash.
Time Indicator: It indicates the adjusted
time value. When the set button is pressed, the set
time value is indicated.
Time Set Button : It is used to see the set
value of time. When it is pressed, the set value
appears on the indicator and starts to flash.
Start-Stop Button : It operates the
determined program. When repressed, it stops
that. When the machine is on the start position,
the led on the left upper corner is illuminated and
when the stop position is taken, the led gets out.
The set values can not be changed on start
position. When the start is engaged, 3 different
modes constituting the selected program start to
operate one following the other. The machine gets
to the stop position once the t3 mode is processed.
Program Indicator: It displays the
number of the programs where the temperature,
time, time mode and combiner rates are
registered.
: Manual Program
Increase Button: It increases the
temperature, time and program values by one as
per the related groups. When kept pressed, it
increases these automatically.
Decrease Button: It decreases the
temperature, time and program values by one as
per the related groups. When kept pressed, it
decreases these automatically.
NOTE: All the increase and decrease buttons
function only on STOP position.
Mode Selection Button:It ensures the
selection of the modes constituting each program
(t1, t2, t3) for the entrance of temperature, time
and combiner rates. At each pressing, the mode
increases by 1. When repressed after t3, it returns
to the beginning (t1). At each mode, the
temperature, time and combiner rates can be
separately entered. When pressed on start
position, the machine continues to operate
according to the set values determined at the next
mode. Time Mode Indicator: It indicates the
actual mode where the device functions or the
machine adjustments are made. Each program
consists of these 3 modes. When the start is
engaged, first t1, then t2 and finally t3 modes are
processed. "00" is entered in the time set value of
the mode, which is not demanded to be processed.
In such a case, the machine goes to the next mode
without processing that mode.

15
Combiner Selection Mode: It is the button
which selects the convection, steam or combined
(steam + convection) cooking rates. The cooking
is performed only with the heaters at 100 %
convection, only with steam at 100 % vapor and
according to heater and steam % rates during 1
minute periods for the others. At each pressing of
the button, the rate moves one unit to the right.
When repressed following the 100 % steam, it
returns to the beginning. This can be entered
separately for all the modes in the whole program.
Combiner Rate Indicator: It
indicates the steam/convection rate selected
through the combiner selection button. % reds
show the convection and % blues indicate the
steam cooking rates.
Manual Steam Supply Button: It is the
button which ensures the steam supply to the oven
during convection cooking. As long as it is kept
pressed, it supplies steam to the oven. When the
oven inner temperature is less than 1000C, (212 F)
it does not supply steam when pressed. A-2 is
displayed on the temperature indicator and the
machine furnishes sound warning.
ON/OFF Button: when pressed during 1
second, it energizes the machine and has it ready
for the function. In this case, the led on the left
upper corner keeps being illuminated. When
repressed, it cuts the energy to the device and the
led gets off. When taken to the OFF position, if
the oven temperature is above 1000C, (212 F) it
stops all the operations, disconnects the indicators
and enters in the cooling regime having connected
the fan. In such a case, only the temperature
indicator shows the oven temperature.
Lamp Button: It ensures the inner lightning
of the oven. When the lamp is connected, the led
on the left upper corner is illuminated. When
repressed, the lamp and led get off.
Fan Button: It ensures that the fan is
engaged and disengaged. When the heaters are
engaged or at stop regime, it is automatically
engaged. On stop position or during steam
cooking, it is engaged or disengaged through this
button. When the fan is engaged, the led on the
left upper corner is illuminated.
Fan Speed Adjustment Button:
It ensures 6 step adjustment of the fan function
cycle. 1 step is 400 rpm., 2 is 600, 3 is 800, 4 is
1000, 5 is 1200 and 6 is 1400 rpm. When
engaged, it starts from the 6th step (1400 rpm.).
When pressed, it goes to the 1st step. At each
press, the step is increased by 1.
Speed Adjustment Indicator: It displays the
actual speed step of the fan. It is independent of
the fan function and indicates the cycle of
function.
NOTE : The fan speed adjustment is independent
from the programs. The programs should be
readjusted before these are operated.
3.2 - Operation of the Machine
Connect the water inlet valve and the electric
switch feeding the machine
Pressing the ON/OFF button during approx. 1
second, ensure that the machine is energized.
The machine has 10 programs. For each program,
temperature, time and cooking types can be
determined in three different modes (t1, t2, t3).
Cooking programs can be arranged as per the list
on Table 1.
3.2.1 - Programming
1-Program Selection
Beside the manual program,
there are 10 programs through which temperature,
time and combiner rates can be entered for three
different modes. Once the parameters are entered,
the automatically stored values are loaded when
the program is called. The program number where
the parameters (temperature, time, combiner rate)
of the product required to be registered for the
cooking operation are to be stored, is selected
with the help of the increase and decrease buttons
on the program section. If a previous record is
kept, such values appear on the related indicators.
2-Time Mode Adjustment:
"t1" mode is selected from
among the time modes. Now, the time,
temperature and combiner rates can be entered for
this mode.
3-Time Adjustment:
For the selected time mode,
the duration in minutes of the cooking is adjusted
on the time section. Should this time mode be not
to be used, the time value is entered as " 00 ". In
such a case, the machine goes to the next mode
without having processed this mode.
4-Temperature Adjustment:

16
The cooking temperature is
also adjusted to the required value through the
temperature buttons.
5-Combiner Rate:
The cooking operation can be
selected on a certain rate on dry (with convection)
boiling (with steam) or both basis. The red rates
on the indicator indicate the dry (with convection)
cooking rates and the blue rates indicate the
boiling (with steam) cooking rates. The record is
made in the determined program number when it
is returned again to the 2nd section and the steps
no. 3, 4 and 5 are performed for t2 and t3 time
modes. When another program is desired to be
realized, it is returned to the 1. step and other
steps are repeated having chosen the new program
number.
6-Fan Speed Adjustment:
This feature is independent
from the programs. It should be adjusted
manually. It is not memorized. It determines the
cycle of the fan, when this is engaged.
3.2.2 - Control of the program parameters
and Operation
1-The program is selected:
Through the increase and decrease buttons, the
program is chosen the parameters of which are to
be controlled (manual program included). In such
a case, the temperature, time, time mode and
combiner rates appear on the related displays and
starts to flash. The time mode is on " t1 ".
2-Temperature Set Values:
The set temperature value is read on the
temperature indicator.
3-Time Set Value:
The set time value is read on the time indicator.
4-Combiner Rate:
The set combiner value is read on the combiner
rate indicator. The time mode button is pressed
for the other " t2 " and " t3 " modes. The
operations no. 2, 3 and 4 are repeated for each
time mode. 5 seconds after the last pressed
button, the machine gets off the adjustment
position.
5-Fan Speed Adjustment:
The fan speed adjustment is done after having
appeared all the adjusted values. The fan speed
adjustment is independent from the program. The
speed adjustment should be done before each
operation according to the type of the product to
be cooked.
6-Operation:
The start button is pressed. The oven starts to
function as per the adjusted values.
7-Control During Operation:
Once the oven starts, the set values can not be
changed. However, these can be seen for control
purposes. The set time can be verified by pressing
on the time set button. The set temperature can be
seen by pressing on the temperature set button.
3.2.3 - Operating Principles
MANUAL START:
After having entered the temperature, time and
combiner rates, the oven starts to function by
pressing on the start/stop button. In such a case,
the time mode is not operative. The adjusted
values appear on the related indicators. After
flashing for some time, it starts to show the actual
(measured on that point) values. Time starts to
count when the temperature reaches the adjusted
(set) value. The set time value decreases by one at
the end of each minute. If the oven door is opened
when the time counts down, the machine emits
continuous warning signal and the time count
stops. When the door is closed, the warning stops
and time continues to count down from where it
has remained. When the time is reset, interrupted
warning is emitted and the heaters and fan are
stopped and the stop position is taken. If it is
meant to stop working before the end of time,
START/STOP button is pressed again.
PROGRAMMED START:
The program number, the temperature, time, time
mode and combiner rates of which have been
previously entered, is selected through the
program increase and decrease button. The
adjusted values appear on the related indicators.
After flashing for some time, it starts to show the
actual (measured on that point) values. When the
start/stop button is pressed, the temperature, time
and combiner rate entered for the "t1" is loaded
from the memory and the oven starts to function.
When the temperature reaches the adjusted (set)
value, the time starts to count. The displayed time
value decreases by one at the end of each minute.
When the time is reset, the machine loads the set
value (as well as the temperature set value and
combiner rate) entered for the " t2" mode and
continues to work according to these new values.
Once the "t2" and "t3" modes are processed, the
machine emits a sound warning and stops

17
working. The time mode returns to "t1" in this
case.
DRY COOKING:
Before giving the start, 100% convection (0%
steam) rate is selected through the combiner
selection button. In this case only the heaters are
engaged. The fan starts to function automatically.
The fan can not be stopped when the heaters are
engaged. However, the speed adjustment can be
changed. The time starts to count when the
temperature reaches the adjusted (set) value. The
set time value decreases by one at the end of each
minute. If the oven door is opened when the time
counts down, the machine emits a continuous
warning sound and the time count is stopped. The
warning stops when the door is closed and the
time continues to count from where it has
remained. If it is desired to feed steam to the oven
during the cooking operation, " Manual Steam
Button " is pressed. As long as it is kept pressed,
steam is fed into the oven. When the time is reset,
a sound warning is emitted, the heaters and fan
are stopped and the stop position is taken. If it is
desired to stop working before the end of time,
START/STOP button is pressed again.
STEAM COOKING (BOILING):
Before giving the start, 0% convection (100%
steam) rate is selected through the combiner
selection button. In this case the boiler is engaged
and it starts to feed steam to the oven. The time
starts to count when the set (adjusted)
temperature value is reached. The difference from
the dry cooking is in that the boiler is engaged
instead of the heaters. The fan can be stopped and
operated when desired.
NOTE: In this case, do not enter a set value
above 850C.
COMBINER COOKING:
Before giving the start, DRY and STEAM
cooking operations are effected together at all
rates except the 100% convection or 100% steam
rates on the combiner selection indicator. In
periods of 1 minute, first the heater and then the
boiler is engaged according to the combiner rates.
The fan can not be stopped when the heaters are
engaged, however, the fan can be manually
started and stopped when the boiler is engaged.
ATTENTION:
1-Once the START is given,
The temperature, time and combiner
adjustments can not be changed,
If the time mode button is pressed, the mode
processed then is terminated and it is
proceeded to the next one (when pressed on
"t3" mode, the time end warning is emitted
and STOP position is taken)
The time count does not start before
reaching the adjusted temperature.
2-The fan can not be stopped when the heaters
are engaged.
3-At convection cooking, manual steam is not
ensured if the temperature is below 1000C. (212
F) A-2 failure warning appears on the
temperature indicator and the sound warning is
heard.
4-At steam cooking, do not adjust the set value
above 1000C. (212 F)
5-If there occurs a failure at the temperature
sensor, A-1 failure warning appears on the
emperature indicator and a sound warning is
heard.
6-While preheating, take the fan speed adjustment
to the 6th step.
7-The oven is not closed before the inner
temperature gets below 1000C. (212 F)
8-If the temperature is above 1000C (212 F) when
the oven is closed, all the indicators get off
except the temperature indicator. The fan is
engaged.
9-At closing regime, no button functions except
the ON/OFF button.
10-If it is desired to operate the fan when the
door is open, operate the fan on STOP position.
3.3 - SWITCHING OFF
When the cooking finishes, the machine will stop
with a voice signal.
Press to ON/OFF key.
Make the water valve and electricity switch feeds
the machine off.
4. SECURITY PRECAUTIONS
If there occurs a breakdown at fan motor of the
machine, there is a speed control unit that
automatically stops the whole system.
If the lid is opened while the machine is
functioning, the heaters and the fan will stop.
When the lid is closed again it goes on to the
cooking/heating in the same programme.
When the steam pressure shows a high increase,
the “3” numbered security valve becomes on
The door arm of the oven has double level
opening in order to avoid the injury of the user
from heat caused due to the sudden opening.
There is a thermostatic control system and system
helps to keep the discharge water maximum at
600C. (140 F) (If the discharge water temperature
higher, it can be effect negatively the other
appliance which is connected in the same main
water supply.

18
If the heat in the oven becomes more than 3000C
(572 F) (because of a breakdown at the electronic
card) the limit thermostat provides a secure use by
stopping the heaters.
5. CLEANING
Do not clean the appliance with direct or high
pressure water not to damage the electrical
installation.
Before beginning to clean, the electricity of the
machine must be off.
At the end of each working day, before not
become cold clean it with oil cleaner and water
with soap and then make it dry.
Use warm soapy water while cleaning the
touchmatic front panel. Do not use solvents such
as thinner, gasoline, acetone etc.
While cleaning the machine surface do not use
corrode detergents and the materials may scratch
the surface like brushes or etc.
The holed intervals in the oven can easily be
taken out. Everyday clean them with water and
soap, dry and put them to their places again.
The appliance is not to be cleaned with a water jet
According to water quality for every period
between 4-6 months, clean the steam jet as to
prevent from use and being limed.
Everyday, after working hours clean the fat and
water dispose hole and fat collection pot at the
oven floor.
6. MAINTENANCE
Make sure that the EARTH connection of the
oven is made.
Cut the energy to the oven while performing
maintenance or cleaning
In case of any failure,
Cut the electric energy supply to the oven
Do not open the electric panel
If possible provide the competent service with
the written detailed explanation of failure
In case of a dangerous situation about the
machine inform the authorised service. Do not
allow unqualified persons to repair the appliance.
EXPIRY TIME IS 10 YEARS.
DE
WARNUNG: Wenn der Frequenzerfinder in den Geräten verwendet wird, muss vor der
Netzeinspeisung der Anlage (von den Klemmen des Netzanschlussblocks) ein RCD
(Differenzstromrelais) vom Typ B mit AC / DC-Empfindlichkeit verwendet werden.
ALLGEMEINE HINWEISE
Installation, Änderungen und Wartungen am
Gerät dürfen nur durch den Hersteller oder
autorisierte Personen, entsprechend den gültigen
Standards, durchgeführt werden.
Der Hersteller lehnt jegliche Verantwortung für
Fehler ab, welche durch Missachtung der
verliegenden Hinweise entstehen.
Die vorliegende Bedienungsanleitung gibt
wichtige Hinweise zur Installation Wartung und
ordnungsgemäßen Verwendung des Gerätes. Der
Hersteller weist daraufhin, dass diese
Bedienungsanleitung immer in der Nähe des
Gerätes aufbewahrt werden muss, wo es vom
Service- oder Wartungspersonal eingesehen
werden kann.
Der elektrische Anschluss, muss entsprechend der
Bedienungsanleitung, den Aufschriften auf dem
Gerät und dem Anschlussschema erfolgen.
Nichtbefolgen der vom Hersteller gegebenen
Anweisungen / Hinweise, zur Verwendung,
Wartung und Anschlusses des Gerätes
entsprechend den Technische Daten und
Aufschriften (Typschild), beeinflusst die
Sicherheit des Gerätes negativ und führt zum
erlöschen der Garantieansprüche. Der Hersteller
lehnt jegliche Verantwortung für Verletzungen
von Personen oder Beschädigungen an
Gegenständen ab, welche durch nicht Beachtung
der verliegenden Hinweise entstehen.
1. MONTAGE
Bitte lesen Sie diese Bedienungsanleitung
aufmerksam durch und verwahren Sie diese
zur späteren Verwendung sorgfältig.
Platzieren Sie das Gerät unter einer Abzugshaube,
damit Rauch, Geruch und Dampf, die beim
Kochen entstehen, abgesaugt werden können.
Ziehen Sie bitte die Schutzfolie vom Gerät ab.
Falls Klebstoff auf der Oberfläche zurückbleiben

19
sollte, säubern Sie diese mit einem passenden
Lösungsmittel.
Stellen Sie das Gerät mit Hilfe der verstellbaren
Füße gerade und ausbalanciert auf einen stabilen
Untergrund.
Wenn entstehender Rauch zwangsläufig
abgesaugt werden soll, so muss die elektrische
Verbindung des Ofens mit der Absaugeinrichtung
gekoppelt werden. Beim Versagen oder
Abschalten der Entlüftung muss der Ofen
abschalten.
Zwischen der linken Seite des Gerätes und einer
Wand oder eines anderen Gerätes sollten ca.
60cm Platz gelassen werden. Dies ist notwendig,
um die Montage und Wartung zu gewährleisten.
Um eine ausreichende Luftzirkulation zu
ermöglichen, und damit ein übermäßiges
Erwärmen der umstehenden Geräte bzw. Wände
zu verhindern, ist ein Abstand von mindestens 10
cm nach allen Seiten notwendig.
Beachten Sie bei der Montage, daß die Ofentür
möglichst um 110° geöffnet werden kann, damit
das Be- und Endladen ohne Probleme erfolgen
kann.
WASSERANSCHLUSS:
Sorgen Sie für einen Wasseranschluss 3/4" am
Aufstellungsort des Gerätes und sorgen Sie für
eine Möglichkeit das Wasser abzustellen (z.B.:
Absperrhahn).
Das Geraet muss mit 70Fh Haerte, 2-4 bar Wasser
versorgt werden. So kann man verhindern dass
der Wasserstrahl in kurze Zeit verkalkt.
Verwenden Sie einen Schlauch mit 30mm
Durchmesser für den Wasserabfluss, installieren
Sie diesen an der Ablauföffnung(4)
ELEKTRISCHER ANSCHLUSS
Das Gerät muss an ein Stromnetz angeschlossen
werden, welches der Norm DIN VDE 0100
entspricht.
Die Spannungsversorgung muss 380-400V 3N
AC 50-60Hz betragen.
Für die elektrische Verbindung müssen
mindestens Kabel H07 RN-F mit einem
Querschnitt entsprechend den technischen Daten
verwendet werden.
Die Spannungstoleranz sollte nicht mehr wie
10% betragen.
Das Gerät muss unbedingt geerdet werden. Dafür
beachten Sie bitte DIN VDE 0100 Teil 540.
Der mit " " gekennzeichnete Anschluss an der
Außenseite des Gerätes, ist für den Anschluss des
Potentialausgleichsleiters vorgesehen.
In der Installation ist eine Möglichkeit zur
allpoligen Trennung mit mindestens 3mm
Kontaktöffnungsweite vorzusehen.
2. HINWEISE ZUM GEBRAUCH
Der Ofen wurde zum Kochen und Erwärmen aller
Nahrungsmitteln entsprechend Tabelle-1 und
darüber hinaus entworfen. Außerdem können Sie
vorbereitete und eingefrorene Nahrungsmitteln
bis zu der zum sofortigen Verzehr geeigneten
Temperatur erwärmen.
Wählen Sie ein Tablett unter der Bedingung, daß
dieses für die zu kochenden Zutaten geeignet ist,
z.B. sollte Ihr Tablett für Sauerteig / Hefeteig
gelocht und 20mm tief, bei Pasteten ungelocht
und 20mm tief, bei wässrigen Speisen und
Speisen mit Soße entsprechend der Speise 20,40
oder 65mm tief sein. Wir empfehlen Ihnen,
Tabletts welche tiefer als 65mm sind, nicht zu
verwenden. Dabei ist die maximale
Tablettkapazität des Ofens wie folgt:
FBE006
FBE010
FBE022
FBE042
GN 1/1
3
6
10
20
GN 2/1
-
-
5
10
400*600
3
6
5
10
Die Tabletts sollten auf den Tablettschienen
entsprechend dem Produkt angeordnet werden.
Dicht aneinander angeordnete Tabletts verhindern
eine gute Luftzirkulation, dies führt zu einer
ungünstigen Temperaturverteilung innerhalb des
Gerätes und damit zu Unterschieden in der
Garzeit der einzelnen Tabletts. Bei der
Zubereitung von Keksen, Blätterteig,
amerikanischen Keksen, italienischen Makronen
usw. können die sogenannten Feinbäckertabletts
mit einer Tiefe von 10mm auf allen
Tablettschienen angeordnet werden. Bei allen
anderen Tabletts sollte aber nur höchstens jede
zweite Tablettschiene benutzt werden, um eine
ideale Luftzirkulation zu gewährleisten.
Achten Sie darauf, dass der Raum zwischen zwei
Tabletts nicht weniger als 20mm ist. Idealerweise
ist dieser Raum mind. 40mm.
Bevor Sie die Produkte in den Ofen bringen,
heizen Sie den Ofen um 60°C (140 F) höher als
die gewünschte Temperatur auf. Also wenn Sie
zum Beispiel ein Produkt bei 170°C (338 F)
kochen möchten, so sollten Sie den Ofen auf
230°C (446 F) vorheizen. Durch das Einbringen
der kalten Produkte, Tabletts usw. verringert sich
die Innenraumtemperatur automatisch. Deswegen
vergessen Sie bitte nicht, den Ofen vor dem
Einbringen der Speisen vorzuheizen. Sie können
die Innenraumtemperatur des Ofen an dem
Bedienfeld überwachen. Sollten Sie die Produkte
bereits in den Ofen einbringen bevor der

20
Aufheizvorgang abgeschlossen ist, kann dies zu
unterschiedlichen Garstufen innerhalb des
Gerätes führen, bzw. die Garzeit entspricht nicht
mehr den angegebenen Zeiten.
Besonders beim Zubereiten von Sauerteig /
Hefeteig und Gebäck sollte, um die
Nahrungsmittel zu befeuchten und ein
Austrocknen sowie eine übermäßige
Krustenbildung zu verhindern, periodisch Dampf
in den Ofen gegeben werden, dadurch werden die
Speisen befeuchtet und das Austrocknen
verhindert.
Während der Zubereitung der Nahrungsmittel und
der Reinigung des Ofens können Sie die
Beleuchtungslampe verwenden. Betätigen Sie
dafür den „Beleuchtungs- Taster“.
Beachten Sie bei der Anordnung der Tabletts im
Einschubgestell, dass die Tabletts bis an das
Schienenende geschoben und waagerecht sind.
Anderenfalls kann es zu unterschiedlichen
Garstufen kommen.
Wenn Sie das Wasser aus dem Boiler ablaufen
lassen möchten, so ziehen Sie dazu den Hebel (5)
zu sich heran. In diesem Falle wird der Boiler
über die Abflussöffnung (4) entlehrt. Bei dem
nächsten Gebrauch des Gerätes wird der Boiler
automatisch wieder aufgefüllt.
Neben der Verwendung als normaler Ofen mit
Umluftbetrieb besitzt dieser Ofen auch alle
Eigenschaften eines Dampfgarers. Somit können
Sie den Ofen als Umluftherd, Dampfgarer oder
als Kombination von Beiden verwenden, damit
können Sie gleichmäßig und langsam kochen
ohne das die Zutaten austrocknen.
Beim Dampfgaren ist es unerheblich, ob der Ofen
vorgeheizt ist oder nicht. Es ist ausreichend den
Timer einzustellen und den Ofen zu starten. Die
Temperatureinstellung ist voreingestellt. Es ist
nicht möglich diese Temperatur zu überschreiten,
jedoch können Sie mit einer niedrigeren
Temperatur arbeiten.
Wenn Sie den Ofen als „KOMBINIERTEN
OFEN“ verwenden, können Sie durch einstellen
des Dampf – Umluft – Verhältnisses die
verschiedensten Speisen zubereiten. Das blau –
rote Display auf dem Bedienfeld zeigt das
eingestellte Verhältnis. Dieses können Sie auf die
voreingestellten Werte verändern. Bitte
verwechseln Sie nicht gesättigten Dampf mit
Befeuchtung. In diesem kombinierten Dampfgarer
wird der Dampf in einem Boiler produziert und in
das Ofeninnere eingebracht, wogegen das
Befeuchten durch Einsprühen von Wasser in den
Ofeninnenraum erzeugt wird. Der kombinierte
Dampfgarer ist ebenfalls mit einer
Befeuchtungsfunktion ausgestattet.
Wenn der Ofen auf Dampfgaren eingestellt ist,
dann ist es unter anderem auch möglich alle
möglichen Früchte und ebenso Gemüse zu
dämpfen. Auf jeden Fall sollten Sie die wichtigste
Kochregel beachten und zwar die Tabletts korrekt
mit den zu dämpfenden Früchten oder Gemüse zu
befüllen.
Die Verwendung des INOKSAN Kombinations-
Dampfgarers garantiert durch sein Drehzahl-
Kontrollsystem wesentliche Unterschiede und
Vorteile gegenüber anderen Öfen. Sie haben die
Möglichkeit die Drehzahl zwischen 400 und 1400
U/min einzustellen. Wie Sie wissen sind
BAKLAVA und KADAYIF wohlschmeckende
Gebäcke der türkischen Küche und diese müssen
am Boden des Ofens zubereitet werden. Aber von
nun an können Sie diese durch die Möglichkeit
der Drehzahleinstellung im gesamten
Kombinations- Dampfgarer zubereiten. Das
Einzige was Sie tun müssen ist, setzen Sie den
Ofen auf 0% Dampf und 100% Umluft dann
wählen Sie Stufe 2 bei der Drehzahl (600 U/min)
und backen Sie das Gebäck 45-50min bei 170°C.
3. VERWENDUNG DES OFENS
3.1- Erklärung der Tasten und Symbole
Heizanzeige: Zeigt an das die Heizer in
Betrieb sind. Die Heizer schalten sich ein, wenn
die Temperatur im Ofen unterhalb der
gewünschten Temperatur liegt.
Temperaturanzeige: Zeigt die
Temperatur im Innenraum des Ofens an. Wenn
die Temperatureinstelltaste betätigt wird, zeigt sie
die gewählte Temperatur. Im Falle eines Fehlers,
wird dieser hier angezeigt.
Temperatureinstelltaste: Sie wird
verwendet, um die gewählte Temperatur
anzuzeigen. Wenn die Taste betätigt wird,
erscheint die gewählte Temperatur in der
Temperaturanzeige und beginnt zu blinken.
Zeit- Countdown: Bedeutet, dass der
Zeit- Countdown eingeschaltet ist. Sobald die
Temperatur den gewählten Wert erreicht hat,
beginnt der Countdown und die Lampe blinkt.
Zeitanzeige: Die noch verbleibende Zeit
wird hier angezeigt. Wenn die Zeiteinstell- Taste
betätigt wird, zeigt das Feld die vorgewählte Zeit
an.
Zeiteinstelltaste: Wird verwendet um die
gewählte Zeit anzeigen zu lassen. Nach
Betätigung der Taste, wird die gewählte Zeit in
der Zeitanzeige angezeigt und beginnt zu blinken.
This manual suits for next models
3
Table of contents
Languages:
Other Inoksan Convection Oven manuals
Popular Convection Oven manuals by other brands

GE
GE Profile Series Dimensions and installation information

Electrolux
Electrolux Air-O-Convect 269504 Specifications

Panasonic
Panasonic NE-9900 operating instructions

Kitchen Monkey
Kitchen Monkey Half Size Convection Oven PRO manual

Thermador
Thermador SCD272 Specifications

Rational
Rational Integrated fat drain Combi-Duo Original installation manual