INOLAV IF2005 User manual

Supply valve
(hot)
Supply valve
(cold)
Wrench
(not supplied)
Hot water
line connector
Cold water
line connector
Faucet
Hot water line Cold water line
Threaded rod
Rubber washer
Steel washer
Fixing nut
Spanner
Counter top
Faucet o-ring
Faucet
Hot water line
Cold water line
2"
4
7
8
"
2"
1
3
4
"
45.00°
45.00°
4
1
2
"
7
1
2
"
3
8
"
13
8
"
11
4
"
max
6
1
2
"
8.00°
max
4
7
8
"
3/8" comp.
6
1
2
"
24
3
4
"
Model: IF2005
Supply valve
(hot)
Supply valve
(cold)
Wrench
(not supplied)
Hot water
line connector
Cold water
line connector
Faucet
Hot water line
Cold water line
Threaded rod
Rubber washer
Steel washer
Fixing nut
Spanner
Counter top
Faucet o-ring
Faucet
Hot water line
Cold water line
2"
4
7
8
"
2"
1
3
4
"
45.00°
45.00°
4
1
2
"
7
1
2
"
3
8
"
13
8
"
11
4
"
max
6
1
2
"
8.00°
max
4
7
8
"
3/8" comp.
6
1
2
"
24
3
4
"
Supply valve
(hot)
Supply valve
(cold)
Wrench
(not supplied)
Hot water
line connector
Cold water
line connector
Faucet
Hot water line Cold water line
Threaded rod
Rubber washer
Steel washer
Fixing nut
Spanner
Counter top
Faucet o-ring
Faucet
Hot water line
Cold water line
2"
4
7
8
"
2"
1
3
4
"
45.00°
45.00°
4
1
2
"
7
1
2
"
3
8
"
13
8
"
11
4
"
max
6
1
2
"
8.00°
max
4
7
8
"
3/8" comp.
6
1
2
"
24
3
4
"
Supply valve
(hot)
Supply valve
(cold)
Wrench
(not supplied)
Hot water
line connector
Cold water
line connector
Faucet
Hot water line
Cold water line
Threaded rod
Rubber washer
Steel washer
Fixing nut
Spanner
Counter top
Faucet o-ring
Faucet
Hot water line
Cold water line
2"
4
7
8
"
2"
1
3
4
"
45.00°
45.00°
4
1
2
"
7
1
2
"
3
8
"
13
8
"
11
4
"
max
6
1
2
"
8.00°
max
4
7
8
"
3/8" comp.
6
1
2
"
24
3
4
"
Supply valve
(hot)
Supply valve
(cold)
Wrench
(not supplied)
Hot water
line connector
Cold water
line connector
Faucet
Hot water line Cold water line
Threaded rod
Rubber washer
Steel washer
Fixing nut
Spanner
Counter top
Faucet o-ring
Faucet
Hot water line
Cold water line
2"
4
7
8
"
2"
1
3
4
"
45.00°
45.00°
4
1
2
"
7
1
2
"
3
8
"
13
8
"
11
4
"
max
6
1
2
"
8.00°
max
4
7
8
"
3/8" comp.
6
1
2
"
24
3
4
"
Supply valve
(hot)
Supply valve
(cold)
Wrench
(not supplied)
Hot water
line connector
Cold water
line connector
Faucet
Hot water line
Cold water line
Threaded rod
Rubber washer
Steel washer
Fixing nut
Spanner
Counter top
Faucet o-ring
Faucet
Hot water line
Cold water line
2"
4
7
8
"
2"
1
3
4
"
45.00°
45.00°
4
1
2
"
7
1
2
"
3
8
"
13
8
"
11
4
"
max
6
1
2
"
8.00°
max
4
7
8
"
3/8" comp.
6
1
2
"
24
3
4
"
PARTS INCLUDED
INSTALLATION MANUAL
Supply valve
(hot)
Supply valve
(cold)
Wrench
(not supplied)
Hot water
line connector
Cold water
line connector
Faucet
Hot water line
Cold water line
Threaded rod
Rubber washer
Steel washer
Fixing nut
Spanner
Counter top
Faucet o-ring
Faucet
Hot water line
Cold water line
2"
4
7
8
"
2"
1
3
4
"
45.00°
45.00°
4
1
2
"
7
1
2
"
3
8
"
13
8
"
11
4
"
max
6
1
2
"
8.00°
max
4
7
8
"
3/8" comp.
6
1
2
"
24
3
4
"
AFaucet o-ring x 1
BRubber washer x 1
CSteel washer x 1
DThreaded rod x 2
EFixing nut x 2
FSpanner x 1
G Water line x 2
Supply valve
(hot)
Supply valve
(cold)
Wrench
(not supplied)
Hot water
line connector
Cold water
line connector
Faucet
Hot water line
Cold water line
Threaded rod
Rubber washer
Steel washer
Fixing nut
Spanner
Counter top
Faucet o-ring
Faucet
Hot water line
Cold water line
2"
4
7
8
"
2"
1
3
4
"
45.00°
45.00°
4
1
2
"
7
1
2
"
3
8
"
13
8
"
11
4
"
max
6
1
2
"
8.00°
max
4
7
8
"
3/8" comp.
6
1
2
"
24
3
4
"
BEFORE USE
INSTALLATION
INSTRUCTIONS
Single-lever basin mixer
●We recommend that this product is installed by a qualified professional contractor.
●Please check this product immediately to ensure that it has not been damaged and is complete. Before installation, please make
sure this product is the correct model and you have all the parts required for installation and using.
●Please flush the water system to ensure that no metal swarf, solder, and other impurities can enter the taps.
●
Turn off water supply before commencing work, this should be done at the isolating valves of inlet feeds if fitted or main sto
pcock.
●Please read these instructions carefully and keep it for future reference.
Maintainance
We do NOT recommend you use any household cleaners to clean the product. Because these cleaners change substance or formula
too frequently. The product should be always cleaned only with soapy water and rinsed with clean water and dried with a soft cloth.
Important
A
1 - 2
Cleaning
Before use: Unscrew the Aerator and allow the water to run freely for 5 minutes. Then screw the filter back in place.
Periodically: Unscrew the Aerator and remove. Rinse it with running water until any loose debris is cleared. Then replace the Aerator
and tighten.
Aerator
TROUBLE SHOOTING
Problem
Leaks underneath handle.
Aerator leaks or has inconsistent
water ow pattern.
Water will not shut off completely.
Cause
Cartridge is loose or damaged.
Aerator is dirty or mystied.
Dirty or worn out plastic washer in
the cartridge.
Action
Make sure retaining nut is fully
tighten. Adjust or replace cartridge
if necessary.
Unscrew aerator to check rubber
packing or replace aerator.
Adjust or replace cartridge.
LIMITED LIFETIME WARRANTY
INOLAV provides its customers with an extensive warranty as a result of our excellent workmanship and high quality
components used in our products.
Mechanical warranty: A limited lifetime warranty is provided on all mechanical parts to be free from
manufacturing defects in materials and workmanship under normal use for as long as the original purchaser owns
their home.
Finish warranty: A 5-year warranty is provided on all INOLAV faucet nishes to the original purchaser against
manufacturing defects in materials and workmanship.
At its sole discretion, INOLAV will repair or replace any part or nish that proves to be defective in material and/or
workmanship under normal installation, use and service.
This warranty is extended to the original consumer owner, but does not cover installation or any other labor charges.
In no event shall INOLAV be liable for any incidental, consequential or special damages, installation cost, labor,
travel time, freight costs incurred, lost prots, or contingent liabilities. INOLAV makes no representation that its
products comply with any or all local building or plumbing codes. It is the consumer’s responsibility to determine
local code compliance.
For warranty issues call us at 1-855 472 4304 or send us an e-mail at warranty@inolav.com For questions call us at 1-855 472 4304 or visit our website at www.inolav.com
Unscrew the aerator and allow the water to run freely for 5 minutes. Then replace the aerator and tighten. It is recom-
mended that you clean the aerator periodically. To do this, remove the aerator, then rinse it with running water until any
loose debris are cleared.
CLEANING AND CARE
Clean the faucet often with a soft cloth to keep it looking like new. For heavy cleaning you can use mild liquid detergents
or non-abrasive liquid polisher. Rinse with water and dry with a soft cloth. Avoid abrasive cleaners, steel wool and harsh
chemicals as these will dull the nish and void your warranty.
Before your installation please make sure you have received the parts indicated below.
Compliance:
NSF/ANSI 61
ASME A112.18.1
CSA B125.1
U
P
C
®
C
HAerator
spanner x 1
Supply valve
(hot)
Supply valve
(cold)
Wrench
(not supplied)
Hot water
line connector
Cold water
line connector
Faucet
Hot water line Cold water line
Threaded rod
Rubber washer
Steel washer
Fixing nut
Spanner
Counter top
Faucet o-ring
Faucet
Hot water line
Cold water line
2"
4
7
8
"
2"
1
3
4
"
45.00°
45.00°
4
1
2
"
7
1
2
"
3
8
"
13
8
"
11
4
"
max
6
1
2
"
8.00°
max
4
7
8
"
3/8" comp.
6
1
2
"
24
3
4
"
Supply valve
(hot)
Supply valve
(cold)
Wrench
(not supplied)
Hot water
line connector
Cold water
line connector
Faucet
Hot water line
Cold water line
Threaded rod
Rubber washer
Steel washer
Fixing nut
Spanner
Counter top
Faucet o-ring
Faucet
Hot water line
Cold water line
2"
4
7
8
"
2"
1
3
4
"
45.00°
45.00°
4
1
2
"
7
1
2
"
3
8
"
13
8
"
11
4
"
max
6
1
2
"
8.00°
max
4
7
8
"
3/8" comp.
6
1
2
"
24
3
4
"
Supply valve
(hot)
Supply valve
(cold)
Wrench
(not supplied)
Hot water
line connector
Cold water
line connector
Faucet
Hot water line Cold water line
Threaded rod
Rubber washer
Steel washer
Fixing nut
Spanner
Counter top
Faucet o-ring
Faucet
Hot water line
Cold water line
2"
4
7
8
"
2"
1
3
4
"
45.00°
45.00°
4
1
2
"
7
1
2
"
3
8
"
13
8
"
11
4
"
max
6
1
2
"
8.00°
max
4
7
8
"
3/8" comp.
6
1
2
"
24
3
4
"
Supply valve
(hot)
Supply valve
(cold)
Wrench
(not supplied)
Hot water
line connector
Cold water
line connector
Faucet
Hot water line Cold water line
Threaded rod
Rubber washer
Steel washer
Fixing nut
Spanner
Counter top
Faucet o-ring
Faucet
Hot water line
Cold water line
2"
4
7
8
"
2"
1
3
4
"
45.00°
45.00°
4
1
2
"
7
1
2
"
3
8
"
13
8
"
11
4
"
max
6
1
2
"
8.00°
max
4
7
8
"
3/8" comp.
6
1
2
"
24
3
4
"
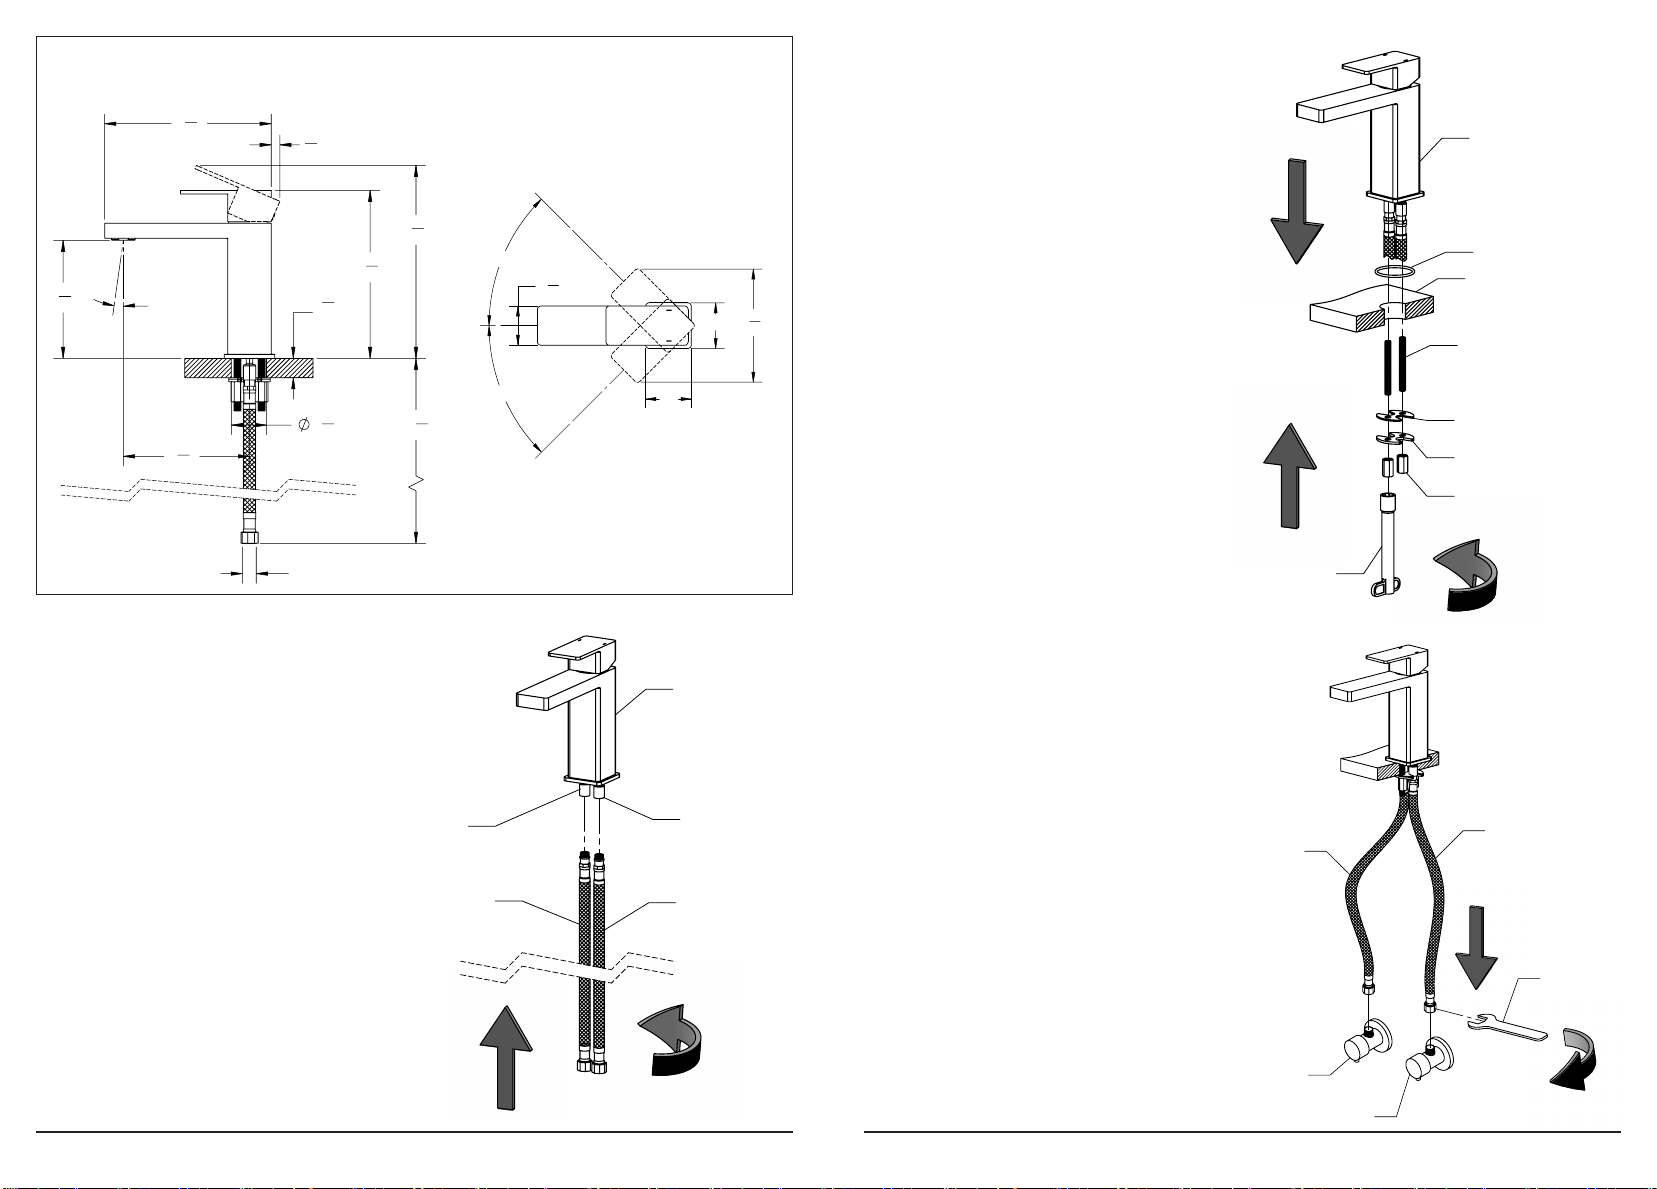
STEP 1
Screw waterlines into corresponding line
connectors of faucet body. Make sure
o-ring goes into the line connector. Do not
over tighten.
Supply valve
(hot)
Supply valve
(cold)
Wrench
(not supplied)
Hot water
line connector
Cold water
line connector
Faucet
Hot water line Cold water line
Threaded rod
Rubber washer
Steel washer
Fixing nut
Spanner
Counter top
Faucet o-ring
Faucet
Hot water line
Cold water line
2"
4
7
8
"
2"
1
3
4
"
45.00°
45.00°
4
1
2
"
7
1
2
"
3
8
"
13
8
"
11
4
"
max
6
1
2
"
8.00°
max
4
7
8
"
3/8" comp.
6
1
2
"
24
3
4
"
STEP 2
Secure faucet to counter top or basin using
the mounting kit as described in the gure.
1-Screw threaded rods into faucet body.
2-Fit o-ring into groove of faucet body and
insert faucet into faucet hole. 3-Align rub-
ber and steel washer, and tighten the xing
nuts using spanner.
Supply valve
(hot)
Supply valve
(cold)
Wrench
(not supplied)
Hot water
line connector
Cold water
line connector
Faucet
Hot water line Cold water line
Threaded rod
Rubber washer
Steel washer
Fixing nut
Spanner
Counter top
Faucet o-ring
Faucet
Hot water line
Cold water line
2"
4
7
8
"
2"
1
3
4
"
45.00°
45.00°
4
1
2
"
7
1
2
"
3
8
"
13
8
"
11
4
"
max
6
1
2
"
8.00°
max
4
7
8
"
3/8" comp.
6
1
2
"
24
3
4
"
STEP 3
Screw water lines into corresponding
water supply lines in the wall using a 5/8”
wrench. Do not over tighten. Check for
leakage.
For questions call us at 1-855 472 4304 or visit our website at www.inolav.com For questions call us at 1-855 472 4304 or visit our website at www.inolav.com
IF2005 Spec sheet
Single handle basin faucet.
Other INOLAV Bathroom Fixture manuals

Popular Bathroom Fixture manuals by other brands


Franke
Franke FRESNO FSG 611-88 Installation and user manual

Cornat
Cornat T319663 instruction manual

Aquadart
Aquadart venturi 6 AQ9349BLK installation instructions

VEDUM
VEDUM Soprano 510 installation guide

Jungborn
Jungborn Sette 10605290 Assembly instructions

Roca
Roca DEBBA COMPACT 855900 Series installation guide