Inovelli NZW39 User manual
Page 1
www.inovelli.com/nzw39-setup
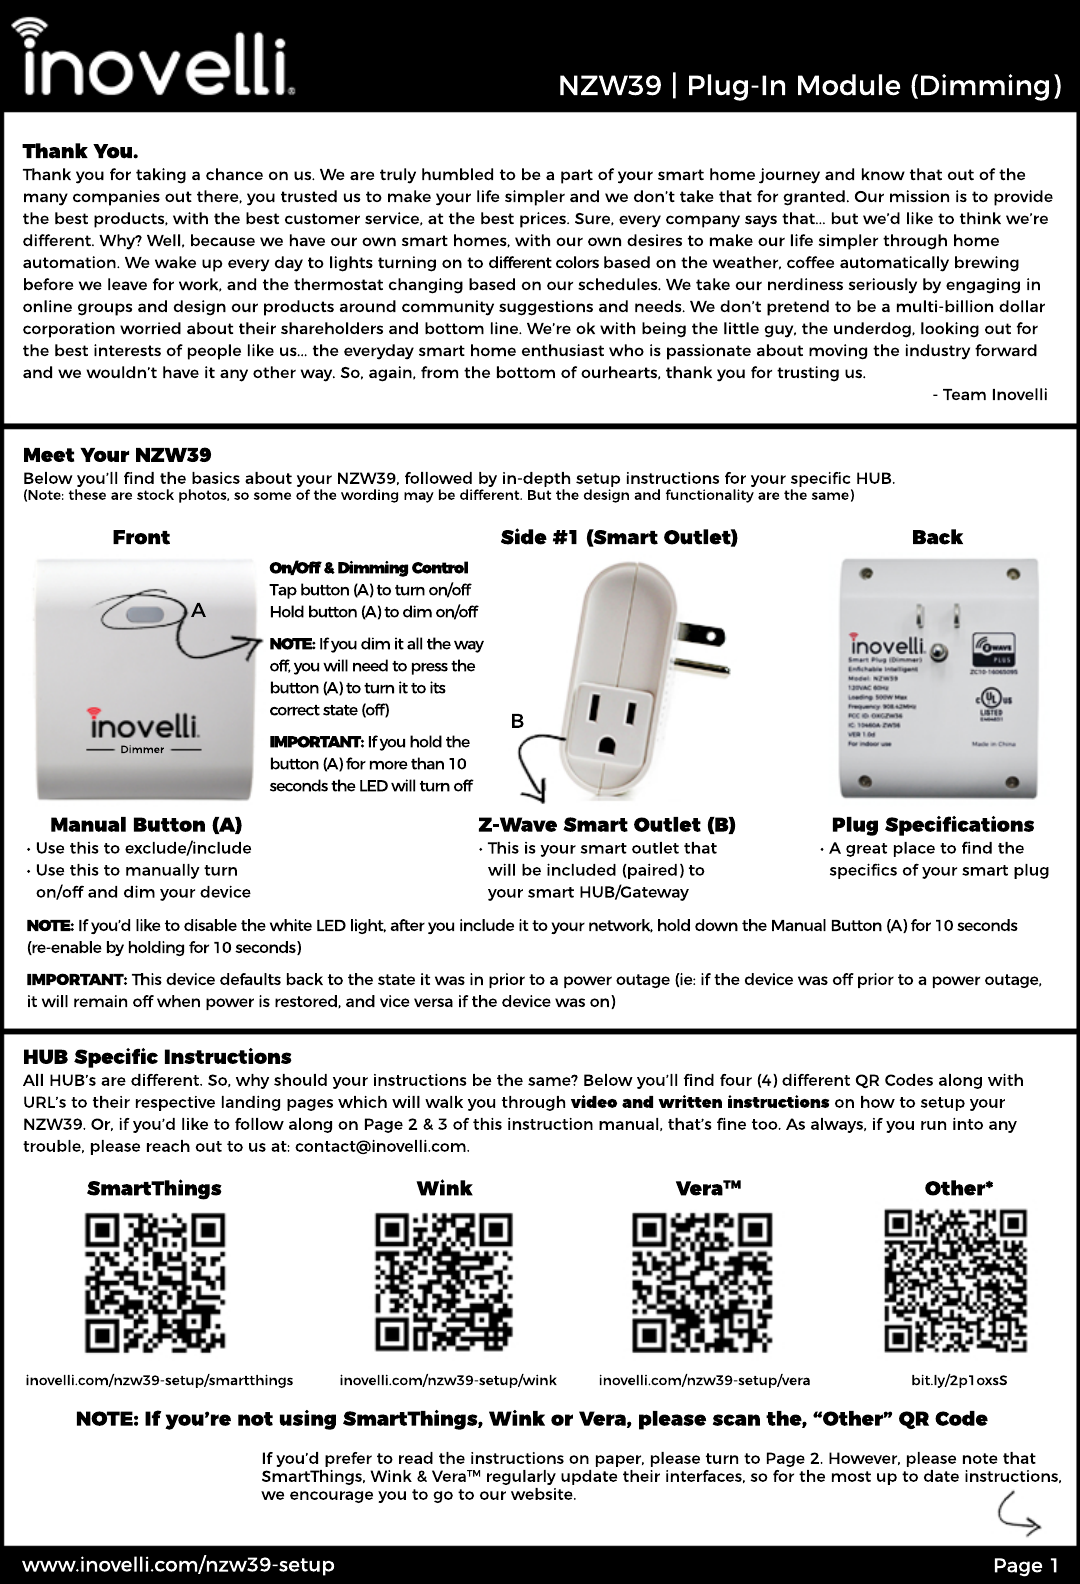
Plug Specifications
• A great place to find the
specifics of your smart plug
Back
Z-Wave Smart Outlet (B)
• This is your smart outlet that
will be included (paired) to
your smart HUB/Gateway
B
On/Off & Dimming Control
Tap button (A) to turn on/off
Hold button (A) to dim on/off
NOTE: If you dim it all the way
off, you will need to press the
button (A) to turn it to its
ccorrect state (off)
IMPORTANT: If you hold the
button (A) for more than 10
seconds the LED will turn off
Side #1 (Smart Outlet)
Manual Button (A)
• Use this to exclude/include
• Use this to manually turn
on/off and dim your device
Dimmer
A
Front
Meet Your NZW39
Below you’ll find the basics about your NZW39, followed by in-depth setup instructions for your specific HUB.
(Note: these are stock photos, so some of the wording may be different. But the design and functionality are the same)
NOTE: If you’d like to disable the white LED light, after you include it to your network, hold down the Manual Button (A) for 10 seconds
(re-enable by holding for 10 seconds)
IMPORTANT: This device defaults back to the state it was in prior to a power outage (ie: if the device was off prior to a power outage,
it will remain off when power is restored, and vice versa if the device was on)
HUB Specific Instructions
All HUB’s are different. So, why should your instructions be the same? Below you’ll find four (4) different QR Codes along with
URL’s to their respective landing pages which will walk you through video and written instructions on how to setup your
NZW39. Or, if you’d like to follow along on Page 2 & 3 of this instruction manual, that’s fine too. As always, if you run into any
trouble, please reach out to us at: contact@inovelli.com.
bit.ly/2p1oxsS
Other*
inovelli.com/nzw39-setup/vera
Vera
TM
inovelli.com/nzw39-setup/wink
Wink
inovelli.com/nzw39-setup/smartthings
SmartThings
If you’d prefer to read the instructions on paper, please turn to Page 2. However, please note that
SmartThings, Wink & Vera
TM
regularly update their interfaces, so for the most up to date instructions,
we encourage you to go to our website.
NOTE: If you’re not using SmartThings, W ink or Vera, please scan the, “Other” QR Code
Thank You.
Thank you for taking a chance on us. We are truly humbled to be a part of your smart home journey and know that out of the
many companies out there, you trusted us to make your life simpler and we don’t take that for granted. Our mission is to provide
the best products, with the best customer service, at the best prices. Sure, every company says that... but we’d like to think we’re
different. Why? Well, because we have our own smart homes, with our own desires to make our life simpler through home
automation. We wake up every day to lights turning on to different colors based on the weather, coffee automatically brewing
bbefore we leave for work, and the thermostat changing based on our schedules. We take our nerdiness seriously by engaging in
online groups and design our products around community suggestions and needs. We don’t pretend to be a multi-billion dollar
corporation worried about their shareholders and bottom line. We’re ok with being the little guy, the underdog, looking out for
the best interests of people like us... the everyday smart home enthusiast who is passionate about moving the industry forward
and we wouldn’t have it any other way. So, again, from the bottom of ourhearts, thank you for trusting us.
- Team Inovelli
NZW39 | Plug-In Module (Dimming)

Page 2
www.inovelli.com/nzw39-setup
Once you’ve finished the Exclusion process (or if you’ve skipped it) it’s time to include your device to the network
If you’ve Excluded (Step 3), press the back button, and then the “x” until you are back at the, “My Home” screen where
you should see the, “Add a Thing” button (NOTE: If you have a lot of devices, please scroll to the bottom of the screen)
Press, “Add a Thing” and SmartThings will automatically start to look for devices
Push the middle button on the smart plug (A - from Page 1) 3-5 times within 3 seconds (don’t worry whether or not the
LED light turns on or LED light turns on or off with this plug -- the important thing is to press the button fast) to activate inclusion
You should now see that your device is detected (it should say, “Z-Wave Dimmer”)
After your device is detected, press, “Save” (or if you’d like to rename your device, please do so and click, “Save”)
Once you click, “Save” a pop-up will appear asking you to, “Confirm Paired Devices” -- Click, “OK”
Now, you should be back at the, “My Home” screen and you should be able to see your switch!
AGAIN: If you have issues with pairing/including, please move as close as possible to the HUB and try again -- you can move to
yyour final location when complete
◄ STEP 4 ►
ADDING (INCLUDING) TO THE NETWORK & COMPLETING THE SETUP PROCESS
While this step is optional, it’s highly recommended. It will reset the device to allow for better pairing to the HUB
Open up your SmartThings app and click on the three lines in the top left of the app (ie: menu)
Click on, “Hub is Online” and then, “Z-Wave Utilities” and finally, “General Device Exclusion”
Push the middle button on the smart plug (A - from Page 1) 3-5 times within 3 seconds (don’t worry whether or not the
LED light turns on or off with this plug -- the important thing is to press the button fast)
You should receive a message that your device has been successfully excluded
AAGAIN: If you have issues with excluding, please move as close as possible to the HUB and try again
◄ STEP 3 ►
PLUG IN THE MODULE AND START THE EXCLUSION PROCESS (OPTIONAL -- BUT HIGHLY RECOMMENDED)
Materials Needed: Grounded Outlet, Cell Phone or Tablet, and SmartThings HUB (1.0 or 2.0)
Locate an indoor outlet which is grounded and within the recommended distance (less than 30ft) from your HUB
Walls, furniture, and other obstructions may affect the communication between the Plug-In Module and the SmartThings
HUB, so please keep this in mind
Before plugging in your outlet, it’s recommended that you plug in the device you’re looking to control (Make sure it does not
exceed 500 Watts) - Do not plug in Appliances to this outlet -- this is meant for bulbs only.
◄ STEPS 1 & 2 ►
GATHER YOUR MATERIALS, FIND AN APPROPRIATE OUTLET, AND PLUG IN LAMPS OR APPLIANCES
SmartThings Quick Setup
The below instructions will allow you to pair/include your NZW39 with your SmartThings HUB. Remember, for the most up to
date instructions, please visit our website as occasionally SmartThings updates their app.
** IMPORTANT: If you are having issues pairing/including your device, please try moving the device as close as possible to
the HUB. 95% of the pairing/including failures stem from this issue. Once you’ve paired/included, you can move to your
final location. **
Once you’ve finished the Exclusion process (or if you’ve skipped it) it’s time to include your device to the network
Start the Inclusion process on your HUB/Gateway
Push the middle button on the smart plug (A - from Page 1) 3-5 times within 3 seconds (don’t worry whether or not the
LED light turns on or off with this plug -- the important thing is to press the button fast)
You should now see that your device is included.
AGAIN: If you have issues with including, please move as close as possible to the HUB and try again -- you can always move to
yyour final location when complete
◄ STEP 4 ►
ADDING (INCLUDING) TO THE NETW ORK & COMPLETING THE SETUP PROCESS
While this step is optional, it’s highly recommended. It will reset the device to allow for better pairing to the HUB
Start the Exclusion process on your HUB/Gateway
Push the middle button on the smart plug (A - from Page 1) 3-5 times within 3 seconds (don’t worry whether or not the
LED light turns on or off with this plug -- the important thing is to press the button fast)
You should now see that your device is excluded.
AGAIN: If you have issues with excluding, please move as close as possible to the HUB and try again
◄ STEP 3 ►
PLUG IN THE MODULE AND START THE EXCLUSION PROCESS (OPTIONAL -- BUT HIGHLY RECOMMENDED)
Materials Needed: Grounded Outlet, Cell Phone/Tablet/Computer, and a Z-Wave enabled HUB/Gateway
Locate an indoor outlet which is grounded and within the recommended distance (less than 30ft) from your HUB/Gateway
Walls, furniture, and other obstructions may affect the communication between the Plug-In Module and your HUB/Gateway,
so please keep this in mind
Before plugging in your outlet, it’s recommended that you plug in the device you’re looking to control (Make sure it does not
exceed 500 Watts) - Do not plug in Appliances to this outlet -- this is meant for bulbs only.
◄ STEPS 1 & 2 ►
GATHER YOUR MATERIALS, FIND AN APPROPRIATE OUTLET, AND PLUG IN LAMPS OR APPLIANCES
General HUB/Gateway (Non-SmartThings, W ink or Vera
TM
) Quick Setup
The below instructions will allow you to pair/include your NZW39 with any Z-Wave enabled HUB.
** IMPORTANT: If you are having issues pairing/including your device, please try moving the device as close as possible to
the HUB. 95% of the pairing/including failures stem from this issue. Once you’ve paired/included, you can move to your
final location. **
NZW39 | Plug-In Module (Dimming)

Page 3
www.inovelli.com/nzw39-setup
◄ STEP 4 ►
ADDING (INCLUDING) TO THE NETW ORK & COMPLETING THE SETUP PROCESS
Reminder: During setup, you can pair as a Z-Wave Light or a Z-Wave Switch -- Wink detects this as a light bulb due to its dimming capabilities.
However, you will be able to use it as a dimmer either way you pair it (ie: as a Z-Wave Light or a Z-Wave Switch).
While this step is optional, it’s highly recommended. It will reset the device to allow for better pairing to the HUB
Open up your Wink app and go to the main menu -- then click on the, “Hubs” icon
Once on the, “Hubs” menu, click on the three dots on the top right of your screen to access the, “Settings” menu
and select the HUB you eventually want to pair your device to
Scroll down about halfway & select, “Z-Wave Controls” (NOTE: It will help if you can see your HUB from where you are
setting up your device to watch it flash to ensure it’s working)
While While watching your HUB, click on, “Exclusion Mode” -- you should see your HUB flashing
Push the middle button on the smart plug (A - from Page 1) 3-5 times within 3 seconds (don’t worry whether or not the
LED light turns on or off with this plug -- the important thing is to press the button fast) -- your HUB will flash GREEN if
successful (if not, move closer to the HUB and try again)
◄ STEP 3 ►
PLUG IN THE MODULE AND START THE EXCLUSION PROCESS (OPTIONAL -- BUT HIGHLY RECOMMENDED)
Materials Needed: Grounded Outlet, Cell Phone or Tablet, and Wink HUB (1.0 or 2.0)
Locate an indoor outlet which is grounded and within the recommended distance (less than 30ft) from your HUB
Walls, furniture, and other obstructions may affect the communication between the Plug-In Module and the Wink HUB, so
please keep this in mind
Before plugging in your outlet, it’s recommended that you plug in the device you’re looking to control (Make sure it does not
exceed 500 Watts) - Do not plug in Appliances to this outlet -- this is meant for bulbs only.
◄ STEPS 1 & 2 ►
GATHER YOUR MATERIALS, FIND AN APPROPRIATE OUTLET, AND PLUG IN LAMPS OR APPLIANCES
Wink Quick Setup - NOTE: W ink will detect this switch as a bulb due to its dimming function
The below instructions will allow you to pair/include your NZW39 with your Wink HUB. Remember, for the most up to date
instructions, please visit our website as occasionally Wink updates their app.
** IMPORTANT: If you are having issues pairing/including your device, please try moving the device as close as possible to
the HUB. 95% of the pairing/including failures stem from this issue. Once you’ve paired/included, you can move to your
final location. **
Now we’ll start the inclusion process for your NZW39 Smart Plug
On the main screen, click on the, “Devices” tab and click, “Add Device” -- Scroll down to the bottom and click, “Generic Z-Wave Device”
Under the, “Pair Your Device” click, “Next” until your HUB goes into inclusion mode
Push the middle button on the smart plug (A - from Page 1) 3-5 times within 3 seconds (don’t worry whether or not the
LED light turns on or off with this plug -- the important thing is to press the button fast)
If successful, you will see a new screen pop up and there will be a notification that says, “Device Detected” -- go ahead
and name and name your device
Select a room (Optional) and hit, “Finish” -- then wait for the device to appear -- you’re all set!
AGAIN: If you have issues with including, please move as close as possible to the HUB and try again -- you can always move to
your final location when complete
◄ STEP 3 ►
ADDING (INCLUDING) TO THE NETW ORK & COMPLETING THE SETUP PROCESS
Materials Needed: Grounded Outlet, PC or Mac, and a Z-Wave enabled HUB/Gateway
Locate an indoor outlet which is grounded and within the recommended distance (less than 30ft) from your HUB/Gateway
Walls, furniture, and other obstructions may affect the communication between the Plug-In Module and the Vera
TM
HUB, so please keep this in mind
Before plugging in your outlet, it’s recommended that you plug in the device you’re looking to control (Make sure it does not
exceed 500 Watts) - Do not plug in Appliances to this outlet -- this is meant for bulbs only.
◄ STEPS 1 & 2 ►
GATHER YOUR MATERIALS, FIND AN APPROPRIATE OUTLET, AND PLUG IN LAMPS OR APPLIANCES
Vera
TM
Quick Setup
The below instructions will allow you to pair/include your NZW39 with your Vera
TM
system. Remember, for the most up to date
instructions, please visit our website, as occasionally Vera
TM
updates their web app.
** IMPORTANT: If you are having issues pairing/including your device, please try moving the device as close as possible to
the HUB. 95% of the pairing/including failures stem from this issue. Once you’ve paired/included, you can move to your
final location. **
NZW39 | Plug-In Module (Dimming)

Page 4
www.inovelli.com/nzw39-setup
Resetting Your Device
Please use your controller to remove the device from your network to factory reset. Only use this if your controller is missing or inoperable
*Theassociationgroupsupportsfivenodesandlifelinefunction
Warranty, Specifications & Warnings
Warranty: Inovelli will replace any defective unit for the lifetime of the unit, pending the unit was used in the manner it was
intended to. Please email us at: contact@inovelli.com to receive a pre-paid shipping label for the return of your defective unit.
Specifications:
Model: NZW39
Power: 120V AC, 60Hz
Signal (Frequency): 908.42 MHzSignal (Frequency): 908.42 MHz
Maximum Load for the Z-Wave Outlet: 500W
Range: Up to 100 feet line of sight between the Wireless Controller (HUB) and the closest Z-Wave Module
Operating Temperature Range: 32-104° F (0-40° C)
For indoor use only
Specifications subject to change without notice due to continuing product improvement
Dimensions: 3.19” x 2.56” x 1.30”
ApprApproval: UL/FCC/IC/NCC/Z-Wave Plus Certified
UL: E464831
FCC ID: OXGZW36
Z-Wave Plus: ZC10-16065095
Warning:
RISK OF FIRE
RISK OF ELECTRICAL SHOCK
RISK OF BURNSRISK OF BURNS
CONTROLLING APPLIANCES: EXERCISE EXTREME CAUTION WHEN USING Z-WAVE DEVICES TO CONTROL APPLIANCES.
OPERATION OF THE Z-WAVE DEVICE MAY BE IN A DIFFERENT ROOM THAN THE CONTROLLED APPLIANCE, ALSO AN
UNINTENTIONAL ACTIVATION MAY OCCUR IF THE WRONG BUTTON ON THE REMOTE IS PRESSED. Z-WAVE DEVICES MAY
AUTOMATICALLY BE POWERED ON DUE TO TIMED EVENT PROGRAMMING. DEPENDING UPON THE APPLIANCE, THESE
UNATTENDED OR UNINTENTIONAL OPERATIONS COULD POSSIBLY RESULT IN A HAZARDOUS CONDITION. FOR THESE
REASONS, WE RECOMMEND YOU DO NOT RETURN THIS PRODUCT TO THE STORE, BUT RATHER CONTACT THE
MANUMANUFACTURER OF THE PRODUCT TO ARRANGE AN EXCHANGE OR REFUND IF THE PRODUCT IS DEEMED DEFECTIVE
Command Class Information & Device Reset Instructions
Generic Device Class GENERIC_TYPE_SWITCH_MULTILEVEL
Specific Device Class SPECIFIC_TYPE_POWER_SWITCH_MULTILEVEL
Command Classes COMMAND_CLASS_ZWAVEPLUS_INFO
COMMAND_CLASS_ASSOCIATION
COMMAND_CLASS_ASSOCIATEION_GRP_INFO
COMMAND_CLASS_CONFIGURATION
COMMAND_CLASS_DEVICE_RESET_LOCALLY
COMMAND_CLASS_MANUFACTURER_SPECIFIC
COMMAND_CLASS_POWERLEVEL
COMMAND_CLASS_SWITCH_ALL
COMMAND_CLASS_SWITCH_MULTILEVEL
COMMAND_CLASS_VERSION
Federal Communications Commission (FCC) Statement
FCC Caution: Any changes or modifications not expressly approved by the party responsible for compliance could void the user’s
authority to operate this equipment. This device complies with Part 15 of the FCC Rules. Operation is subject to the following two
conditions: (1) This device may not cause harmful interference, and (2) this device must accept any interference received
including interference that may cause undesired operation.
NOTE: This equipment has been tested and found to comply with the limits for a Class B digital device, pursuant to Part 15 of
the Fthe FCC Rules. These limits are designed to provide reasonable protection against harmful interference in a residential installation.
This equipment generates, uses and can radiate radio frequency energy and, if not installed and used in accordance with the
instructions, may cause harmful interference to radio communications. However, there is no guarantee that interference will not
occur in a particular installation. If this equipment does cause harmful interference to radio or television reception, which can be
determined by turning the equipment off and on, the user is encouraged to try to correct the interference by one or more of the
ffollowing measures: Reorient or relocate the receiving antenna, increase the separation between the equipment and receiver,
connect the equipment into an outlet on a circuit different from that to which the receiver is connected or consult the dealer or
an experienced radio/TV technician for help. This equipment should be installed and operated with minimum distance 8in
(20cm) between the radiator and your body.
IC Caution: This device complies with Industry Canada licence-exempt RSS standard(s). Operation is subject to the following two
conditions: (1) this device may not cause interference, and (2) this device must accept any interference, including interference
that mthat may cause undesired operation of the device.
DECLARATION DE CONFORMITE D'INDUSTRIE CANADA: Ce périphérique a été testé et reconnu conforme aux limites spécifiées
dans RSS-210. Son utilisation est soumise aux deux conditions suivantes: (1) il ne doit pas provoquer d'interférences gênantes et
(2) il doit tolérer les interférences re.ues, notamment cellessusceptibles d'en perturber le fonctionnement.
NZW39 | Plug-In Module (Dimming)
Table of contents
Other Inovelli Home Automation manuals


 MINIMASTER 1 Guide Notes")


