Inscape Height Adjustable Table User manual

OCTOBER 2019
Height
Adjustable Table
User Guide


Glossary
Components:
Desk leg (DL) The lifting columns, typically with powder coated steel proles, responsible for lifting the working load of the application.
Control box (CBD6S) Both the computer and power supply of the system.
Desk panel (DP) The user interface. Depending on the model, it is used to activate the application, set memory positions,
display the height, display error codes, connect to mobile apps, and give reminders to the user.
Motor cable Transmits low voltage power (18-39 VDC) from the control box to the desk legs,
and also transmits Piezo signals when available from the desk leg.
Mains cable Transmits high voltage power (120 VAC in US and Canada) to the control box.
Other:
Initialize Procedure to reset all desk legs to the fully retracted position so that the control box knows where they are.
Reference Any group of desk legs that run in parallel when an Up or Down command is sent to the control
box. It is possible to have a custom control box conguration that allows for more than one
Reference. [Example: Two (2) desk legs on Reference #1 (Channels #1 and #2) to lift a work
surface, and one (1) LA31 on Reference #2 (Channel 3) to adjust a monitor array.]
Height Adjustable Table – User Guide | October 2019 3
Introduction
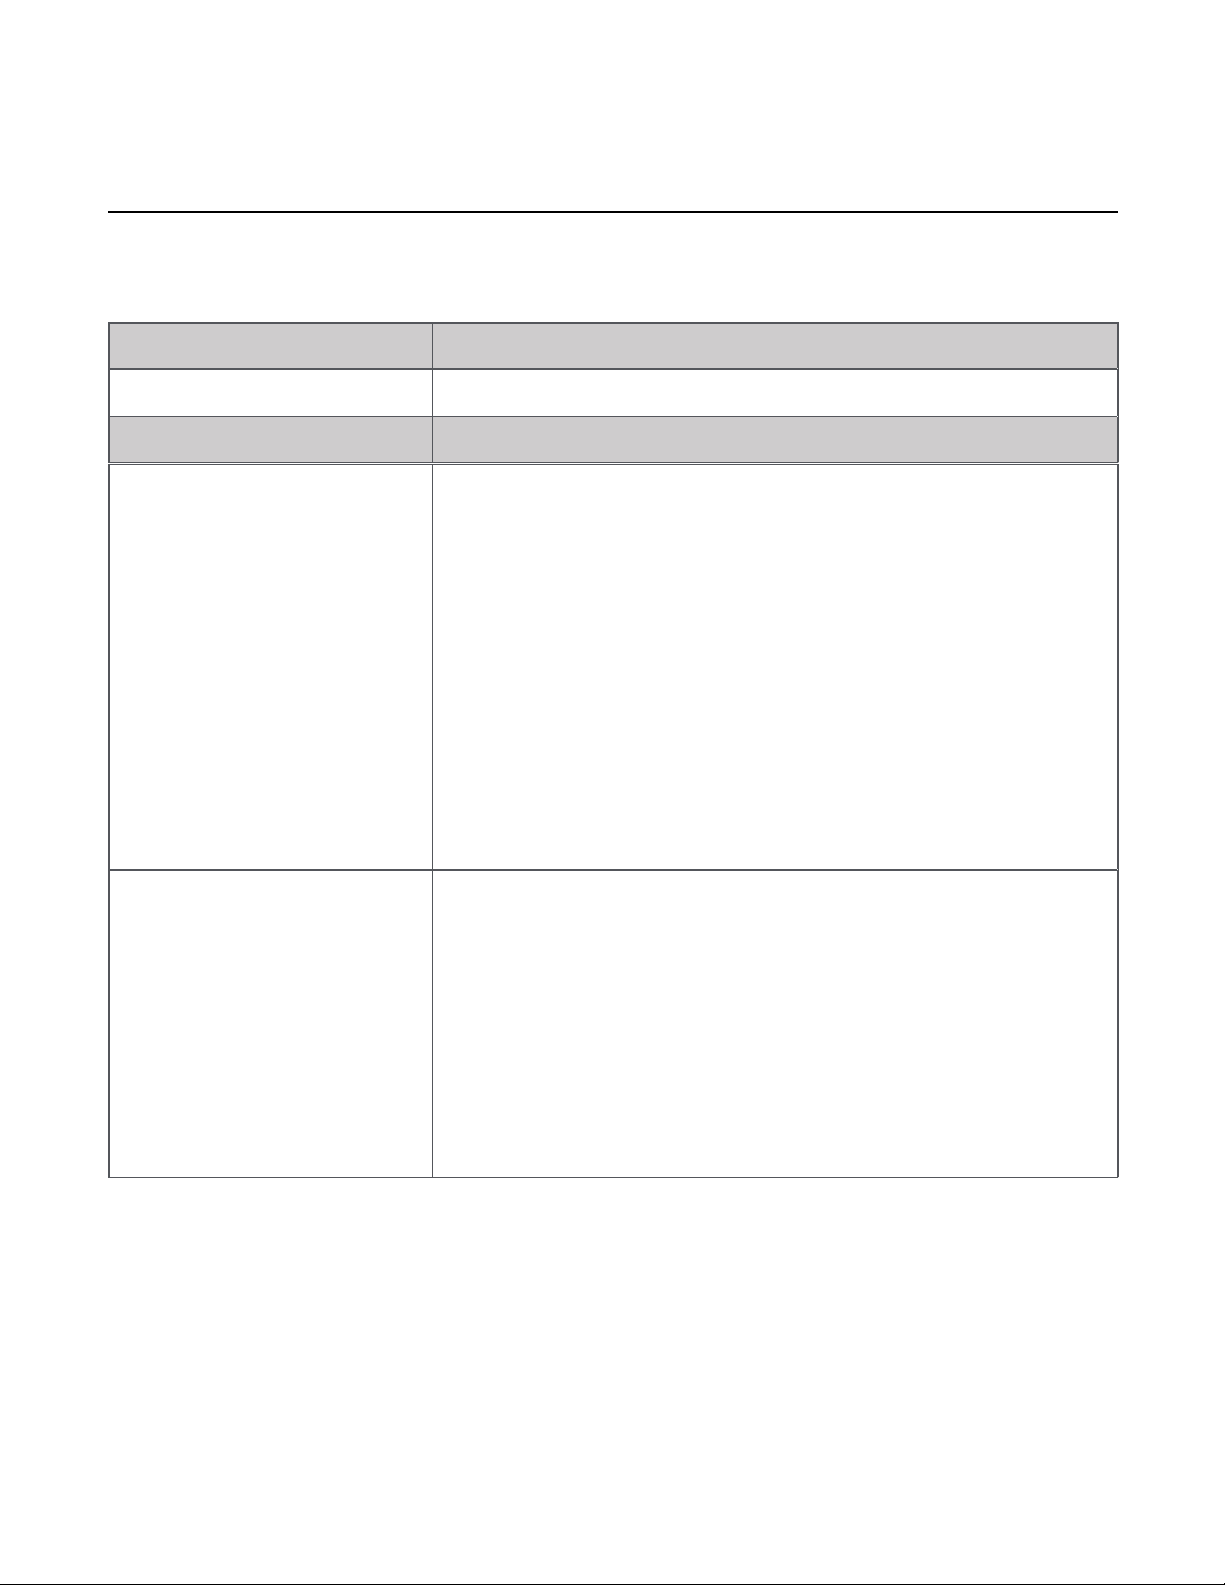
There are four available options for control switches:
1. Basic Control Switch (DPF1K)
2. Programmable Control Switch with Display (DPF1C)
3. Basic Paddle Control Switch (DPG1K)
4. Programmable Paddle Control Switch (DPG1C)
Only DPF control switches must be mounted with a 45˚ mounting bracket and placed at the edge of the tabletop.
See illustration below:
Control switch mounted with a 45˚ mounting
bracket on the edge of a tabletop.
Height Adjustable Table – User Guide | October 2019 4

Basic Control Switch (DPF1K)
This controller provides basic up and down functions.
Height Adjustable Table – User Guide | October 2019 5

Programmable Control Switch with Display (DPF1C)
The programmable control switch with display shows you the height in either centimeters or inches. It also
features an automatic shut-off for when the unit is not in use thereby saving power in standby mode. As
an extra feature, the panel can be used for diagnostics as error codes can be displayed.
How to use the controls
Up and down (arrows):
Activate either the up or down button for parallel drive. The system will drive until the button is released again or the system reaches end position.
Memory:
The four small buttons are used for memory drive or storing memory.
Store Memory:
• Press the “S” button – display will ash for 2seconds
• Within these two seconds press one of the small buttons with dots and the position will be stored at this button
• The panel will acknowledge by showing “1”, “2” or “3” in the display depending on chosen position
Memory drive (small buttons with dots):
Press one of the memory buttons and the system will start driving to the pre-programmed memory position.
Keep the button pressed until the desired position has been reached.
Display function:
Display shows the actual height in either centimeters or inches.
Display will show error codes if error in table occurs.
= Parallel up
= Parallel down
S = Store memory
• = Memory 1
•• = Memory 2
••• = Memory 3
Height Adjustable Table – User Guide | October 2019 6

Basic Paddle Control Switch (DPG1K)
This controller provides basic up and down functions.
Height Adjustable Table – User Guide | October 2019 7

Programmable Paddle Control Switch (DPG1C)
The programmable paddle control switch with display shows you the height in either centimeters or inches.
As an extra feature, the panel can be used for diagnostics as error codes can be displayed.
Height Adjustable Table – User Guide | October 2019 8

How to use the controls
Up and down (arrows):
Activate either the up or down button for parallel drive. The system will drive until the
button is released again or the system reaches end position.
Memory:
This switch has a "store memory" button that supplies four memory positions.
Display function:
Display shows the actual height in either centimeters or inches.
Display will show error codes if error in table occurs.
Bluetooth:
Once the Desk Control™ App is downloaded onto your device, the paddle switch can be connected
via Bluetooth. This App can drive controls and create pre-sets for your desk.
• App comes in 8 languages (English, German, French, Spanish, Italian, Korean, Chinese and Japanese
Light strip reminder:
A thin line of LED lighting is used to remind the user to adjust the height of the desk based on the intervals chosen.
• Three intervals for reminders (55 minutes, 50 minutes or 45 minutes)
• Intervals can be customized through the Desk Control™ App
Programmable Paddle Control Switch (DPG1C)
Height Adjustable Table – User Guide | October 2019 9

Basic Troubleshooting Guide
Two ways to Troubleshoot:
1. Controller with display only shows error codes. To order parts, refer to order entry codes in chart at the end of the document
2. Swap controllers if you have multiple to see if it is only the controller that is having errors
Standard Troubleshooting Procedures:
P1 - Initialize the control box (“reset”)
Note: This is commonly the solution when a complaint is that a desk will move down but not up. When
a control box requires initialization, this is how the system is programmed to behave.
1. Hold Down button on desk panel to ensure the desk is retracted to its lower limit (whether
it’s the fully retracted hard stop, or a congured lower limit).
2. Briey release Down
3. Press and hold Down for 5 seconds, wait until all desk movement has stopped, then release
a. If initialization is successful, you should see a slight up/down “handshake” movement of the desk legs
b. If you have a desk panel with display, you should also see E01 during this part of the procedure.
P2 - Check all cable connections
1. Mains cable, connected to both the control box and power outlet.
2. All motor cables, connected to both the control box and desk leg.
3. Assuming a standard control box conguration, these must be connected in channels 1 and 2, or channels 1, 2 and 3 for a 3-leg table.
They can’t be connected in channels 1 and 3 or 2 and 3 unless there is a conguration on the control box specifying this arrangement.
4. Desk panel cable, connected to the control box in either port A1 or A2 (doesn’t matter which)
P3 - Check for obstructions
1. Check under, above and on the sides of the desk for any obstructions that could prevent movement in either direction.
Note: Ideally, for each of the following two troubleshooting procedures (P4 and P5), one would have an extra,
known good version of the components listed in the Components Glossary at the beginning of this document. It’s
not necessary to have the exact same item numbers as those that are being evaluated, unless one is replacing a
single desk leg. However, it’s possible to do some troubleshooting with a different type of desk leg.
P4 - Check for faulty component(s) WITH error codes (digital display on Desk Panel, or on app via Bluetooth)
Note: Check the error code list in the appendix of this troubleshooting guide for assistance. The code should
read E##. Some error codes are channel-specic which can help pinpoint the problem.
Height Adjustable Table – User Guide | October 2019 10

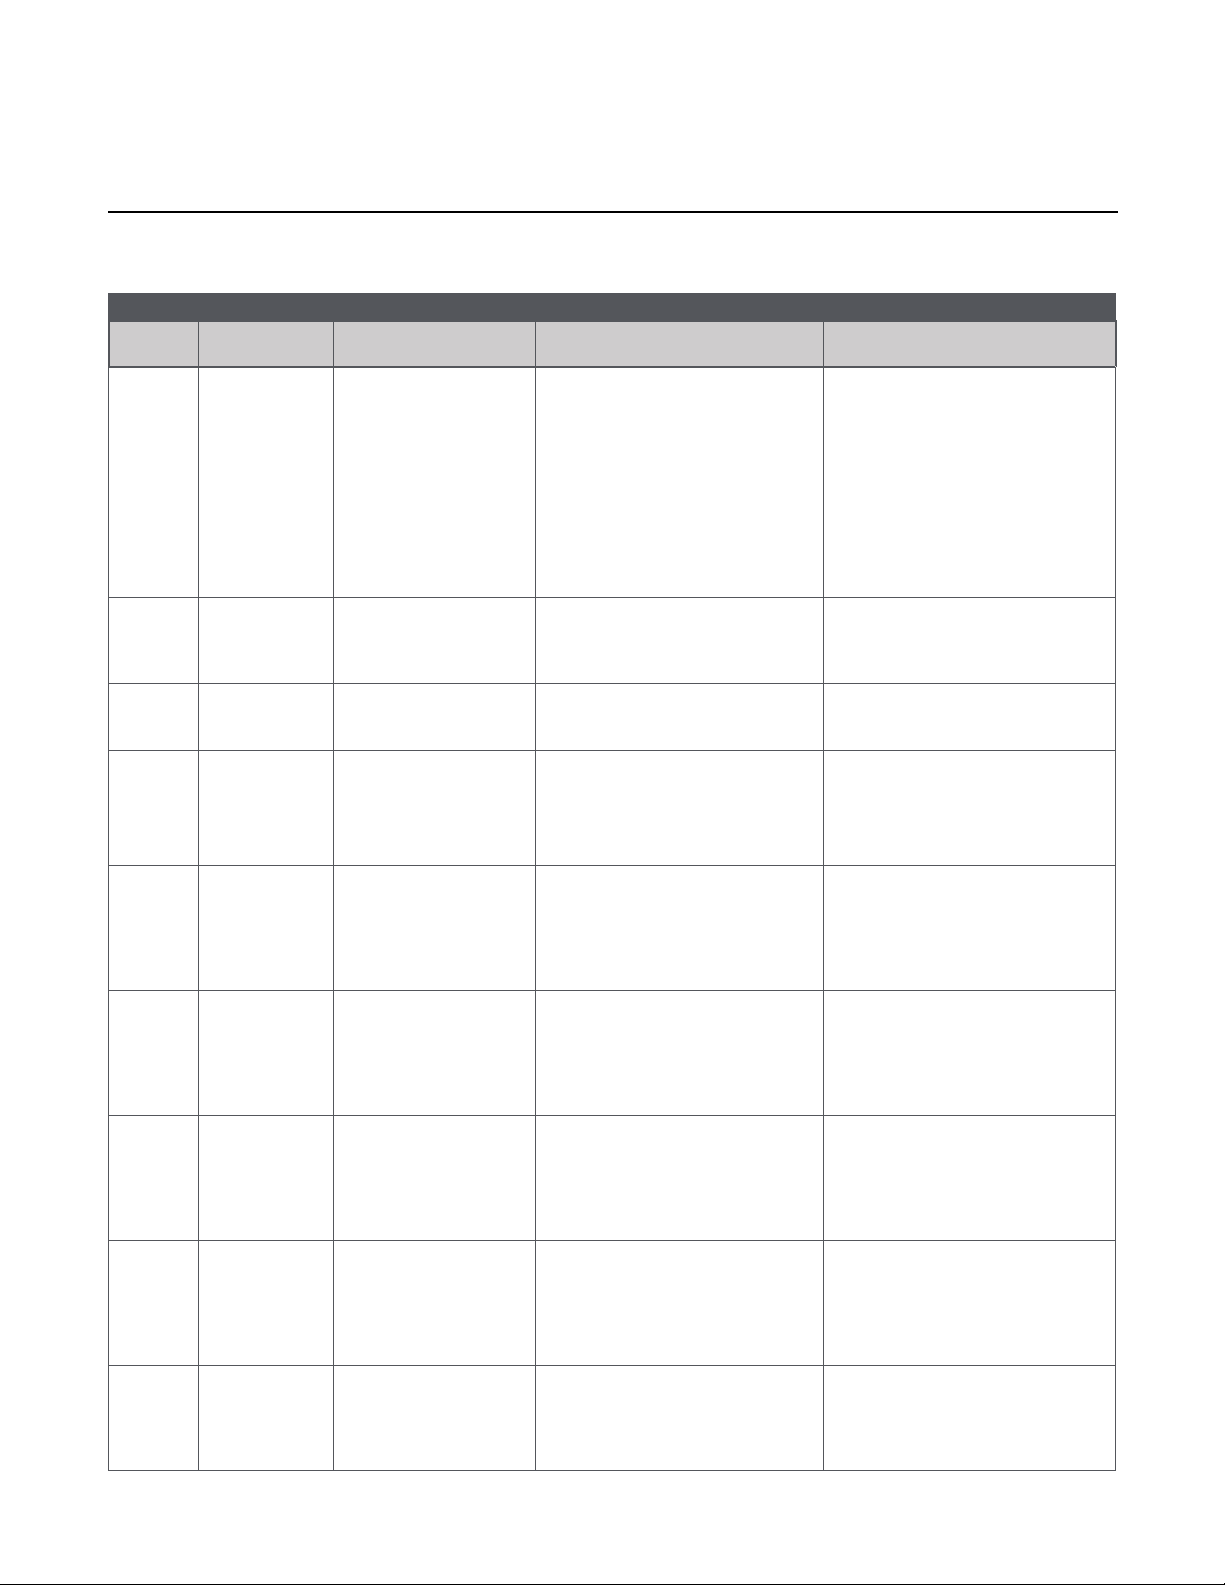
SYMPTOM PROCEDURE
System will move down but not up 1. Initialize (P1)
System unresponsive (no power to display
with any button is pressed). If any of these
steps activates the digital display, initialize
the system (P1).
1. Check mains cable connection
2. Test power outlet using another device (lamp, phone charger, etc.)
3. Plug in a new switch and test
4. Connect all existing cables to a new control box and test
SYMPTOM 1. PROCEDURE
System is powered, but will not initialize 1. Try pressing and releasing the down button a few times
before pressing and holding for 5 seconds.
2. Also, be aware if the control box has a special conguration: If the desk
is programmed with a lower stroke limit, so as to avoid a collision with
something like a le cabinet, it is possible that it also has a custom, longer
Forced Initialization Time. This is the time required to hold Down before
initialization begins. Sometimes this is 10 seconds or longer.
3. If you have a standard control box without a special conguration (i.e. “Plug
& Play”), try to initialize each leg in Channel 1 by itself, with nothing else
plugged into the motor channels on the control box. Also, swap the motor
cables so that a different motor cable is used to initialize Channel 1 by
itself. The problem could be a faulty desk leg or a faulty motor cable.
Channel-specic error (Ex: E41 – Channel
1 overload) – Everything except Piezo
errors (E59-E63)
1. Swap the motor cable connections at the control box (Motor cable #1 from
channel 1 to 2, motor cable #2 from channel 2 to 1). If It remains E41, there
could be a problem with the application (load or obstruction on one side)
or a bad control box. If the error changes to E42, go to step P4-3-b.
2. Swap the motor cable connections at the desk legs, so that the leg that was
originally connected to Channel 1 is back in Channel 1, but with the motor
cable that was originally connected to Channel 2. If it remains E42, it is
most likely a bad motor cable, now connected to Channel 2. If it goes back
to E41, it is most likely a bad desk leg, now connected to Channel 1.
Desk is uneven 1. Initialize the desk. If both legs begin to run down, complete the
initialization. If only one leg moves, stop and move to Step 2.
2. Check motor cable connections. Check to ensure motor cables are not pulled during
movement. With a standard, Plug & Play control box, it’s possible that only one leg is
connected, and connected to Channel 1. In this case, it will initialize and run Channel
1 only. If there is only one leg but it’s connected to Channel 2, it will not initialize.
3. If a motor cable was disconnected, try initializing again.
4. If unsuccessful, connect the desk leg from Channel 2 into Channel
1, with nothing in Channel 2, and initialize.
5. Try initializing the same leg that’s in Channel 1, but with a different
motor cable. If it still won’t initialize, replace the desk leg.
Basic Troubleshooting Guide
Height Adjustable Table – User Guide | October 2019 11
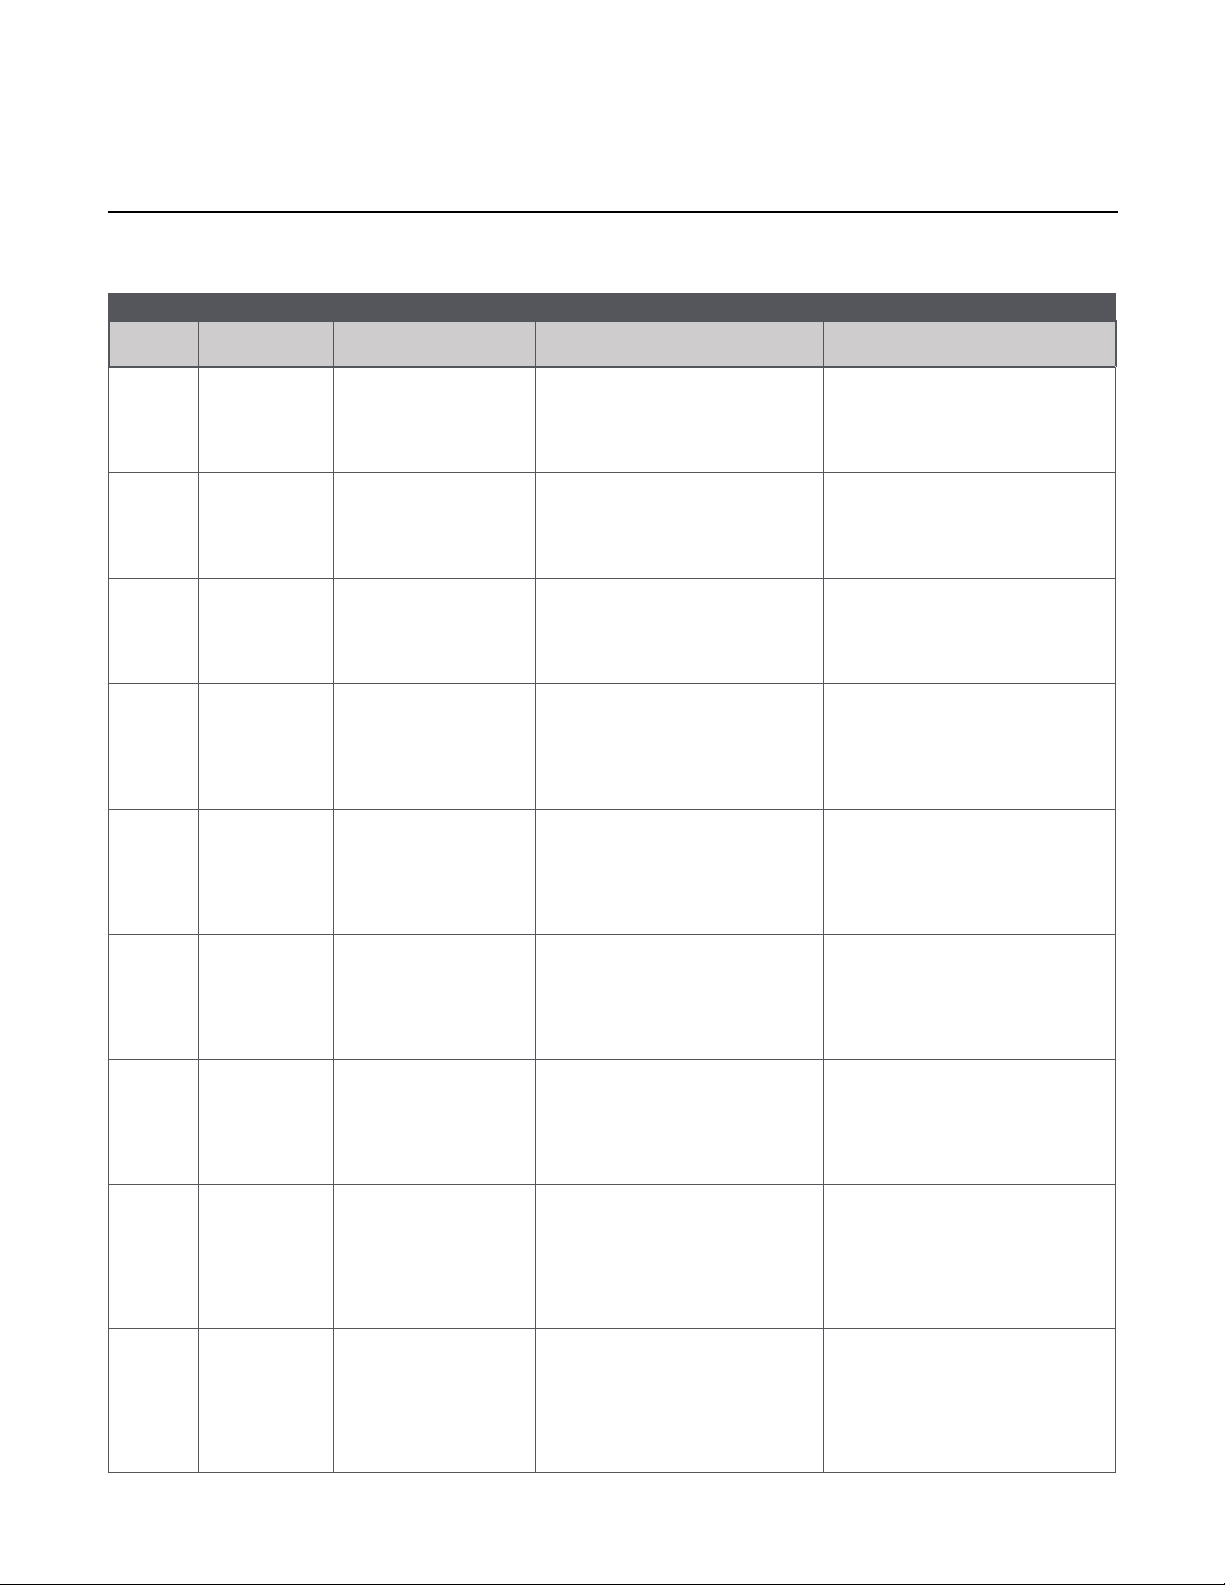
System will not initialize.
OR
System won’t complete the full range of
motion.
– After each of these steps, attempt to
initialize (P1).
1. Check mains cable connection. Test power outlet using
another device (lamp, phone charger, etc.)
2. Plug in a new switch.
3. Connect all existing cables to a new control box.
4. Try pressing and releasing the down button a few times
before pressing and holding for 5 seconds.
5. Also, be aware if the control box has a special conguration: If the desk is programmed
with a lower stroke limit, so as to avoid a collision with something like a le cabinet, it
is possible that it also has a custom, longer Forced Initialization Time. This is the time
required to hold Down before initialization begins. Sometimes this is 10 seconds or longer.
6. If you have a standard control box without a special conguration (i.e. “Plug
& Play”), try to initialize each leg in Channel 1 by itself, with nothing else
plugged into the motor channels on the control box. Also, swap the motor
cables so that a different motor cable is used to initialize Channel 1 by
itself. The problem could be a faulty desk leg or a faulty motor cable.
Desk is uneven 1. Initialize the desk. If both legs begin to run down, complete the
initialization. If only one leg moves, stop and move to Step 2.
2. Check motor cable connections. Check to ensure motor cables are not pulled during
movement. With a standard, Plug & Play control box, it’s possible that only one leg is
connected, and connected to Channel 1. In this case, it will initialize and run Channel
1 only. If there is only one leg but it’s connected to Channel 2, it will not initialize.
3. If a motor cable was disconnected, try initializing again.
4. If unsuccessful, connect the desk leg from Channel 2 into
Channel 1, with nothing in Channel 2, and initialize.
5. Try initializing the same leg that’s in Channel 1, but with a different
motor cable. If it still won’t initialize, replace the desk leg.
P5 – Check for faulty component WITHOUT error codes (no digital display on Desk Panel, no Bluetooth)
SYMPTOM PROCEDURE
System will move down but not up 1. Initialize (P1)
SYMPTOM PROCEDURE
Basic Troubleshooting Guide
Height Adjustable Table – User Guide | October 2019 12

Error Codes
Please contact your SRT representative and provide them with the error code (EXX) for further assistance.
DIAGNOSTIC CODES FOR CBD6S
CODES NAME DESCRIPTION POTENTIAL CAUSE SOLUTION/TROUBLESHOOTING
E01 Position Lost
The desk has an
unknown position and
needs to be initialized
• Position error
• New Desk Leg added • Initialize the system
E02 General
Overload Up
Overload in upward
direction has occurred - -
E03 General
Overload Down
Overload in downward
direction has occurred - -
E08 Watchdog Indicate that software
failed to kick watchdog • Program fault
• Unplug mains cable for 15 sec
• Initialize the system
• Replace Control Box
E09 LIN collision Collisions detected
on the LIN bus
• Key pressed on two or
more connected handset
simultaneously
• Multiple LINBUS devices
activated simultaneously
• Check if another desk panel is
connected and being activated
• Unplug all but one desk
panel and test system
E10 Power fail
Power fail happened,
or power regulator
adjusted below 10%
• Mains cable pulled during driving
• Internal fault
• Only 1 battery for a 3- or
4-channel system
• "E10 is a power fail, voltage on
power supply drops below a
certain limit, power removed"
• Check mains cable is not caught,
and is allowed to freely travel
• Use strain-relief loop
built into control box
• Use a 2nd battery; charge batteries
E11 Channel
mismatch
Change in number
of actuators since
initialization
• Disconnection
• Desk Leg added
• Check Motor cable
connections and Integrity
• Change Motor cable or Desk Leg
• Initialize the system
E12 Position error
One channel have
position different
than others
• Too much back drive occurred
• Move table to fully
retracted position
• Initialize system
E13 Short circuit Short circuit detected
during operation
• Squeezed Motor Cable
• Short in motor
• Check motor cable connections
• Isolate and replace Motor Cable
• Isolate and replace Desk Leg
Height Adjustable Table – User Guide | October 2019 13
DIAGNOSTIC CODES FOR CBD6S
CODES NAME DESCRIPTION POTENTIAL CAUSE SOLUTION/TROUBLESHOOTING
E15 Power limit System has reached
its power limitation
• Mains cable pulled during driving
• Internal fault
• Many times will see
this alongside E10
• "E15 is when power regulator
has adjusted speed down on
actuators without any signicant
current draw, usually caused
by power supply dropping."
• Check mains cable is not caught,
and is allowed to freely travel
• Use strain-relief loop
built into control box
E16 Key Error
Illegal keys pressed
(handled internally
in DP1C).
• Hitting multiple buttons
simultaneously • Check switch
E17 Safety missing LIN bus unit does not
support safety feature
• * DP1C/DPF1C does not
have up-to-date software
• >Try DP with more recent software
version (version printed on label)
E18 Missing
Initialization plug
A special service tool
is required to change
number of channels
to the system
• [BASELIFT Only]
• Service tool missing
from BASELIFT system
when initializing
• Add service tool
E23 Ch1 missing Channel 1 is
detected missing
• Disconnection
• Faulty motor cable
• Faulty motor in leg
• Check Motor cable
connections and Integrity
• Change Motor cable or Desk Leg
• Initialize the system
E24 Ch2 missing Channel 2 is
detected missing
• Disconnection
• Faulty motor cable
• Faulty motor in leg
• Check Motor cable
connections and Integrity
• Change Motor cable or Desk Leg
• Initialize the system
E25 Ch3 missing Channel 3 is
detected missing
• Disconnection
• Faulty motor cable
• Faulty motor in leg
• Check Motor cable
connections and Integrity
• Change Motor cable or Desk Leg
• Initialize the system
E26 Ch4 missing Channel 4 is
detected missing
• Disconnection
• Faulty motor cable
• Faulty motor in leg
• Check Motor cable
connections and Integrity
• Change Motor cable or Desk Leg
• Initialize the system
E29 Ch1 type Channel 1 is not same
type as when initialized
• Change in Desk Leg type
• Loose wire inside motor
• Check Desk Leg type
• Change Desk Leg
• Initialize the system
Error Codes
Height Adjustable Table – User Guide | October 2019 14
DIAGNOSTIC CODES FOR CBD6S
CODES NAME DESCRIPTION POTENTIAL CAUSE SOLUTION/TROUBLESHOOTING
E30 Ch2 type
Channel 2 is not
same type as when
initialized or not same
type as channel 1
• Change in Desk Leg type
• Loose wire inside motor
• Check Desk Leg type
• Change Desk Leg
• Initialize the system
E31 Ch3 type
Channel 3 is not
same type as when
initialized or not same
type as channel 1
• Change in Desk Leg type
• Loose wire inside motor
• Check Desk Leg type
• Change Desk Leg
• Initialize the system
E32 Ch4 type
Channel 4 is not
same type as when
initialized or not same
type as channel 1
• Change in Desk Leg type
• Loose wire inside motor
• Check Desk Leg type
• Change Desk Leg
• Initialize the system
E35 Ch1 pulse fail Channel 1 had to
many pulse errors
• Loose/faulty cable
• Hall sensor PCB
• Check motor cable
connections and integrity
• Initialize the system
• Change Desk Leg
E36 Ch2 pulse fail Channel 2 had to
many pulse errors
• Loose/faulty cable
• Hall sensor PCB
• Check motor cable
connections and integrity
• Initialize the system
• Change Desk Leg
E37 Ch3 pulse fail Channel 3 had to
many pulse errors
• Loose/faulty cable
• Hall sensor PCB
• Check motor cable
connections and integrity
• Initialize the system
• Change Desk Leg
E38 Ch4 pulse fail Channel 4 had too
many pulse errors
• Loose/faulty cable
• Hall sensor PCB
• Check motor cable
connections and integrity
• Initialize the system
• Change Desk Leg
E41 Ch1 overload up Overload up occurred
on channel 1
• Leg is overloaded
• Hit obstruction
• Reached end stop (before
initialization at upper
end-stop occurs)
• Remove obstruction
• Remove load
• Initialize if necessary
E42 Ch2 overload up Overload up occurred
on channel 2
• Leg is overloaded
• Hit obstruction
• Reached end stop (before
initialization at upper
end-stop occurs)
• Remove obstruction
• Remove load
• Initialize if necessary
Error Codes
Height Adjustable Table – User Guide | October 2019 15

DIAGNOSTIC CODES FOR CBD6S
CODES NAME DESCRIPTION POTENTIAL CAUSE SOLUTION/TROUBLESHOOTING
E43 Ch3 overload up Overload up occurred
on channel 3
• Leg is overloaded
• Hit obstruction
• Reached end stop (before
initialization at upper
end-stop occurs)
• Remove obstruction
• Remove load
• Initialize if necessary
E44 Ch4 overload up Overload up occurred
on channel 4
• Leg is overloaded
• Hit obstruction
• Reached end stop (before
initialization at upper
end-stop occurs)
• Remove obstruction
• Remove load
• Initialize if necessary
E47 Ch1 overload
down
Overload down
occurred on channel 1 • Hit obstruction • Remove obstruction
• Initialize if necessary
E48 Ch2 overload
down
Overload down
occurred on channel 2 • Hit obstruction • Remove obstruction
• Initialize if necessary
E49 Ch3 overload
down
Overload down
occurred on channel 3 • Hit obstruction • Remove obstruction
• Initialize if necessary
E50 Ch4 overload
down
Overload down
occurred on channel 4 • Hit obstruction • Remove obstruction
• Initialize if necessary
E53 Ch1 anti-col Anti-collision triggered
on channel 1 • Hit obstruction • Remove obstruction
• Initialize if necessary
E54 Ch2 anti-col Anti-collision triggered
on channel 2 • Hit obstruction • Remove obstruction
• Initialize if necessary
E55 Ch3 anti-col Anti-collision triggered
on channel 3 • Hit obstruction • Remove obstruction
• Initialize if necessary
E56 Ch4 anti-col Anti-collision triggered
on channel 4 • Hit obstruction • Remove obstruction
• Initialize if necessary
E59 Ch1 SLS/PIEZO Safety limit switch
activated on channel 1 • Hit obstruction • Remove obstruction
• Initialize if necessary
E60 Ch2 SLS/PIEZO Safety limit switch
activated on channel 2 • Hit obstruction • Remove obstruction
• Initialize if necessary
Error Codes
Height Adjustable Table – User Guide | October 2019 16

DIAGNOSTIC CODES FOR CBD6S
CODES NAME DESCRIPTION POTENTIAL CAUSE SOLUTION/TROUBLESHOOTING
E61 Ch3 SLS/PIEZO Safety limit switch
activated on channel 3 • Hit obstruction • Remove obstruction
• Initialize if necessary
E62 Ch4 SLS/PIEZO Safety limit switch
activated on channel 4 • Hit obstruction • Remove obstruction
• Initialize if necessary
E65 Ch1 pulse dir Pulses counted wrong
direction in channel 1
• Motor poles are crossed
• Hall sensor Cables are crossed
• Check motor cable
connections and integrity
• Initialize the system
• Exchange Desk Leg
E66 Ch2 pulse dir Pulses counted wrong
direction in channel 2
• Motor poles are crossed
• Hall sensor Cables are crossed
• Check motor cable
connections and integrity
• Initialize the system
• Exchange Desk Leg
E67 Ch3 pulse dir Pulses counted wrong
direction in channel 3
• Motor poles are crossed
• Hall sensor Cables are crossed
• Check motor cable
connections and integrity
• Initialize the system
• Exchange Desk Leg
E68 Ch4 pulse dir Pulses counted wrong
direction in channel 4
• Motor poles are crossed
• Hall sensor Cables are crossed
• Check motor cable
connections and integrity
• Initialize the system
• Exchange Desk Leg
E71 Ch1A short
Short circuit on channel 1
[If T-splitter is used,
short circuit on 1A]
• Damage to motor cable
• Damage to cable exiting
leg (if applicable)
• Inspect motor cable for
damage, replace if damaged
• Inspect cable exiting leg (if
applicable), replace if damaged.
E72 Ch1B short
Short circuit on channel 1
[If T-splitter is used,
short circuit on 1B]
• Damage to motor cable
• Damage to cable exiting
leg (if applicable)
• Inspect motor cable for
damage, replace if damaged
• Inspect cable exiting leg (if
applicable), replace if damaged.
E73 Ch2A short
Short circuit on channel 2
[If T-splitter is used,
short circuit on 2A]
• Damage to motor cable
• Damage to cable exiting
leg (if applicable)
• Inspect motor cable for
damage, replace if damaged
• Inspect cable exiting leg (if
applicable), replace if damaged.
Error Codes
Height Adjustable Table – User Guide | October 2019 17

DIAGNOSTIC CODES FOR CBD6S
CODES NAME DESCRIPTION POTENTIAL CAUSE SOLUTION/TROUBLESHOOTING
E74 Ch2B short
Short circuit on channel 2
[If T-splitter is used,
short circuit on 2B]
• Damage to motor cable
• Damage to cable exiting
leg (if applicable)
• Inspect motor cable for
damage, replace if damaged
• Inspect cable exiting leg (if
applicable), replace if damaged.
E75 Ch3A short
Short circuit on channel 3
[If T-splitter is used,
short circuit on 3A]
• Damage to motor cable
• Damage to cable exiting
leg (if applicable)
• Inspect motor cable for
damage, replace if damaged
• Inspect cable exiting leg (if
applicable), replace if damaged.
E76 Ch3B short
Short circuit on channel 3
[If T-splitter is used,
short circuit on 3B]
• Damage to motor cable
• Damage to cable exiting
leg (if applicable)
• Inspect motor cable for
damage, replace if damaged
• Inspect cable exiting leg (if
applicable), replace if damaged.
E77 Ch4A short
Short circuit on channel 4
[If T-splitter is used,
short circuit on 4A]
• Damage to motor cable
• Damage to cable exiting
leg (if applicable)
• Inspect motor cable for
damage, replace if damaged
• Inspect cable exiting leg (if
applicable), replace if damaged.
E78 Ch4B short
Short circuit on channel 4
[If T-splitter is used,
short circuit on 4B]
• Damage to motor cable
• Damage to cable exiting
leg (if applicable)
• Inspect motor cable for
damage, replace if damaged
• Inspect cable exiting leg (if
applicable), replace if damaged.
E84 DC-out DC unit has been
disconnected or failed
• [Reserved for future
development] • [Reserved for future development]
E86 Master
Connection to master lost
OR following messages
are from master
• [Only used in multiparallel
system]
• Poor cable connection
to master box
• If followed by another error
code, then codes being
communicated from master box
• Check connection to master
box, check cable integrity
• If communicating other
error codes, see above
E87 Slave 1
Connection to
1st slave lost OR
following messages
are from 1st slave
• [Only used in multiparallel
system]
• Poor cable connection
to slave box
• If followed by another error
code, then codes being
communicated from slave box
• Check connection to master
box, check cable integrity
• If communicating other
error codes, see above
Error Codes
Height Adjustable Table – User Guide | October 2019 18

DIAGNOSTIC CODES FOR CBD6S
CODES NAME DESCRIPTION POTENTIAL CAUSE SOLUTION/TROUBLESHOOTING
E88 Slave 2
Connection to
2nd slave lost OR
following messages
are from 2nd slave
• [Only used in multiparallel
system]
• Poor cable connection
to slave box
• If followed by another error
code, then codes being
communicated from slave box
• Check connection to master
box, check cable integrity
• If communicating other
error codes, see above
E89 Slave 3
Connection to
3rd slave lost OR
following messages
are from 3rd slave
• Damage to motor cable
• Damage to cable exiting
leg (if applicable)
• Inspect motor cable for
damage, replace if damaged
• Inspect cable exiting leg (if
applicable), replace if damaged.
100
Forced
initialization
Reference 1
Forced initialization was
initiated on this reference.
Note: This code is
not transmitted in
LINBUS, therefore it is
not displayed on the
desk panel. It is only
viewable in the CBD6S
congurator list of most
recent 10 error codes.
- -
101
Forced
initialization
Reference 2
- -
102
Forced
initialization
Reference 3
- -
103
Forced
initialization
Reference 4
- -
Error Codes
Height Adjustable Table – User Guide | October 2019 19

Replacement Parts
OE CODES FOR REPLACEMENT PARTS
OE CODES DESCRIPTION COLOUR IMAGES
INLK1DL5BLK DL5 2 Stage Leg Black
INLK1DL5GRY DL5 2 Stage Leg Grey
INLK1DL5WHT DL5 2 Stage Leg White
INLK1DL6BLK DL6 3 Stage Leg Black
Height Adjustable Table – User Guide | October 2019 20
Table of contents
Other Inscape Indoor Furnishing manuals

Popular Indoor Furnishing manuals by other brands

Triarch
Triarch 34103 Assembly instructions

Coaster
Coaster 603502 Assembly instructions

IKEA
IKEA ANDY DRAWER UNIT W/CASTERS 15X23" instructions

Munchkin
Munchkin brica Night Light Baby In-Sight owner's manual

Meble Furniture
Meble Furniture PARIS Assembly instructions

Coaster
Coaster 190621GLD Assembly instructions


