INSE H5 User manual

Model: H5

IMPORTANT WARNINGS AND SAFETY PRECAUTIONS 01
01
02
02
03
06
07
08
09
INTENDED USE
SPECIFICATIONS
INTRODUCTION OF COMPONENTS
INSTRUCTIONS FOR USE
CARE AND MAINTENANCE
1-YEAR WARRANTY
TROUBLESHOOTING
7*24HR STAND-BY CUSTOMER SERVICE

IMPORTANT WARNINGS AND SAFETY PRECAUTIONS
INTENDED USE
Please read all of the instructions carefully and retain for future reference.
♦ Check that the voltage indicated on the rating plate corresponds with that of the local network
before connecting the appliance to the mains power supply.
♦ Children under 8 years old and people with reduced physical, sensory or mental capabilities
or lack of experience and knowledge should not use this appliance, only if they have been
given supervision or instruction concerning use of the appliance in a safe way and understand
the hazards involved.
♦ This appliance is not a toy. Children should be supervised to ensure that they do not play with
the appliance.
♦ Keep the appliance out of the reach of children, especially when it is switched on or cooling down.
♦ The vacuum cleaner should only be used and stored indoors. In order to avoid the risk of an
electric shock, please follow below warnings:
♦ Do not use the appliance to pick up flammable liquid, matches, cigarette ends, hot ashes or any
hot, burning or smoking objects that could cause damage.
♦ Do not use this appliance to pick up hard, sharp objects such as glass or nails etc.
♦ Do not use the appliance for anything other than its intended use.
♦ Do not immerse the appliance in water or any other liquid.
♦ Do not operate the appliance with wet hands.
♦ Do not expose the appliance to rain.
♦ Do not remove the adaptor from the mains power supply by pulling the cord; switch off and
remove the plug by hand.
♦ Do not use the adaptor to recharge non-rechargeable batteries.
♦ Do not use the appliance or adapters if it has been dropped or if there are visible.
Do not use any parts/accessories or adapters other than those supplied with this appliance, as
this may cause damage.
♦ Do not use this appliance if any of the openings are blocked.
♦ This appliance contains no user serviceable parts. If the power supply cord, plug or any part of
the appliance is malfunctioning or if it has been dropped or damaged, only a qualified electrician
should carry out repairs. Improper repairs may place the user at risk of harm.
♦ Use of an extension cord with the appliance is not recommended.
♦ Take care when equipping accessories with rotating parts as this could cause entrapment.
♦ Switch off the appliance and disconnect it from the mains power supply before changing or fitting
accessories.
♦ Always ensure that the appliance has cooled fully after use before performing any cleaning or
user maintenance.
♦ This appliance should not be operated by means of an external timer or separate remote control
system.
The vacuum cleaner is intended for vacuuming and extracting materials that are not hazardous to
one's health.
The vacuum cleaner is intended for normal domestic non-commercial/indoor use, for example,
in cars, departments, houses, hotels, schools, factories, shops, offices, etc.
01

SPECIFICATIONS
INTRODUCTION OF COMPONENTS
Model No.
Operating Power
Operating Voltage
Input Voltage
Input Current
Weight
Package Size
Use Type
H5
90W
14.8V
18V
400mA
1.5Kg
390*140*180mm
Dry & Wet
1. On/off switch
2. 14.8V rechargeable battery unit
3. Dust container release button
4. Washable filter
5. Waterproof cover
6. Dust container
7. Air inlet
8. Charging port
9. Squeegee nozzle
10. 2-in-1 Dust brush
11. Adaptor
12. Crevice tool
12
3
4&5
6
7
8
89
10
11
02
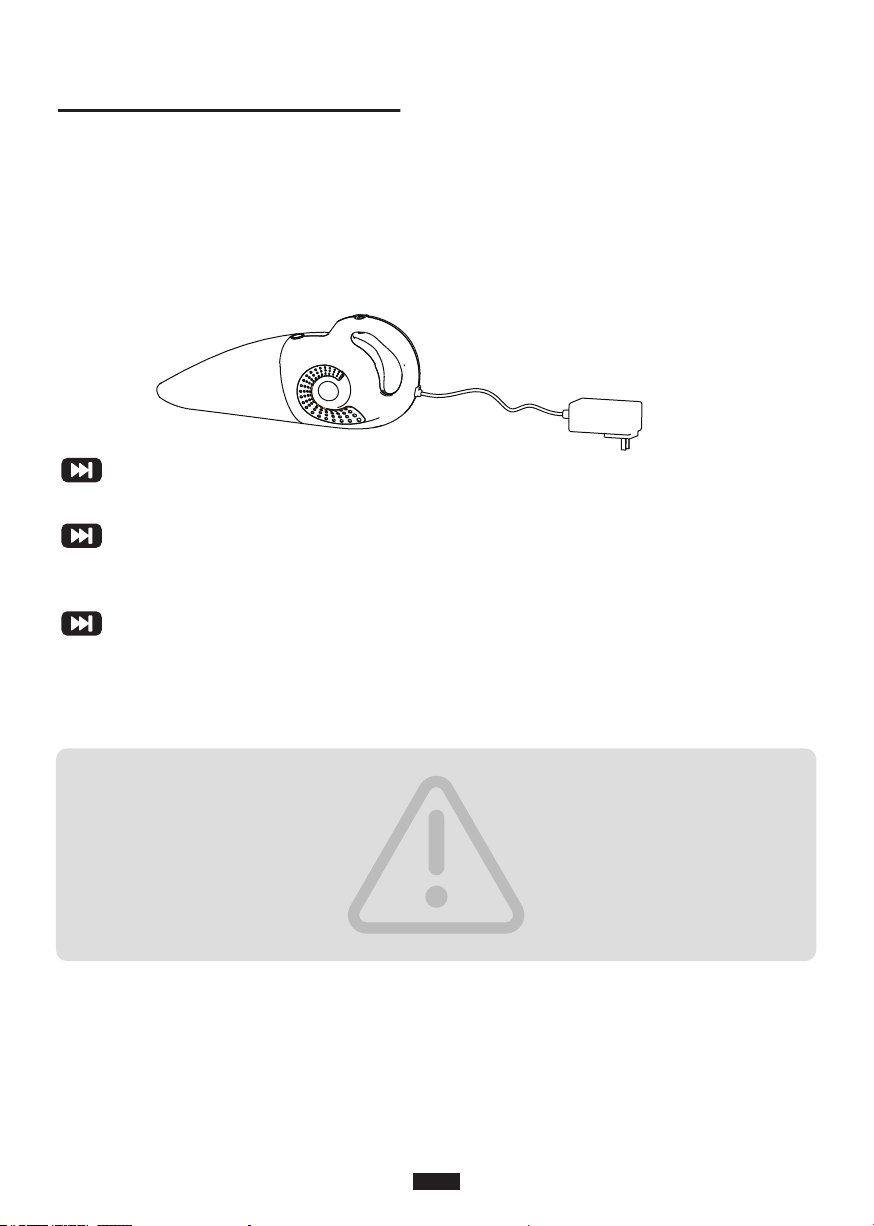
INSTRUCTIONS FOR USE
Before using the vacuum cleaner for the first time, clean it with a soft, damp cloth and dry
thoroughly.
1. Charging the Cordless Wet and Dry Vac
Before using the vacuum cleaner, it must be charged for approx. 5.5 hours. Subsequent charging
times will vary dependent upon use. If the vacuum cleaner battery runs down completely during
use, it may take up to 5.5 hours to fully recharge again.
STEP I:
Put the vacuum cleaner on the safe table.
STEP 2:
Plug in and switch on the mains power adaptor at the mains power supply; the indicator light will
flash blue to confirm that the vacuum cleaner is correctly clocked and charging.
STEP 3:
Blinking blue light while charging, once the battery is fully charged, the indicator light will stop
flashing and will remain solid blue.
Note:
Turn off the vacuum cleaner before charging.
Whilst charging, the vacuum cleaner may begin to heat up and become warm; always switch
off and unplug from the mains power supply when charging is complete.
Warning:
Never recharge the vacuum cleaner whilst liquid is present inside the dust container. Always
empty and dry the dust container after vacuuming liquid spills.
03
Table of contents
Other INSE Vacuum Cleaner manuals


