INSE W5 User manual
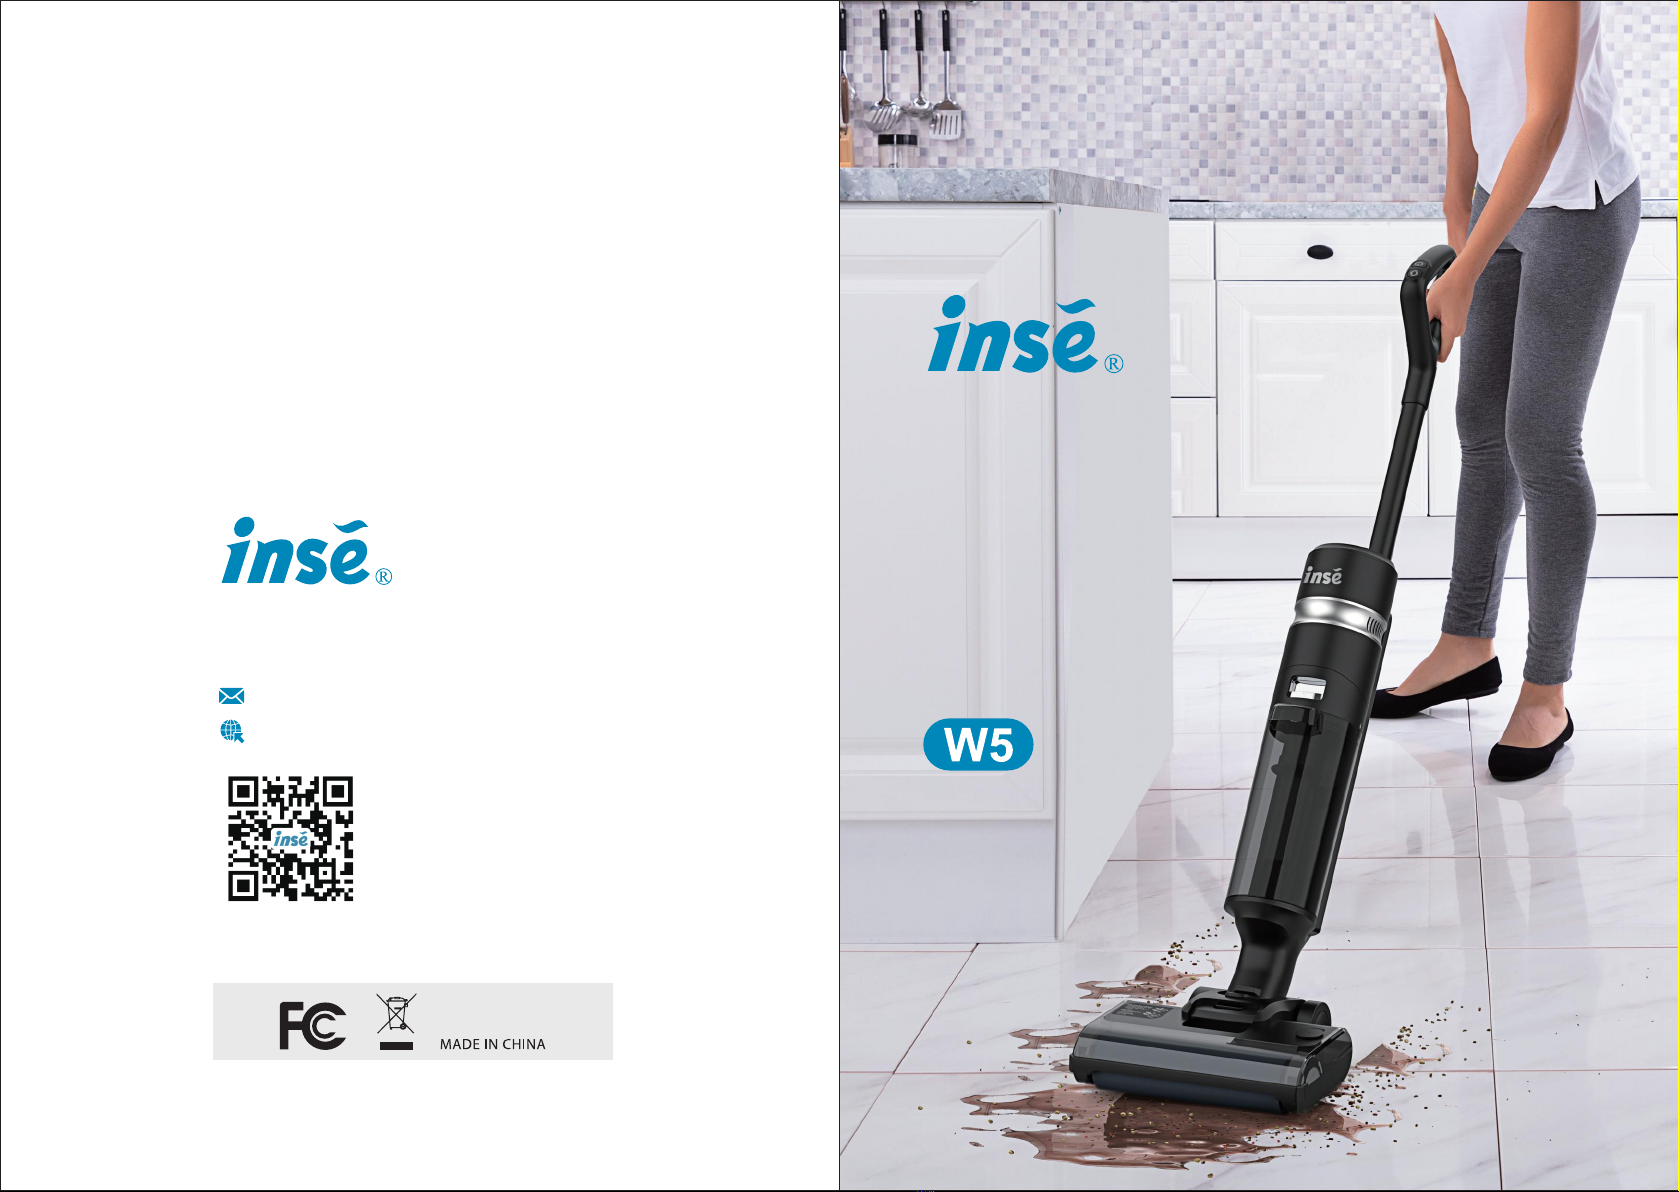
INSTRUCTION
MANUAL
Wet Dry
Vacuum Cleaner
www.inselife.com
General tips, FAQ, etc
https://bit.ly/inse-w5-y2b
Installation Videos
Please do not hesitate to contact us whenever you
want, we are always more than happy to help you!
www.inselife.com

WARRANTY
NOTE: THIS WARRANTY TERM GIVES YOU SPECIFIC LEGAL RIGHTS, AND
YOU MAY ALSO HAVE OTHER RIGHTS WHICH VARY FROM STATE TO STATE.
24-month Warranty & Lifetime Customer Support
Only apply to eligible purchases made directly from INSE Authorized Retailers.
Warranty coverage applies to the original owner and to the original product only and is not
transferable.
How to Initiate a Warranty Claim
Within the warranty period, if your appliance operates improperly under normal household
www.inselife.com and fill out the warranty form to initiate a warranty claim.
For more warranty details, please refer to www.inselife.com. All rights are reserved by INSE
official website.
INSE CUSTOMER CARE
Your INSE W5 enjoys a 24-month warranty. We kindly recommend that upon purchase,
register the warranty for your appliance on INSE official website with your order number.
It will be covered for all accessories for 24-month from the date of purchase. If you have
any questions about your INSE appliance, please contact INSE Customer Support via the
following channels:
Website: www.inselife.com
You can reach Expert INSE Support Team with your order ID and details of the issue.
CONTENTS
Important Safety Instructions
Overview
Product Overview
Digital Display
Voice Prompt
Specifications
Assembly
Handle
Dirty Water Tank (DWT)
Clean Water Tank (CWT)
Roller
Operation
Charging
Adding Water to Clean Water Tank
Start to Use
Clean the Dirty Water Tank
Self-Cleaning
Maintenance
Main Body & Storage Base
Dirty Water Tank
Clean Water Tank
Roller
Troubleshooting
Get Support
03
05
05
06
07
08
09
09
10
11
11
12
12
13
14
15
16
17
17
18
19
19
21
22

Important Safety Instructions
Warning
Before use, make sure to read all below instructions in order to avoid injury or damage, and to
get the best results from the appliance. Make sure to keep this manual in a safe place.
If you give or transfer this appliance to someone else, make sure to also include this manual.
In case of damage caused by user failing to follow the instructions in this manual, the warranty
will be void. The manufacturer/importer accepts no liability for damages caused by failure to
follow the manual, a negligent use or use not in accordance with the requirements of this manual.
About self-drying
The roller will enter self-drying mode after self-cleaning. Self-cleaning indicator will keep
flashing green lights until it is ended. It takes 5 minutes for self-drying. Press on-off switch
can turn off self-drying.
This appliance is for indoor use only
1. This appliance can be used by children aged from 8 years and above, and persons with
reduced physical, sensory, or mental capabilities or lack of experience and knowledge if they
have been given supervision or instruction concerning use of the appliance in a safe way and
understand hazards involved.
2. Children shall not play with the appliance. Cleaning and user maintenance shall not be made
by children without supervision.
3. Do not touch the plug or any liver parts of the appliance. This could cause electric shock.
4. Stop using the adapter/plug if it is broken. This could cause electric shock. And call our
professional for replacement.
5. Keep hair, loose clothing, fingers, and other parts of body away from opening and moving
parts of the appliance. Do not point the vacuum tube, accessories, or tools to eyes, ears, or
put them into mouth.
6. Stop using the appliance if electric leakage, motor over-heating, or abnormal sound is found.
And call our professional for help.
7. For the purpose of recharging the battery, only use the supply unit provided with this appliance.
Other types of chargers can cause battery failure or extreme thermal effects. If the appliance is
to be stored unused for a long period, unplug the adapter to turn off the power.
8. After using, please clean the dirty water tank, clear the ventilating duct clear to avoid blockage,
reduced suction, motor overheating which will affect the service life of the appliance. Put the
appliance in a dry place after using. Humidity will affect the insulation and service life of the
appliance.
9. Do not immerse the main body, motorized brush, or adapter into water or other liquids.
There is danger of electric shock.
10. Check the suction nozzle regularly. If there is blockage, please remove it to avoid the reduction
of suction and affect the performance of the appliance. Power off the appliance before
disassemble the roller.
11. Do not repair the appliance when it’s broken. Call our professional to get help.
12. The appliance can be used on indoor even hard floors, such as waxed floor, rubber floor,
marble floor, granite floor, terrazzo floor, wood floor, bamboo floor, mirror brick surface,
porcelain tile floor. The appliance will fail to reach best performance on uneven floors.
13. Do not pick up anything that is burning or smoking such as cigarettes, matches, or hot ashes.
14. Do not operate the appliance too close to heaters, radiators, or cigarette butts.
15. Do not pick up flammable or combustible liquids such as gasoline, or use in areas where
they may be presented.
16. Do not vacuum up hard or sharp objects such as glass, nails, screws, or cions that could
damage the appliance. Do not vacuum up drywall dust, fireplace ash, or embers.
Do not use as an attachment to power tools for dust collection.
17. Do not vacuum up toxic solutions such as chlorine bleach, ammonia, or drain cleaner.
18. Do not use the appliance to clean stains with strong grease, strong viscosity, and strong
dyeing, such as shoe polish, paintings, pigment.
19. Use extra care when cleaning on stairs.
20. Do not shake or bump the appliance violently. It could bring the dirty water into the motor.
21. Do not move or lift the appliance while it is working. Do not tilt the appliance to a side or
put it horizontally. It could bring dirty water into the motor.
22. Put the appliance against the wall to avoid stumble.
23. Do not use the appliance if the clean water tank and dirty water tank are not correctly
assembled.
24. Do not put any objects into openings. Do not use with any openings blocked. Keep free of
dust, lint, hair, and anything else that may reduce air flow.
25. Do not charge the battery at temperature below 5℃ or above 40℃.
EN-03 EN-04
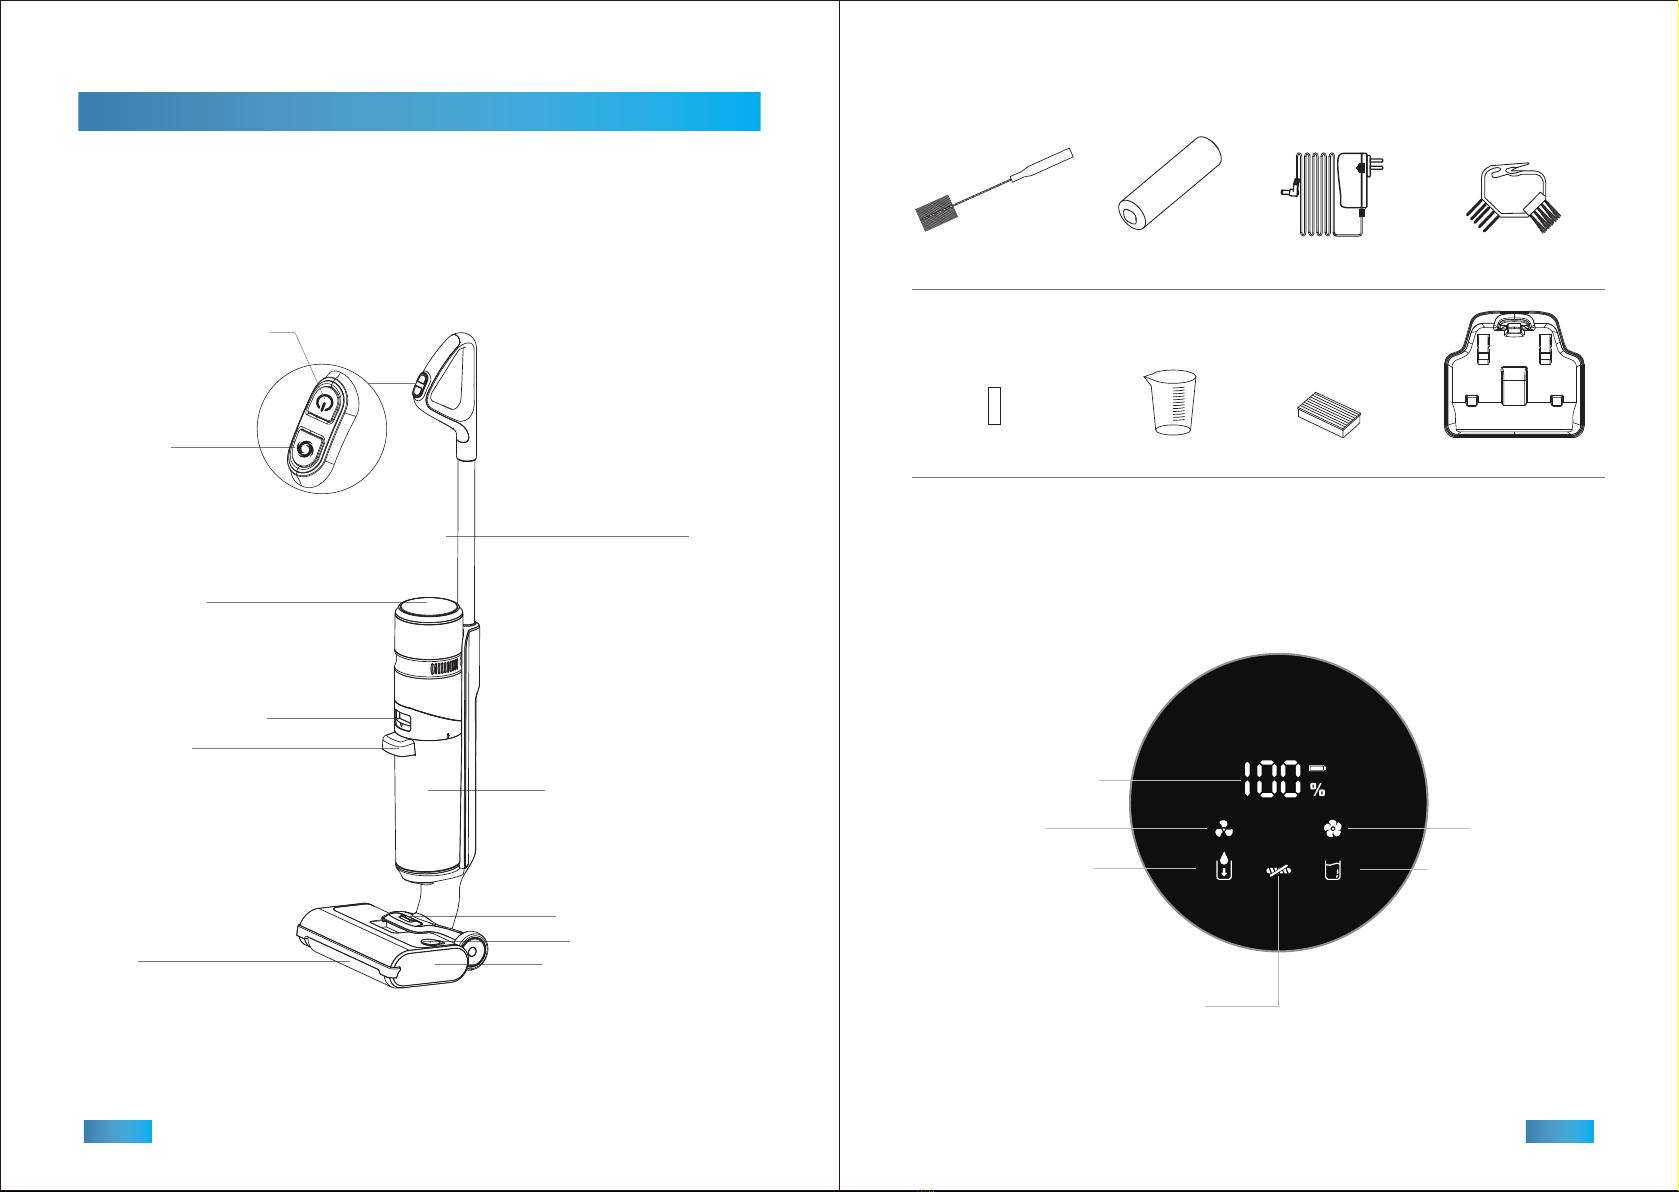
Overview
Product Overview
Adapter
Measuring CupDetergent Sheet
Cleaning Tool Roller Cover 2-in-1 Cleaning Gadget
Hepa Filter Storage Base
Tube
Display Screen
DWT Releasing Button
DWT Handle
CWT Releasing Button
Roller
Dirty Water Tank (DWT)
Water Filling Nozzle
Clean Water Tank (CWT)
ON-OFF / Self-Cleaning
Power +/-
Digital Display
Self Cleaning (GREEN Light Flashing)
Roller Tangled (RED Light Flashing)
Standard Speed
CWT Empty Indicator
High Speed
DWT Full Indicator
Battery Level Indicator
EN-05 EN-06

SpecificationsVoice Prompt (Contents may vary, please in kind prevail.)
Estimated data provided by Laboratory using ambient temperatures between
39.2°F (4°C) to 104°F (40°C).
Product
Rated Voltage
Rated Power
Adapter Input
Adapter Output
Charging Time
Battery Capacity
Runtime
Clean Water Tank Capacity
Dirty Water Tank Capacity
W5
22.2V
200W
100-240V ~ 50/60HZ Max 1.2A
26.5V 800mA
4-5 hours
4000mAh
≤35min
450ml/15oz
750ml/25oz
Status Reminder
Charging Charging started.
Welcome to use the floor cleaner.
Low speed.
Powering off. Please clean the dirty water tank.
Power off.
High speed / Low speed.
Clean water tank is empty. Please refill.
Dirty water tank is full. Please clean it.
Low battery. Please recharge.
Please clean the roller.
Please refill the clean water tank, then restart.
Self-drying started.
Self-drying finished.
Please clean the dirty water tank.
Charging started.
Self-cleaning started.
Please refill the clean water tank.
Ding, Ding, Ding, if you need self-cleaning,
please power off, put the machine back to
the base, connect the adapter, and press
On-Off switch to start.
Power on
Power off
Switch speed
Clean water tank is empty
Battery level 25%
Battery level 10%
Roller tangled
Self-cleaning started
Self-drying started
Self-drying finished
Clean water tank empty
when self-cleaning
Dirty water tank full
or channel blocked
EN-07 EN-08
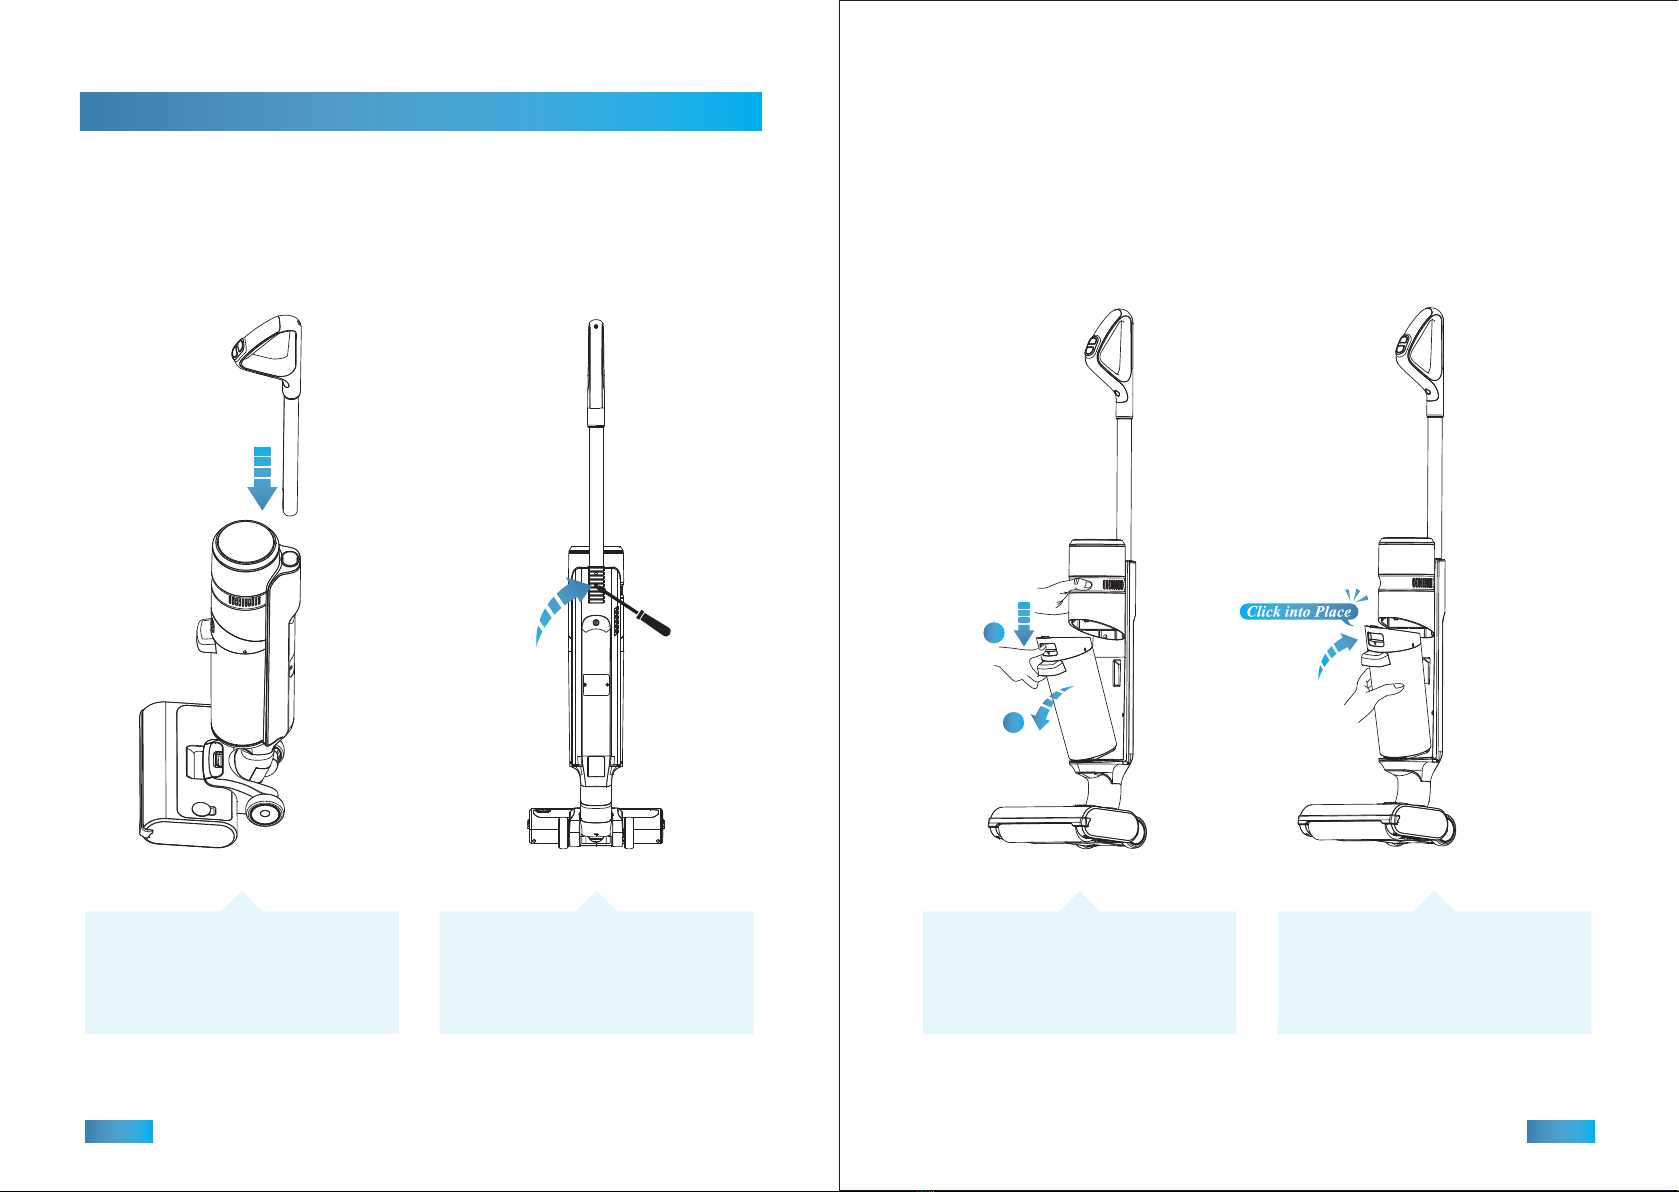
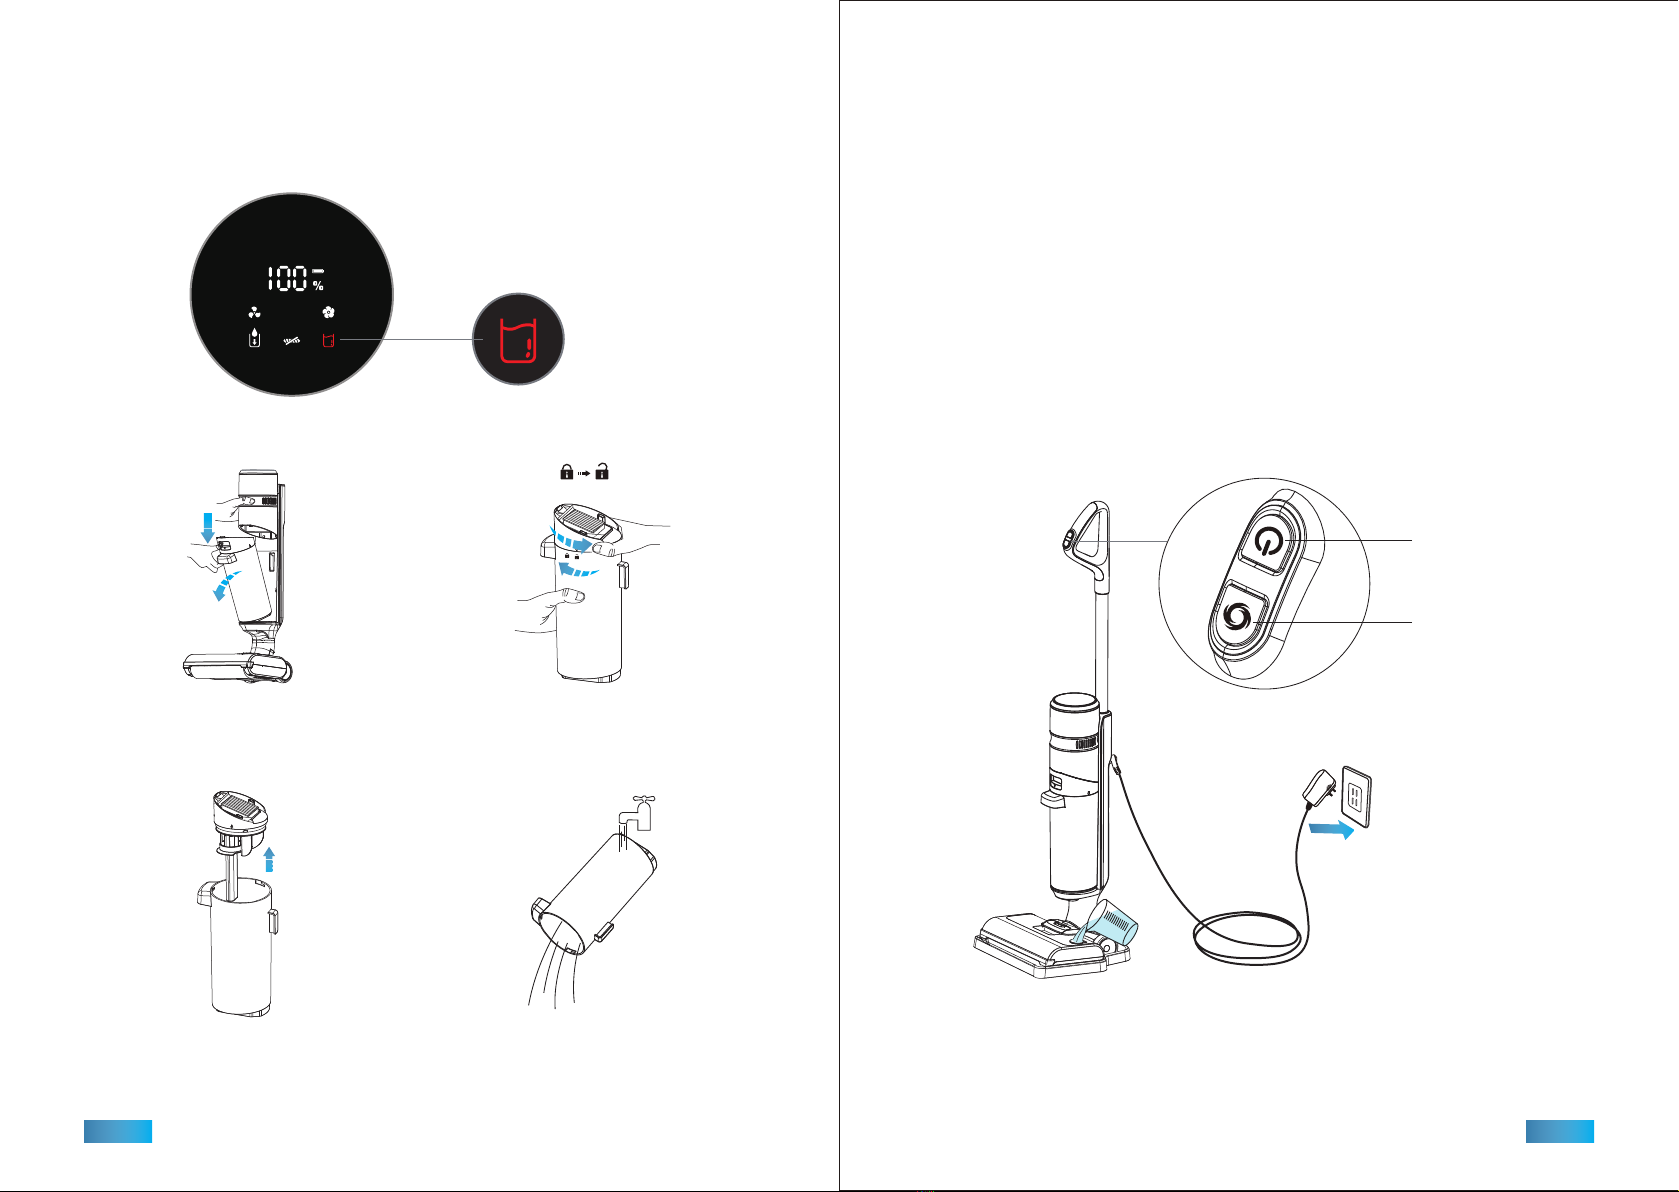
Assembly
Handle Dirty Water Tank (DWT)
Insert the end of the handle into the
nozzle of the main body vertically.
Make sure the handle is firmly installed.
To disassemble the handle, press the latch
in the hole on the back of the main body
with a screwdriver, pull up the handle.
①Press the dirty water tank releasing
button;
Put the bottom of the dirty water tank
onto the holding point, then push the
tank into the main body.
②Take out the dirty water tank.
1
2
EN-09 EN-10
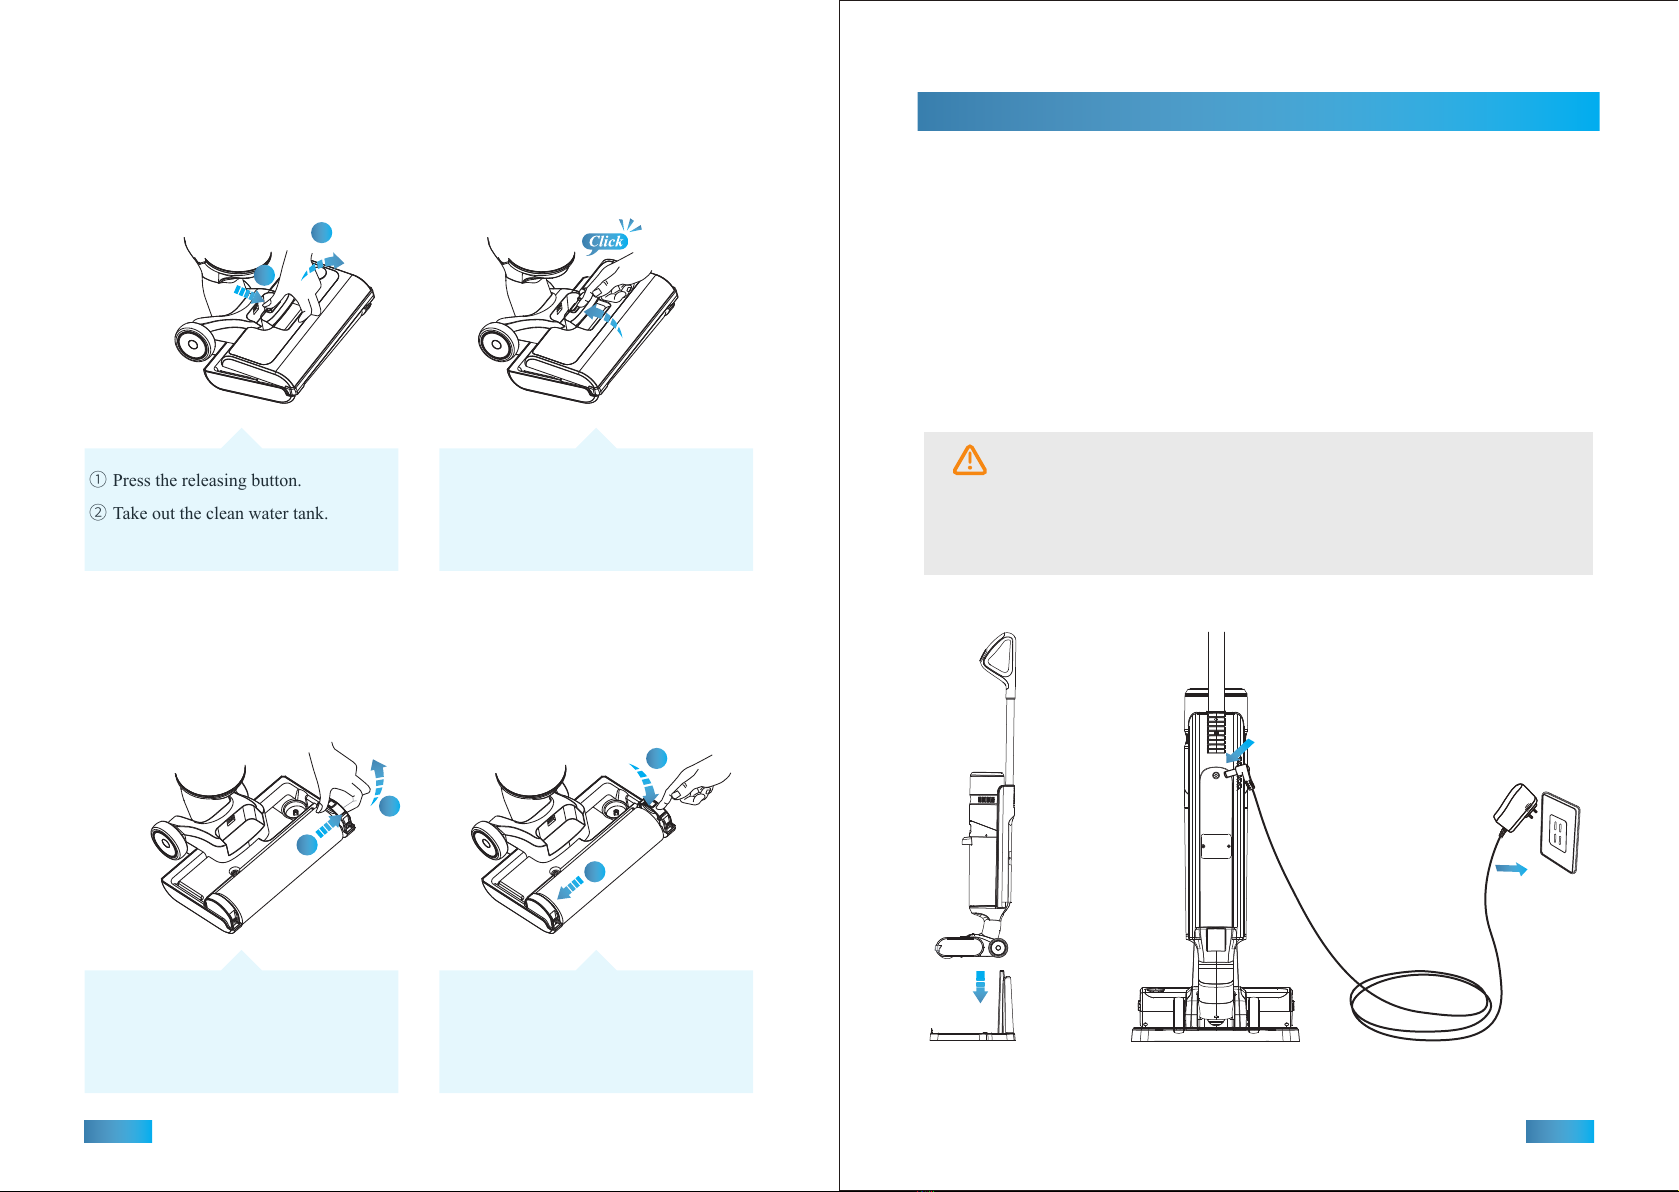
Operation
Charging
Clean Water Tank (CWT)
Roller
①Press the releasing button.
②Take out the clean water tank.
Take out the clean water tank first.
①Slide the lock of roller outwards
and then upwards.
②Take out the Roller.
① Align one end of the roller with the
slot, and put the other end into the slot.
② Slide the lock back.
①Align the buckle at the ends of tank
with the slots of the brush.
②Press the tank until you hear a click.
2
1
2
1
2
1
Before first use, please fully charge the appliance (4~5 hours)
1. For the purpose of recharging the battery, only use the supply unit matched with this
appliance. Other types of chargers can cause battery failure or extreme thermal effects.
2. While charging, please put the product upright on the storage base, and put them against
to the wall to avoid stumble.
3. Normally, it takes about 4-5 hours for the vacuum to be fully-charged.
4. Unplug the adapter after charging is finished.
5. Please keep the adapter away from water.
If you won’t use the product for a long time, please charge the product for 3 hours
every 3 months to protect the product (no need fully charged).
Do not charge the battery at temperature below 39.2°F (4°C) or above 104°F (40°C).
Warning:
EN-11 EN-12

Adding Water to Clean Water Tank Start to Use
2. Pull out the plug on the clean
water tank.
1. Dissolve the detergent sheet with
some water using the measuring cup.
(1 detergent sheet/450ml, ≤60℃/140°F)
3. Pour the water into the tank through
the nozzle.
4. Put the plug back.
142°
ON-OFF / Self-cleaning
Power +/-
·Power ON/OFF:
Press ON-OFF to power on. The default
mode is low speed. Press the switch again
to power off.
·Switch Speed:
Press Power +/-
to switch speed.
NOTE:
The plug of the water filling nozzle
has a hole to balance the air pressure.
* When you lift up the product,
please make sure the brush head
is 90° from the main body to avoid
water leak from the clean water tank.
* Please tilt the product while using.
* Do not recline more than 142° to
avoid water leakage.
EN-13 EN-14
Note: To ensure long-term use, please only use INSE detergent sheets; using other
detergent sheets might cause corrosion and damage to the machine.
Clean the Dirty Water Tank Self-Cleaning
When the DWT is full, the DWT Full Indicator will flash to remind you clean the tank.
1. Press the releasing button and take
out the dirty water tank.
3. Take out the lid assembly. 4. Pour the dirty water, and rinse
the tank thoroughly.
2. Rotate the lid assembly in above
direction and open the tank.
① Put the product on the storage base.
② Empty the Dirty Water Tank; Fill up the Clean Water Tank with clean water.
③ Connect the Charging Cable to the vacuum, remaining battery level should be ≥ 25%.
④ Press ON/OFF to start self-cleaning.
* The charging will stop while self-cleaning and will start again when self-cleaning is finished.
* If the roller is too dirty, self-clean twice: for the 1st time adding Detergent Sheet; for the 2nd
using ONLY clean water.
ON-OFF / Self-cleaning
Power +/-
EN-15 EN-16

Maintenance
Main Body & Storage Base
Dirty Water Tank
For optimal performance and to prevent odors, please empty the Dirty Water Tank and
self-clean the roller after each use.
Place the appliance on the Storage base vertically after each use.
Do not expose the appliance to direct sunlight.
Use a half-dry cloth to clean the surface.
5. Leave them to dry thoroughly
before reinstalling.
4. Wash Floater, Strainer and Lid
with clean water.
3. Separate the assembly in above
direction.
2. Take out the lid assembly.1. Take out the HEPA, wipe out dust
using the Cleaning Gadget.
EN-17 EN-18
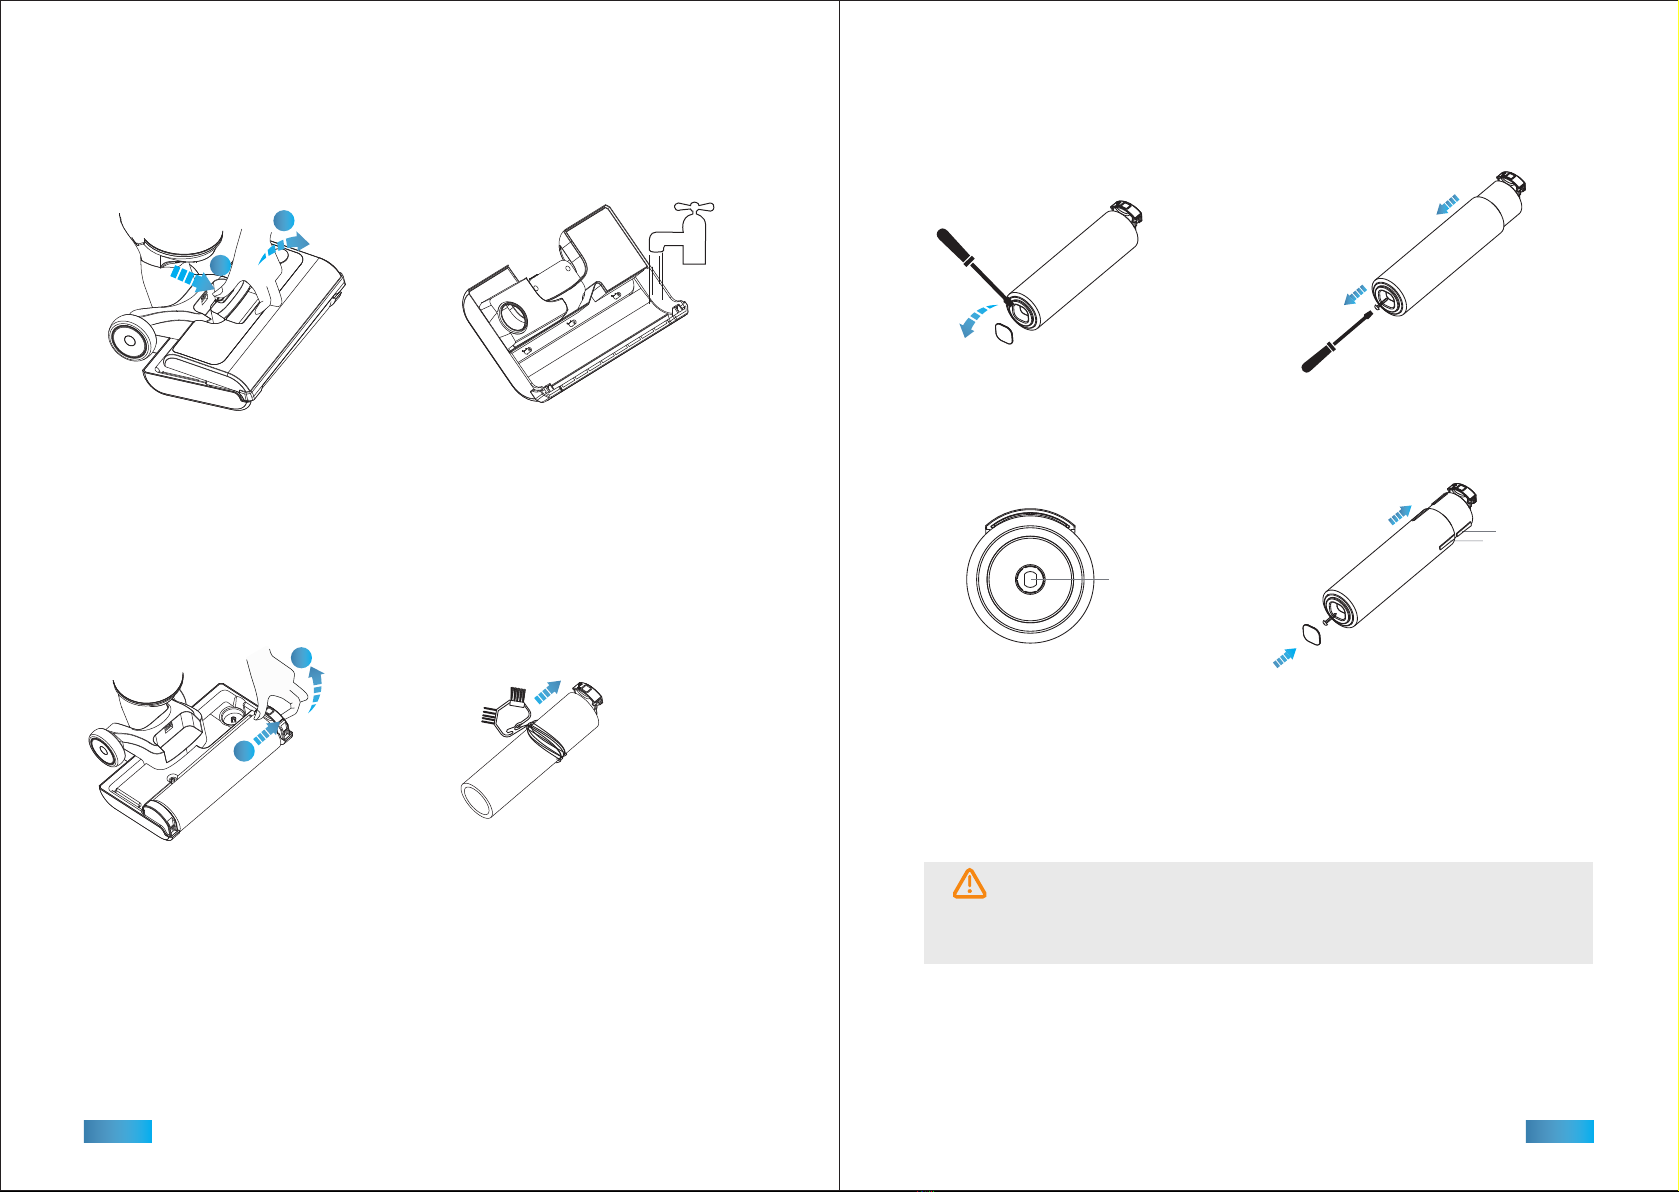
Warning:
Clean Water Tank Replace the Roller Cover
Roller
1. Take out the clean water tank.
Clean the Roller
2. Rinse with water thoroughly.
1. Take out the roller. 2. Remove dirt and tangled hairs using
the Cleaning Gadget.
2
1
2
1
Roller Shaft
Slot
3. To install the new cover, align the
roller shaft with the hole on the
new roller cover.
4. Align slot of the roller shaft with the
slot of the new roller cover, screw on,
and cover with rubber gasket.
2. Unscrew and pull out the roller cover
with a screwdriver.
1. Take out the rubber gasket.
* The roller can be cleaned under running water if necessary.
* Please wipe off the water on the ends of roller because the motor is in the roller.
EN-19 EN-20

Troubleshooting Get Support
To reduce unintended operation, turn off the appliance before troubleshooting.
www.inselife.com
General tips, FAQ, etc
https://bit.ly/inse-w5-y2b
Installation Videos
If the solutions cannot solve the problem, or the issue you meet has not been listed,
please contact Expert INSE Support Team via the following channels to get support:
Email: [email protected]
Website: www.inselife.com
Problem Possible cause Possible solution
Not working Low battery
Roller tangled
Fully charge the battery
Clean the roller
Poor suction
Abnormal
sound in motor
No clean water
come out
Water leak from
air outlet
Not charging
DWT Full
indicator flashing
Dirty water reaches
max volume
Clean dirty water tank
Roller, or dirty water tank
not installed correctly
Reinstall the roller and dirty
water tank
Roller tangled Clean the roller
Mesh filer (strainer) in the
dirty water tank get blocked
Clean the mesh filter
(strainer)
HEPA blocked or not installed Clean the HEPA
Nozzle or dirt passage blocked
Nozzle or dirt passage blocked Clean nozzle or dirt passage
Clean dirty water tank
Reinstall clean water tank
Refill clean water tank
Dirty water reaches max volume
Clean water tank not correctly
installed
Clean water tank lack of water
Floater not installed
HEPA is wet
Plug isn’t well connected
Adapter isn’t well connected
with the appliance
Dirty water tank is full or the
dirt passage is blocked
Clean dirty water tank,
or clean dirt passage
CWT Empty
indicator flashing
Clean water tank is empty Refill clean water tank
Roller Tangled
(Flashing RED)
Roller tangled Clean roller
Make sure the plug is well
connected
Make sure the adapter is well
connected with the appliance
Install floater
Dry HEPA
Clean nozzle or dirt passage
EN-21 EN-22
Table of contents
Other INSE Vacuum Cleaner manuals


