INSIGHT PRO 1080P Lite Owner's manual
领悟高清图传
Insight PRO 1080P Lite 快速使用手册
HD video transmission
Insight PRO 1080P Lite Quick User Manual
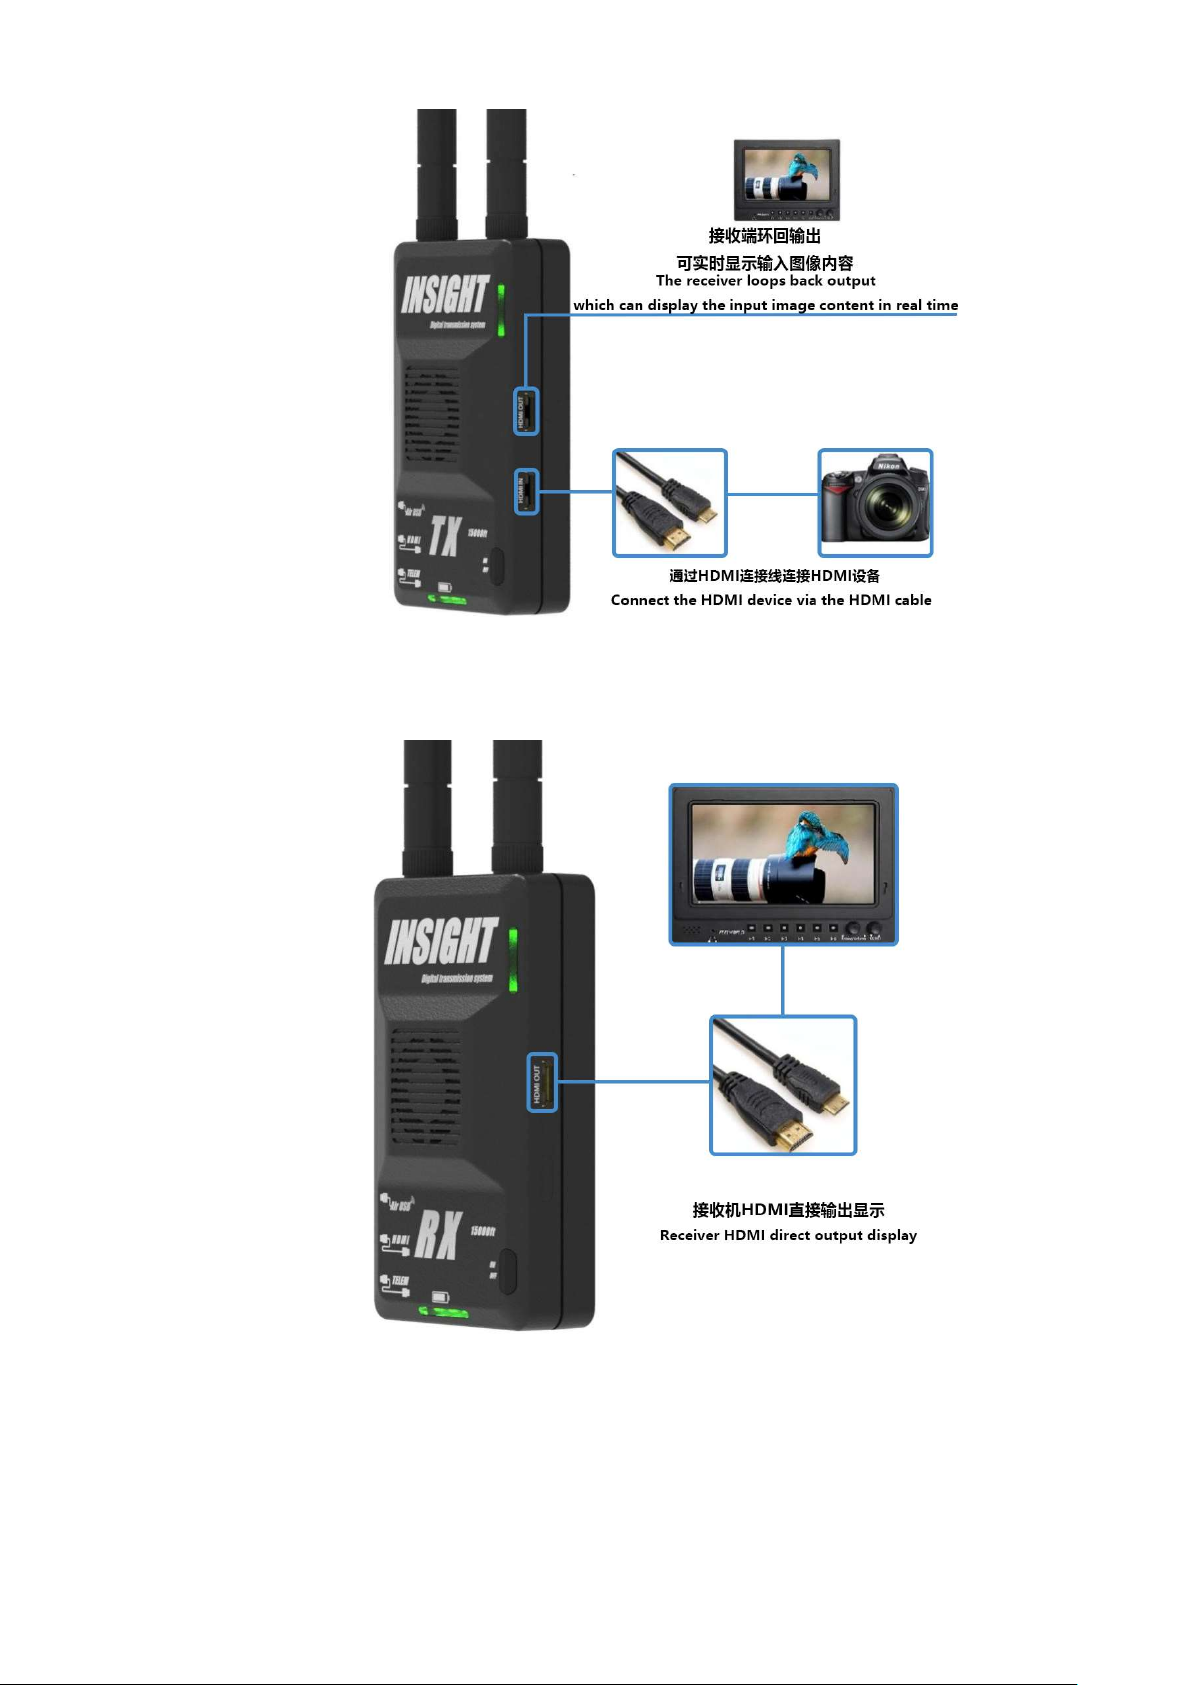
(HDMI 发送和接收)
HDMI transmitter and receiver
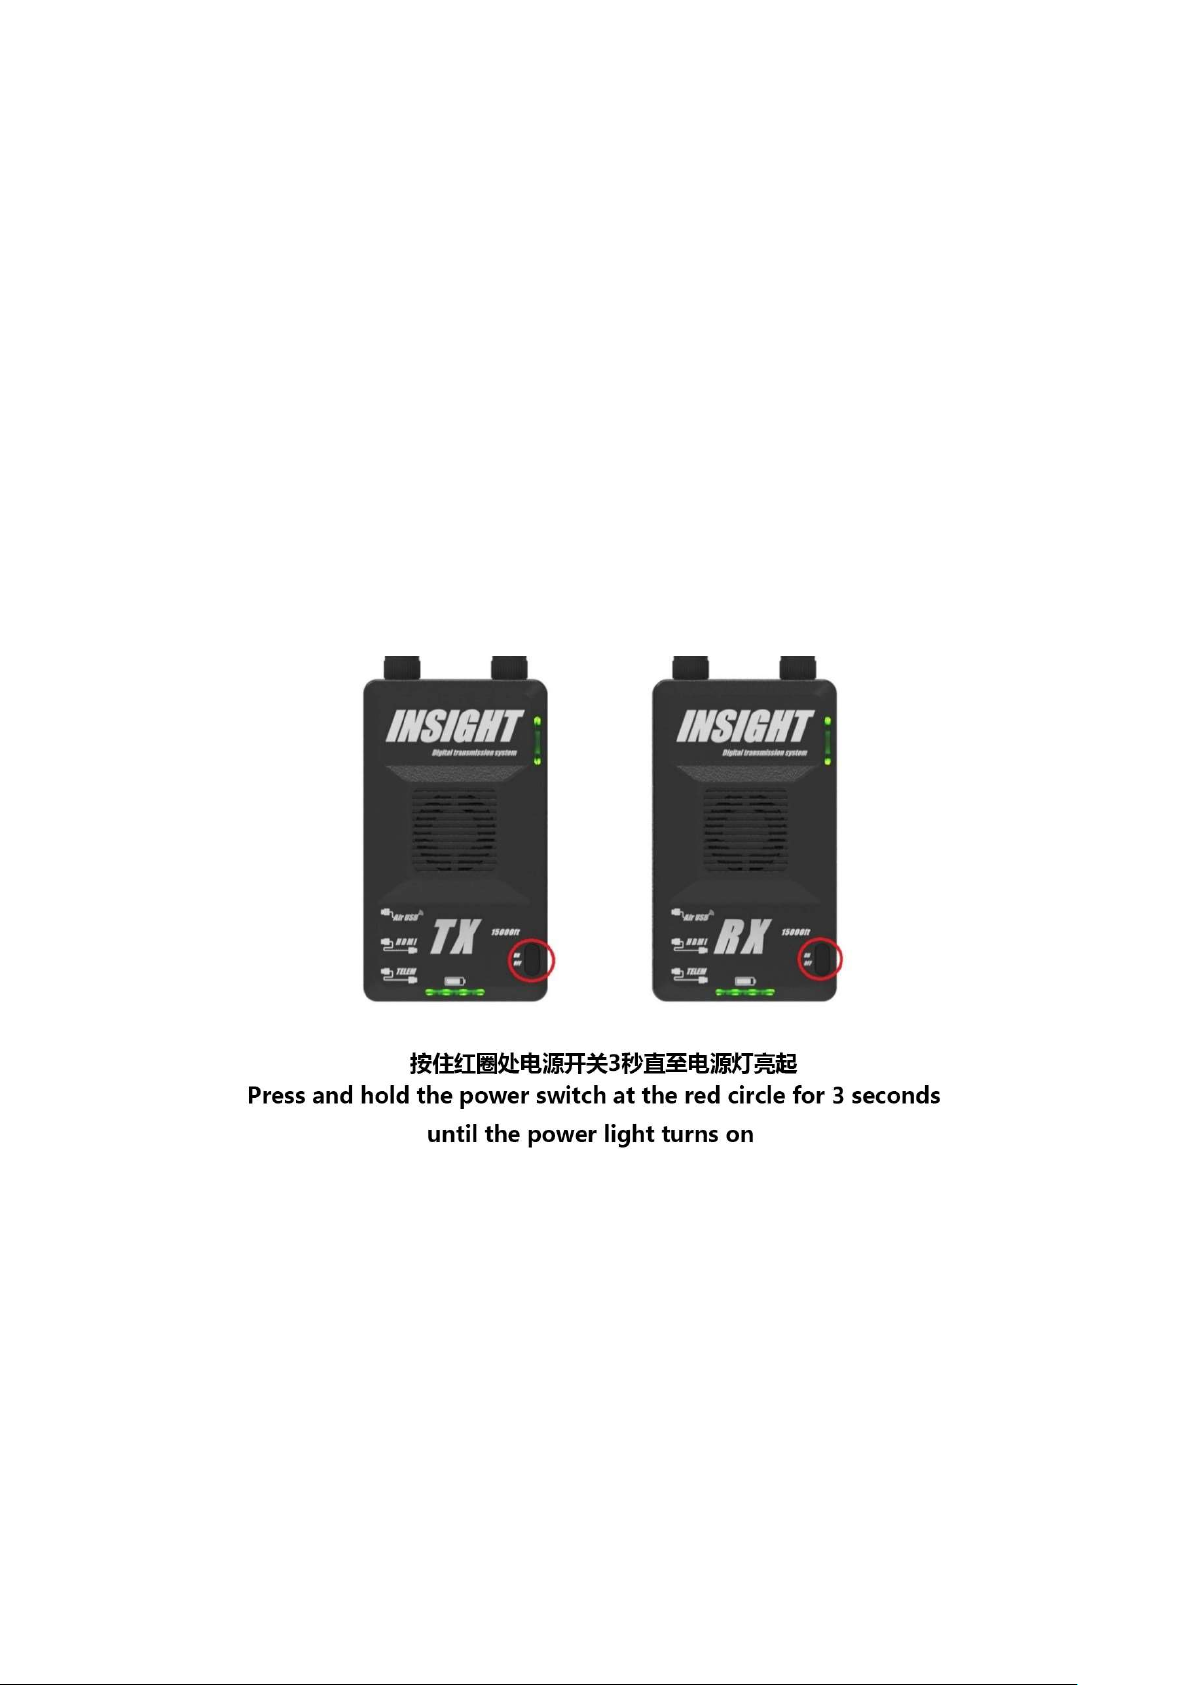
1
2
3
完成上述 3 个步骤后,图像将在几秒钟内显示在连接到接收器的设备上(无线或 HDMI 电缆)。
After 3 steps finished above, the image will display on the devices which connect to the receiver in a few
seconds (wireless or HDMI cable).

(支持多个客户端设备)
Support multiple client devices
通过连接接收机的 Wi-Fi,使用平板电脑或者手机监看画面,支持多设备同时查看.
By connecting the Wi-Fi of the receiver, using a tablet or mobile phone to monitor the screen, support multiple
devices to view at the same time.
完成图 1 和图 2 步骤后,在手机、平板或者电脑上访问我们的网站 www.ARGUSFPV.com,下载相关平台的 APP
After completing the steps of Figure 1 and Figure 2, visit our website www.ARGUSFPV.com on a mobile phone,
tablet or computer to download the APP of the relevant platform.
step A:在你的设备上搜索并连接 SSID 名称为 IN-*****的 Wi-Fi 信号。
Search and connect the Wi-Fi signal with SSID name IN-***** on your device.
step B:Wi-Fi 连接默认密码:12345678
Wi-Fi connection default password: 12345678
step C:运行我们的 APP(例如:Insight Pro)
Run our APP (for example: Insight Pro).
step D:通过操作 APP 来实现对发射机和接收机的控制以及在设备上显示画面
By operating the APP to control the transmitter and receiver and display pictures on the device.
*请确认你的设备支持 5G Wi-Fi 制式。
* Please confirm that your device supports 5G Wi-Fi standard.
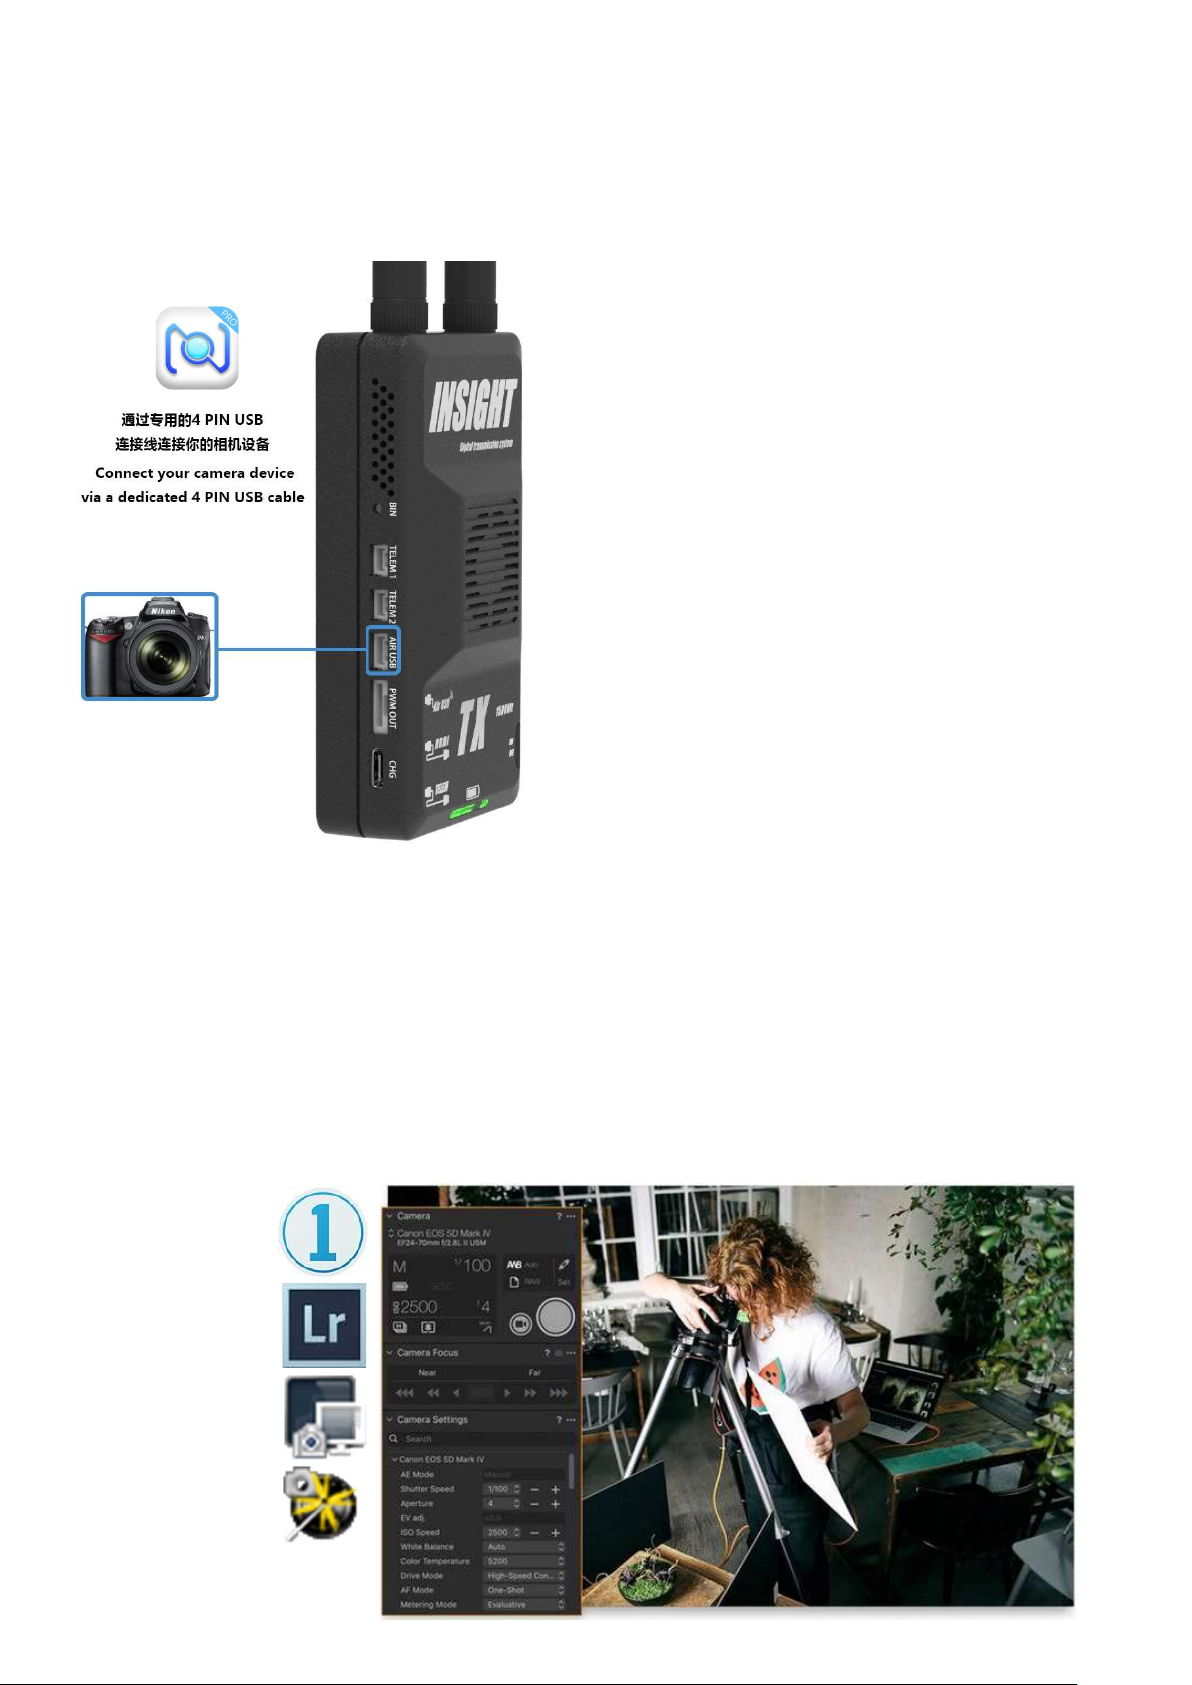
(AirUSB)
1发射机的连接使用 Connect the transmitter.
1、从我们网站 www.argusfpv.com 下载并安装
Windows 版本的 Insight Pro 软件。安装过程中请务
必信任来之 Insight Pro 的驱动程序。
Download and install the Insight Pro software for
Windows from our website www.argusfpv.com.
During the installation process, please trust the
driver of Insight Pro.
开启接收机并让你的电脑连接上接收机的 Wi-Fi.
Turn on the receiver and connect your computer to
the receiver's Wi-Fi.
2、运行 Windows 版本的 Insight PRO 软件(AirUSB
功能只有在软件运行时生效,如果你仅需要使用
AirUSB 功能,可以最小化程序窗口。)
Run the Windows version of Insight PRO software
(The AirUSB function only takes effect when the
software is running. If you only need to use the
AirUSB function, you can minimize the program
window.)
3、如图所示:使用我们的专用 AirUSB 配件线连接发射机与相机。
As shown: Use our dedicated AirUSB accessory cable to connect the transmitter and camera.
4、数秒后你的电脑会发现有新 USB 设备接入。(类似有线 USB 插入电脑的操作)。如下图所示,使用 Capture
One 12 软件实现远程联机操作,拍摄,即时获取照片等。你可以根据自己的喜好使用不同的软件,包括相机设备
的官方或非官方的软件。包括但不限于 Lightroom Camera-Control-Pro 等软件,更多使用方式期待你的开拓。
After a few seconds, your computer will find a new USB device connected. (Similar to the operation of
plugging a wired USB into a computer). As shown in the following figure, use Capture One 12 software to
achieve remote online operation, shooting, instant photo acquisition, etc. You can use different software
according to your preferences, including the official or unofficial software of the camera device. Including but
not limited to Lightroom Camera-Control-Pro and other software, more ways to use it look forward to your
development.

2 室内节单机状态使用 Indoor stand-alone use
如果你只需要在近距离的环境中使用,那么你可以使
用单机模式,利用接收机来实现 AirUSB 功能。参考
上述图示,把相机或者其他 USB 设备通过转换线连
接到接收机的 AirUSB 接口上。
按照以上步骤,你就可以开始利用接收机单机实现
AirUSB 功能。
If you only need to use it in a close range
environment, then you can use the stand-alone
mode and use the receiver to implement the
AirUSB function. Referring to the above
illustration, connect the camera or other USB
device to the AirUSB interface of the receiver
through the conversion cable.
Follow the steps above, you can start using the
receiver to achieve AirUSB function.
该模式的使用距离取决于你设备的无线 5G Wi-Fi 网
卡的能力,可以提供约 50 到 100 米的无遮挡距离。
The usage distance of this mode depends on the
capabilities of your device's wireless 5G Wi-Fi network card, which can provide an unobstructed range of about
50 to 100 meters.
*目前该功能仅支持 Windows10 或 Windows7 系统。
* Currently this feature only supports Windows 10 or Windows 7.
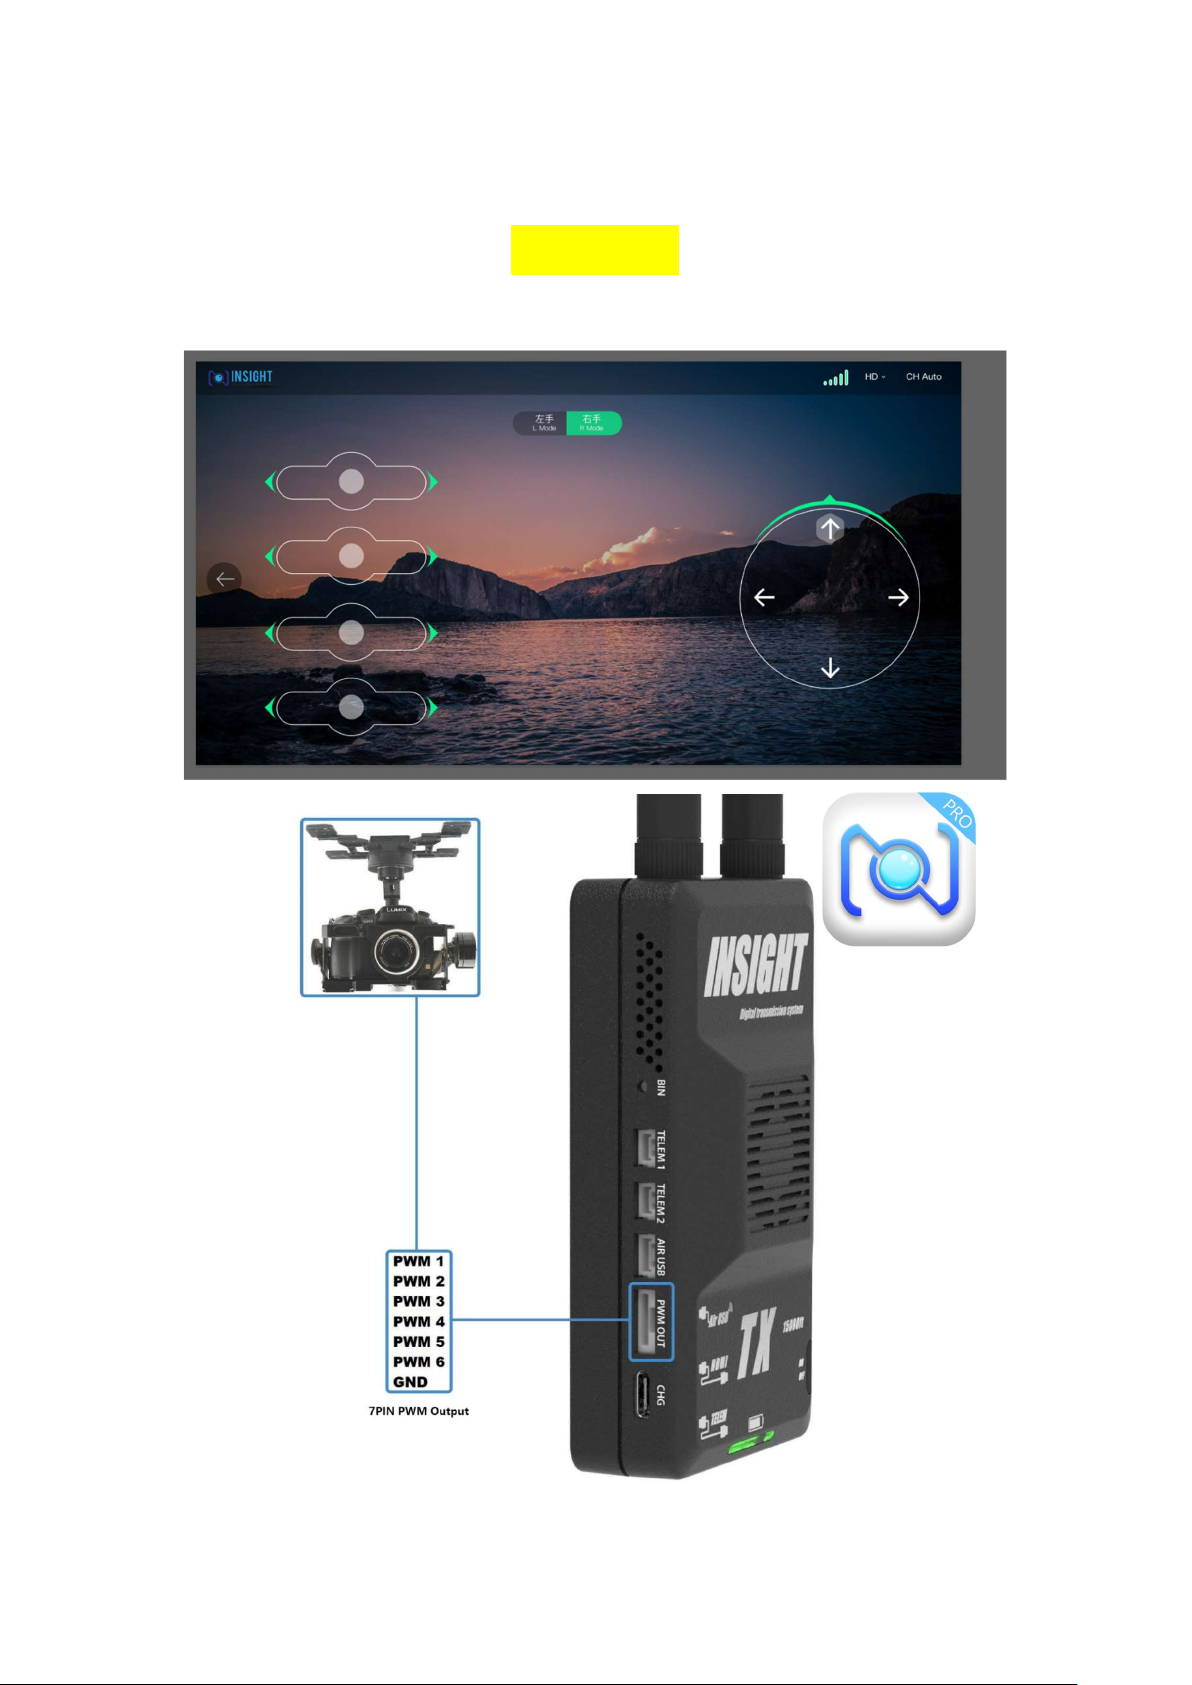
(PWM 输出)
(PWM output)
云台控制演示
Gimbal control demonstration
发射机提供一个 6 通道的 7PIN 接口(包括一个 GND)。
The transmitter provides a 6-channel 7PIN interface (including a GND).
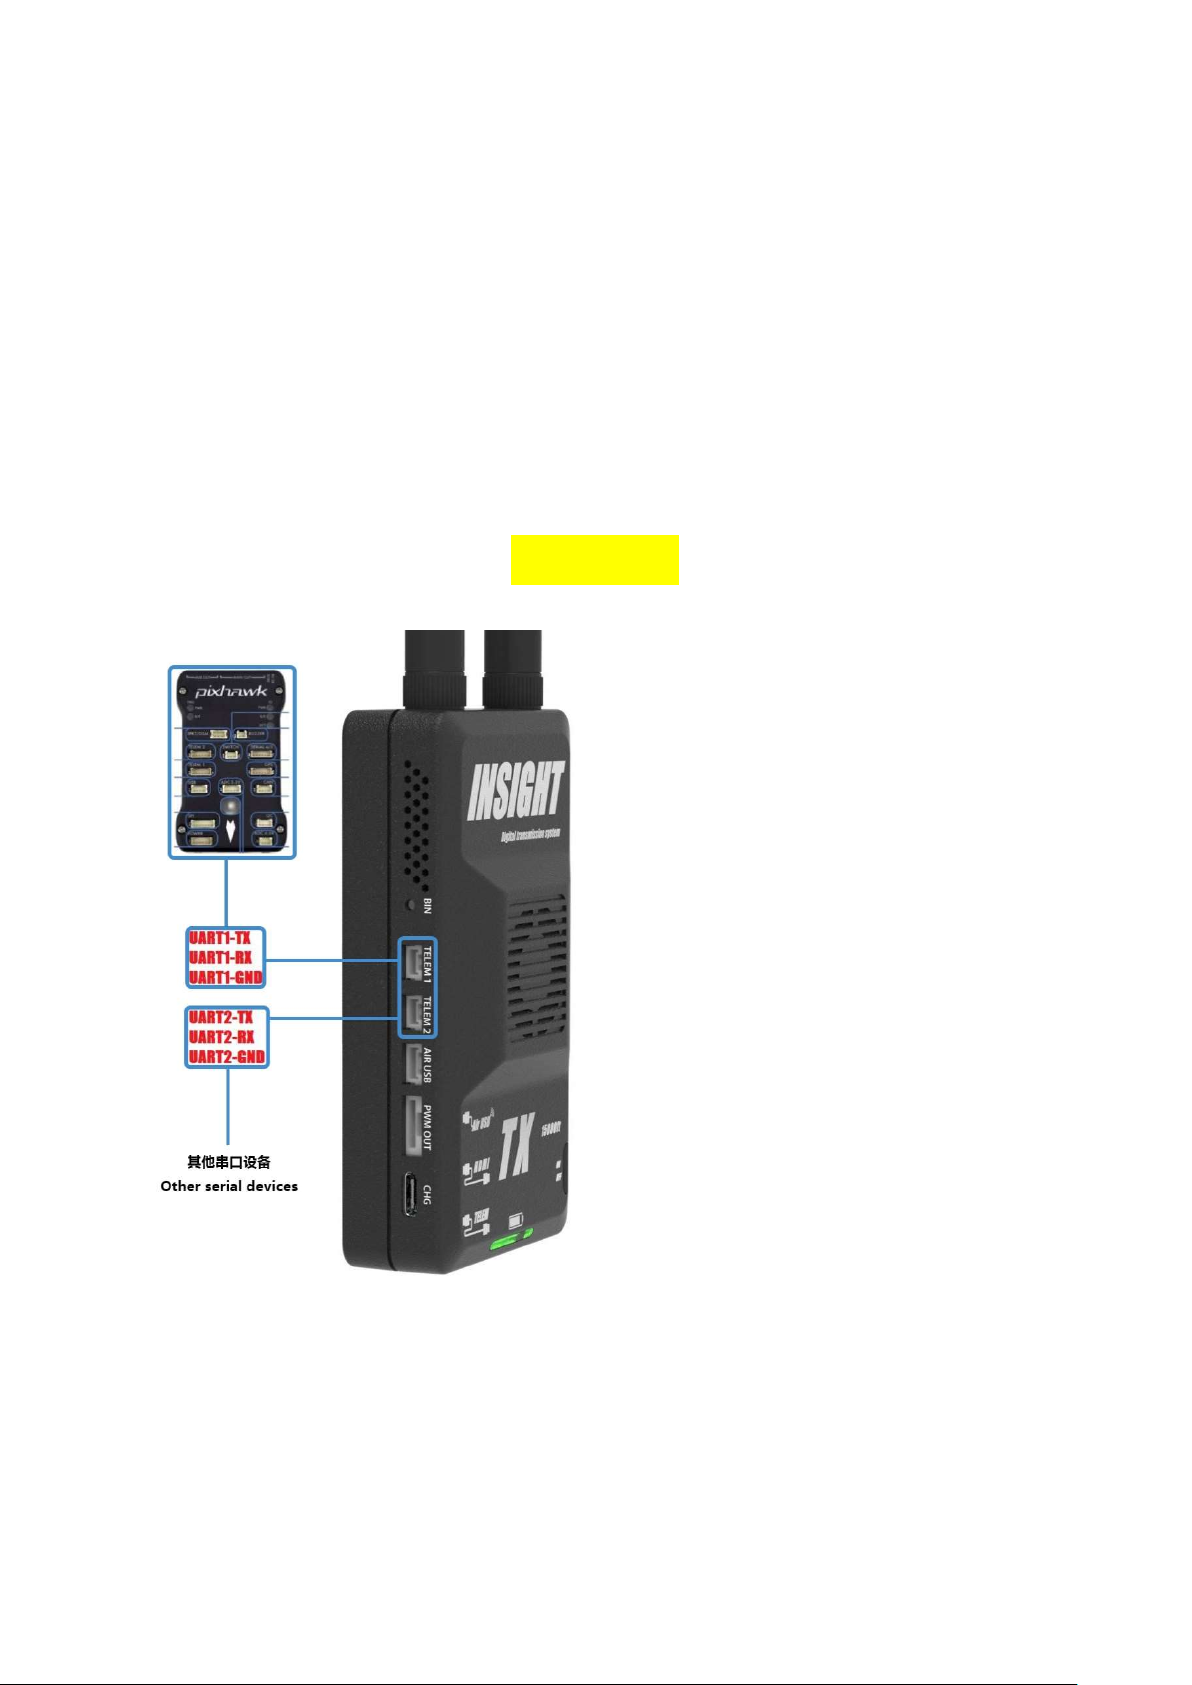
你可以连接支持 PWM 信号控制的云台或者其他支持 PWM 信号控制的设备。通过使用我们的软件 Insight Pro(安
卓、Windows)来控制 PWM 信号输出。如果你的设备不支持 PWM,只支持 PPM 或者 S.BUS 的话,那么你需要
额外购买 PWM 转换 PPM 或 S.BUS 转换模组使用。
You can connect a gimbal that supports PWM signal control or other devices that support PWM signal control.
Use our software Insight Pro (Android, Windows) to control the PWM signal output. If your device does not
support PWM and only supports PPM or S.BUS, then you need to purchase an additional PWM conversion PPM
or S.BUS conversion module.
(串口通讯)
(Serial Communication)
飞控通讯演示
Flight-controller demonstration
发射机和接收机各提供 2 组 Uart 通讯串口。提
供 115200BT 全双工通讯速率,我们以 PixHawk
飞控为例,演示如何通信。你也可以连接任何支
持这种通讯方式的设备。首先你必须设置你的飞
控的 TELEM 接口为 115200BT(默认 57600,
需要通过我们的 windows 软件更改端口速
率)。飞控连接在发射机的 Uart1 或者 Uart2 接
口上。发射机的 Uart 接口作为主机模式,可以
同时与多个客户端通讯,而各个客户端之间不可
以互相通信。发射机和接收机的 Uart 接口是互
相对应的(即 1 对 1,2 对 2),来自于 Uart 接
口的数据经由接收机通过 Wi-Fi 与你的设备连
接,并使用 TCP 的方式向你的设备发送数据。
The transmitter and receiver each provide 2
sets of UART communication serial ports.
Providing 115200BT (Default 57600, you need
to change the port rate through our windows
software) full-duplex communication rate, we
take the PixHawk flight-controller as an
example to demonstrate how to
communicate. You can also connect any
device that supports this communication method. First, you must set your flight-controller TELEM interface to
115200BT. The flight-controller is connected to the Uart1 or Uart2 interface of the transmitter. As the host
mode, the UART interface of the transmitter can communicate with multiple clients at the same time, and
each client cannot communicate with each other. The Uart interfaces of the transmitter and the receiver
correspond to each other (1 to 1, 2 to 2). The data from the UART interface is connected to your device via
Wi-Fi via the receiver, and uses TCP to your device sends data.
左图所示:使用串口转 USB 模块直接与电脑通讯。电
脑通过 USB 与发射机上的串口设备通讯。通过类似的
连接方式,你便可以利用 PC 上的软件通过无线传输与
其他设备进行自由通讯,只需要在软件上填写对应的
地址就可以通信。UART1 地址 192.168.2.220 端口
2018,UART2 地址 192.168.2.220 端口 2019,所有的
地面站软件均支持 USB 和 TCP 连接,建议使用我们专
属的 QGroundControl 版本(支持我们专有视频协
议)。
Shown on the left: use the serial port to USB module
to communicate directly with the computer. The
computer communicates with the serial device on
the transmitter via USB. Through a similar
connection method, you can use the software on the
PC to communicate with other devices through
wireless transmission. You only need to fill in the
corresponding address on the software to
communicate. UART1 address 192.168.2.220 port
2018, UART2 address 192.168.2.220 port 2019, all
ground station software supports USB and TCP
connection, it is recommended to use our exclusive QGroundControl version (supporting our proprietary
video protocol).
电量指示
Battery indicator
开机的时候电量指示灯会根据电池的容量点亮不同数量的 LED。当电量为 100%时,全部电池指示灯全亮起。当电
量指示灯剩余一盏亮起并且开始闪烁时,则表示电量不足请及时充电。
When the power is turned on, the power indicator will light up different numbers of LEDs according to the
capacity of the battery. When the power is 100%, all the battery indicator lights are on. When the remaining
one lights of the power indicator and flash, it means that the power is insufficient, please charge in time.

充电状态指示
Charge status indication
使用 TEYP-C 充电线连接充电接口,充电时,电量指示灯会亮起红色,涓流充电状态时,指示灯会
闪烁。电量充满后指示灯会绿色常亮。
Use the TEYP-C charging cable to connect to the charging port. When charging, the battery indicator will
light up in red, and the indicator will flash when trickle charging. The indicator light will be steady green after
the battery is fully charged.
配对(发射机与接收机配对)
Pairing (transmitter and receiver pairing)
如果非必要,请不要进行操作。这个步骤仅适用于你需要更换已经损坏或者丢失的发射机或者接收机时使用。
If not necessary, please do not operate. This step is only applicable when you need to replace a damaged or
missing transmitter or receiver.
1 配对准备工作:断开发射机和接收机上的所有外接设备,然后发射机和
接收机启动电源后,等待 45 秒。
Preparation for pairing: Disconnect all external devices on the
transmitter and receiver, and then wait for 45 seconds after the
transmitter and receiver are powered on.
2 短按(小于 1 秒)接收机(RX)配对按钮, 右图绿圈位置 BIN 标识下
方的按钮,接收机(RX)右上方的 DATA 指示灯会快速闪动,则表示进入
配对模式,状态会持续 1 分钟。所以,请在 30 秒内操作发射机(TX)的
步骤。
Short press (less than 1 second) the receiver (RX) pairing button, the button below the BIN mark in the green
circle on the right, the DATA indicator at the upper right of the receiver (RX) will flash quickly, indicating that
the pairing mode is entered, and the status will continue 1 minute. Therefore, please operate the transmitter
(TX) within 30 seconds.
3 长按(大于 5 秒)发射机(TX)的配对按钮,右图绿圈位置 BIN 标志下方按钮,发射机(TX)进入配对模式后,
接收机(RX)右上方的数据指示灯将会慢闪,状态会持续 1 分钟。成功配对后,接收机(RX)的 DATA 指示灯会
停止闪烁并长亮状态。
Long press (greater than 5 seconds) the pairing button of the transmitter (TX), the button below the BIN mark
in the green circle on the right, after the transmitter (TX) enters the pairing mode, the data indicator on the
upper right of the receiver (RX) will slow Flashes, the state will last for 1 minute. After successful pairing, the
DATA indicator of the receiver (RX) will stop blinking and stay on.

更多使用细节请留意我们的经销商和网站的更新。
For more usage details, please pay attention to the updates of our dealers and websites.
Other INSIGHT Transmitter manuals


