manuals.online logo
Brands
  1. Home
  2. •
  3. Brands
  4. •
  5. Jamara
  6. •
  7. Transmitter
  8. •
  9. Jamara Compa X3 Evo User manual

Jamara Compa X3 Evo User manual

IT - Informazioni generali
Jamara e. K. non e´responsabile per danni, sostenute al prodotto stesso o attraverso questo, dovuti
ad una gestione non corretta del articolo. Solo il cliente si assume la piena responsabilità per la
manutenzione e l´utilizzo corretto dello stesso; questo include il montaggio, la ricarica, l´utilizzo,
 no alla scelta della aerea di applicazione. Si prega di notare e rispettare le istruzioni d´uso, questi
contengono informazioni e avvertimenti molto importanti.
GB - General information
Jamara e.K. is not liable for any damage caused to the product itself or through this, provided this
is due to improper operation or handling errors. The Customer alone bears the full responsibility for
the proper use and handling, including without limitation, the assembly, the charging process, the
use and choice of the operation area. Please refer to the operating and user instructions, it contains
important information and warnings.
No. 061222
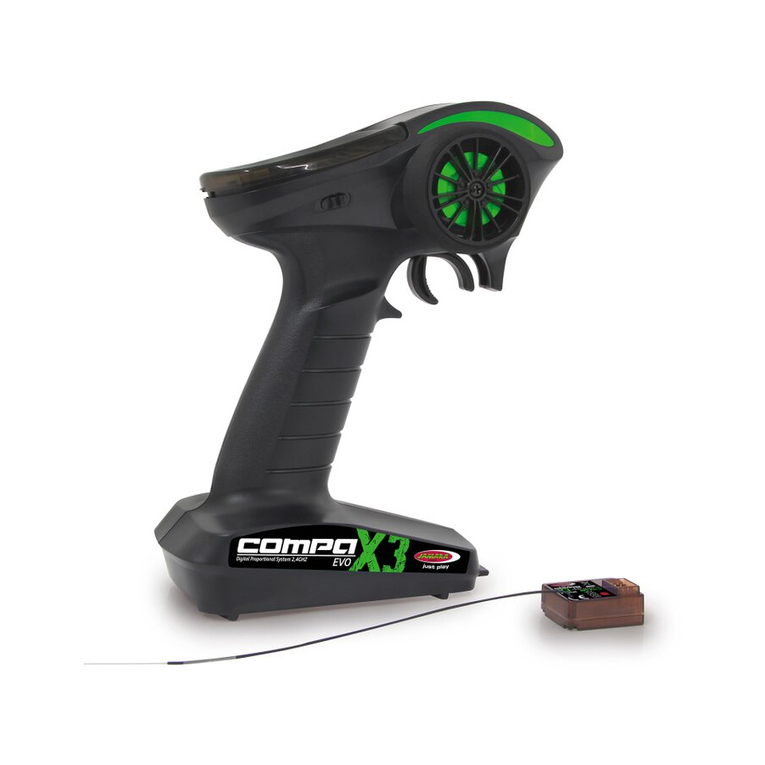
Compa X3 Evo
Emisora | Transmitter
28/20
IT - Istruzioni di montaggio
GB - Instruction
Contenuto del kit:
• Trasmittente • Ricevente • Instruzioni
Accesori:
4 x batterie AA, Cod. 140267 (4 pz.)
Caratteristiche:
• 3 canali
• Sistema 2,4 GHz
• Dual Rate
• Servorevers
• Regolamento posizione neutrale servo
• Regolazione corsa servo
• Modulazione FHSS
• Adatto per auto, barche
• Temperature - 10 a + 40° C
• Alimentazione 4,8 - 6 V
• Sicurezza di sottotensione
• Lunghezza antenna ca. 20 cm
• Misure 175 x 90 x 210 mm
• Peso 277,4 g
• Fail-Safe al ricevente (acceleratore e direzione)
Ricevente Compa X3 Evo 2,4 GHz
Cod. 061223
Dati tecnici:
Frequenza 2,4 GHz
Modulazione FHSS
Tensione di operazione 4,5 - 7,4 V DC
Dimensioni 34 x 13 x 26 mm
Peso 11,8 g
Box contents:
• Transmitter • Receiver • Instruction
Accessories:
4 x AA 1,5 V batteries, No. 140267 (4 pieces)
Features:
• 3 channel
• 2,4 GHz System
• Dual Rate
• Servo reverse
• Adjustment of servo centre
• Servo end point adjustment
• Modulation FHSS
• Model types Car, boat
• Temperature range - 10 to + 40° C
• Operating range 4,8 - 6 V
• Low-Voltage warning
• Receiver antenna length app. 20 cm
• Size 175 x 90 x 210 mm
• Weight 277,4 g
• Fail Safe on receiver (For gas and steering)
Receiver Compa X3 Evo 2,4 GHz
Ord. No. 061223
Technical data:
Frequency 2,4 GHz
Modulation FHSS
Operating voltage 4,5 - 7,4 V DC
Size 34 x 13 x 26 mm
Weight 11,8 g
Rispettate inoltre le norme seguenti:
• Prima di accendere la vostra radio controllate che lo stick del gas sia al minimot.
• Assicurarsi che il binding della trasmittente e della ricevente siano e󰀨ettuati in modo corretto.
• Accendete primable trasmittente e poi la ricevente.
• Agite al contrario per spegnere.
• Prima di andare in volo fate sempre una prova di portata in distanza con il modello a terra e
l‘antenna chiusa.
• Non mettere in pericolo persone o animali.
• Utilizzare il sistema o il modello solo per essere controllati su un terreno adatto.
• Non usare la trasmittente con pioggia, vento forte oppure temporali.
• Se per un periodo più lungo non usata la trasmittente, togliete le batterie.
Following should be strictly adhered to:
• Before Switching on the system ensure that throttle stick is in the o󰀨 position.
• Check that the transmitter and receiver are compatible and bonded to one another.
• Always switch the transmitter on rst and then the receiver.
• Always switch the receiver o󰀨 rst and then the transmitter .
• Complete a full range and function test before every take-o󰀨.
• Never over-y people and do not allow your model to endanger people or animals.
• Do not y near to over-head cables, buildings or airelds.
• The system must not be operated in rain, or thunder storms.
• If you do not intend to use the transmitter for a long period, remove the batteries.
Declaración de conformidad
Con la presente JAMARA e.K. dichiara che il prodotto‚ “Emisora Compa X3 Evo,
No. 061222“ sono conformi alle Direttive 2014/53/EU e 2011/65/EU.
Il testo integrale della dichiarazione di conformità UE è disponibile al seguente
indirizzo Internet: www.jamara-shop.com/Conformity
Certicate of Conformity
Hereby JAMARA e.K. declares that the product “Fernsteuerung Compa X3 Evo, No. 061222“ com-
plies with Directive 2014/53/EU, 2011/65/EU.
The full text of the EU Declaration of Conformity is available at the following Internet address:
www.jamara-shop.com/Conformity
Modello di oggetto di costruzione - ¡Non un giocattolo!
Prima di avviare il modello, leggere attentamente tutte le istruzioni per l’uso.
Attenzione! Leggere completamente le avvertenze / istruzioni di sicurezza,
questi sono per la vostra sicurezza può prevenire incidenti / infortuni.
For model building only - Not a toy!
Read the complete instructions and security instructions carefully before using the
model.
Caution! Please fully and carefully read warnings/ safety instructions. These are
for our own security and can avoid accidents/injuries.
Frequency bands: 2,4 GHz | Frequency range: 2,405 MHz - 2,450 MHz | EIRP: < 100 mW (max. power transmitted)
2
IT - Controlli
1. Canale 3
2. Volante
3. Leva del gas
4. Vano Batterie
GB - Controls
1. Channel 3
2. Steering Wheel
3. Throttle Trigger
4. Battery Compartment
IT - Settore di programmazione
1. Reverse (canale 2 & 1)
2. Canale 2 ajuste de punto  nal
3. Dual Rate direzione
4. Canal 1 & 2 Trim
5. Power LED
6. Interruttore on /o󰀨
7. Pulsante collegamen to Binde
GB - Programming Panel
1. Reverse (CH2 & CH1)
2. CH2 EPA
3. Steering Dual Rate
4. Trim Channel 1 & 2
5. Power LED
6. On/O󰀨 Switch
7. Bind Button
12
3
4
1
2
4
3
5
6
7
3
Informazioni relative alle pile:
Le batterie non ricaricabili non devono essere caricate!
Non aprire!
Non gettare nel fuoco!
Non usare contemporaneamente pile nuove e pile usate!
Non usare contemporaneamente pile alcaline, standard (zincocarbone) e ricaricabili!
Le batterie ricaricabili devono essere rimosse dal giocattolo!
Le batterie ricaricabili possono essere ricaricate solo sotto la supervisione di un adulto!
I morsetti di collegamento don devono essere cortocircuitati!
Battery warning:
Non-rechargeable batteries are not to be recharged!
Do not open!
Do not dispose of in re!
Do not mix old and new batteries!
Do not mix alkaline batteries, standard (carbon-zinc) or rechargeable batteries!
Rechargeable batteries are to be removed from the toy before being charged!
Rechargeable batteries are only to be charged under adult supervision!
The supply terminals are not to be short-circuited!
IT - Ricevente
1 Antenna
2 Setup
Congurazione del ricevitore::
A CH 1: Servo direzionale
B CH 2: Servo gas
C CH 3: canale 3
D Bat: Batteria
GB - Receiver
1 Antenna wire
2 Setup button
Receiver Conguration:
A CH 1: Steering Servo
B CH 2: Throttle Servo
C CH 3: Channel 3
D Bat: Battery
1
2
A
B
C
D
IT - Inserire le batterie
1. Rimuovere il coperchio del vano batteria..
2. Inserire 4 x AA batterie nella giusta posizione, facendo attenzione ai poli. Prestare attenzione
alla polarità corretta (+ & - Pol) come mostrato nel vano batteria.
3. Rimettere il coperchio del scomparto batterie.
GB - Fitting the batteries
1. Remove the battery compartment cover.
2. Install 4 „AA“ batteries (or battery pack) into the battery compartment.
Pay attention to the correct polarity (+ & - Pol) as shown in the battery compartment.
3. Replace the battery compartment cover and close it.
Allacciare la trasmittente alla ricevente
Attenzione!
Prima di iniziare il processo di collegamento, collegare il cablaggio dell‘interruttore, i servi
e la batteria al ricevitore. Assicurarsi che sia il trasmettitore che il ricevitore siano spenti.
1. Accendete il radiocomando.
L‘indicatore di alimentazione sul trasmettitore si illumina in rosso sso.
2. Premere e tenere premuto il pulsante di impostazione del ricevitore.
Ora accendi il ricevitore.
Il LED del ricevitore lampeggerà rapidamente.
Rilascia il pulsante di congurazione.
3. Tenere premuto il pulsante di associazione sul trasmettitore no al LED sul ricevitore è
continuamente acceso.
Attenzione!
Quando il processo di associazione ha esito positivo, il LED Bind sul ricevitore rimarrà rosso sso
quando sia il trasmettitore che il ricevitore sono accesi. Se il LED Bind sul ricevitore lampeggia
rapidamente o non è a󰀨atto illuminato, il trasmettitore e il ricevitore non sono accoppiati. In questo
caso, spegnere sia il trasmettitore che il ricevitore, quindi ripetere il processo di rilegatura.
Binding of transmitter and receiver
Attention!
Before beginning the binding process, connect the switch harness, servos, and the battery
to your receiver. Make sure that both the transmitter and the receiver are turned OFF.
1. Turn the transmitter ON.
The Power Indicator on the transmitter will illuminate solid red.
2. Press and hold the receiver setup button.
Now switch on the receiver.
The receiver LED will ash quickly.
Release the setup button.
3. Press and hold the binding button on the transmitter until the LED
on the receiver is continuously lit.
Attention!
When the binding process is successful, the Bind LED on the receiver will stay solid red when
both the transmitter and receiver are turned ON. If the Bind LED on the receiver is ashing rapidly
or not illuminated at all, the transmitter and receiver are not paired. In this case, turn both the
transmitter and receiver OFF, then repeat the binding process.
Montaggio del sistema di ricezione
Attenzione!
Quando si collegano i cavi, assicurarsi che la polarità (polo + e -) sia corretta, altrimenti il ricevitore
andrà in corto circuito. Montare l‘antenna 2,4 GHz in verticale. Tuttavia, non si deve ssare l‘antenna
a oggetti metallici, distanzia di funzionamento si ridurrebbe.
Antena
Collegare l‘antenna verticale 2,4 GHz. Non si può, tuttavia, montare l‘antenna su oggetti metallici, il
raggio d’azione si ridurrebbe notevolmente.
Connecting to the receiver
Warning!
To avoid any short-circuit in your receiver, please make sure to connect the cables with correct
polarity (+ & - Pol) in mind.
Antenna
Mount the 2.4 GHz antenna vertically. Do not allow any metal object to come into contact with the
antenna or to shield it as this will reduce the range.
S + -
JAMARA e.K.
Inh. Manuel Natterer
Am Lauerbühl 5 - DE-88317 Aichstetten
Tel. +49 (0) 75 65/94 12-0 - Fax +49 (0) 75 65/94 12-23
[email protected] ●www.jamara.com
Service - Tel. +49 (0) 75 65/94 12-777
kundenservice@ jamara.com
Irrtum und technische Änderungen vorbehalten. Copyright JAMARA e.K. 2020
Kopie und Nachdruck, auch auszugsweise, nur mit Genehmigung von JAMARA e. K.
All rights reserved. Copyright JAMARA e.K. 2020
Copying or reproduction in whole or part, only with the expressed permission of JAMARA e.K.
IT - Istruzioni per lo smaltimento
Batterie e gli accumulatori non devono essere smaltiti nei riuti domestici, ma devono
essere smaltiti separatamente. Siete obbligati di eseguire lo smaltimento professi-
onale delle batterie vecchie (raccolta di󰀨erenziata). È possibile restituire le batterie
dopo l’uso gratuitamente nelle attività commerciali. Dato che le batterie contengono
delle sostanze, che provocano irritazione, possono causare allergie o sono altamente
reattivi, la raccolta di󰀨erenziata e il riciclaggio sono importanti per l’ambiente e la sua
salute. Se le batterie, a disotto del “bidone a ruote cancellato” sono segnati con un
simbolo chimico Hg, Cd o Pb, signica che questi contengono più di 0,0005 % Mercu-
rio (Hg), più di 0,002 % Cadmio (Cd) o piu di 0,004 % Piombo (Pb).
GB - Disposal restrictions
Batteries and accumulators must not be disposed of in domestic waste. You are obliged to dispose
of batteries (seperate collection) appropriately. After use you can return batteries free of charge
to the retail store. As batteries contain substances that can be irritant, can cause allergy and are
highly reactive, separate collections and proper recycling is important to the environment and to
your health. If the batteries are marked with a chemical symbol Hg, Cd or Pb below the crossed-
out waste bin on wheels it refers to that more than 0.0005% of mercury (Hg), more than 0.002%
of cadmium (Cd) or more than 0.004% Lead (Pb) is included.
IT - Istruzioni per lo smaltimento
Apparecchi elettrici non devono essere smaltiti nei riuti domestici, ma devono essere
smaltiti separatamente. Siete obbligati di rimuovere le batterie e portare l´apparecchi
elettrici vecchi ai punti di raccolta comunali. Qualora ci sono dati personali sul appa-
recchio elettrico, devono essere rimossi da voi stessi.
GB - Disposal restrictions
Electrical appliances must not be disposed of in dome stic waste and must be disposed of separa-
tely. You are obliged to take out the batteries, if possible, and to dispose of the electrical equipment
at the communal coll ection points. Should personal data be stored on the
electrical appliance you must remove them by yourself.
IT - Fail safe setup (Acceleratore e sterzo)
Die Failsafefunktion ist in der Regel nicht ab Werk eingerichtet. Sie sollten sich trotzdem
damit vertraut machen und vor dem Einsatz Ihre Funktion überprüfen.
1. Accendere la trasmittente
Accendere la ricevente.
Premere il pulsante di impostazione sul ricevitore no a quando il LED sul ricevitore inizia a
lampeggiare.
2. Posizionare l‘acceleratore e il volante nella posizione desiderata e premere di nuovo il
pulsante di impostazione sul ricevitore no a quando il LED si illumina di nuovo.
3. Controllare la funzione controllando brevemente il trasmettitore durante il funzionamento
Spegni. Il servo o controller collegato controlla quello programmato posizione.
Atención! En el caso de un motor de combustión, siempre debe ajustar el Failsafe en la
posición máxima de frenado. Cuando use un regulador, siempre en la posición neutral.
GB - Fail safe setup (For gas and steering)
The fail-safe function is usually not set up already from the factory. You should get familiar
with it anyway and check before using the function.
1. Turn on the transmitter.
Turn on the receiver.
Press the Setup button on the receiver until the LED on the receiver starts to ash.
2. Set the throttle and the Steering Wheel to the desired position and press again the
Setup button until the receiver LED is constantly lit.
3. Check the function by turning shortly o󰀨 the transmitter during operation.
The servo or ESC goes to the programmed position.
Attention! At Nitromodels, you should always set the failsafe on maximum braking position.
If you using an ESC, always choose neutral for setting up the failsafe.
Istruzioni per la sicurezza
Questo radiocomando é progettato e costruito per in impiego di modelli di auto / navi. Jamara
non si assume nessuna responsabilità per li suo impiego in altri campi.
I modelli radiocomandati non solo giocalloli, per cui il loro uso é limitato ai bambini ed in ogni caso
sollo il controllo e la responsabilità di adulti.
Dato che ne il fabbricante ne il rivenditore possono controllare che l‘ usuario rispetti queste istru-
zioni, va da sé che ambedue riutano totalmente ogni responsabilità per danni a cose oi persone
causate durante l‘ uso di qualsiasi modello radiocomandato.
Dato che ne il fabbricante ne il rivenditore possono controllare che l‘ usuario rispetti queste istru-
zioni, va da sé che ambedue riutano totalmente ogni responsabilità per danni a cose oi persone
causate durante l‘ uso di qualsiasi modello radiocomandato
Usate la trasmittente con cautela. Rispettate le norme di sicurezza. Accendere la trasmittente pri-
ma e poi la sistema ricevente. Accendere la trasmittente prima e poi la sistema ricevente. Quando
si spegne si attenga con l‘ordine invertito. Accendere la trasmittente prima e poi la sistema rice-
vente. Usate solo riceventi originali Jamara. La CX 2,4 GHz non è compatibile con altre riceventi
2,4 GHz.
Tenete sempre pulita e spolverata la vostra radio mantenendola sempre in luoghi asciutti e protet-
ti dalle temperature. Usate la trasmittente solo tra -10 no a +40°C. Usate la trasmittente solo tra
-10 no a +40°C. Usare caricatori Jamara per il caricamento delle batterie. Rispettate le norme
del fornitore durante la carica.
Evitare urti e pressione di carica. Controllare regolarmente il trasmittente, il ricevitore e i cavi su
danneggiamenti. Non usare mai pezzi danneggiati o pezzi che si sono bagnati in passato, anche
se oggi sono asciutti. Chiamare il nostro servizio di assistenza o sostituire i pezzi.
Safety Information
This remote control system is designed and approved exclusively for the operation of remote-
controlled car/boat models. The company Jamara assumes no liability for any other use.
Radio Controlled models, are not toys and as such and should only be operated by children or
youths if closely supervised by a responsible adult.
Building and operating such models requires a degree of skill, understanding and technical know-
how as well as a responsible attitude. Faults in the construction or irresponsible behaviour could
lead to serious damage or injury.
As neither the manufacturer or retailer has any inuence over the correct use of modelling pro-
ducts we wish to emphasise these safety instructions and will in no way be held responsible for
the misuse of our products.
Please be aware that the receiver system can also create a danger if operated when the trans-
mitter is not switched on. Always operate the Transmitter with extreme caution and follow the
instructions listed here. Always switch the transmitter on before the receiver and switch o󰀨 in the
opposite order. Only use our original receivers as any other brand of 2.4 GHz receivers will not
bond to our transmitters.
Protect the system from dust, dirt and moisture. Never expose the system to extreme heat, cold
or vibration. The system should only be operated between - 10 and + 40°C. Use a good quality
charger selected from our range and follow the battery manufacturers instructions.
Avoid exposing the system to impact or vibration and inspect all of the components regularly for
damage to the casing, plugs, sockets and cables. If any component gets damaged or is exposed
to water do not use it even if it has been dried out! Any such component should be replaced or
returned to our service department.

This manual suits for next models

1

Other Jamara Transmitter manuals

Jamara FCX6 Pro Tel User manual

Jamara

Jamara FCX6 Pro Tel User manual

Jamara CCX Lipo User manual

Jamara

Jamara CCX Lipo User manual

Jamara CCX Pro User manual

Jamara

Jamara CCX Pro User manual

Jamara SCX User manual

Jamara

Jamara SCX User manual

Jamara CCX Lipo User manual

Jamara

Jamara CCX Lipo User manual

Jamara SCX 2,4 GHz User manual

Jamara

Jamara SCX 2,4 GHz User manual

Jamara CCX Lipo 2,4 GHz 3 CH User manual

Jamara

Jamara CCX Lipo 2,4 GHz 3 CH User manual

Jamara SCX 2,4 GHz User manual

Jamara

Jamara SCX 2,4 GHz User manual

Jamara CCX Pro 2,4 GHz User manual

Jamara

Jamara CCX Pro 2,4 GHz User manual

Jamara FCX6 Pro Tel User manual

Jamara

Jamara FCX6 Pro Tel User manual

Jamara CCX Pro User manual

Jamara

Jamara CCX Pro User manual

Jamara Compa XR3 User manual

Jamara

Jamara Compa XR3 User manual

Jamara SCX User manual

Jamara

Jamara SCX User manual

Jamara SCX 2,4 GHz User manual

Jamara

Jamara SCX 2,4 GHz User manual

Jamara CCX Pro 2,4 GHz User manual

Jamara

Jamara CCX Pro 2,4 GHz User manual

Jamara CCX Lipo User manual

Jamara

Jamara CCX Lipo User manual

Jamara Compa 2,4 GHz User manual

Jamara

Jamara Compa 2,4 GHz User manual

Jamara CCX Pro User manual

Jamara

Jamara CCX Pro User manual

Jamara Compa X3 Evo User manual

Jamara

Jamara Compa X3 Evo User manual

Jamara CCX Pro 2,4 GHz User manual

Jamara

Jamara CCX Pro 2,4 GHz User manual

Jamara FCX6 Pro Tel User manual

Jamara

Jamara FCX6 Pro Tel User manual

Jamara CCX Pro User manual

Jamara

Jamara CCX Pro User manual

Jamara CX 2,4 GHz User manual

Jamara

Jamara CX 2,4 GHz User manual

Jamara FCX6 Pro Tel User manual

Jamara

Jamara FCX6 Pro Tel User manual

Popular Transmitter manuals by other brands

ASCOM A51 - user manual

ASCOM

ASCOM A51 - user manual

Bacharach MGS 550 user manual

Bacharach

Bacharach MGS 550 user manual

INOR IPAQ R202 User instructions

INOR

INOR IPAQ R202 User instructions

Crestron DigitalMedia DM-TX-200-2G Operations & installation guide

Crestron

Crestron DigitalMedia DM-TX-200-2G Operations & installation guide

Elenos ETG5200 manual

Elenos

Elenos ETG5200 manual

CYP CH-306TXA & RXA Operation manual

CYP

CYP CH-306TXA & RXA Operation manual

Chiayo NB-3100 Operation manual

Chiayo

Chiayo NB-3100 Operation manual

Ametek Drexelbrook Universal Lite 509-1 Series Installation and operating instructions

Ametek Drexelbrook

Ametek Drexelbrook Universal Lite 509-1 Series Installation and operating instructions

INVISIBLE FENCE ICT 801 installation manual

INVISIBLE FENCE

INVISIBLE FENCE ICT 801 installation manual

IDTOLIGHT WERCHTER ID836004ZZZ installation instructions

IDTOLIGHT

IDTOLIGHT WERCHTER ID836004ZZZ installation instructions

Novus TxRail Installation and operating manual

Novus

Novus TxRail Installation and operating manual

Chamberlain TriCode TC4 user guide

Chamberlain

Chamberlain TriCode TC4 user guide

Retekess TT117 instructions

Retekess

Retekess TT117 instructions

AMG AMG5513 instruction manual

AMG

AMG AMG5513 instruction manual

CYP PUV-1620S-TX Operation manual

CYP

CYP PUV-1620S-TX Operation manual

EUTECH INSTRUMENTS apha-CON500 instruction manual

EUTECH INSTRUMENTS

EUTECH INSTRUMENTS apha-CON500 instruction manual

Broadcast Warehouse TX 25/50 Technical manual

Broadcast Warehouse

Broadcast Warehouse TX 25/50 Technical manual

Honeywell XYR 5000 Series user manual

Honeywell

Honeywell XYR 5000 Series user manual

manuals.online logo
manuals.online logoBrands
  • About & Mission
  • Contact us
  • Privacy Policy
  • Terms and Conditions

Copyright 2025 Manuals.Online. All Rights Reserved.