Insignia NS-DACMSFK User manual

AC Master/Slave Flash Kit
NS-DACMSFK
Before using your new product, please read these instructions to prevent any damage.
USER GUIDE
NS-DACMSFK_14-1397_V3_MAN_ENG.book Page i Thursday, December 4, 2014 10:15 AM

2
www.insigniaproducts.com
AC Master/Slave Flash Kit
Contents
IMPORTANT SAFETY INSTRUCTIONS. . . . . . . . . . . . . . . . . . . . . . . . . . . . . . . . . . . . . . . . . . . . . . . . . . . . . . . . . . . . . . 2
Introduction . . . . . . . . . . . . . . . . . . . . . . . . . . . . . . . . . . . . . . . . . . . . . . . . . . . . . . . . . . . . . . . . . . . . . . . . . . . . . . . . . . . . 3
Features. . . . . . . . . . . . . . . . . . . . . . . . . . . . . . . . . . . . . . . . . . . . . . . . . . . . . . . . . . . . . . . . . . . . . . . . . . . . . . . . . . . . . . . . . 3
Package contents . . . . . . . . . . . . . . . . . . . . . . . . . . . . . . . . . . . . . . . . . . . . . . . . . . . . . . . . . . . . . . . . . . . . . . . . . . . . . . . . . . . . . .3
Flash head . . . . . . . . . . . . . . . . . . . . . . . . . . . . . . . . . . . . . . . . . . . . . . . . . . . . . . . . . . . . . . . . . . . . . . . . . . . . . . . . . . . . . . . . . . . . .4
Light holder. . . . . . . . . . . . . . . . . . . . . . . . . . . . . . . . . . . . . . . . . . . . . . . . . . . . . . . . . . . . . . . . . . . . . . . . . . . . . . . . . . . . . . . . . . . .5
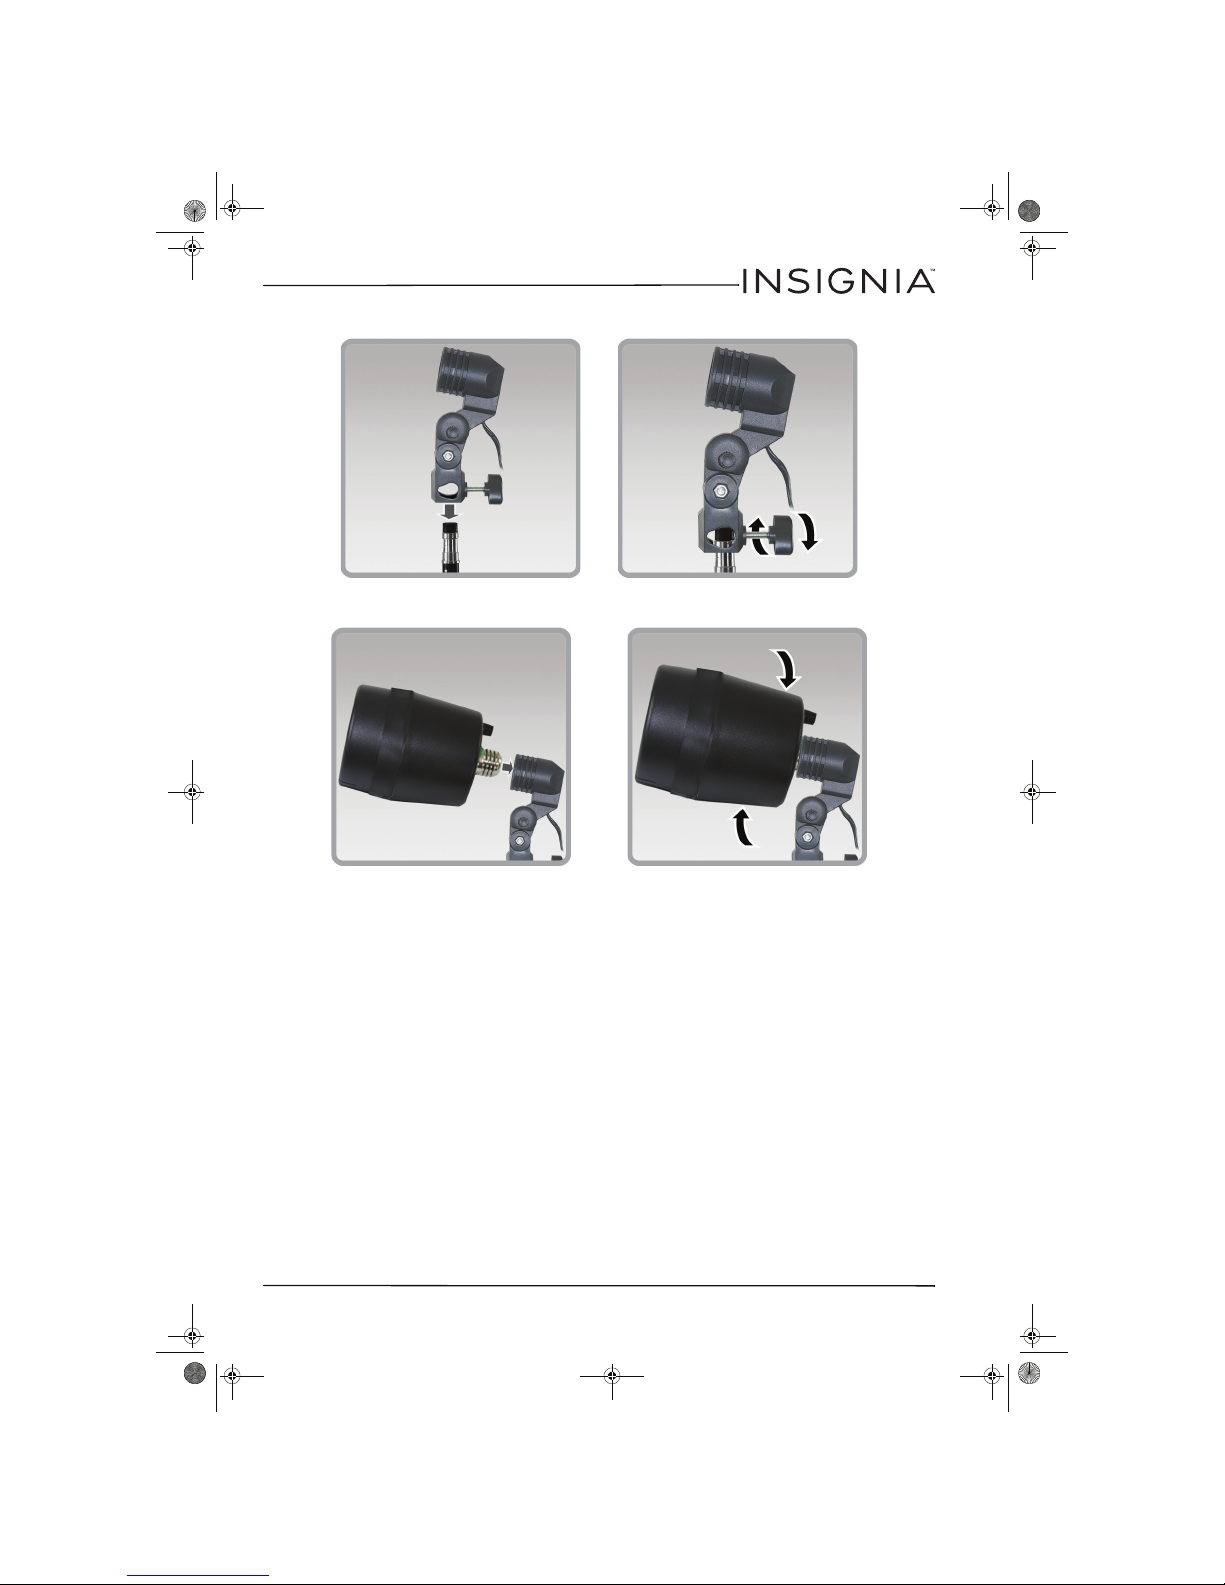
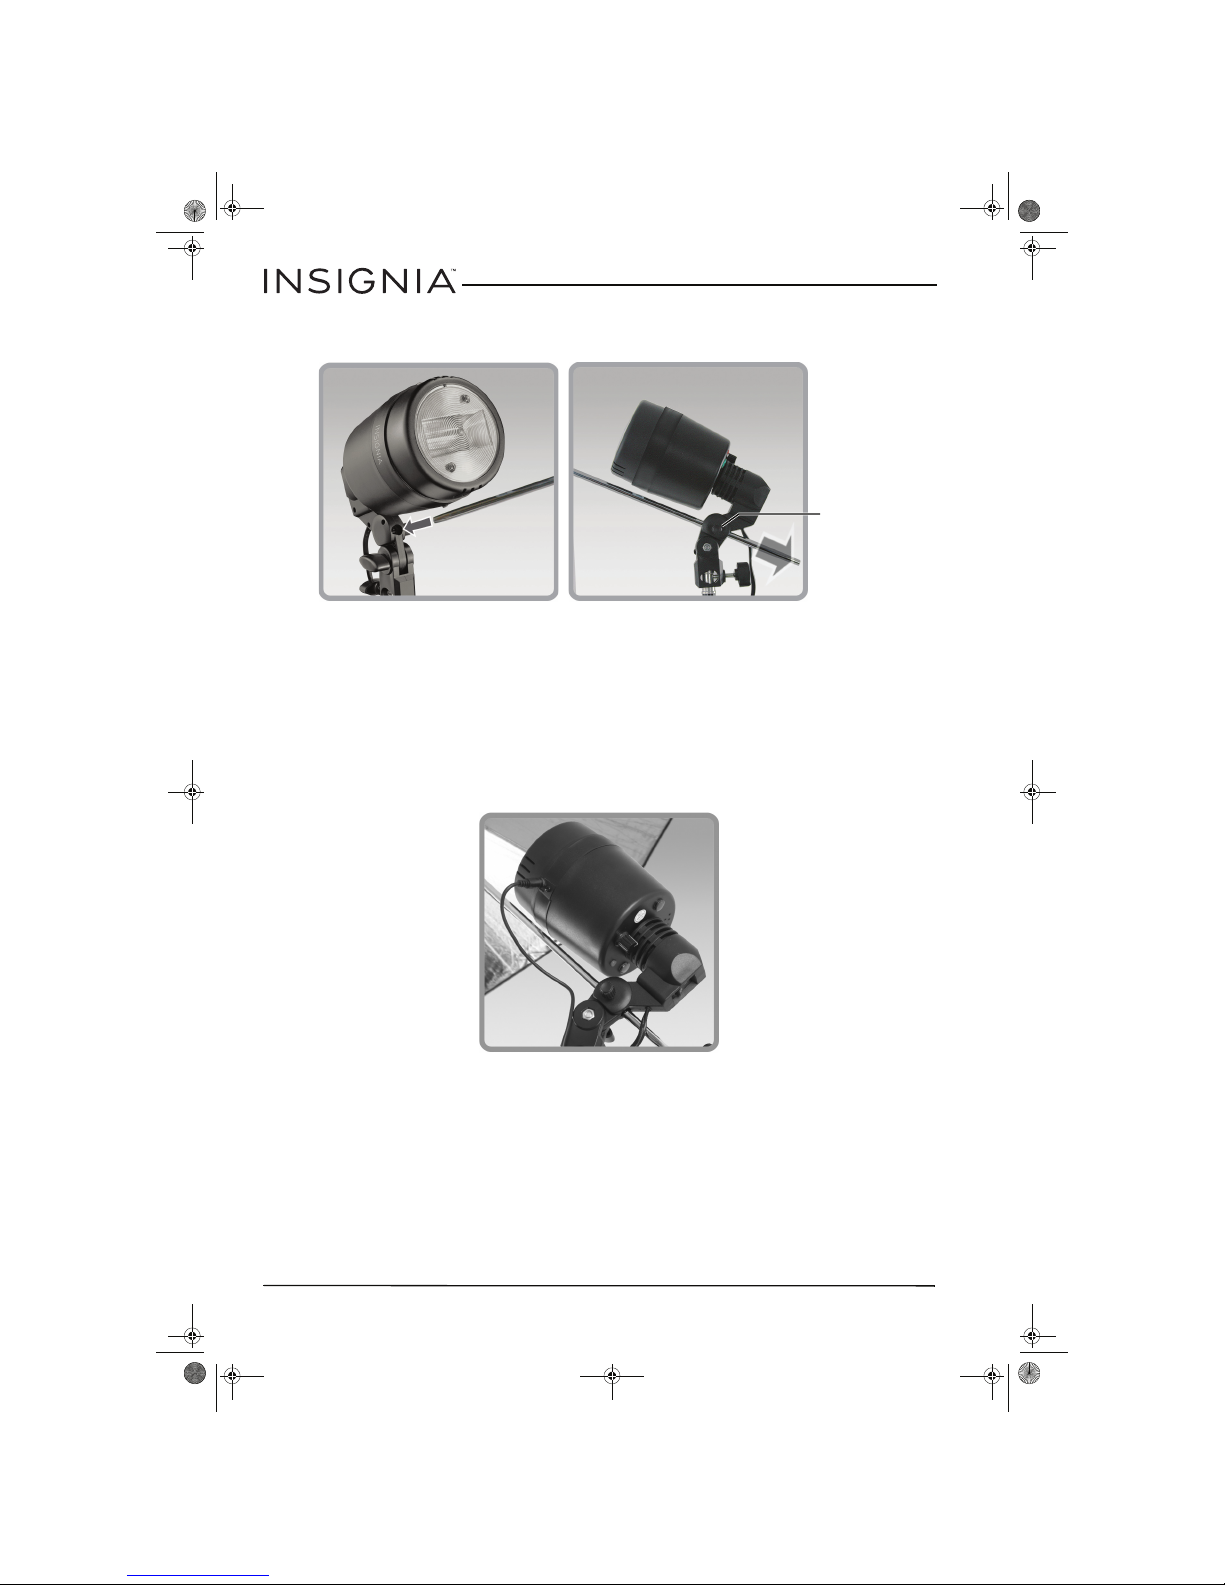
Assembling your flash kit . . . . . . . . . . . . . . . . . . . . . . . . . . . . . . . . . . . . . . . . . . . . . . . . . . . . . . . . . . . . . . . . . . . . . . . . 5
Using your flash kit . . . . . . . . . . . . . . . . . . . . . . . . . . . . . . . . . . . . . . . . . . . . . . . . . . . . . . . . . . . . . . . . . . . . . . . . . . . . . . 8
Troubleshooting. . . . . . . . . . . . . . . . . . . . . . . . . . . . . . . . . . . . . . . . . . . . . . . . . . . . . . . . . . . . . . . . . . . . . . . . . . . . . . . . . 9
Replacement parts . . . . . . . . . . . . . . . . . . . . . . . . . . . . . . . . . . . . . . . . . . . . . . . . . . . . . . . . . . . . . . . . . . . . . . . . . . . . . . 9
Specifications . . . . . . . . . . . . . . . . . . . . . . . . . . . . . . . . . . . . . . . . . . . . . . . . . . . . . . . . . . . . . . . . . . . . . . . . . . . . . . . . . . . 9
Legal notices . . . . . . . . . . . . . . . . . . . . . . . . . . . . . . . . . . . . . . . . . . . . . . . . . . . . . . . . . . . . . . . . . . . . . . . . . . . . . . . . . . . 10
One-year limited warranty - Insignia . . . . . . . . . . . . . . . . . . . . . . . . . . . . . . . . . . . . . . . . . . . . . . . . . . . . . . . . . . . . 11
IMPORTANT SAFETY INSTRUCTIONS
When using your photographic equipment, basic safety precautions should always be followed, including the following:
1Read and understand all instructions before using.
2Close supervision is necessary when any appliance is used by or near children. Do not leave the appliance
unattended while in use.
3Care must be taken as burns can occur from touching hot parts.
4The flash head switch is provided with the symbols O indicating off and | indicating on.
5Do not operate the appliance with a damaged cord or if the appliance has been dropped or damaged until it has
been examined by a qualified serviceman.
6Position the power cord and sync cable so that they will not be tripped over, pulled, or contact hot surfaces.
7If an extension cord is necessary, a cord with a current rating at least equal to that of the appliance should be used.
Cords rated for less amperage than the appliance may overheat.
8Always unplug the appliance from the electrical outlet before cleaning or servicing and when not in use. Never yank
the cord to pull the plug from the outlet. Grasp the plug and pull to disconnect.
9Let the appliance cool completely before putting away. Loop cord loosely around the flash head when storing.
10 To reduce the risk of electric shock, do not immerse this appliance in water or other liquids.
11 Keep dry. Do not handle with wet hands or immerse in or expose to water or rain. Failure to observe this precaution
could result in fire or electric shock.
12 Do not operate this appliance in damp or wet settings or outdoors when the appliance may be exposed to the wet
weather conditions.
13 Do not expose to high temperatures. Do not leave this appliance in a closed vehicle under the sun or in other areas
subject to extremely high temperature. Failure to observe this precaution could result in fire or damage to the
housing or internal parts.
14 To reduce the risk of electric shock, do not disassemble this appliance. If the appliance breaks open as the result of a
fall or other accident, do not use the appliance. Instead, take it to a qualified serviceman when service or repair work
is required. Incorrect reassembly can cause electric shock when the appliance is used subsequently.
15 The use of an accessory attachment not recommended by the manufacturer may cause a risk of fire, electric shock, or
injury to persons.
16 This appliance has a polarized plug (one blade is wider than the other). To reduce the risk of electric shock, this plug is
intended to fit in a polarized outlet only one way. If the plug does not fit fully in the outlet, reverse the plug. If it still
does not fit, contact a qualified electrician. Do not modify the plug in any way.
17 The flash produces a bright light that can damage a person's eyes. Do not point the flash at someone at a close range.
For close up shots, use an umbrella to defuse the light.
18 Turn off the flash immediately when it works abnormally and consult a qualified repair technician to determine the
cause.
19 Avoid sudden impacts.
20 Dedust the flash regularly.
21 The flash gets hot when in use. Avoid continuous flashes when it is not necessary. Avoid touching the flash when the
flash is in use.
22 The use of an accessory attachment not recommended by the manufacturer may cause a risk of fire, electric shock, or
injury to persons.
SAVE THESE INSTRUCTIONS
NS-DACMSFK_14-1397_V3_MAN_ENG.book Page 2 Thursday, December 4, 2014 10:15 AM

3
AC Master/Slave Flash Kit
www.insigniaproducts.com
Introduction
Congratulations on your purchase of a high-quality Insignia product. Your NS-DACMSFK represents the state of the
art in master/slave flash technology and is manufactured for reliable and trouble-free performance.
Features
• Versatile slave flash kit for indoor portrait or product shots
• Master sync or optical slave operation
• Continuously variable light output adjustment
• Guide number (GN) 27m at ISO100
• Recycle time of one to four seconds
Package contents
Flash head (2) Flash socket and holder (2) PC sync cable (2)
Light stand (2) Umbrella
32-inch black and silver (1)
Translucent (2)
Carrying case (1)
NS-DACMSFK_14-1397_V3_MAN_ENG.book Page 3 Thursday, December 4, 2014 10:15 AM

4
NS-DACMSFK AC Master/Slave Flash Kit
www.insigniaproducts.com
Flash head
#Item Description
1Flash window Covers the flash tube.
2PC sync cable jack Connect a PC sync cable to this jack and to your camera’s PC flash
sync jack, then set your camera to flash or sync mode.
3Flash intensity control knob
Turn this knob clockwise to increase the flash intensity or
counter-clockwise to decrease the intensity. You can select from 1/8
intensity to full intensity.
4TEST button Press this button to test the flash without taking a picture or to
release the stored flash power.
5READY indicator Lights green when the flash is fully charged. Lights red when the
flash is not fully charged.
6AC power plug Screw this plug into the power socket on the light holder, then
connect the light holder power cord to an AC power outlet.
7Light sensor Senses the light from your camera’s flash and triggers your slave
flash.
1
2
7
3
4
5
6
Front Back
NS-DACMSFK_14-1397_V3_MAN_ENG.book Page 4 Thursday, December 4, 2014 10:15 AM

5
AC Master/Slave Flash Kit
www.insigniaproducts.com
Light holder
Assembling your flash kit
To assemble you flash kit:
1Pull open the legs on a light stand, then slide the legs down until they are fully extended and lock into place.
2Open the locking knobs on the center stand column, extend the column to the height you want, then tighten
the knobs to lock the column in place.
Caution: Make sure the stand’s legs are fully extended and the center column is locked into place before
attaching the light holder.
#Item Description
1Power socket Screw the AC power plug on the bottom of the flash head into this
socket.
2Umbrella mounting hole Insert an umbrella through this hole.
3Angle adjustment knob Loosen this knob, tilt the light holder up or down to adjust the angle,
then tighten the knob.
4Power switch Press this switch to turn the flash on or off.
5Umbrella knob Loosen this knob, insert an umbrella through the umbrella mounting
hole, then tighten this knob to secure the umbrella in place.
6Light holder knob Tighten this knob to secure the light holder to the stand.
2
3
5
6
14
Stand leg
Locking knobs
Center column
NS-DACMSFK_14-1397_V3_MAN_ENG.book Page 5 Thursday, December 4, 2014 10:15 AM

6
NS-DACMSFK AC Master/Slave Flash Kit
www.insigniaproducts.com
3Place a light holder onto the top of a light stand, then tighten the light holder knob.
4Screw the AC power plug on the bottom of a flash head into the power socket on the light holder.
Warning: Do not plug the power cord into a power outlet until you have completed the flash head assembly.
Touching the exposed power socket when the power cord is plugged into a power outlet can cause an electric
shock or fire.
NS-DACMSFK_14-1397_V3_MAN_ENG.book Page 6 Thursday, December 4, 2014 10:15 AM

7
AC Master/Slave Flash Kit
www.insigniaproducts.com
5Loosen the umbrella mounting knob on the light holder, insert an umbrella though the umbrella mounting
hole, then tighten the knob.
Slide the tab on the umbrella handle over the tab to open the umbrella.
Notes:
• The black and silver umbrella diffuses, broadens, and evenly distributes the light from the flash. Point the silver
interior of the umbrella at the subject and the flash at the interior of the umbrella. The flash light bounces back
on the subject. The black exterior of the umbrella keeps light from escaping.
• The transparent umbrella softens the light from the flash. Point the exterior of the umbrella at the subject and
the flash at the interior of the umbrella. As the light from the flash passes through the umbrella, the light is
softened. The transparent umbrella is good for shooting close-up pictures and outdoor pictures in bright
sunlight.
6Optional:Insert one end of a PC sync cable into the PC sync cable jack on the slave flash, then plug the other
end of the cable into the your camera’s PC flash sync jack.
Note: If you camera does not have a PC flash sync jack, you can purchase a hotshoe adapter that lets you
connect a PC sync cable.
Notes:
• Your slave flash automatically fires when it detects the flash from a camera. Some cameras have a pre-flash
feature that fires a test flash before firing the main flash. The pre-flash adjusts camera settings to suit the
lighting environment. Your slave flash may fire when it detects the pre-flash. For accurate flash timing, set your
camera's flash mode to manual (instead of auto or TTL), and adjust the flash's power level so it is just enough
to fire the slave flash.
You can also adjust the flash timing from the flash PC sync port on your camera. The PC sync cable lets the
camera control your slave flash. When the camera shutter opens or the main camera flash fires, the camera
triggers your slave flash.
• Your flash kit comes with two flash heads and light stands. You can use the second flash head as a second
slave flash to provide additional lighting. The second flash head fires when it detects the light from the first
slash head or the camera. If you want to connect both slave flash heads using PC sync cables. You will need a
multi-flash controller unit (not provided).
Umbrella
mounting
knob
NS-DACMSFK_14-1397_V3_MAN_ENG.book Page 7 Thursday, December 4, 2014 10:15 AM

8
NS-DACMSFK AC Master/Slave Flash Kit
www.insigniaproducts.com
Using your flash kit
To use your flash kit:
1Assemble your flash kit. See “Assembling your flash kit” on page 5.
2If you are not using a PC sync cable, position the flash heads so that the light sensor on your flash head has a
clear line-of-sight to the camera’s flash.
3Point the flash head toward the surface you want the light to reflect off of. You can point the flash toward an
umbrella or a wall or other surface.
4Plug the power cord on the light holder into a power outlet, then press the power switch on the on back of the
flash head. When the flash is fully charged, the READY indicator lights green.
5If necessary, adjust the flash intensity. Turn the intensity knob clockwise to increase the flash intensity or
counter-clockwise to decrease the flash intensity.
6Take a picture.
Note
If you decrease the flash intensity, press the TEST button
to release the stored power. When the flash recharges, the
amount of stored power matches to lower setting.
Tips
For best results:
• Take several shots.
• If the picture is too dark, increase the flash intensity.
• If the picture is too light, decrease the flash intensity or
adjust the camera’s exposure.
• If the picture has unwanted shadows, move the flash or
use an umbrella to filter the light from the flash.
NS-DACMSFK_14-1397_V3_MAN_ENG.book Page 8 Thursday, December 4, 2014 10:15 AM

9
AC Master/Slave Flash Kit
www.insigniaproducts.com
Troubleshooting
Replacement parts
For a list of replacement or spare parts go to insigniaproducts.com. In the Search for Keyword/SKU box, enter your
model NS-DACMSFK, then press ENTER.
Specifications
Specifications are subject to change without notice.
Problem Possible solutions
My flash head does not turn on
and the power indicator does not
light.
• Make sure that the flash head is securely tightened to the flash holder socket.
• Make sure that the power cord is plugged into a working power outlet.
• Make sure the power switch on the back of the flash holder socket is turned on.
Picture looks bleached out • Decrease the flash intensity.
• Use an umbrella to soften the light from your flash head.
Picture is too dark • Increase the flash intensity.
• Use the black and silver umbrella to intensify the light from your flash head.
Using my flash does not seem to
change the lighting in a picture • Some cameras have a pre-flash feature that fires before the main flash. The
pre-flash adjusts camera settings to suit the lighting environment. Your slave
flash may fire when it detects the camera pre-flash. Make sure that the camera is
set to manual flash mode (not pre-flash).
• Another option is to use the PC sync cable to connect your slave flash to your
camera. The camera fires your slave flash when the main camera flash fires or
when the camera shutter opens.
• Your slave flash may also fire when it detects any bright light. For example, if you
turn on a lamp or light source near your slave flash, it may fire.
The slave flash goes off too late or
not at all • Make sure that the READY indicator has turned on before you take a picture.
• If the light sensor on your slave flash does not have a clear line-of-sight to the
camera’s flash or if the camera’s flash is weak, your slave flash may fire late or not
at all.
• Move your slave flash to provide a clear line-of sight.
• Use the PC sync cable to let the camera control your slave flash.
Camera’s flash does not seem
bright enough • Increase the flash intensity on your camera's flash settings.
• Make sure that the READY indicator has turned on before you take a picture.
The flash head fires by itself
without any camera interaction. • Make sure that there are no bright light sources close to the flash head’s sensor.
• The PC sync cable may be damaged. Try a different cable.
Power is on but the READY
indicator does not light. • Your flash’s internal thermal overload protection has activated. Let the flash
head cool for 10 to 20 minutes.
Max power (WS) 72
Guide number (m ISO 100) 27
Color temperature 5600K ± 200K
Operating voltage AC 120 V, 60Hz
Power control Stepless (1/8 to full power)
Recycle time 1 to 4 seconds
Trigger model Sync, slave, test button
Flash duration 1/2000-1/800s
Flash overload protection Thermally protected
Duty cycle Continuous with 1 flash every 30 sec. at full power
Thermally protected
Dimensions 4 × 6 in. (100 x 152 mm)
Weight Approximately 12 ounces (340 g)
NS-DACMSFK_14-1397_V3_MAN_ENG.book Page 9 Thursday, December 4, 2014 10:15 AM

10
NS-DACMSFK AC Master/Slave Flash Kit
www.insigniaproducts.com
Legal notices
FCC Part 15
This device complies with Part 15 of the FCC Rules. Operation of this product is subject to the following two conditions: (1) this device may not
cause harmful interference, and (2) this device must accept any interference received, including interference that may cause undesired
operation.
This equipment has been tested and found to comply within the limits for a class B digital device, pursuant to Part 15 of the FCC Rules. These
limits are designed to provide reasonable protection against harmful interference in a residential installation. This equipment generates, uses,
and can radiate radio frequency energy and, if not installed and used in accordance with the instructions, may cause harmful interference to
radio communications. However, there is no guarantee that interference will not occur in a particular installation. If this equipment does cause
harmful interference to radio or television reception, which can be determined by turning the equipment off and on, the user is encouraged to
try to correct the interference by one or more of the following measures:
• Reorient or relocate the receiving antenna.
• Increase the separation between the equipment and receiver.
• Connect the equipment into an outlet on a circuit different from that to which the receiver is connected.
• Consult the dealer or an experienced radio/TV technician for help.
FCC warning
Changes or modifications not expressly approved by the party responsible for compliance with the FCC Rules could void the user’s authority to
operate this equipment.
NS-DACMSFK_14-1397_V3_MAN_ENG.book Page 10 Thursday, December 4, 2014 10:15 AM

11
AC Master/Slave Flash Kit
www.insigniaproducts.com
One-year limited warranty - Insignia
Definitions:
The Distributor* of Insignia branded products warrants to you, the original purchaser of this new Insignia-branded product (“Product”), that the
Product shall be free of defects in the original manufacturer of the material or workmanship for a period of one (1) year from the date of your
purchase of the Product (“Warranty Period”).
For this warranty to apply, your Product must be purchased in the United States or Canada from a Best Buy branded or Future Shop branded
retail store or online at
www.bestbuy.com, www.bestbuy.ca, or www.futureshop.ca
and is packaged with this warranty statement.
How long does the coverage last?
The Warranty Period lasts for 1 year (365 days) from the date you purchased the Product. Your purchase date is printed on the receipt you
received with the Product.
What does this warranty cover?
During the Warranty Period, if the original manufacture of the material or workmanship of the Product is determined to be defective by an
authorized Insignia repair center or store personnel, Insignia will (at its sole option): (1) repair the Product with new or rebuilt parts; or (2) replace
the Product at no charge with new or rebuilt comparable products or parts. Products and parts replaced under this warranty become the
property of Insignia and are not returned to you. If service of Products or parts are required after the Warranty Period expires, you must pay all
labor and parts charges. This warranty lasts as long as you own your Insignia Product during the Warranty Period. Warranty coverage terminates
if you sell or otherwise transfer the Product.
How to obtain warranty service?
If you purchased the Product at a Best Buy or Future Shop retail store location, please take your original receipt and the Product to any Best Buy
or Future Shop store. Make sure that you place the Product in its original packaging or packaging that provides the same amount of protection
as the original packaging. If you purchased the Product from a Best Buy or Future Shop online web site (www.bestbuy.com, www.bestbuy.ca, or
www.futureshop.ca), mail your original receipt and the Product to the address listed on the web site. Make sure that you put the Product in its
original packaging or packaging that provides the same amount of protection as the original packaging.
To obtain warranty service, in the United States call 1-888-BESTBUY, Canada call 1-866-BESTBUY for Future Shop call 1-800-663-2275. Call agents
may diagnose and correct the issue over the phone.
Where is the warranty valid?
This warranty is valid only in the United States and Canada at Best Buy or Future Shop branded retail stores or websites to the original purchaser
of the product in the county where the original purchase was made.
What does the warranty not cover?
This warranty does not cover:
• Customer instruction/education
• Installation
•Setupadjustments
•Cosmeticdamage
• Damage due to weather, lightning and other acts of God, such as power surges
• Accidental damage
•Misuse
•Abuse
• Negligence
• Commercial purposes/use, including but not limited to use in a place of business or in communal areas of a multiple dwelling
condominium or apartment complex, or otherwise used in a place of other than a private home.
• Modification of any part of the Product, including the antenna
• Display panel damaged by static (non-moving) images applied for lengthy periods (burn-in).
• Damage due to incorrect operation or maintenance
• Connection to an incorrect voltage or power supply
• Attempted repair by any person not authorized by Insignia to service the Product
• Products sold “as is” or “with all faults”
• Consumables, including but not limited to batteries (i.e. AA, AAA, C etc.)
• Products where the factory applied serial number has been altered or removed
• Loss or Theft of this product or any part of the product
• Display panels containing up to three (3) pixel failures (dots that are dark or incorrectly illuminated) grouped in an area smaller than one
tenth (1/10) of the display size or up to five (5) pixel failures throughout the display. (Pixel based displays may contain a limited number of
pixels that may not function normally.)
• Failures or Damage caused by any contact including but not limited to liquids, gels or pastes.
REPAIR OR REPLACEMENT AS PROVIDED UNDER THIS WARRANTY IS YOUR EXCLUSIVE REMEDY FOR BREACH OF WARRANTY. INSIGNIA SHALL
NOT BE LIABLE FOR ANY INCIDENTAL OR CONSEQUENTIAL DAMAGES FOR THE BREACH OF ANY EXPRESS OR IMPLIED WARRANTY ON THIS
PRODUCT, INCLUDING, BUT NOT LIMITED TO, LOST DATA, LOSS OF USE OF YOUR PRODUCT, LOST BUSINESS OR LOST PROFITS. INSIGNIA
PRODUCTS MAKES NO OTHER EXPRESS WARRANTIES WITH RESPECT TO THE PRODUCT, ALL EXPRESS AND IMPLIED WARRANTIES FOR THE
PRODUCT, INCLUDING, BUT NOT LIMITED TO, ANY IMPLIED WARRANTIES OF AND CONDITIONS OF MERCHANTABILITY AND FITNESS FOR A
PARTICULAR PURPOSE, ARE LIMITED IN DURATION TO THE WARRANTY PERIOD SET FORTH ABOVE AND NO WARRANTIES, WHETHER EXPRESS OR
IMPLIED, WILL APPLY AFTER THE WARRANTY PERIOD. SOME STATES, PROVINCES AND JURISDICTIONS DO NOT ALLOW LIMITATIONS ON HOW
LONG AN IMPLIED WARRANTY LASTS, SO THE ABOVE LIMITATION MAY NOT APPLY TO YOU. THIS WARRANTY GIVES YOU SPECIFIC LEGAL RIGHTS,
AND YOU MAY ALSO HAVE OTHER RIGHTS, WHICH VARY FROM STATE TO STATE OR PROVINCE TO PROVINCE.
Contact Insignia:
For customer service please call 1-877-467-4289 (U.S. and Canada) 01-800-926-3000 (Mexico)
www.insigniaproducts.com
*Distributed by Best Buy Purchasing LLC
7601 Penn Avenue South, Richfield, Minnesota, U.S.A. 55423-3645
© 2014 BBY Solutions, Inc.
All rights reserved. INSIGNIA is a trademark of BBY Solutions, Inc. Registered in some countries. All other products and brand names are
trademarks of their respective owners.
Made in China
NS-DACMSFK_14-1397_V3_MAN_ENG.book Page 11 Thursday, December 4, 2014 10:15 AM

www.insigniaproducts.com
1-877-467-4289 (U.S. and Canada) 01-800-926-3000 (Mexico)
*Distributed by Best Buy Purchasing, LLC
7601 Penn Avenue South, Richfield, Minnesota, U.S.A. 55423-3645
© 2014 BBY Solutions, Inc.
All rights reserved. INSIGNIA is a trademark of BBY Solutions, Inc. Registered in some countries.
All other products and brand names are trademarks of their respective owners.
Made in China
V3 ENGLISH
14-1397
NS-DACMSFK_14-1397_V3_MAN_ENG.book Page -1 Thursday, December 4, 2014 10:15 AM
Table of contents
Other Insignia Camera Accessories manuals

Insignia
Insignia NS-DFD04 User manual

Insignia
Insignia NS-DGPSMC10 User manual

Insignia
Insignia Dual Layer Convertible Umbrella User manual

Insignia
Insignia NS-M16LED10 User manual

Insignia
Insignia NS-DTRP65 User manual

Insignia
Insignia NS-TPR58 User manual

Insignia
Insignia NS-MPKIT50 User manual

Insignia
Insignia NS-WSCC User manual

Insignia
Insignia NS-DLCDH3 User manual

Insignia
Insignia NS-DCLR42X5 User manual