Inspired Flight IF1200 User manual

IF1200 Hexacopter
HereLink Blue
HereLink Black
LRT
User Manual
IFT Doc. Num. 102090, Rev. 3.00

IF1200 User Manual
Copyright 2022 by Inspired Flight Technologies
Document Number: 102090
This document shall not be copied or reproduced, whether in whole or in part, in any form or by
any means without the express written authorization of Inspired Flight Technologies. The
information, technical data, designs and drawings disclosed in this document are proprietary
information of Inspired Flight Technologies or third parties and shall not be used or disclosed to
any third party without permission of Inspired Flight Technologies.
Address: 225 Suburban Rd, San Luis Obispo, CA 93401
On the Web:https://inspiredflight.com/
Contact us:
●Phone: (805) 776-3640
●Email:[email protected].
IFT Doc. Num. 102090, Rev. 3.00

IF1200 User Manual
Table of Contents
Safety Information and Notes 1
IF1200 Overview 2
Hand Controllers 4
HereLink Blue Hand Controller 5
HereLink Black Hand Controller 6
Long Range Telemetry (LRT) 7
Battery Charging 9
Install QGroundControl 15
Assemble the Aircraft 16
Using HereLink Hand Controllers 24
Set Up the Long Range Telemetry (LRT) Radio 26
Power On the Aircraft 28
Flight Modes 29
Arm and Disarm 32
Takeoff and Landing 33
Power Off the Aircraft 34
Planning a Mission 35
Preflight Checklist 45
Appendix 46
Security Risks and Mitigation 47
Registering an Aircraft with the FAA 48
Critical Situations 49
Upgrading the Aircraft Firmware 50
Calibrate the Compass 53
Calibrate the Accelerometers 56
IF1200 Maintenance Schedule 58
Revisions 59
IFT Doc. Num. 102090, Rev. 3.00
IF1200 User Manual 1. Safety Information and Notes
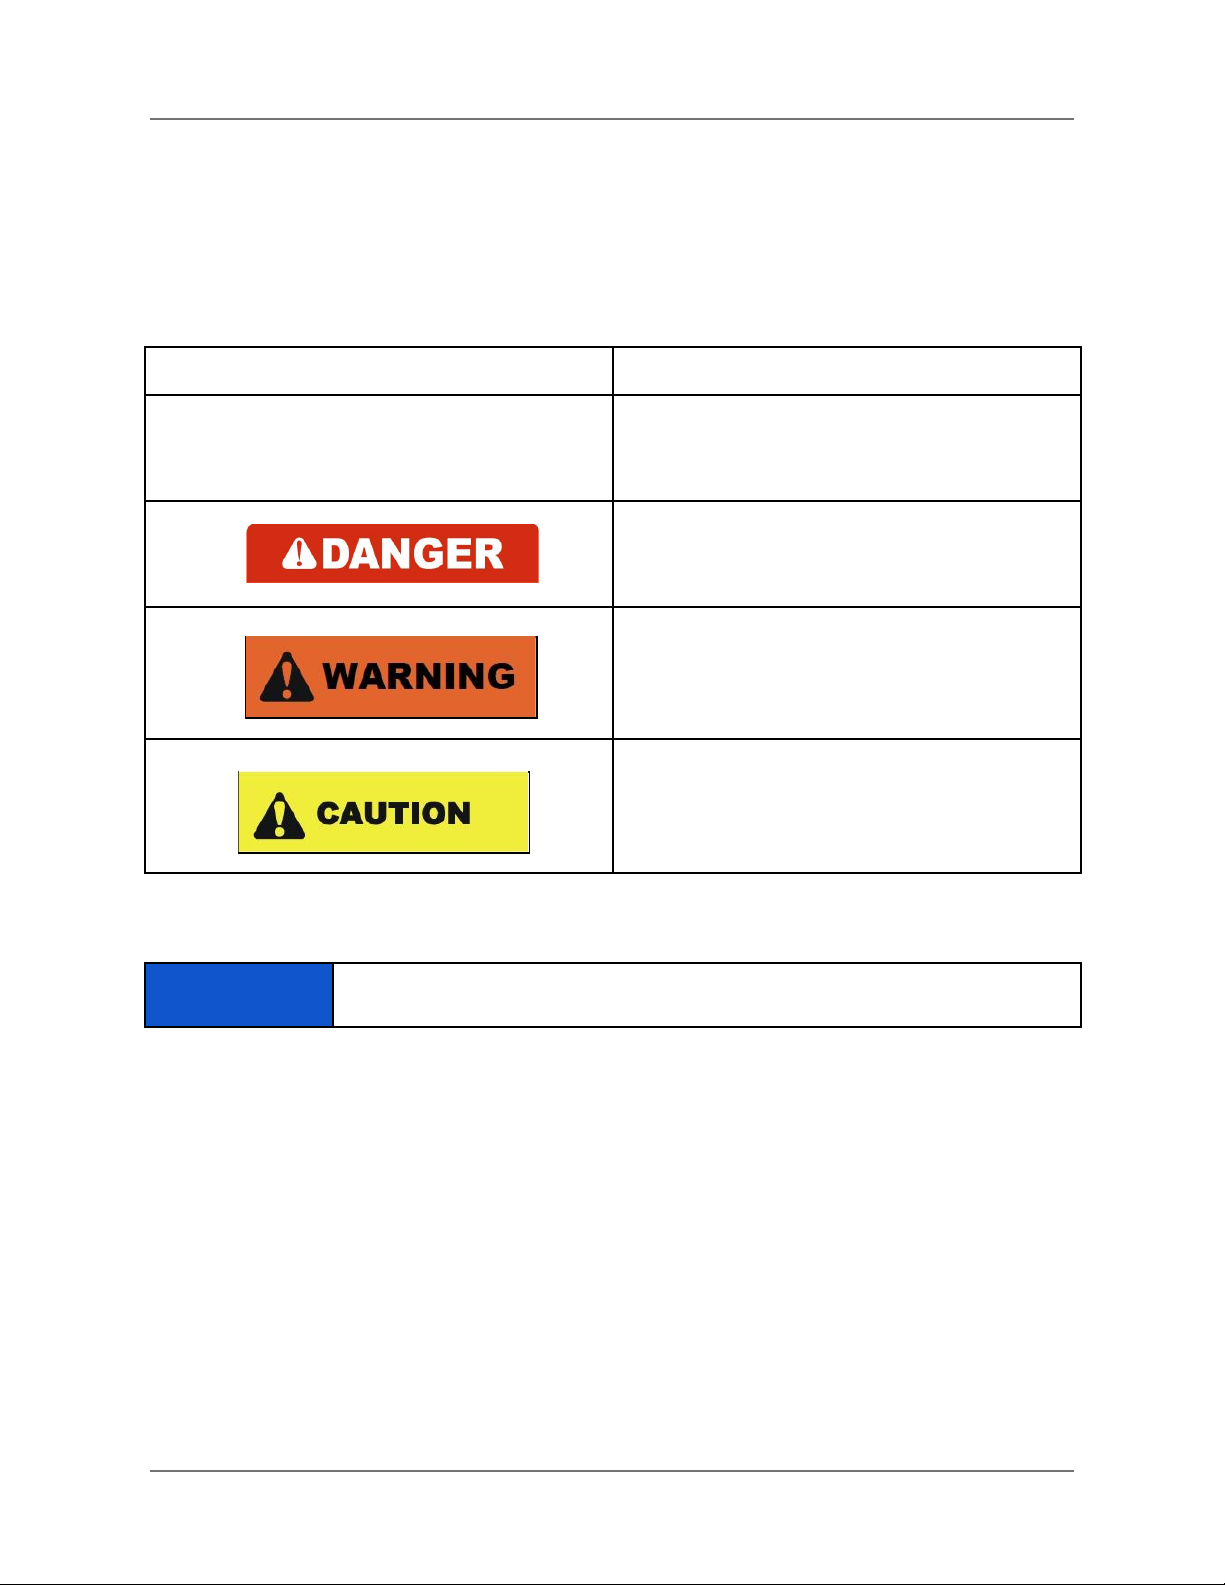
1. Safety Information and Notes
The IF1200 is a high-performance system, engineered for safe use. Where appropriate, this
manual alerts the user to specific actions necessary for safe operation of the aircraft.
The following symbols are used:
Symbol
Meaning
General alert to an action or condition that
may affect the safe operation of the
equipment.
Indicates a hazardous situation that, if not
avoided, can result in death or serious injury.
Indicates hazards or unsafe practices which
could result in severe personal injury or death
Indicates hazards or unsafe practices which
could result in minor personal injury or
equipment damage.
NOTE
Offers important information about a topic.
IFT Doc. Num. 102090, Rev. 3.00 Page 1

IF1200 User Manual 2. IF1200 Overview
2. IF1200 Overview
The IF1200 is an American-made, NDAA-compliant heavy-lift hexacopter. This User Manual
describes how to utilize the full functionality of this aircraft to meet your most demanding needs.
There are three models of the IF1200, which differ according to the hand controller they use:
● IF1200 HereLink Blue: uses the Union Robotics HereLink Blue hand controller
● IF1200 HereLink Black: uses the Cube Pilot HereLink hand controller
● IF1200 Long Range Telemetry (LRT): uses the Jeti DS-12 hand controller in conjunction
with the RFD900x-US radio.
All three versions of the IF1200 are identical except for the hand controller. This User Manual
describes all three versions.
Figure 1 below shows major components of the IF1200 aircraft. Figure 2 on the next page
shows the front view of the aircraft,
Orientation: In this manual, the side of the IF1200 that has the GPS mast is referred to as the
“front” of the aircraft.
Figure 1. IF1200 (Top View)
IFT Doc. Num. 102090, Rev. 3.00 Page 2

IF1200 User Manual 2. IF1200 Overview
Figure 2. Front View of the IF1200 Aircraft
IFT Doc. Num. 102090, Rev. 3.00 Page 3

IF1200 User Manual 3. Hand Controllers
3. Hand Controllers
The IF1200 includes one of the hand controllers shown below. Click on the link to go to the page
for that hand controller.
NOTE: The HereLink Blue and HereLink Black both have QGroundControl software installed at
the factory.
HereLink Blue (Union Robotics)
QGroundControl installed
Using HereLink Hand Controllers
HereLink Black (CubePilot HereLink HD video
transmission system)
QGroundControl installed
Using HereLink Hand Controllers
IF1200 Long Range Telemetry (LRT)
Uses a Jeti DS-12 hand controller (shown at left),
and RFD900x-US long range telemetry radio
QGroundControl installed
Long Range Telemetry (LRT)
IFT Doc. Num. 102090, Rev. 3.00 Page 4

IF1200 User Manual 4. HereLink Blue Hand Controller
4. HereLink Blue Hand Controller
This configuration uses the HereLink Blue hand controller, made by Union Robotics. The User
Guide for this hand controller can be found online at:
https://docs.union-robotics.com/manuals/blue-herelink-overview
The HereLink Blue GCS has an internal battery which can be charged via a micro USB port on
the bottom of the unit.
The HereLink Blue hand controller has QGroundControl software installed at the factory.
Note: The HereLink hand controller can be used while it is being charged.
Figure 3. HereLink Blue Hand Controller
IFT Doc. Num. 102090, Rev. 3.00 Page 5

IF1200 User Manual 5. HereLink Black Hand Controller
5. HereLink Black Hand Controller
This IF1200 version uses the HereLink Black hand controller, made by CubePilot. The HereLink
Black User Guide can be found online at:
https://www.cubepilot.com/#/herelink/features
Note: The HereLink hand controller can be used while it is being charged.
Figure 4. HereLink Black Hand Controller
IFT Doc. Num. 102090, Rev. 3.00 Page 6

IF1200 User Manual 6. Long Range Telemetry (LRT)
6. Long Range Telemetry (LRT)
Description
The LRT kit includes:
● IF1200 aircraft
● Jeti DS-12 hand controller
● RFD900x-US telemetry radio
Customer-supplied:
● Laptop or tablet, with QGroundControl installed. The RFD900x-US telemetry radio plugs
into a USB port on this device.
The RFD900x-US telemetry connects to a USB port on the laptop or tablet.
The device, (laptop or tablet), operates as a ground control station. QGroundControl (QGC)
software must be installed on the device before flying. QGC is an open-source mission planning
software for aircraft running PX4, and is extremely well documented. You are encouraged to
review the user guide at: https://docs.qgroundcontrol.com/en/.
Figure 5. Long Range Telemetry Configuration
IFT Doc. Num. 102090, Rev. 3.00 Page 7

IF1200 User Manual 6. Long Range Telemetry (LRT)
Figure 6. Jeti DS-12 Hand Control
IFT Doc. Num. 102090, Rev. 3.00 Page 8

IF1200 User Manual 7. Battery Charging
7. Battery Charging
The IF1200 kit uses a Tattu TA1200 battery charger (see below) for charging the flight batteries.
The Tattu charger can charge two batteries simultaneously. Looking at the top of the charger,
you can see that both sides of the charger have the same controls, outputs, and displays.
NOTE
Please read the Tattu TA1200 Product Manual thoroughly before using the
charger.
Figure 7. Tattu TA1200 Battery Charger
IFT Doc. Num. 102090, Rev. 3.00 Page 9

IF1200 User Manual 7. Battery Charging
Charge the Flight Batteries
IMPORTANT! Read the accompanying charger manual thoroughly before
connecting power and batteries to the charger. It contains important safety
information.
NOTE
Balancing cells: The flight batteries used in the IF1200 contain multiple cells.
Differences in the voltages between cells can degrade the performance of the
batteries, and shorten its life. The Tattu battery charger has a function for
balancing the voltages of the cells. Read the included manual to implement this
function.
Step
Action
Note: This procedure describes how to set up a single battery for charging. The Tattu charger
can charge two fly batteries simultaneously.
1
Connect the included AC power cable into the AC input connector on the charger.
2
Connect the other end of the AC power cable to a power source (100V–240 VAC).
3
Press the power button on the side of the battery charger (see below) to power on
the unit. Fans begin spinning, and the LCD displays on top of the charger illuminate.
Continued next page
IFT Doc. Num. 102090, Rev. 3.00 Page 10

IF1200 User Manual 7. Battery Charging
Charge the Flight Batteries, Continued
Step
Action
4
Rotate the Charge Mode dial (see below) to select the charge mode.
There are three charging modes:
● Trickle: The slowest charging rate. Use Trickle mode when possible to extend
the battery life.
● Standard: A compromise between Trickle and Fast
● Fast: Typically used in the field
Note: Faster charging rates shorten the battery’s lifespan.
Continued next page
IFT Doc. Num. 102090, Rev. 3.00 Page 11

IF1200 User Manual 7. Battery Charging
Charge the Flight Battery, Continued
Step
Action
5
Uncap the battery cable and plug it into the Power Interface port on the charger (see
below).
Note: The battery cable and Power Interface port on the charger are designed to
prevent incorrect mating of the two.
6
Once connected, the battery goes through a precharge countdown for 10 seconds,
then begins charging automatically.
Note: To skip the precharge countdown, hold the ‘Charge’ button for 2 seconds.
7
Cell voltages and battery levels are displayed on the LCD screen. When the battery
is fully charged, each cell voltage should be about 4.20 Volts, and the charger will
display ‘Fully Charged’.
NOTE
If you can’t wait for the battery to fully charge, power off the charger by pressing the
‘On/Off’ button BEFORE unplugging the battery to avoid an error message being
displayed on the LCD.
DO NOT disconnect the battery cable from the charger while the
flight batteries are charging. Doing so may result in electrical
arcing, causing severe burns to the operator.
End of Procedure
IFT Doc. Num. 102090, Rev. 3.00 Page 12

IF1200 User Manual 7. Battery Charging
Balancing the Battery’s Cells
The flight battery used with the IF1200 are composed of individual cells. During the life of a
battery, individual cells voltages may differ from each other, which shortens the lifespan of the
battery. The cells’ voltages must be ‘balanced’ so that all of the cells’ voltages are within the
same voltage range.
When the battery is connected to the charger, individual cell voltages are displayed on the LCD
screen.
NOTE
It is recommended to balance a battery’s cells once every 10 charge cycles, or
whenever the red triangular LEDs on the battery are illuminated.
The following procedure describes how to balance the cells in a battery.
Balance a Battery’s Cells
Step
Action
1
Power on the battery charger.
2
Locate the Balance Cable in the aircraft kit.
3
Connect one end of the Balance Cable to the Balance Interface on the charger (see
Figure 7), and the other end to the Balance port on the battery.
4
Perform the battery charging procedure described in the previous section.
End of Procedure
Storage Mode
If a battery will be shipped or will not be used for long periods of time, it is highly recommended
that the battery be placed into storage mode. Depending on the battery’s state of charge, putting
the battery into storage mode will either charge or discharge the battery to a voltage that is most
stable for shipping and sitting for long periods of time.
To place a battery into storage mode, plug the battery’s power cable into the charger and hold
the Storage button for 5 seconds. The charger will beep, the fans will spin up, and the LCD
display will indicate that storage mode has begun.
IFT Doc. Num. 102090, Rev. 3.00 Page 13

IF1200 User Manual 7. Battery Charging
Troubleshooting Battery Charging
Error message appears on the screen:
● Unplug the battery and press the ‘Charge’ button to reset the interface.
Popping or arcing when plugging the battery into the charger:
● The battery likely needs to be balanced. Plug in the balance cable to both the charger
and battery, then plug the main lead of the battery into the charger to conduct a balance
charge.
IFT Doc. Num. 102090, Rev. 3.00 Page 14
IF1200 User Manual 8. Install QGroundControl
8. Install QGroundControl
QGroundControl (QGC) is an open-source mission planning and configuration software for
aircraft using the MAVLink Communication Protocol. QGC is extremely well documented and we
encourage all first-time users to review the available user guide at:
https://docs.qgroundcontrol.com/en/. Training videos describing all aspects of planning and
uploading an autonomous mission are available online.
The following procedure describes how to install QGC onto a laptop or tablet.
Install QGC onto a Device
Step
Action
1
Download the QGroundControl installer from http://qgroundcontrol.com/. The
download links for PC, Mac or Android tablets can be found on the top right
‘Downloads’ drop-down menu of the website (see below).
2
Follow the prompts on the website to download and install QGC to your device.
3
To establish a link between the aircraft and QGC, power on the ground station (and
open QGC) BEFORE you power on the aircraft. QGC automatically connects to the
aircraft when it powers up.
End of Procedure
IFT Doc. Num. 102090, Rev. 3.00 Page 15

IF1200 User Manual 9. Assemble the Aircraft
9. Assemble the Aircraft
Step
Action
1
Remove the aircraft from its shipping container and gently set aside. The landing gear
are located in the two horizontal cavities under the aircraft.
2
The aircraft has two landing gear, each made of a horizontal tube, and a vertical tube
(see figure 8 below).
3
On one of the horizontal tubes (with the rubber feet), loosen the clamp.
4
Insert a vertical tube into the horizontal tube so that the rubber O-rings are on the
lower half, toward the horizontal tube.
Note: There is a notch in the end of each vertical tube (see Figure 9 on the next
page). Insert the vertical tube so that the notch aligns with the inner features of the
horizontal tube, so that the vertical tube is fully seated in the horizontal tube.
Continued next page
Figure 8. IF1200 Landing Gear Assembly
IFT Doc. Num. 102090, Rev. 3.00 Page 16

IF1200 User Manual 9. Assemble the Aircraft
Step
Action
5
The ratcheting arm can be pulled away from the screw to move the arm to a more
convenient location when tightening. Tighten the clamp.
6
Repeat steps 3 through 5 to assemble the second landing gear.
Continued next page
Figure 9. Alignment Notch in the end of the Vertical Tube
IFT Doc. Num. 102090, Rev. 3.00 Page 17
Other manuals for IF1200
3
Table of contents
Other Inspired Flight Toy manuals


Popular Toy manuals by other brands


Doctor Dreadful
Doctor Dreadful Alien Slime Drink Instruction guide

TP active fun
TP active fun Muddy Maker Mud Kitchen Instructions for assembly, maintenance and safe use

Black Horse Model
Black Horse Model P47 Thunderbolt Instruction manual book

REVELL
REVELL Supermarine Walrus Mk.I Assembly manual

Rapido
Rapido GMD-1 Product guide

M.T.H.
M.T.H. PREMIER FM TRAINMASTER operating instructions