Inspired Flight IF1200 User manual
IF1200 Hexacopter
User Manual

Table of Contents
Aircraft Overview 3
Controller Overview 4
Tattu TA1200 Battery Charger 6
Battery Charging Instructions 7
Installing QGroundControl 10
Set-Up Aircraft 11
Installing Batteries 14
Installing Propellers 17
Powering On Vehicle 20
Powering On Controller 21
Flight Modes 21
Altitude Mode 21
Position Mode 21
Return to Home Mode 22
Kill Switch 22
Opening QGroundControl 24
Arming and Takeoff 25
Landing and Disarming 27
Planning an Autonomous Mission 28
Motor Navigation Lights 34
Appendix 35
Registering Vehicle with FAA 35
Calibrating the Compass 35
Re-binding the Controller 37
System Failure 37
2
1. Product Profile
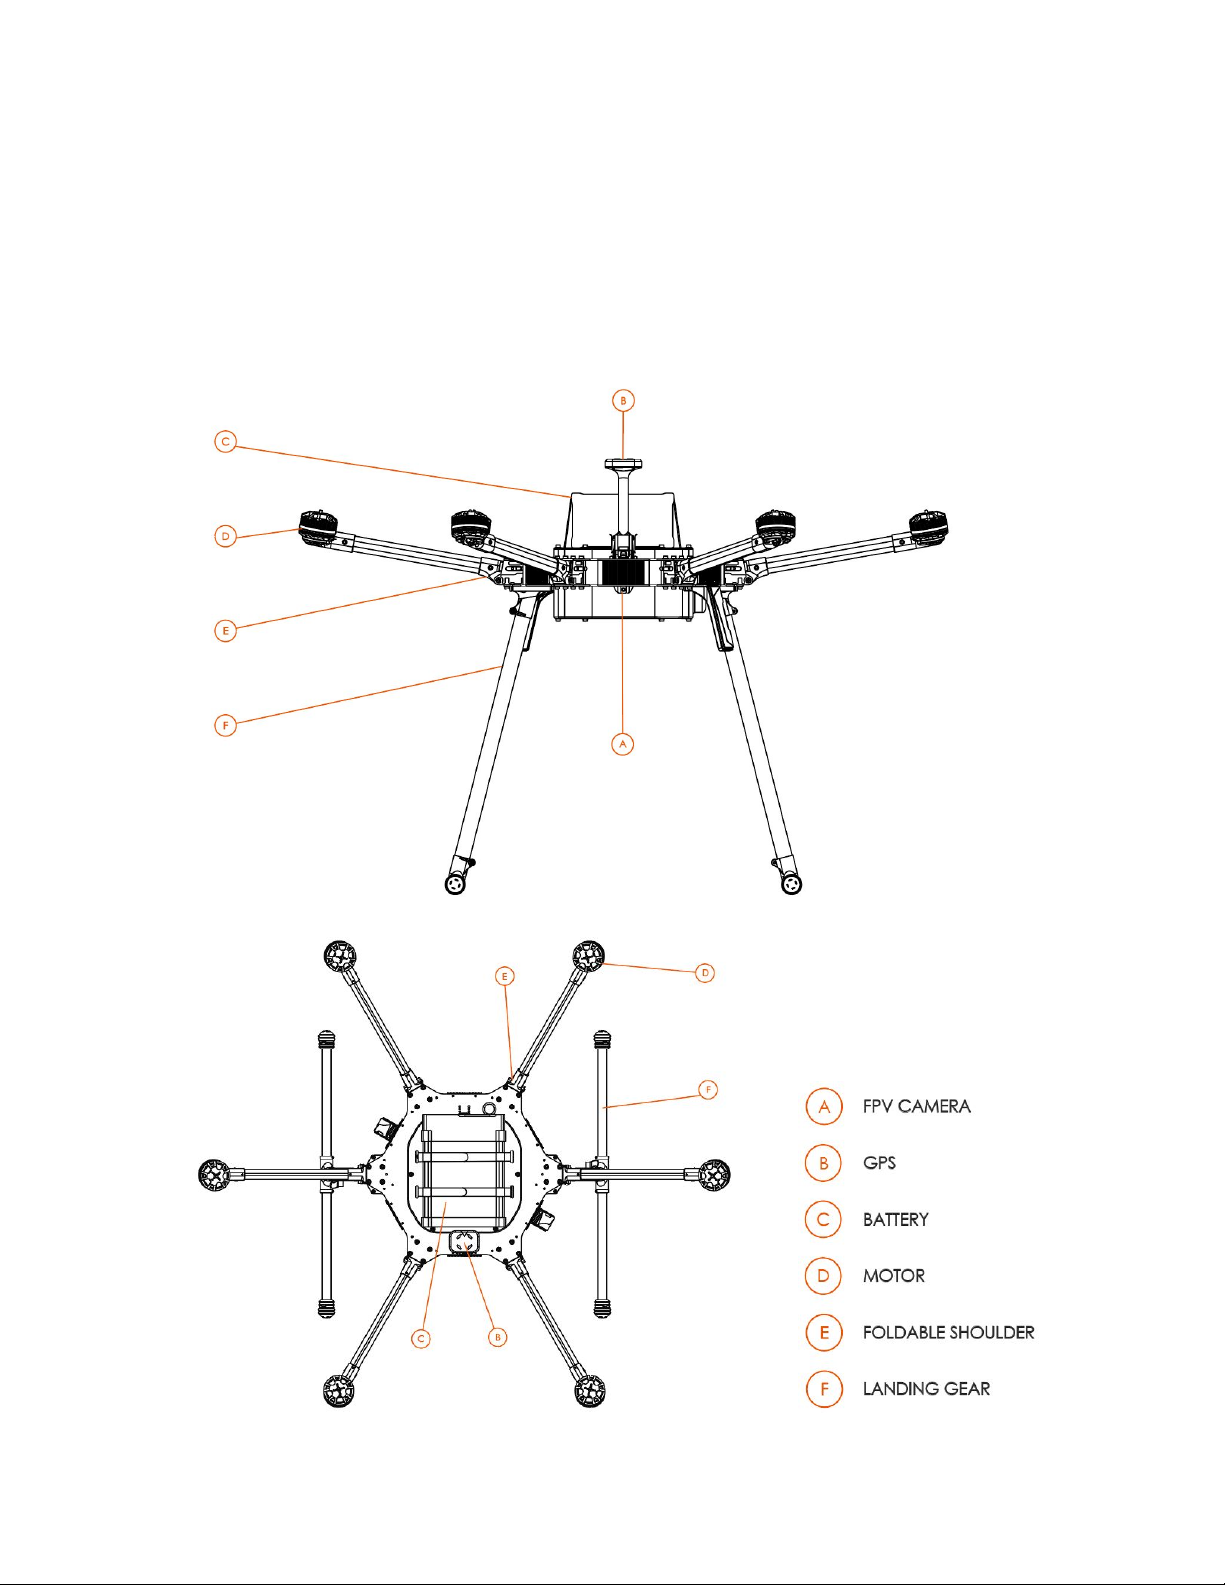
1.1. Aircraft Overview
Each IF1200 comes bound and ready to fly. Listed below are all the various
subassemblies included in the kit.
3
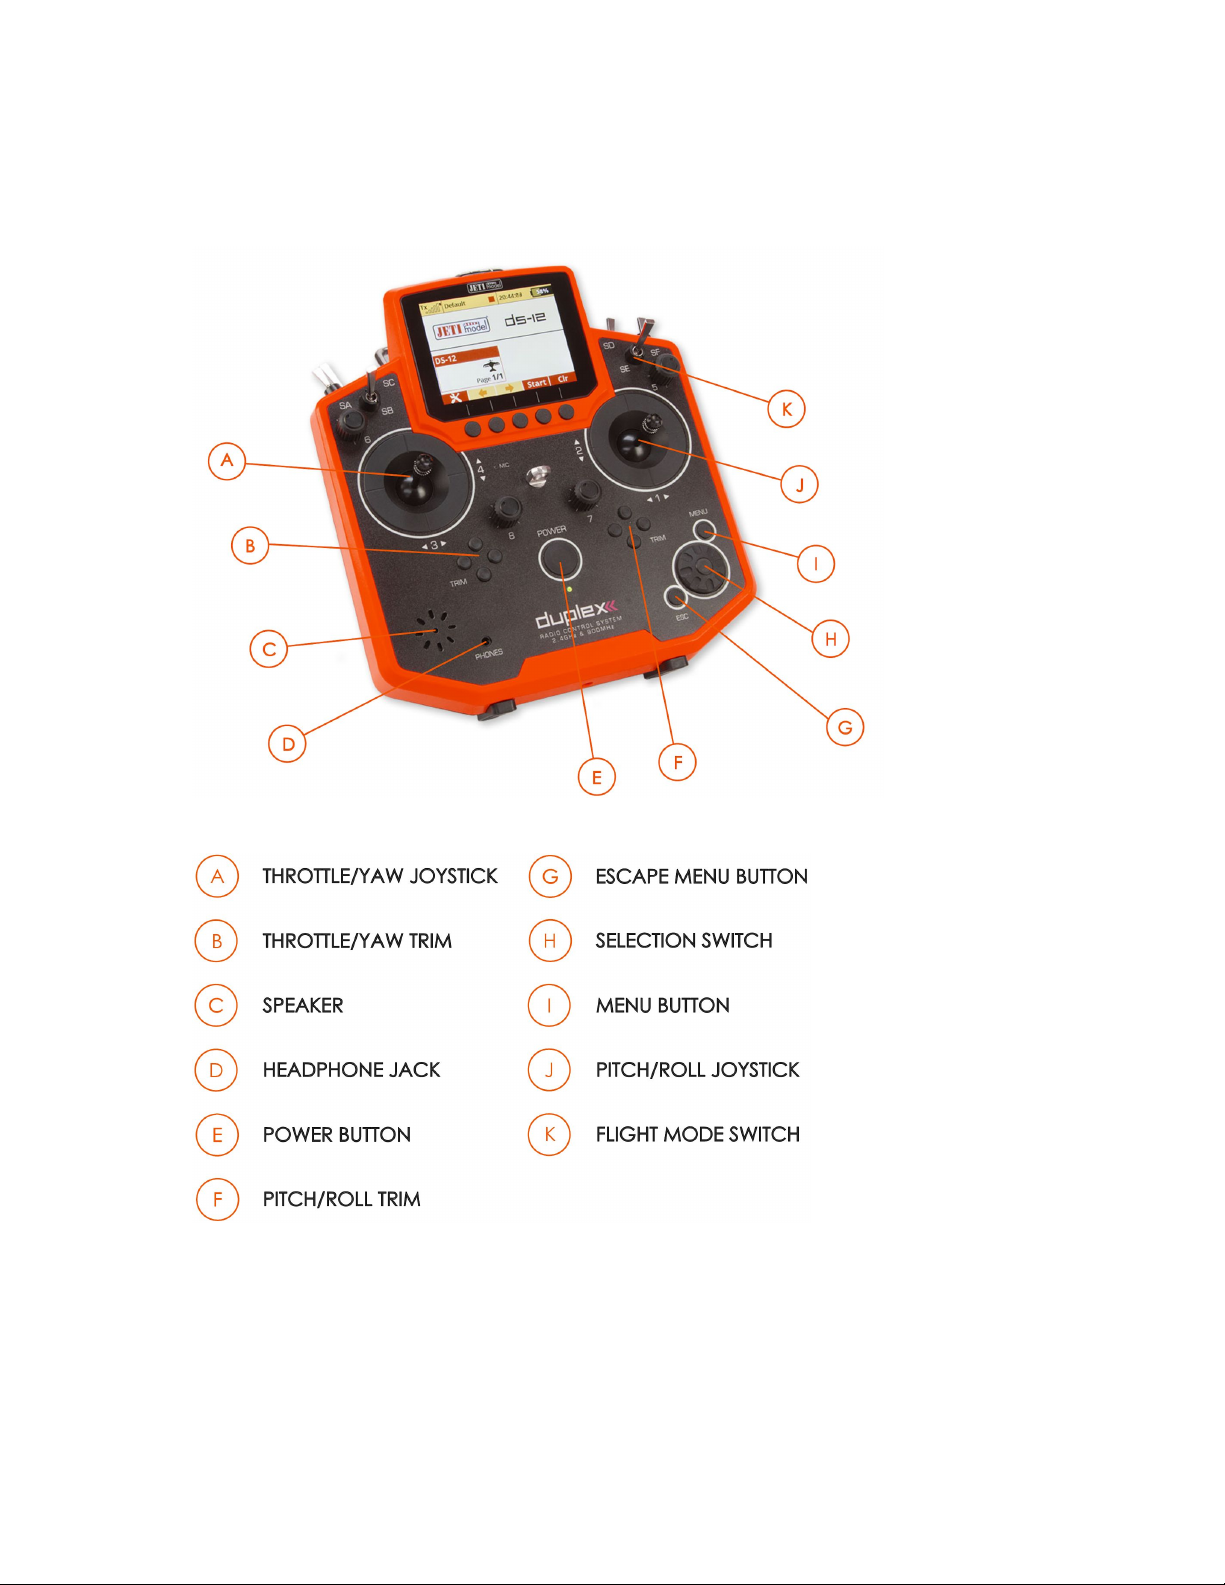
1.2. Controller Overview
Jeti DS-12 Controller
Note: Switches not labelled are not programmed for standard use, but can be
customized to conduct any Mavlink commands
4

Herelink Controller
Note: Switches labeled as ‘Disabled’ are not programmed for standard use, but can be
customized to conduct any Mavlink commands
5
2. Flight Instructions
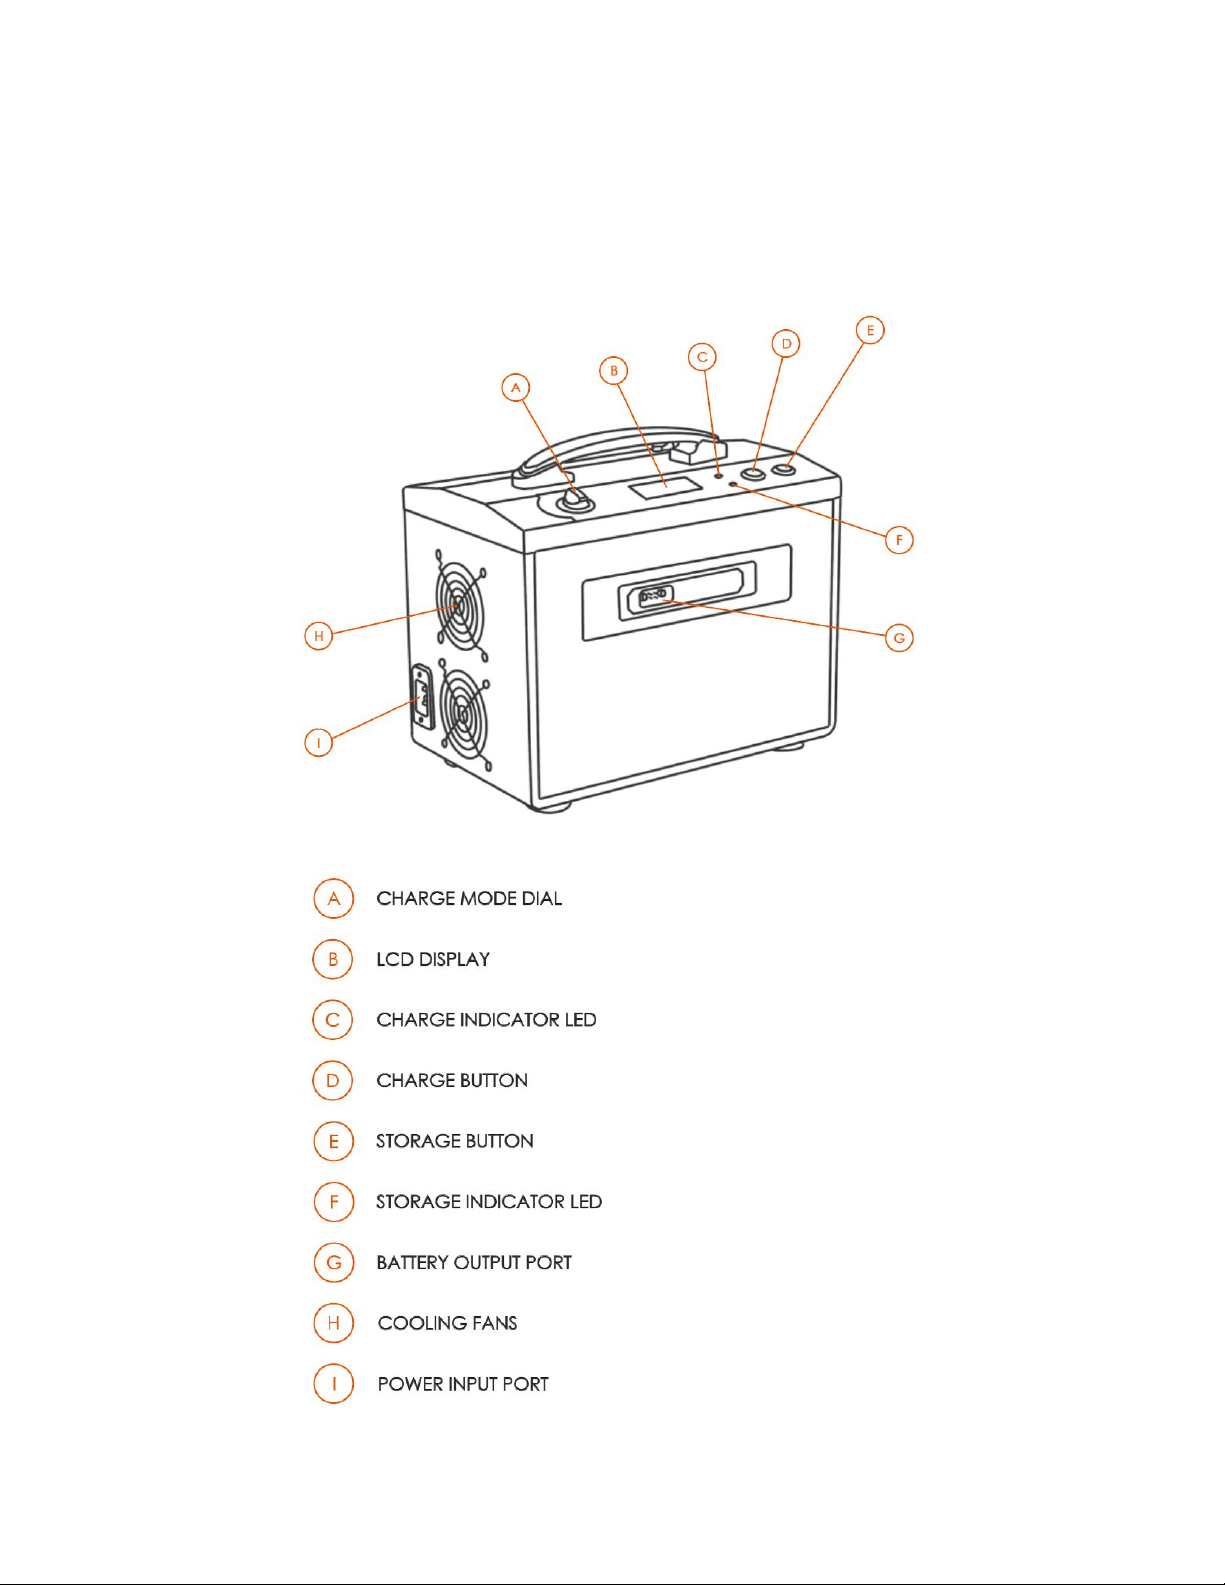
2.1. Tattu TA1200 Battery Charger
6
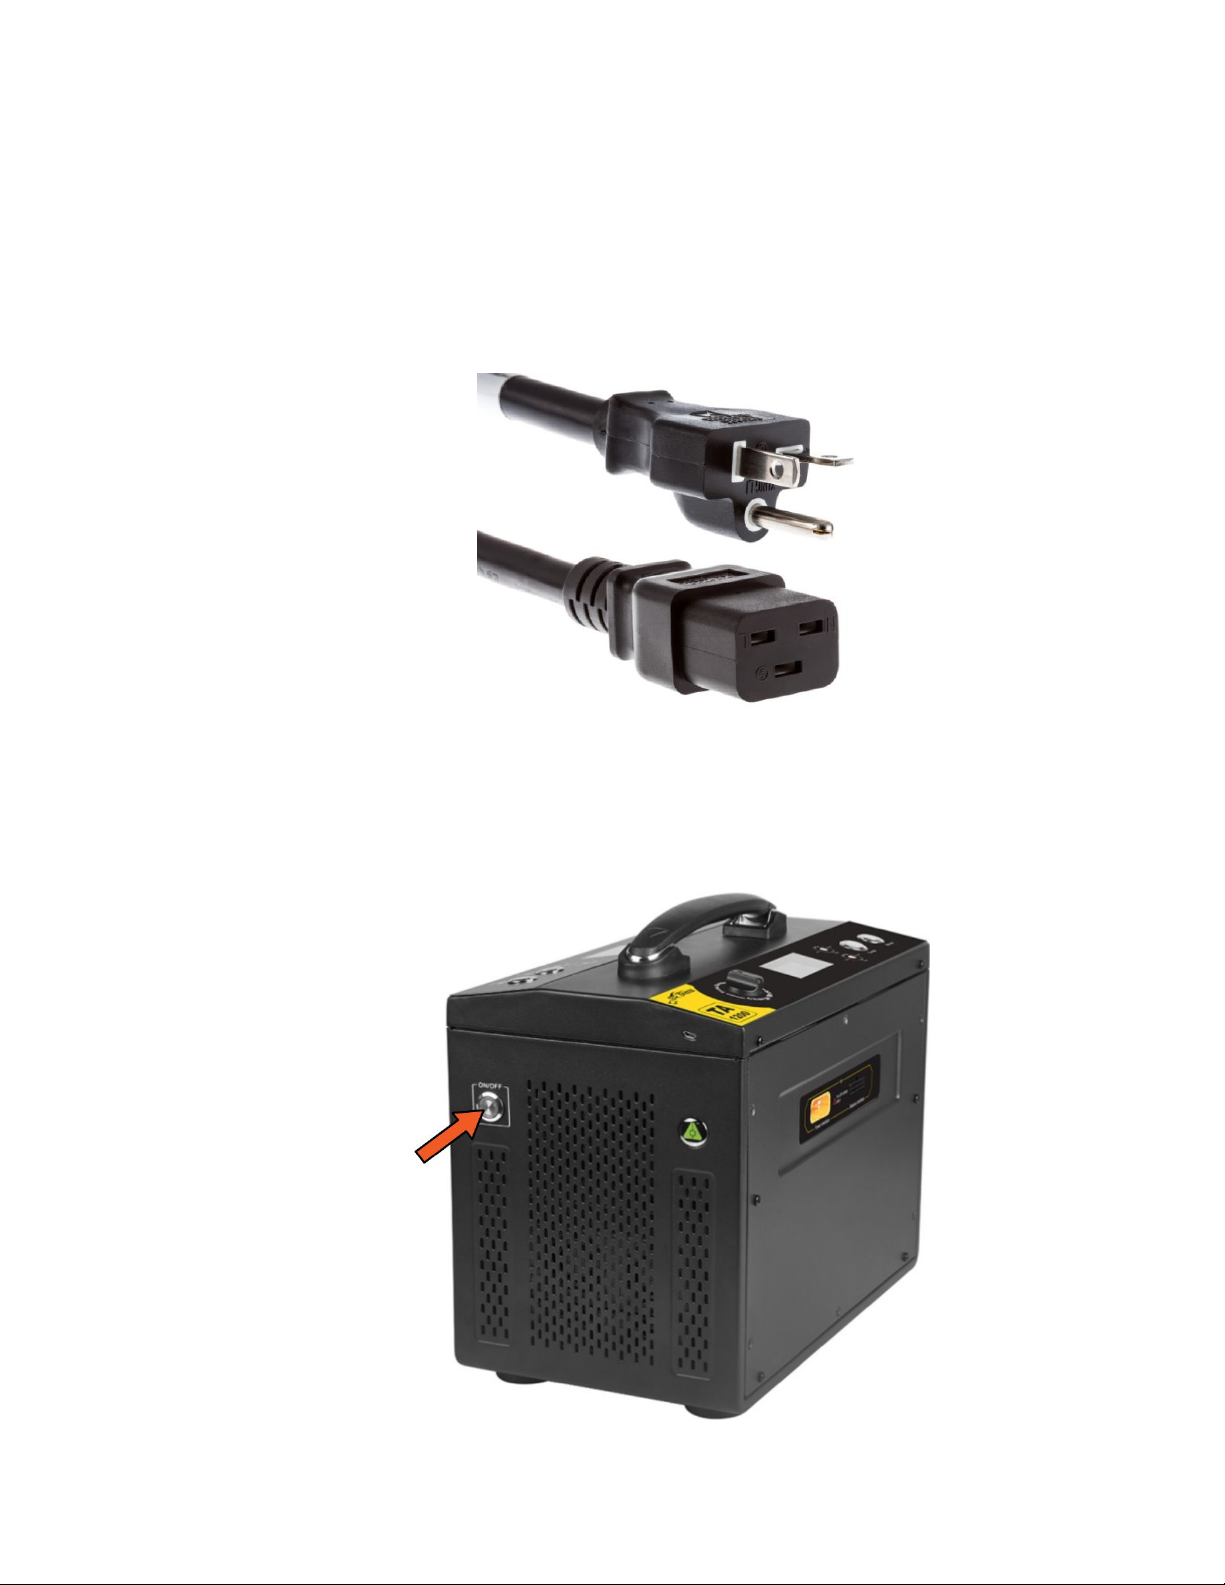
Battery Charging Instructions
Plug in the charger unit using the power cable included. Make sure the charger is
plugged into a 110v power source.
Press the power button on the side of the battery charger to power on the unit.
Fans will begin spinning, and the LCD screen on each side of the charger will
illuminate.
7

Adjust the charge mode dial. There are three charge mode options: Trickle,
Standard, and Fast. If time is not an issue, it is recommended to charge the
batteries as slowly as possible for extended battery health.
Uncap the battery and plug into one side of the charger.
Note: The connector design ensures a mistake can not be made with the
connector orientation.
8

Once connected, the battery will go through a precharge countdown of 10
seconds, then will begin charging automatically. To skip the precharge
countdown, hold the ‘Charge’ button for 2 seconds. Cell voltages and battery
levels will be indicated on the LCD screen.
Balancing Instructions
When the battery is connected to the charger, individual cell voltages will be
displayed on the LCD screen. Balancing the batteries should be a part of the
charging sequence about every 10th charge, or whenever one or more of the cell
voltages is significantly different than the other cells after a full charge.
To balance the battery cells while charging, first connect each end of the balance
cable into the corresponding balance ports on the battery and charger. Follow
the charging instructions above to conduct a balanced charge.
Storage Mode Instructions
If a battery will be shipped or will not be used for long periods of time, it is highly
recommended that the battery is placed into storage mode. Depending on the
current battery percentage, placing the battery into storage mode will either
charge or discharge the battery to a voltage that is most stable for shipping and
sitting for long periods of time.
To place a battery into storage mode, simply plug the main connector into the
charger and hold the storage button for 5 seconds. The charger will beep, fans
will begin to spin, and the LCD screen will indicate that storage mode has begun.
9

2.2. Installing QGroundControl
QGroundControl (QGC) is an open-source mission planning software for UAVs running
PX4. QGC is extremely well documented and we encourage all first-time users to review
the available user guide at: https://docs.qgroundcontrol.com/en/.
If using a Jeti DS-12 Controller:
Download the QGroundControl installer from http://qgroundcontrol.com/ , then install
QGC on your PC or USB-C enabled Tablet. The Inspired Flight UAV will automatically
connect to QGC once the vehicle has been powered on and the USB telemetry module
(included) has been plugged into the PC or Tablet.
If using a Herelink Controller:
Before powering on the controller, always make sure the antennas are plugged in to the
top, as seen in Section 1.3. Once powered (by holding the power button), the Inspired
Flight UAV will automatically connect to QGC once the vehicle and Herelink
controller are powered on. QGC can be accessed either directly through the Herelink or
through a laptop by connecting to the Wi-Fi signal emitted by the Herelink.
10
2.3. Set-Up Aircraft
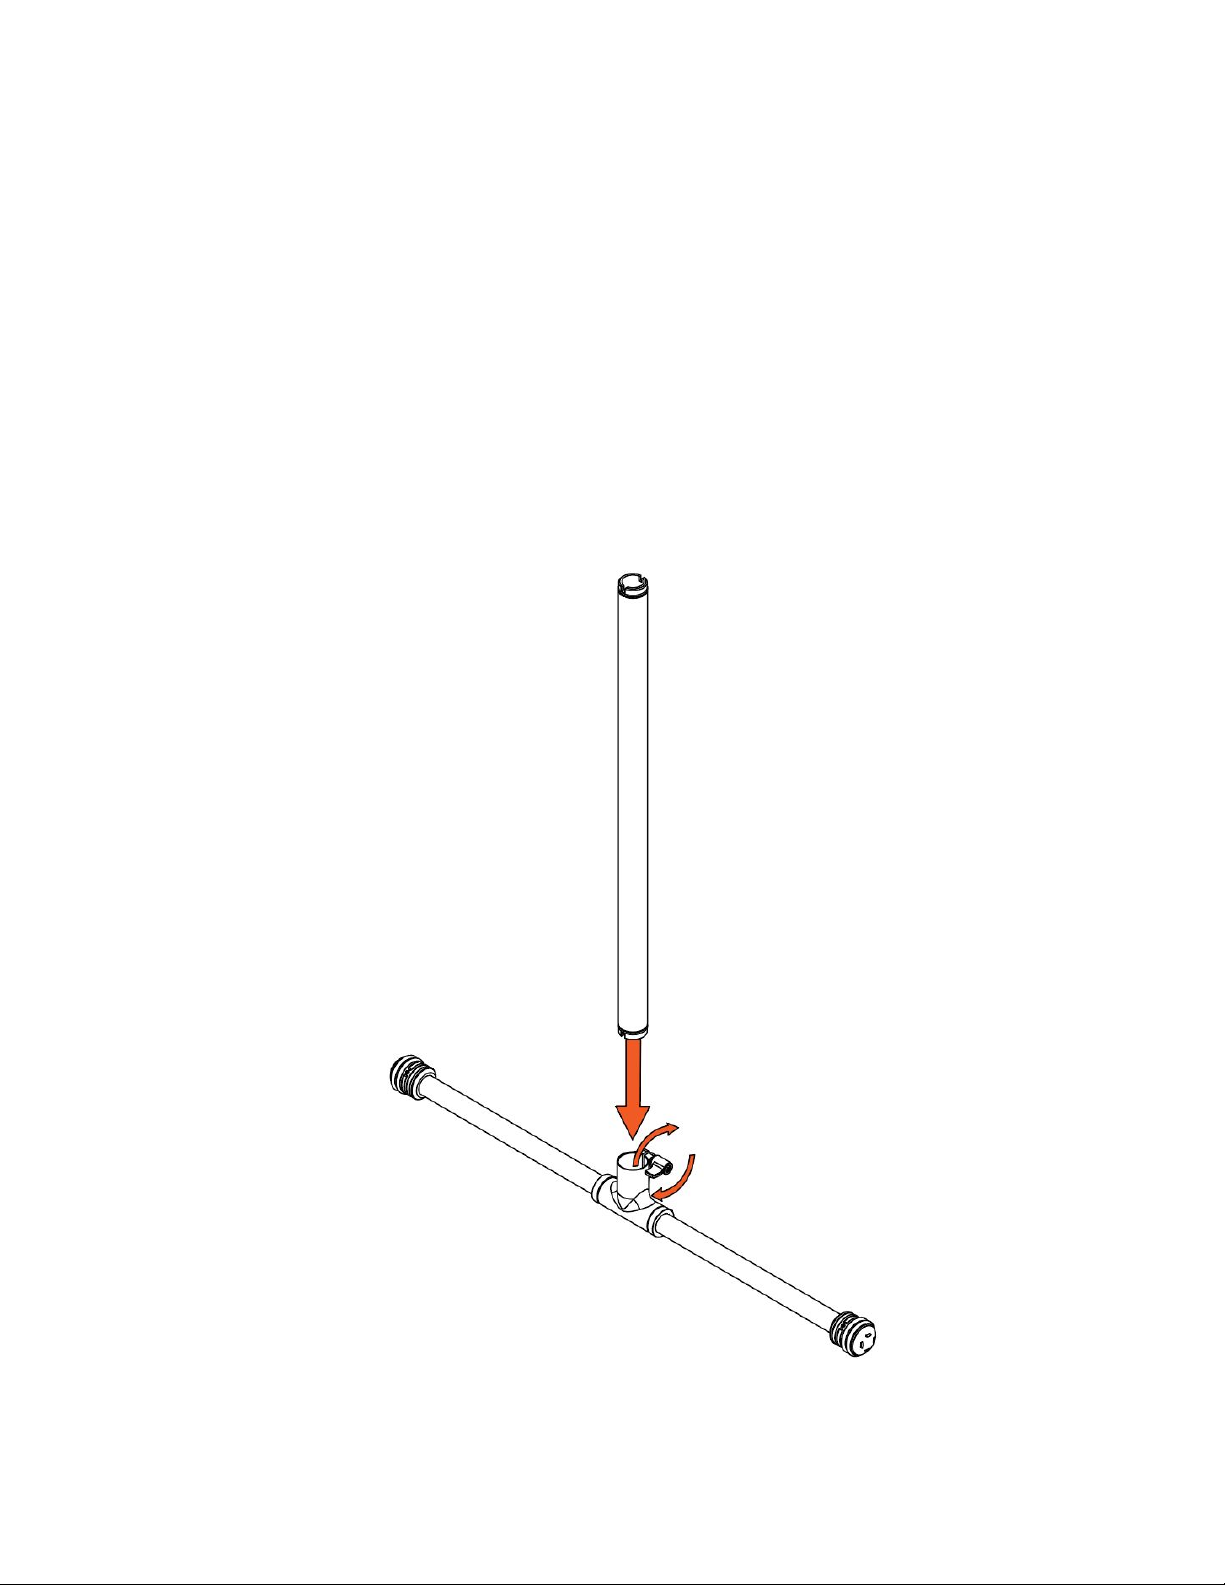
Locate the two parts that make up each side of the landing gear.
Loosen the clamp on the horizontal tube (with rubber feet), then assemble the landing
gear by inserting the vertical tube fully into the horizontal tube. The notches on the end
inserts should line up perpendicularly to the horizontal tube.
Ensure the vertical tube is fully seated before tightening the ratcheting clamp. If there
are o-rings on the vertical tube, insert the tube such that the o-rings are on the lower
half of the assembly. The ratcheting arm can be pulled away from the screw to move the
arm to a more convenient location when tightening.
Once tightened, set the two landing gear legs aside.
11

Remove the body of the drone from the case.
Note: The next steps are most easily done with two people (one person holding body,
one assembling).
Lift the GPS mast into place, latching the clips on both sides.
Unfold the six aircraft arms into upright position. The shoulders should lock the arms
securely into place.
12

Locate the assembled landing gear. Insert the landing gear legs into the corresponding
sockets on the underside of the vehicle.
Again, ensure the vertical tube is fully seated before tightening the ratcheting clamp.
The ratcheting arm can be pulled away from the screw to move the arm to a more
convenient location when tightening.
13
2.4. Installing Batteries
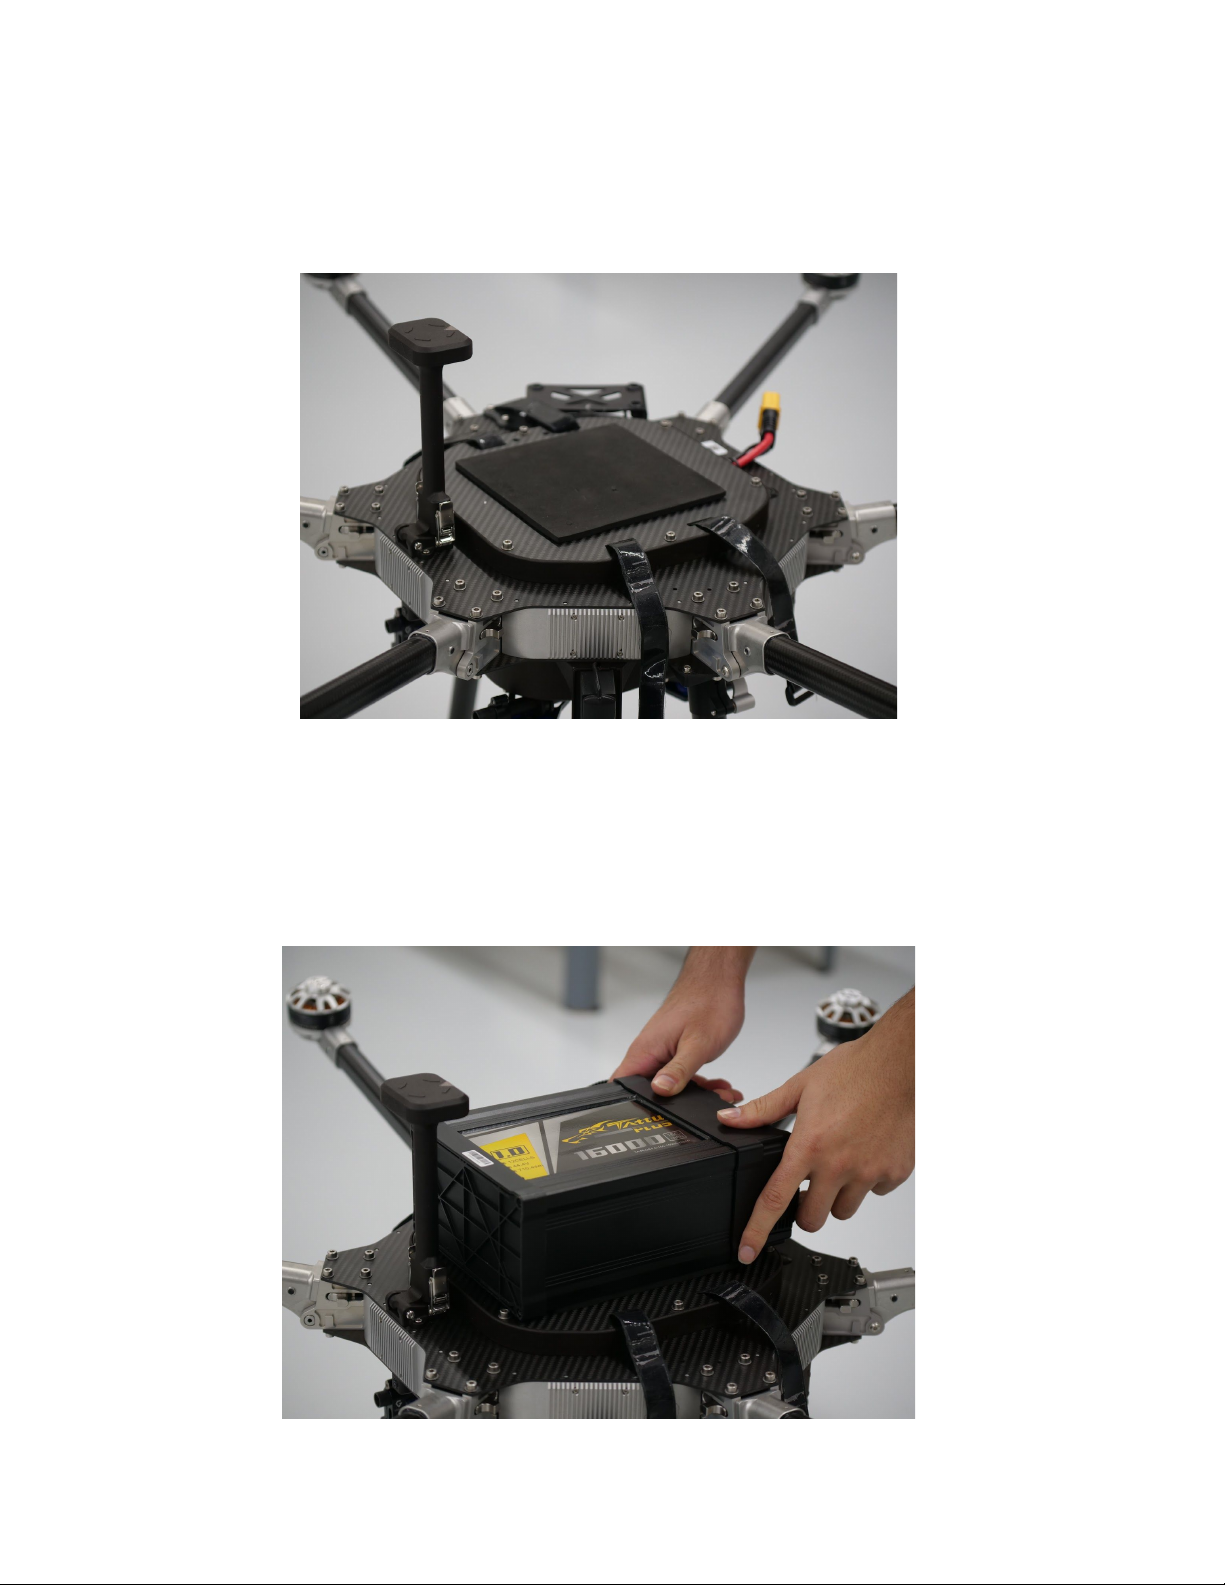
Ensure the velcro straps on top of the vehicle are unfastened and moved away from the
top plate’s center.
Lay the battery on the foam pad at the top of the vehicle, ensuring:
1. The battery is oriented such that the battery’s indicator lights and cables are at
the rear of the vehicle.
2. The battery is centered left and right. Note: While centering, it helps to look at
the battery from the front of the vehicle.
3. The battery is pushed towards the front of the vehicle until the plastic frame of
the battery is resting against the two screw heads just behind the GPS mast.
14

Locate the battery straps and loop the ends through themselves over the body of the
battery. The plastic loop should be close to the center of the battery.
Pull the straps tightly over the battery, securing the velcro strap to itself close to the
body of the vehicle. Note: While tightening the straps, it helps to hold the far side of the
battery for more leverage.
15

Plug in the male battery connector on the battery into the female battery connector on
the aircraft. Note: The connector design ensures a mistake can not be made with the
connector orientation. Ensure the connectors are pushed together fully.
Gently grab the battery and attempt to move it in place. The battery should be solid and
secure, and should not move relative to the aircraft.
16
2.5. Installing Propellers
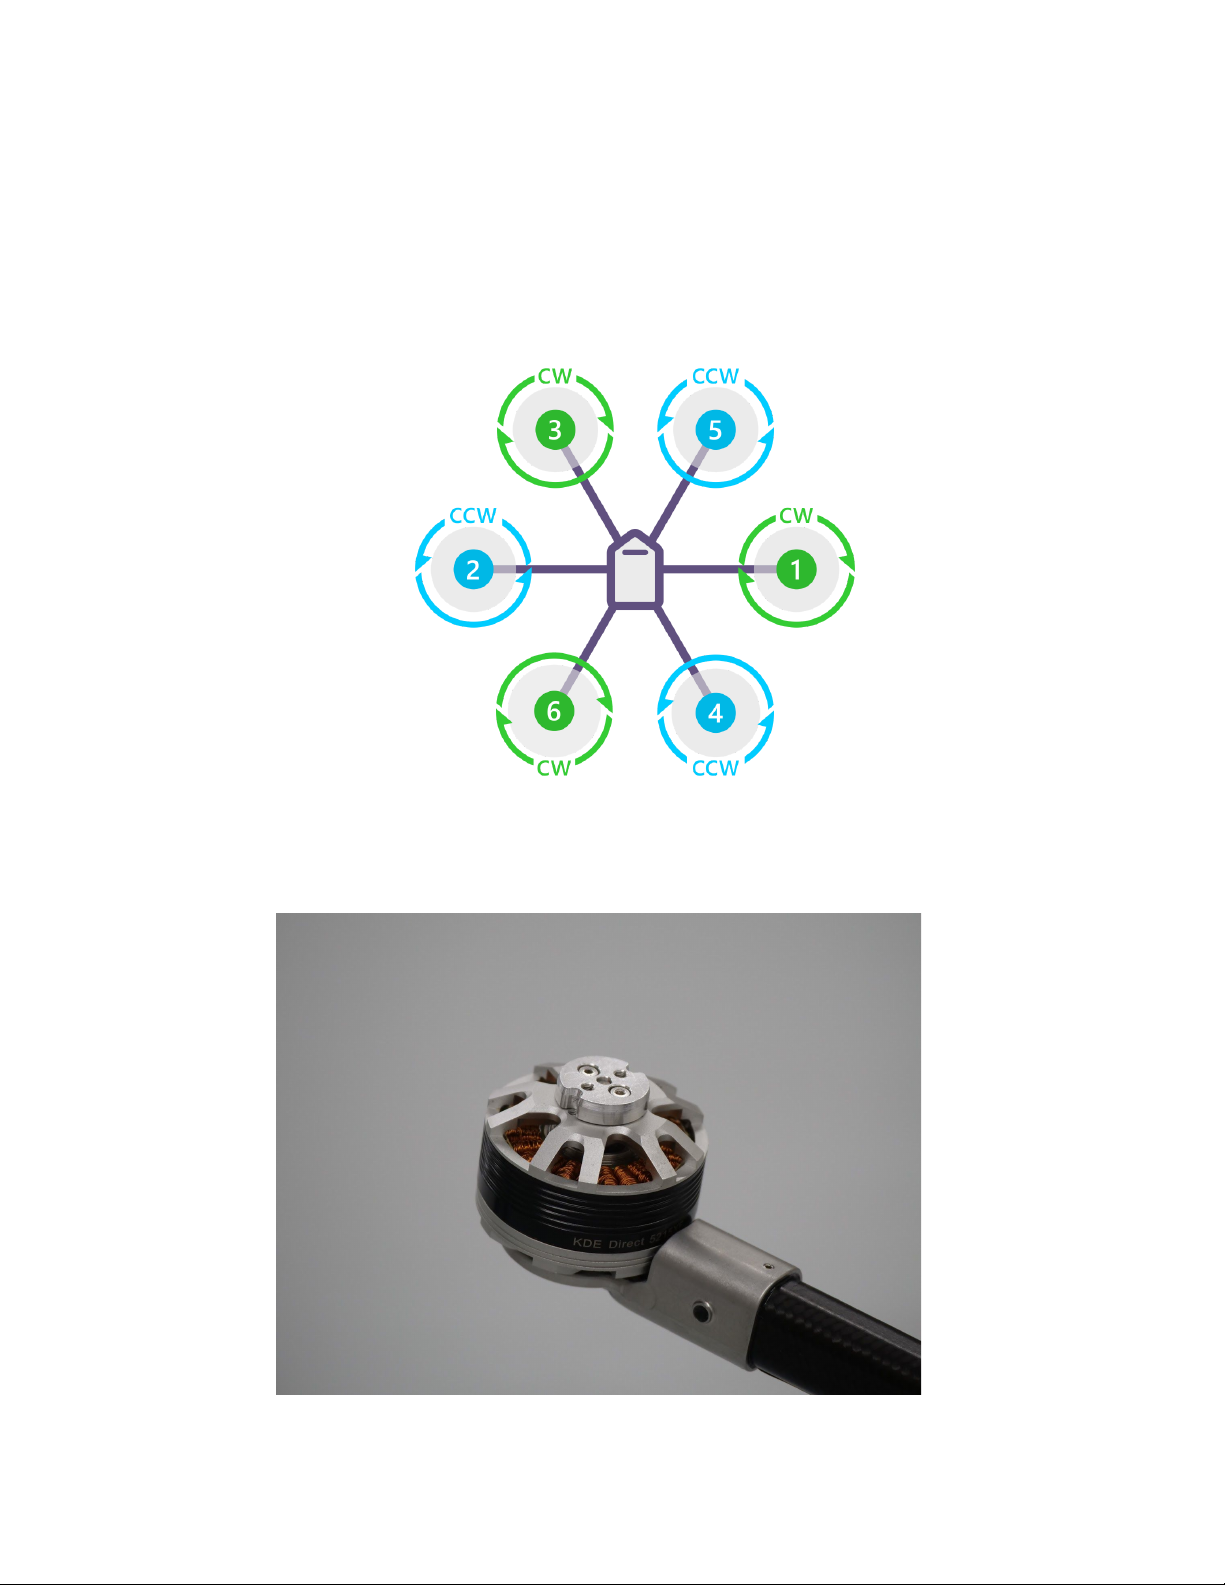
Locate the correct prop for each motor. As seen in the photo below, three of the IF1200’s
motors will spin clockwise, and three will spin counterclockwise. The two motor and
prop types have keyed quick-disconnects that prevent a user from mounting the wrong
propeller on the wrong motor.
The clockwise quick disconnects have three notches, while the counterclockwise motors
have two. A counterclockwise motor with two notches can be seen below.
17
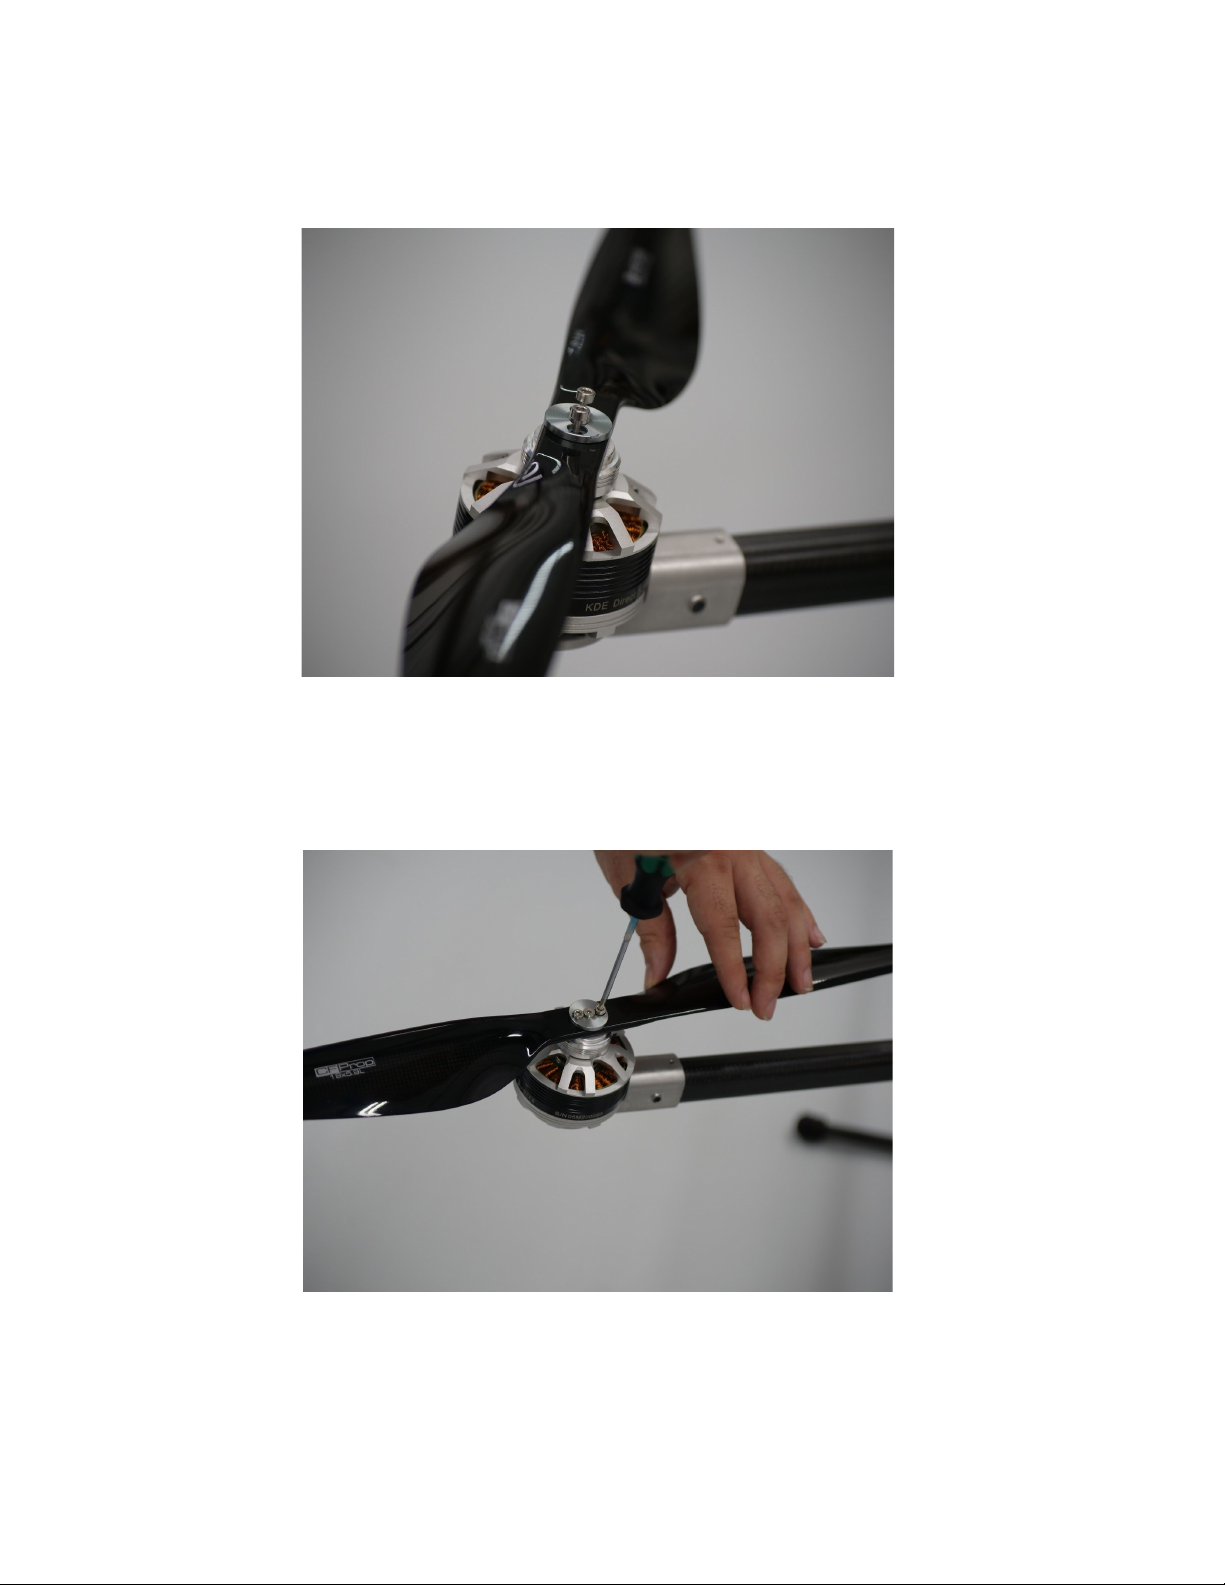
Ensuring the screws line up with the corresponding screw holes on the motor, place
each propeller on its motor. Make sure each propeller is fully seated, with the aluminum
quick-disconnect resting on the motor itself.
Tighten the propellers onto the motors, ensuring not to over-tighten. We recommend
using the provided green-handled screwdriver. Tighten each retained screw until it
stops, then snug it up with an additional ⅛ of a turn. Note: Do not use a T-handled
driver, as the aluminum parts will strip more easily.
18

When the propellers are mounted correctly, the propellers should be parallel to the top
surface of the motor, and everything should be fully seated and firmly secured.
19
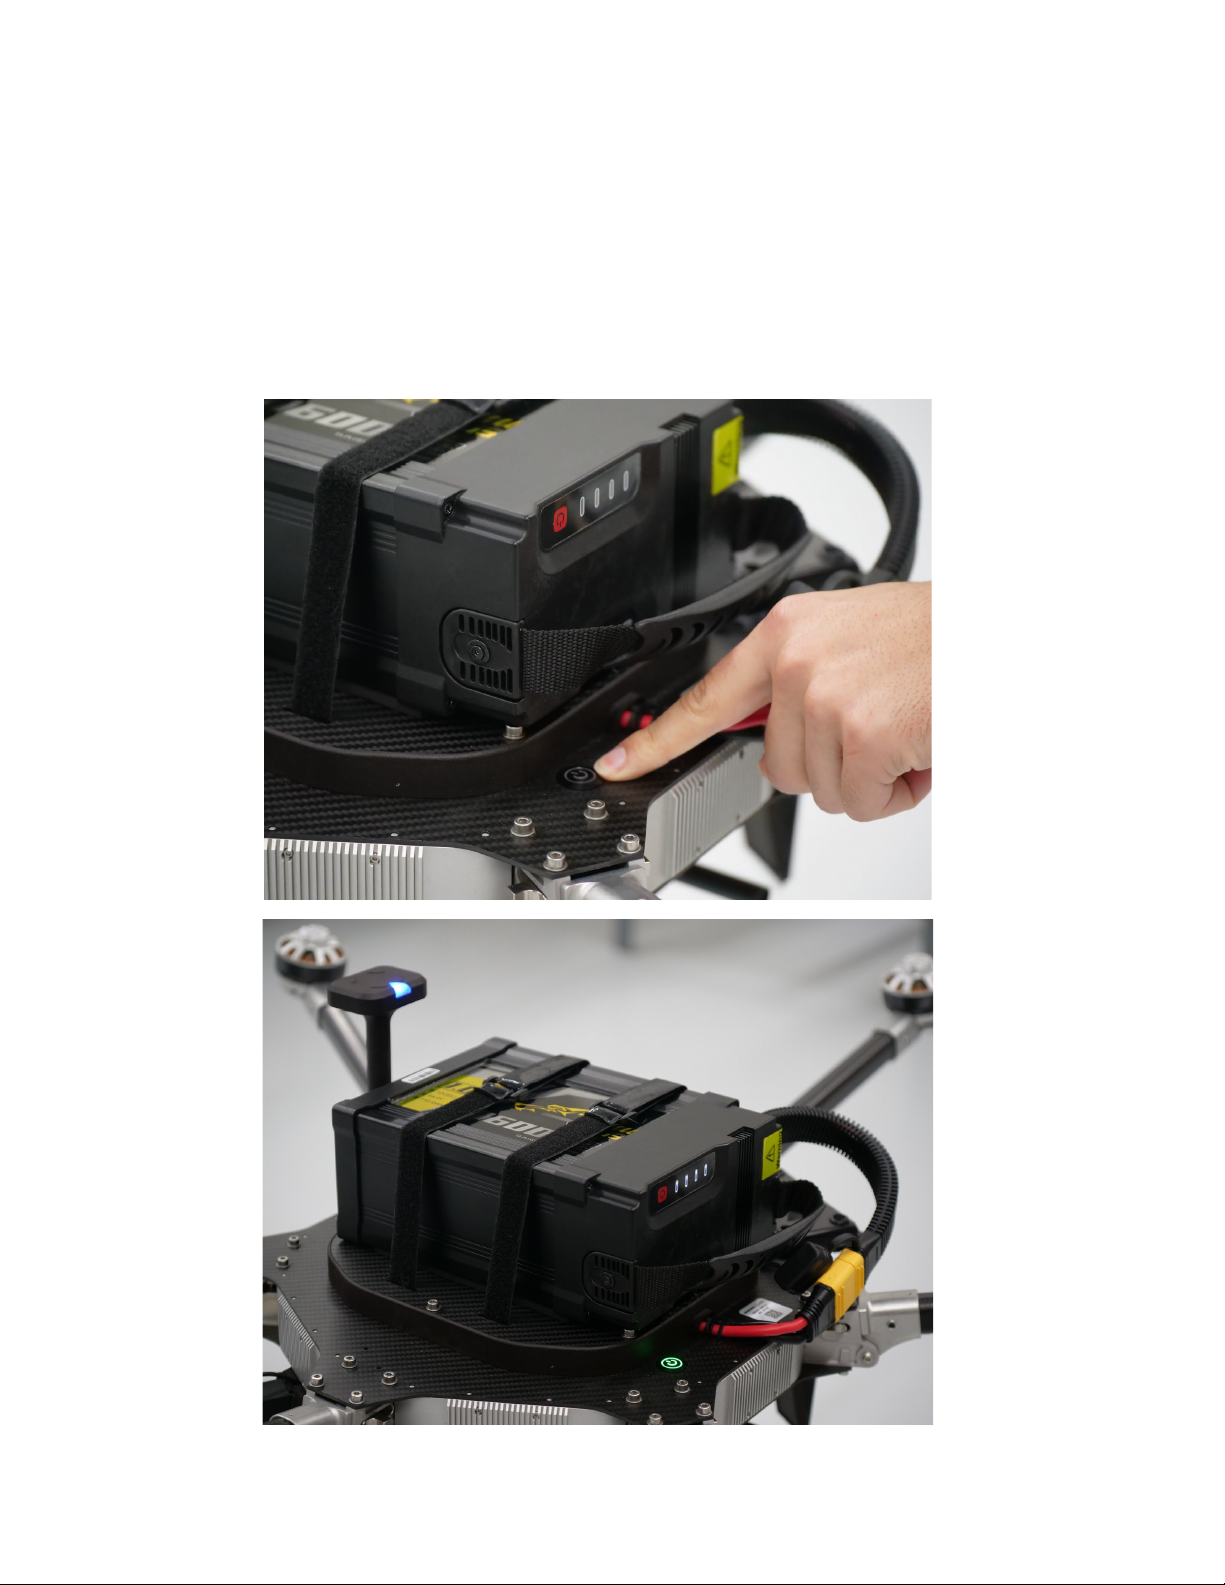
2.6. Powering On Vehicle
To power the IF1200, press and hold the power button on the rear of the vehicle for 5
seconds. The LED indicator light will turn green when the aircraft is on, and beeping will
occur during the initialization sequence. The LED on the GPS mast will begin breathing
blue as it searches for a GPS signal. More information on the GPS status light colors can
be found in section 2.10.
20
Other manuals for IF1200
3
Table of contents
Other Inspired Flight Toy manuals


