InstantPot DUO CRISP AF 6 User manual

DUO CRISPTM + AIR FRYER
MULTI-USE PRESSURE COOKER AND AIR FRYER – 5.7 AND 8 LITRE
User Manual

32
Welcome to the world of Instant cooking. Table of Contents
Thank you for welcoming us into your kitchen.
Having families ourselves, we developed the Instant Pot®Duo Crisp™+ Air Fryer
to allow busy families and professionals alike to cook healthy, delicious meals
more easily and in less time.
We have partnered with chefs, authors and bloggers to compile a collection
of recipes that we hope you enjoy!
Happy cooking,
Robert J. Wang
Founder and Chief Innovation Officer
IMPORTANT SAFEGUARDS............................................................................................ 5
Special Lead Set Instructions .....................................................................................11
Product Specications.................................................................................................11
Initial Setup ..................................................................................................................... 12
Product, Parts and Accessories ................................................................................... 13
Control Panel .................................................................................................................. 18
Smart Programme Settings ..........................................................................................20
Status Messages.............................................................................................................22
Cleaning Before First Use .............................................................................................23
Overview of Pressure Control Features .....................................................................25
Pressure Cooking Lid ................................................................................................. 25
Quick Release Button ................................................................................................. 26
Steam Release Valve ................................................................................................... 27
Anti-Block Shield ......................................................................................................... 28
Sealing Ring.................................................................................................................. 29
Float Valve..................................................................................................................... 30
Condensation Collector..............................................................................................31
Introduction to Pressure Cooking ...............................................................................32
Depressurising the Cooker (Venting Methods).........................................................34
Natural Release (NR) ................................................................................................... 34
Quick Release (QR)...................................................................................................... 34
10-Minute NR ............................................................................................................... 35
Initial Test Run (Water Test) ..........................................................................................36
Download the Instant Pot app to
access 1000+ recipe ideas.
Subscribe to our e-newsletter to
receive regular recipe e-books
and find your next dinner
favourite.
Join other Instant home chefs on
the Instant Pot UK community
on Facebook for tips, tricks, and
inspiration from the recipes they
have created.
And of course, we want to hear
from you, so don’t forget to tag us
online @instantpotuk and share
your experiences and the dishes you
create using #InstantChefAtHome
#instantpot.

54
IMPORTANT SAFEGUARDS
Table of Contents
When using electrical appliances, basic safety precautions should
always be followed:
Smart Programmes: Non Air Frying............................................................................ 37
Pressure Cook and Steam.......................................................................................... 37
Sauté ............................................................................................................................. 40
Slow Cook..................................................................................................................... 42
Sous Vide ...................................................................................................................... 43
Sous Vide Cooking Guidelines ................................................................................. 45
Smart Programmes: Air Frying .................................................................................... 47
Roast .............................................................................................................................. 50
Bake ................................................................................................................................51
Grill................................................................................................................................ 52
Dehydrate ..................................................................................................................... 53
Smart Programme Overview........................................................................................54
Cooking Time Chart .....................................................................................................55
Grain-to-Water Ratios....................................................................................................55
Care, Cleaning and Storage .........................................................................................56
Troubleshooting .............................................................................................................58
Warranty ..........................................................................................................................62
Read this manual carefully and completely, and
retain for future reference. Failure to adhere to safety
instructions may result in serious injury or damage.
WARNING
READ THIS ENTIRE DOCUMENT BEFORE OPERATING THE
APPLIANCE. FAILURE TO FOLLOW THESE SAFEGUARDS AND
INSTRUCTIONS MAY RESULT IN INJURY AND/OR PROPERTY
DAMAGE.
02 Use only the Instant Pot Duo Crisp™pressure cooking lid and Duo Crisp
air fryer lid with the Instant Pot Duo Crisp cooker base. Using any other
pressure cooking lids or air fryer lids may cause injury and/or damage.
03 To reduce the risk of pressure leakage, cook only in an authorised
stainless-steel Instant Pot inner pot. DO NOT use the appliance without
the removable inner pot installed.
04 Always use an Instant Pot stainless-steel inner pot when using the air
05
fryer lid. DO NOT use a ceramic coated inner pot.
When pressure cooking, do not open the appliance until
it has depressurised, and all internal pressure has been released. If the
oat valve is still up and/or the lid is difcult to open, this indicates that
the appliance is still pressurised—do not force it open. Any pressure
in the appliance can be hazardous. Refer to Releasing pressure:
Venting methods for information on releasing pressure. Opening the
appliance while it is still pressurised may lead to sudden release of hot
contents and may cause burns or other injuries.
06 Always operate the appliance on a stable, non-combustible, level surface.
07 Do not use the appliance for anything other than its intended use.
Failure to follow this instruction may result in injury or property damage.
08 For household use only. Do not use outdoors. Not for commercial use.
01
Do not place the appliance on or in close proximity to
a hot gas or electric burner, or a heated oven. Heat from an external
source will damage the appliance. Failure to follow these instructions
may result in injury or property damage.
Do not use the appliance near water or ame. Keep out
of direct sunlight. Failure to follow these instructions may result in injury
or property damage.
09
10

76
IMPORTANT SAFEGUARDS IMPORTANT SAFEGUARDS
Read this manual carefully and completely, and
retain for future reference. Failure to adhere to safety
instructions may result in serious injury or damage.
Read this manual carefully and completely, and
retain for future reference. Failure to adhere to safety
instructions may result in serious injury or damage.
WARNING WARNING
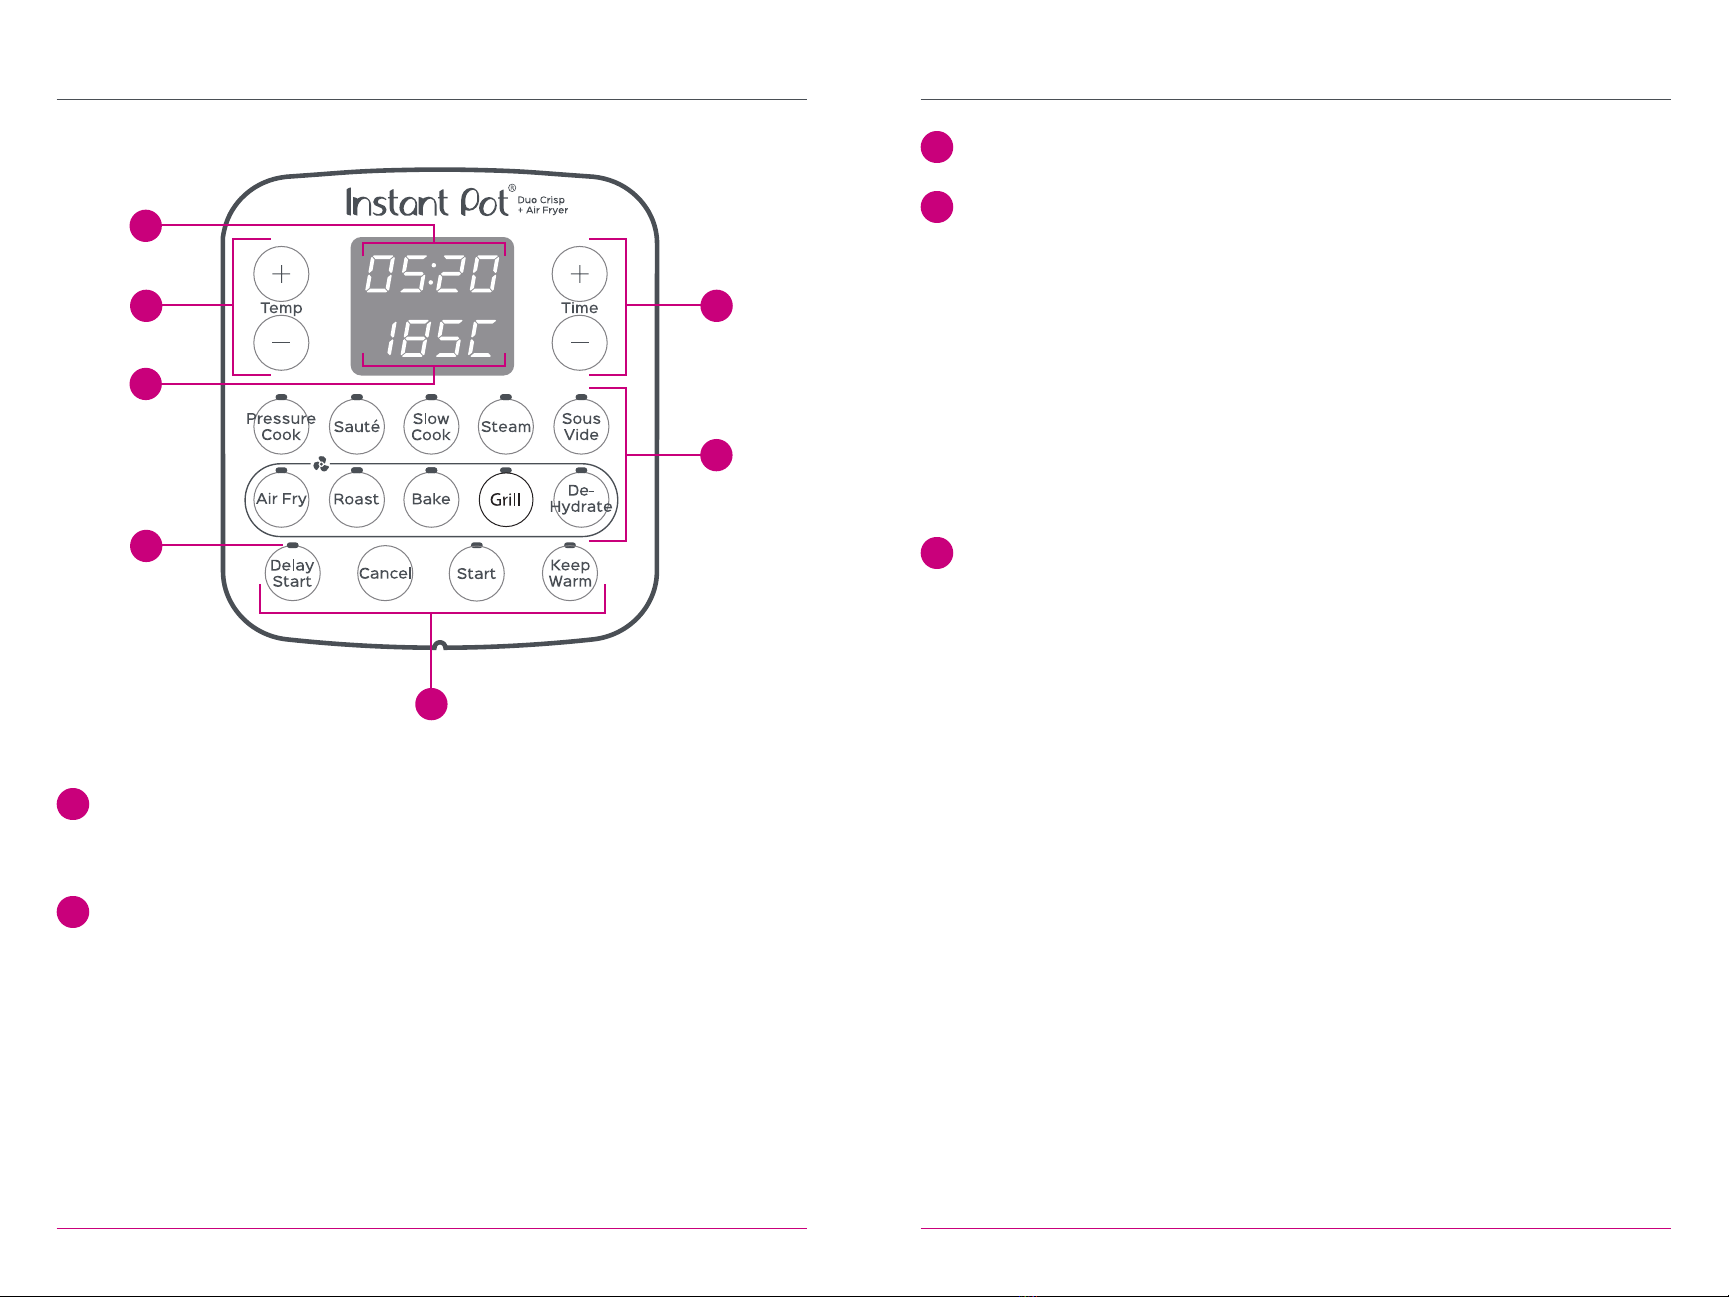
Do not touch hot surfaces. Only use side handles for
carrying or moving. Extreme caution must be used when moving the
appliance containing hot liquids. Do not move the appliance when it is
under pressure.
The cooker base and air fryer lid contain electrical
components. To avoid electrical shock, do not put liquid of any kind into
cooker base or air fryer lid, and do not immerse power cord, plug, or the
appliance in water or other liquid. Do not rinse the appliance under tap.
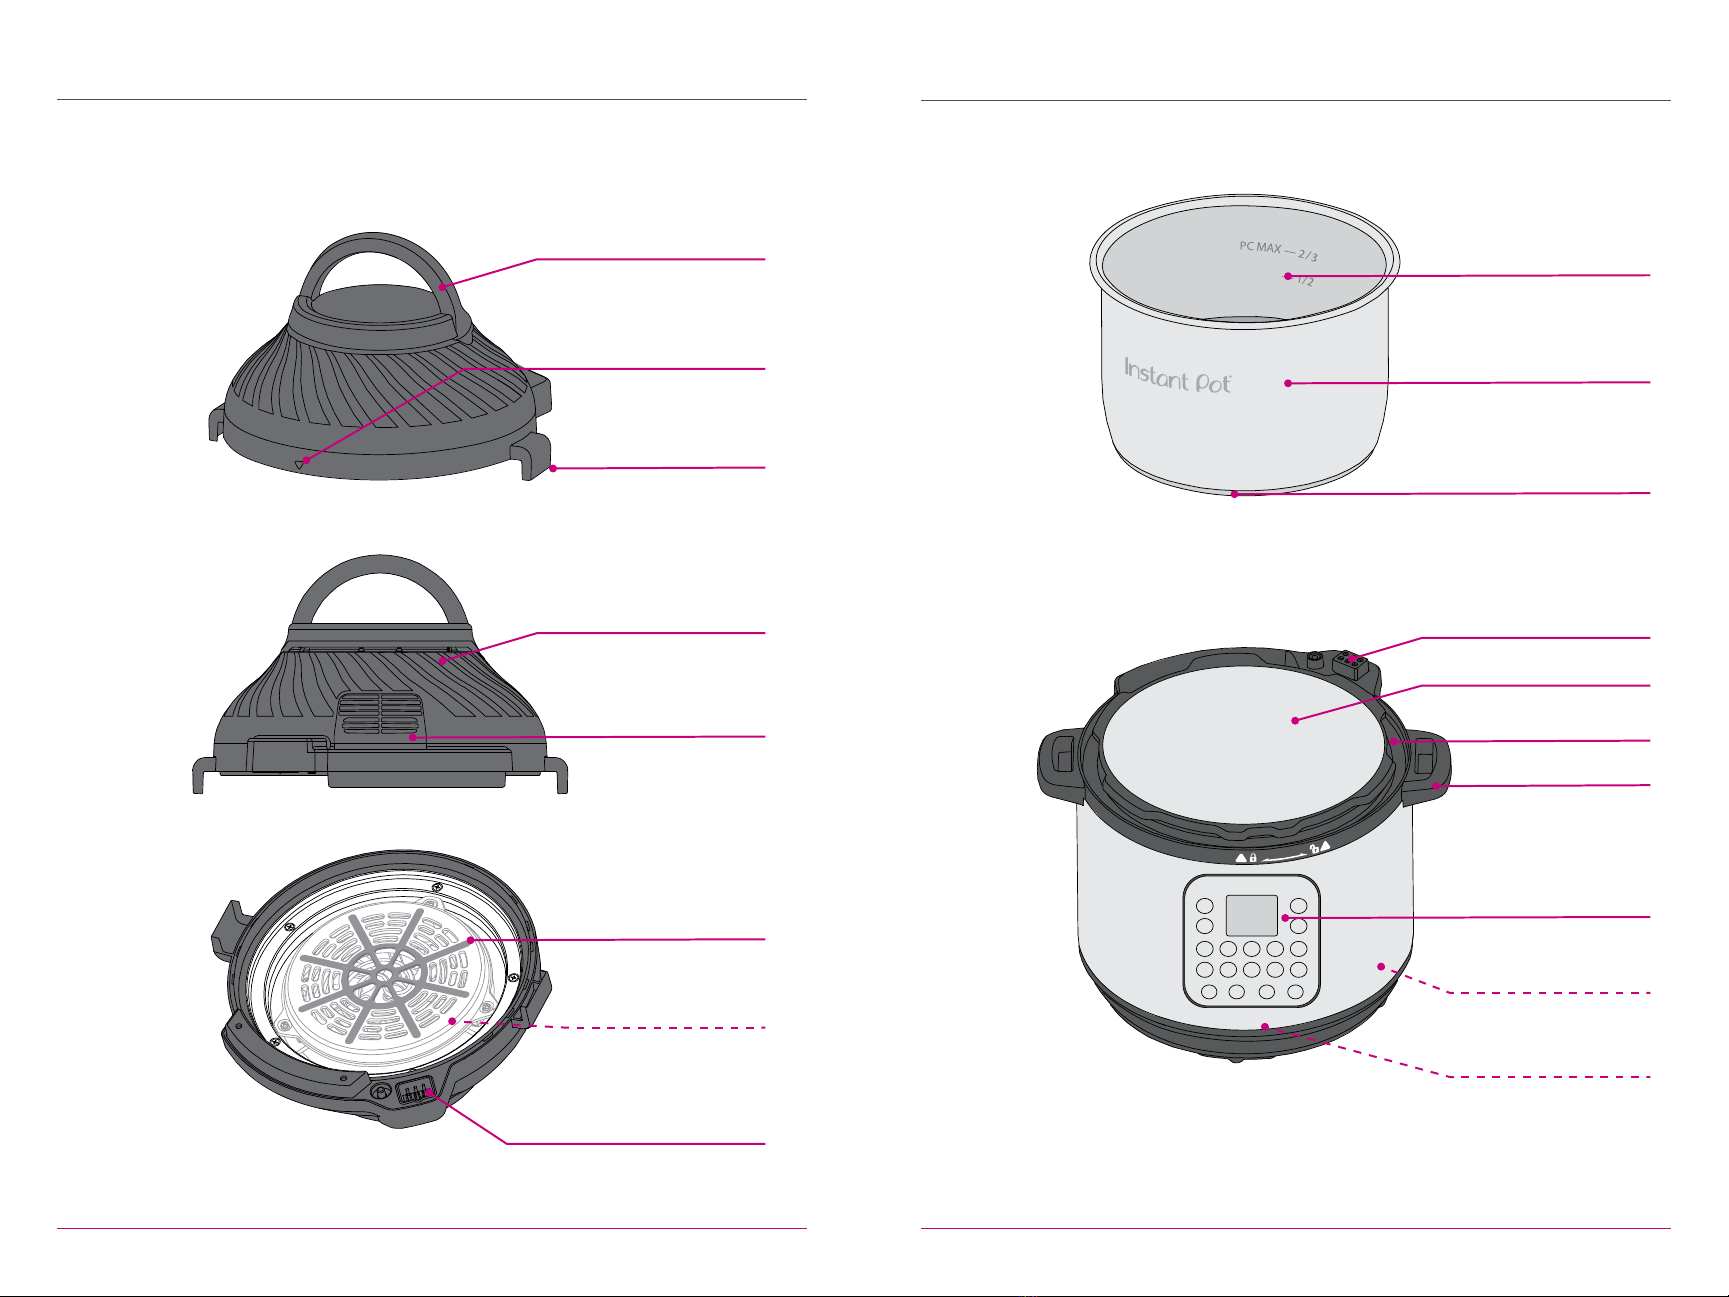
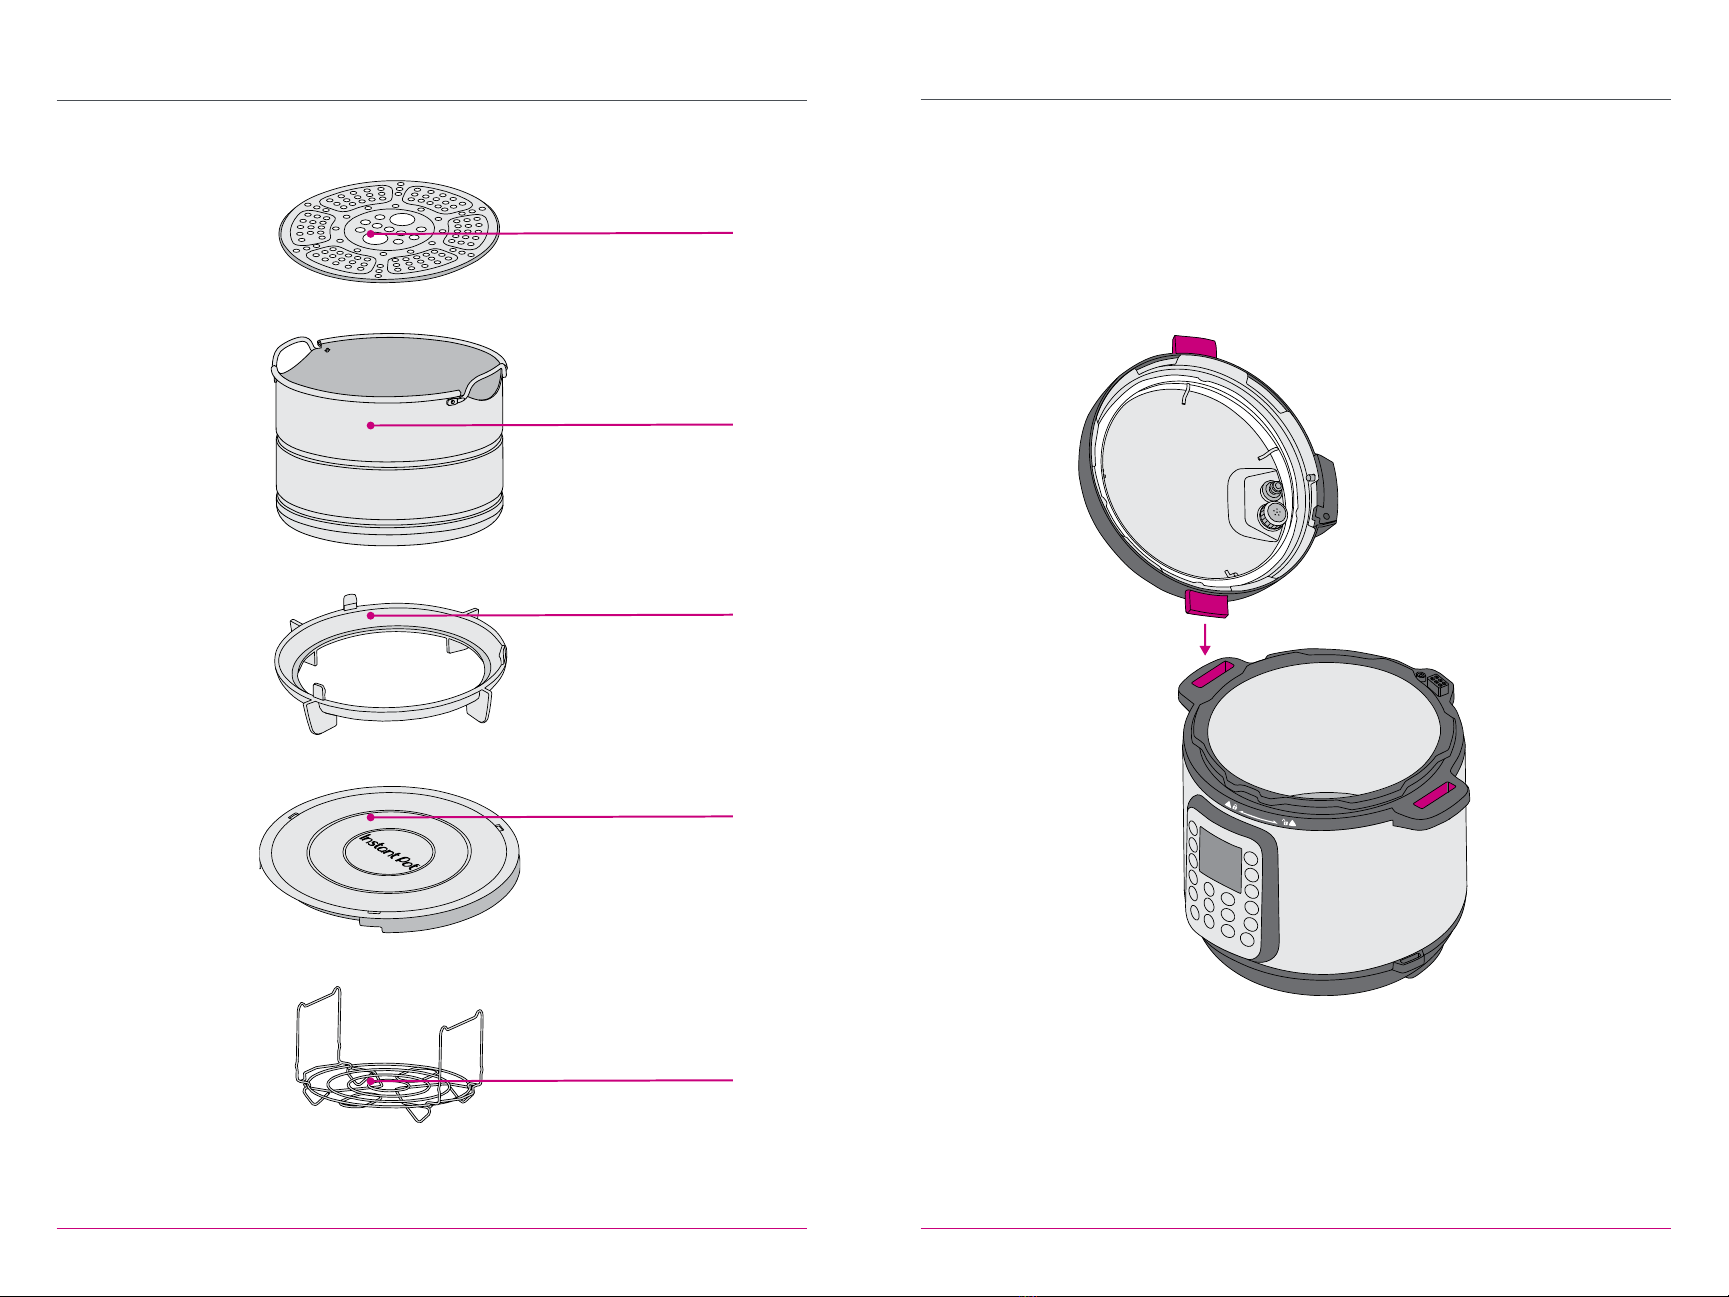
Do not fill over PC MAX — 2/3 as indicated on the inner
pot. When cooking foods that expand during cooking such as rice or dried
vegetables, do not fill the inner pot over — 1/2 line. Overfilling may cause
a risk of clogging the steam release pipe and developing excess pressure.
Refer to Cooking: Pressure Cook and Steam.
This appliance cooks under pressure. Make certain the
appliance is properly closed before operating. Failure to do so may
result in burns, injury and/or property damage. Refer to Pressure
Control Features: Pressure Cooking Lid – Closing the lid.
15 When cooking meat with skin (e.g., sausage with casing), the skin can
16
17
swell when heated. Do not pierce the skin while it is swollen; this could
result in scalding injury.
When pressure cooking food with a doughy or thick
texture, or a high fat/oil content, contents may splatter when opening
the lid. Please follow recipe instructions for pressure release method.
Refer to Releasing pressure: Venting methods.
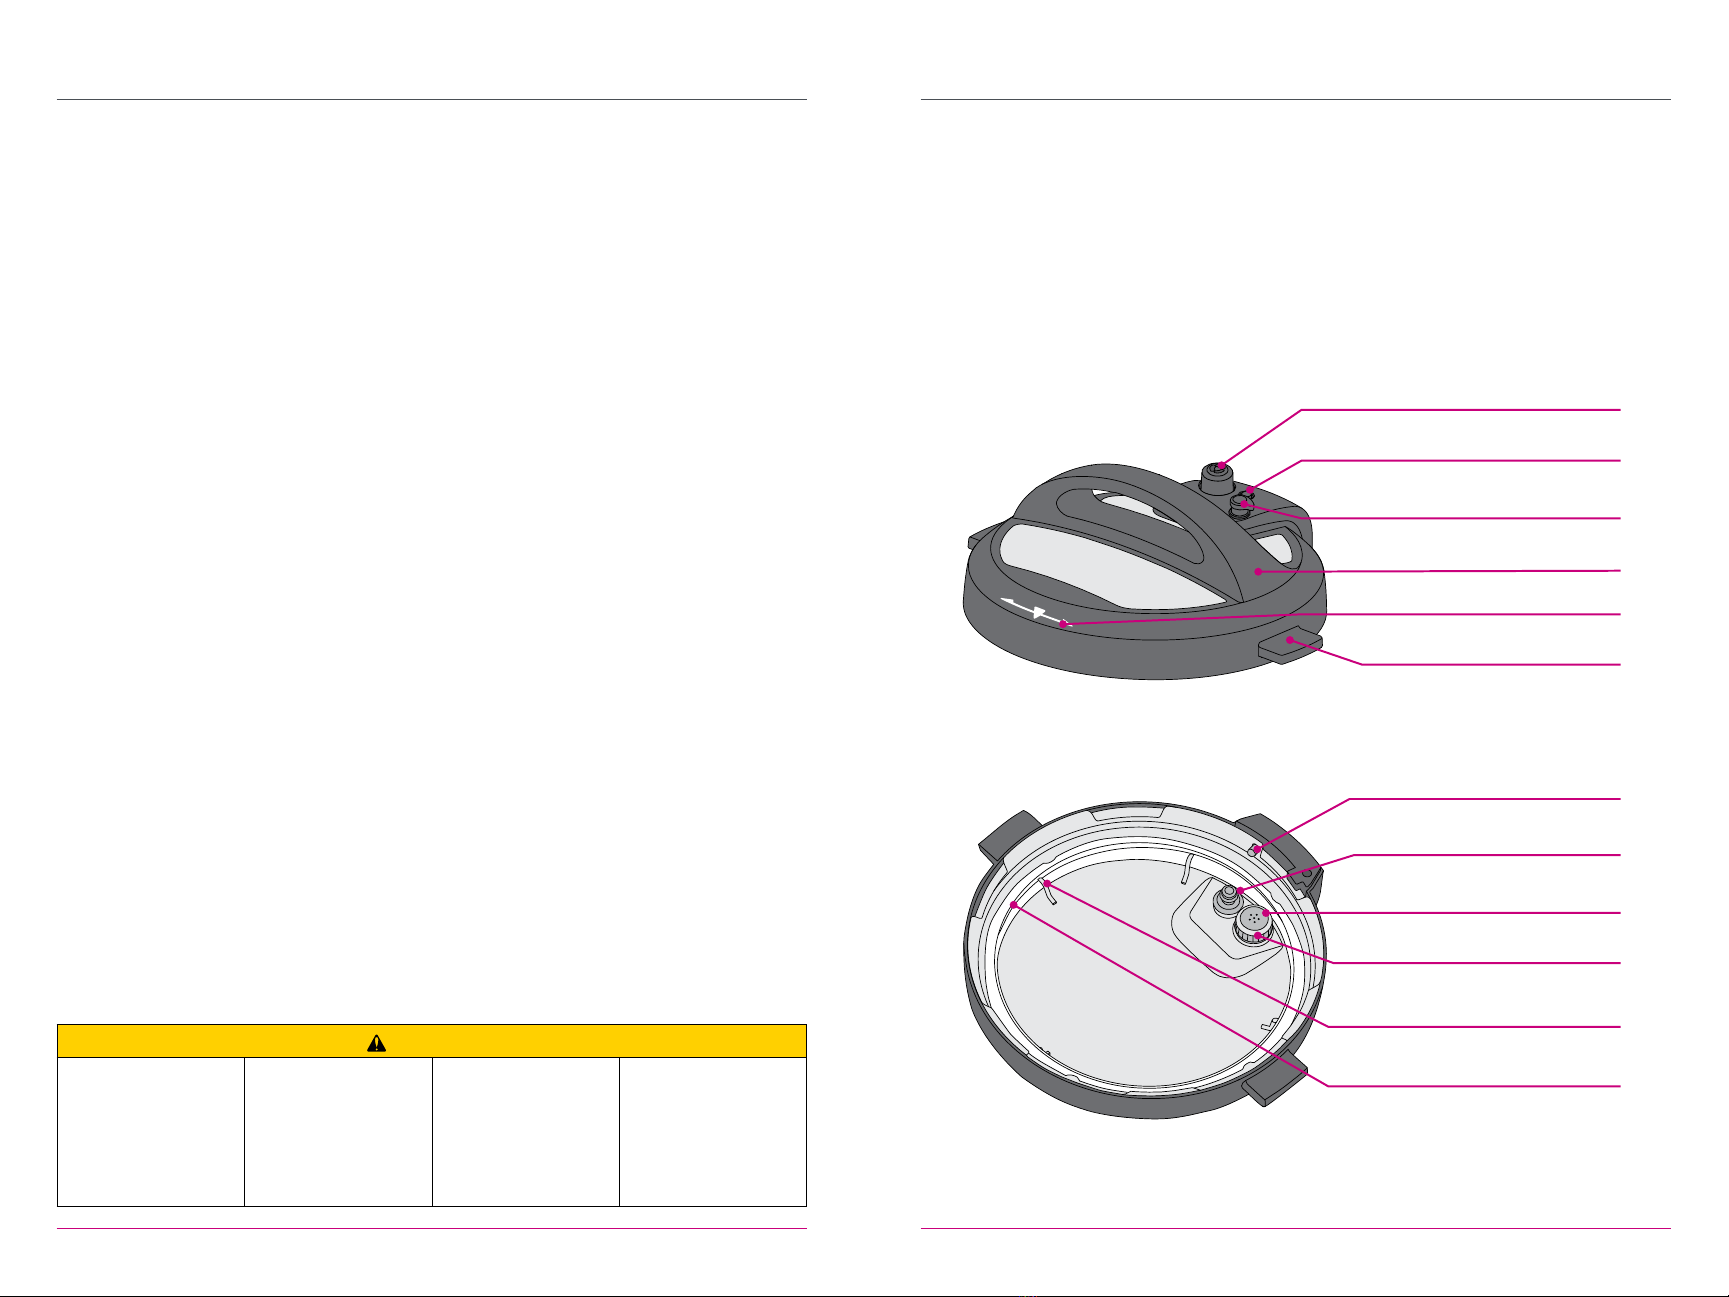
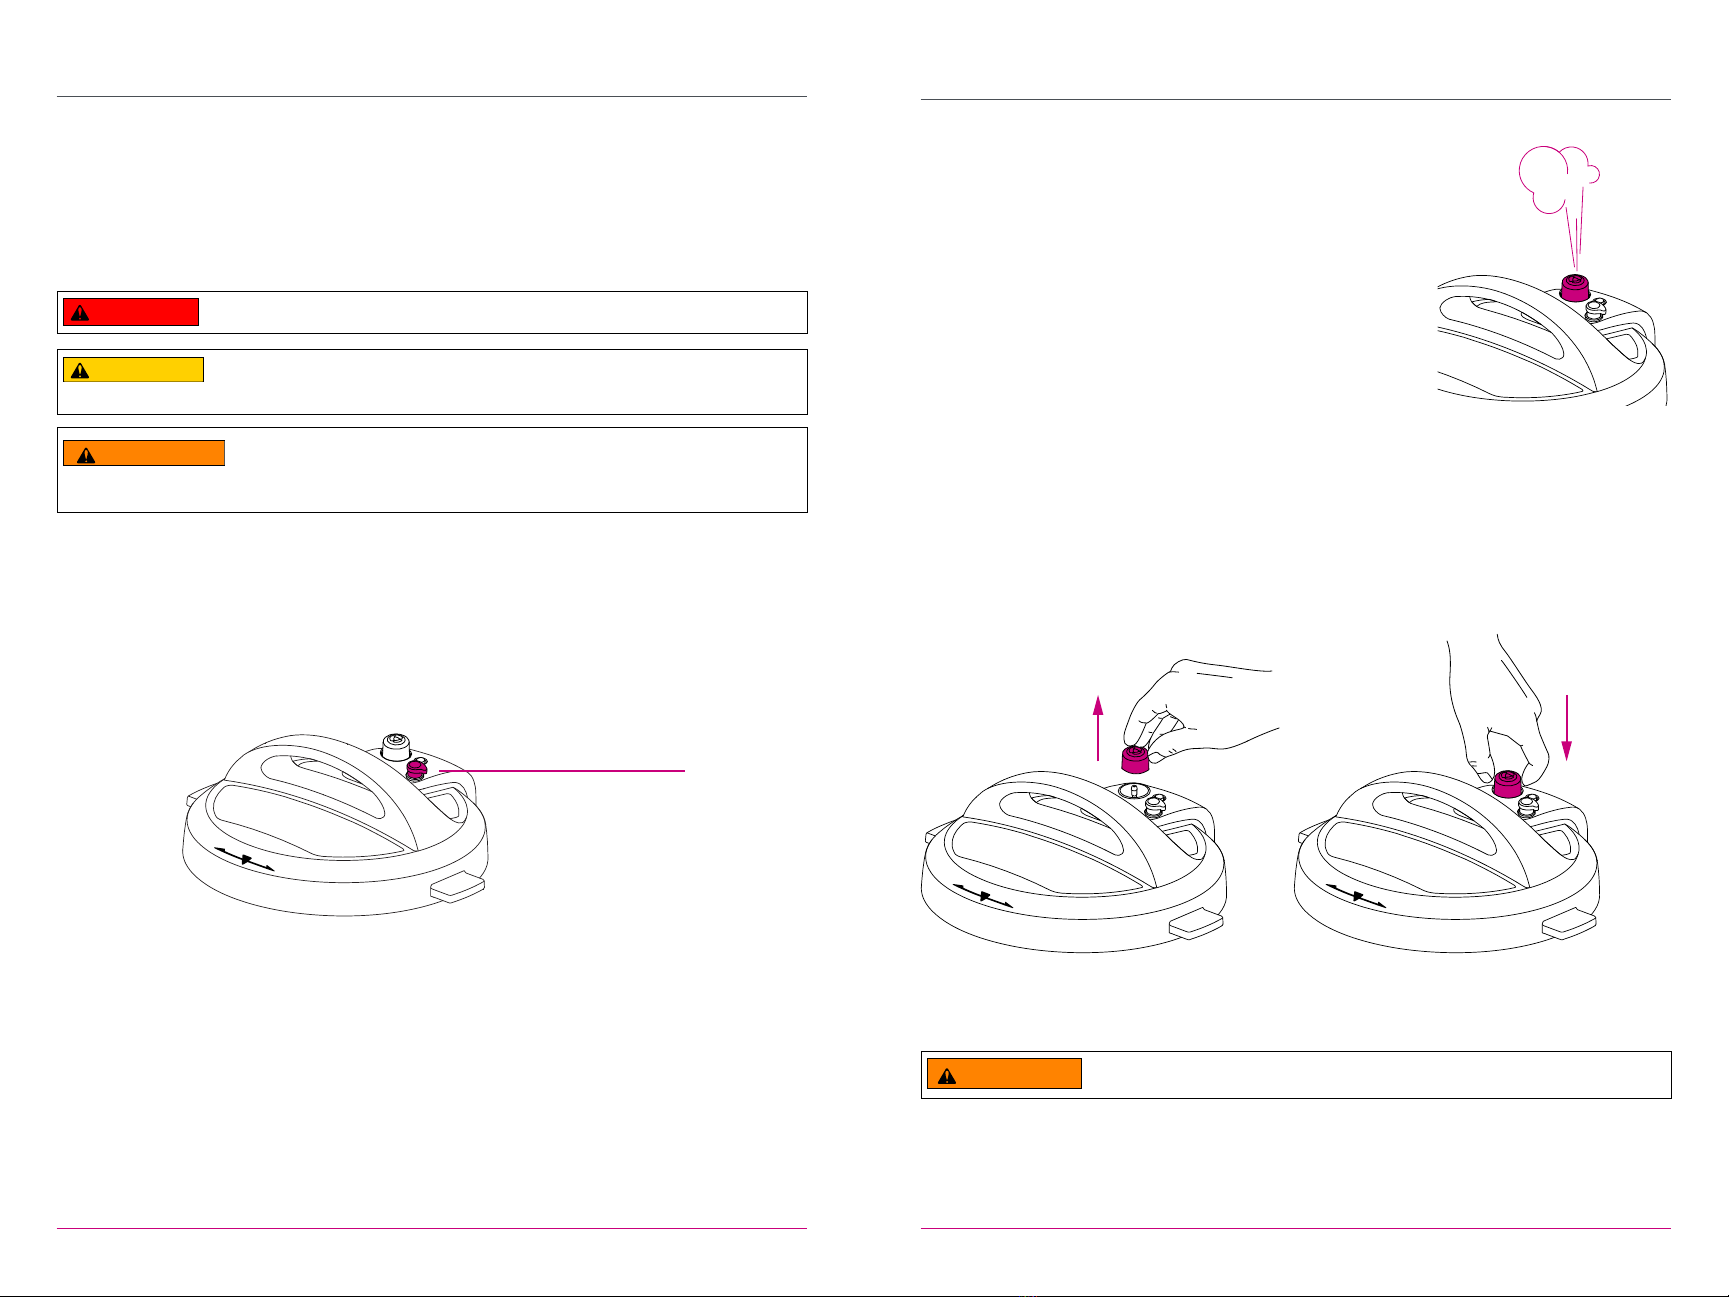
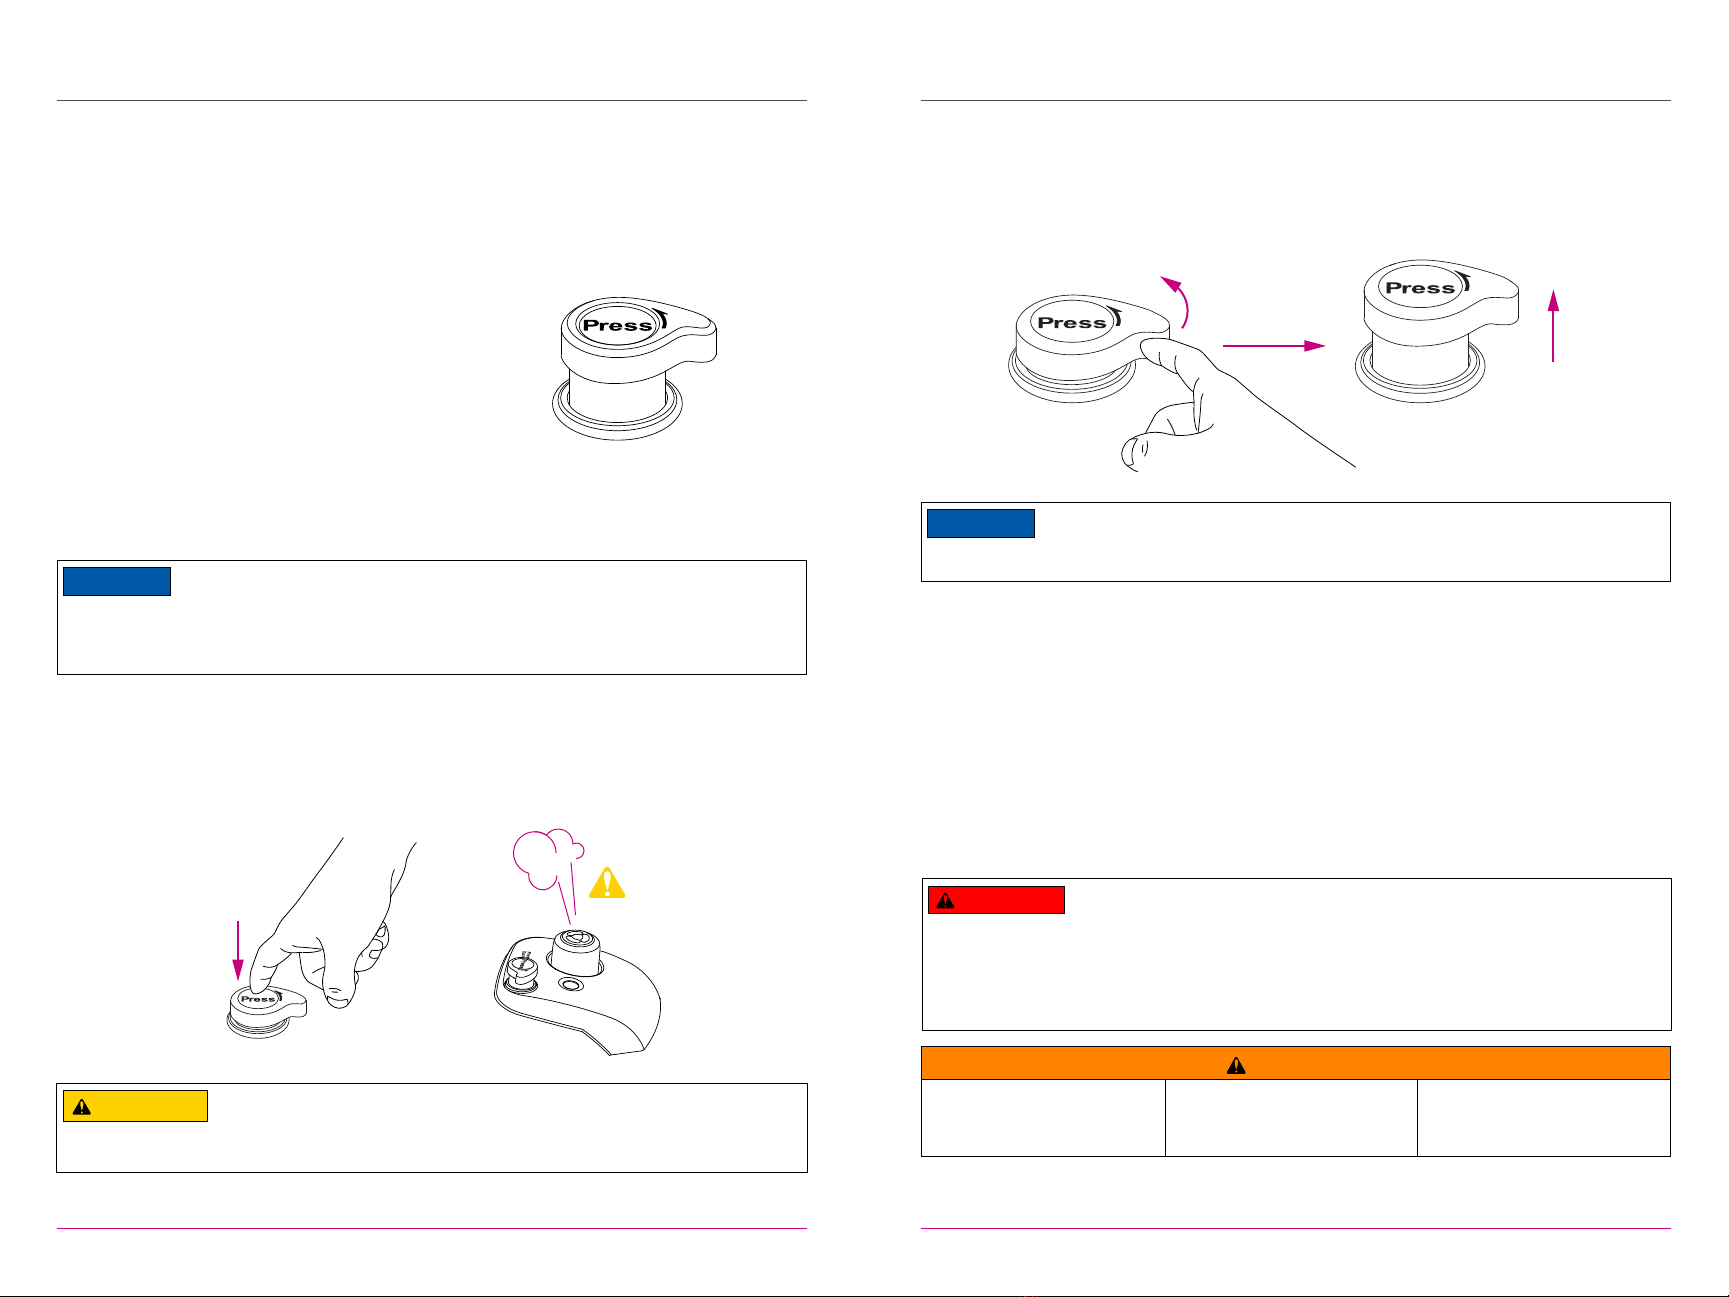
Before using the pressure cooking lid, check the steam
release valve, steam release pipe, anti-block shield and oat valve for
clogging. Failure to do so may result in injury or property damage.
11
12
13
14
18 Do not use this appliance for deep frying or pressure frying with oil.
19 Do not lean over or place your hands or face over the steam release
valve or oat valve when the appliance is in operation or has residual
pressure. Do not touch the metal portion of the lid when the appliance is
in operation as this could result in injury.
20 Do not cover or obstruct the steam release valve and/or the oat valve
with cloth or any other objects. Covering or obstructing the steam
release valve and/or oat valve can create a safety issue and may
cause injury.
21 Turn the appliance off if steam escapes from the steam release valve
and/or oat valve in a steady stream for longer than 3 minutes. There
may be residual pressure in the appliance. Allow the appliance to
depressurise naturally or release all excess pressure before opening.
Refer to Releasing pressure: Venting methods for information on
safe depressurisation.
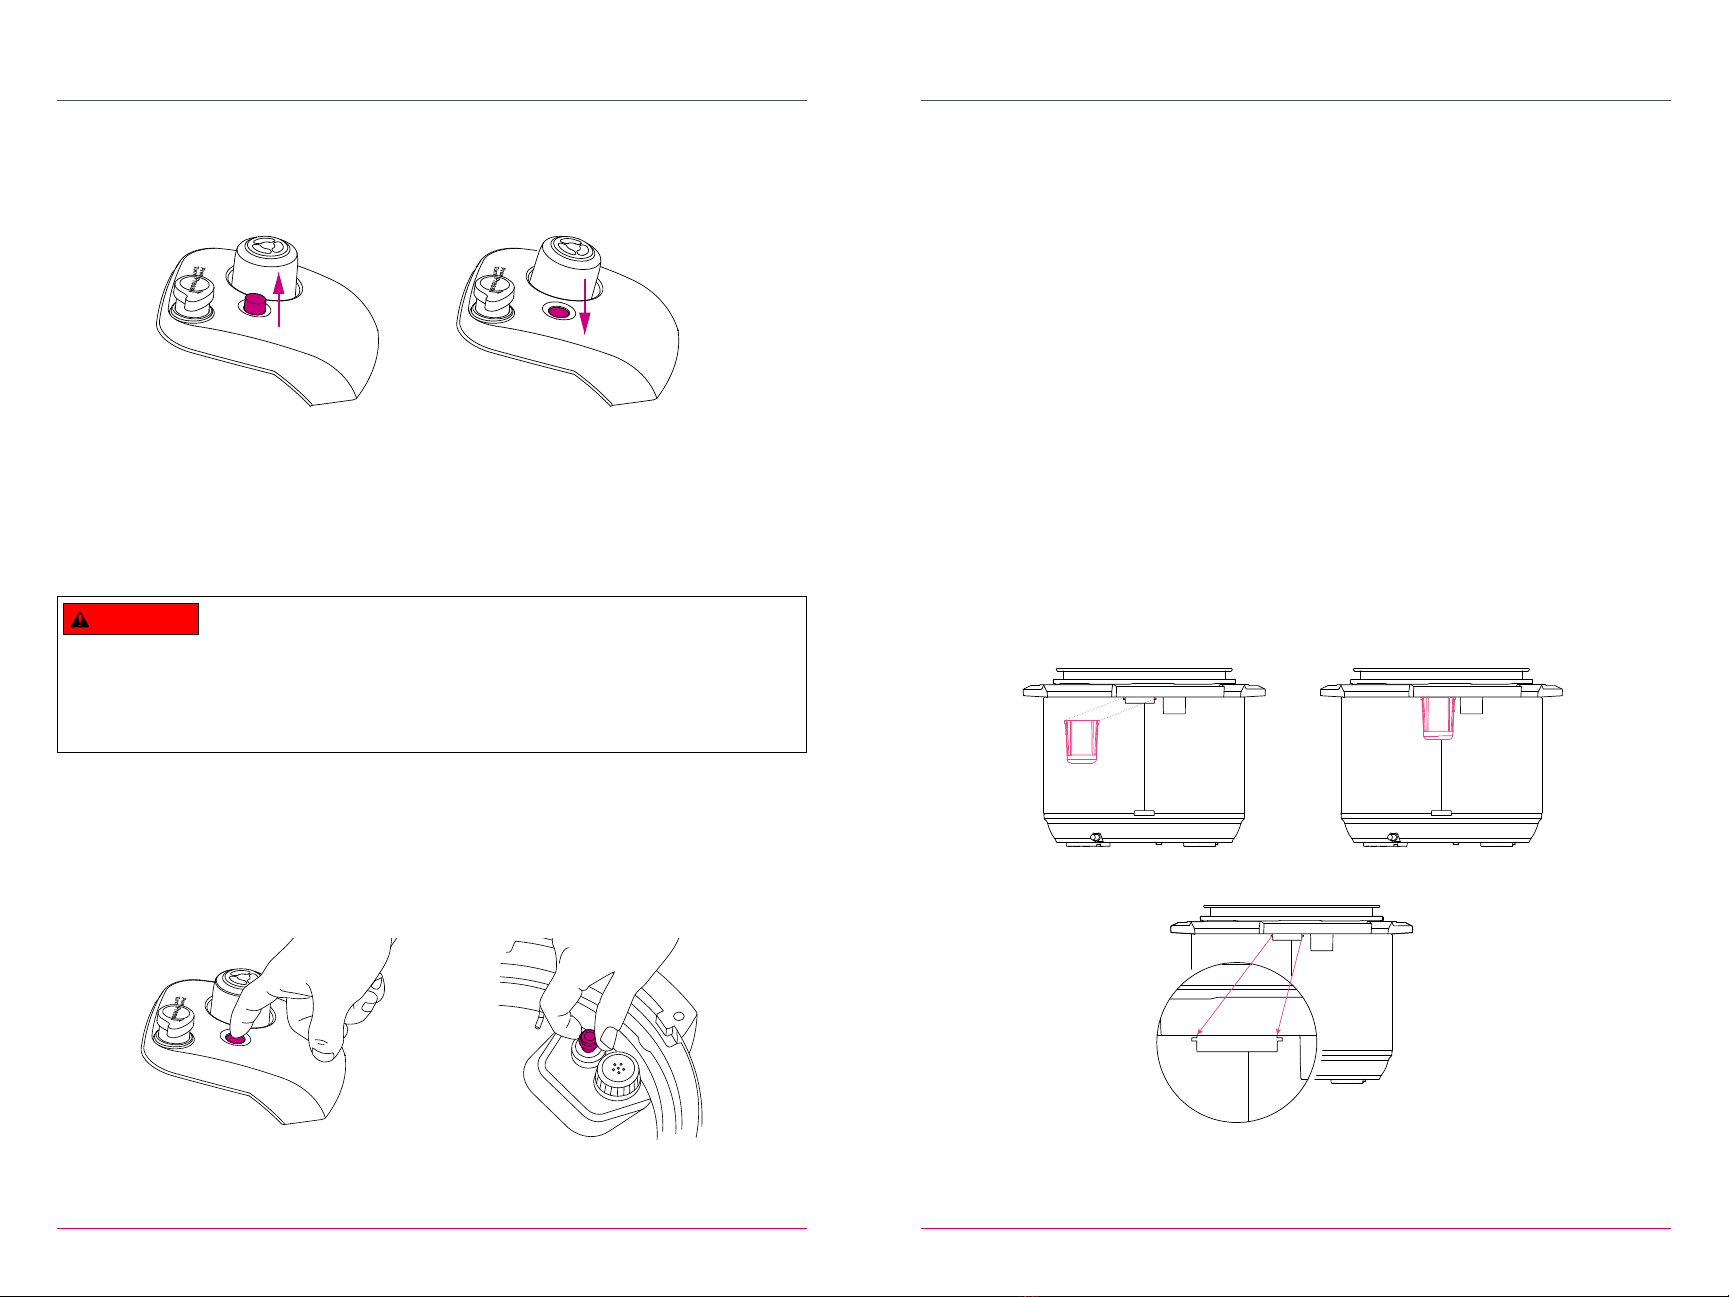
22 Turn the appliance off if steam escapes from the sides of the lid and
ensure sealing ring is properly installed. Refer to Care, cleaning and
storage: Removing and installing parts for information on checking
the sealing ring.
23 To disconnect, press Cancel, then remove plug from power source.
24 Unplug from the outlet when not in use, as well as before adding or
removing parts or accessories, and before cleaning. To unplug, grasp
the plug and pull from the outlet. Never pull from the power cord.
25 Regularly inspect the appliance and power cord. Do not operate the
26
appliance if the power cord or plug is damaged, or after the appliance
malfunctions or is dropped or damaged in any manner. For assistance,
+44 (0) 3331 230051.
Spilled food can cause serious burns. A short power-
supply cord is provided to reduce the hazards resulting from grabbing,
entanglement and tripping.
•Keep the appliance and cord away from children.
•Never drape the power cord over edges of tables or counters.
•Never use below-counter power outlets, and never use with an
extension cord.
27 Do not let the power cord hang over edges of tables or
counters, or touch hot surfaces or open ame, including the stovetop.
28 Intended for countertop use only. Keep the appliance on a stable,
heat-resistant platform. Do not place on anything that may block the
vents on the bottom of the cooker base or on the air fryer lid. Leave at
least 13 cm of space around the air fryer lid when in use. Do not place
the appliance on a hot stove. Do not operate the appliance on or near
combustible materials such as tablecloths and curtains.

98
IMPORTANT SAFEGUARDS IMPORTANT SAFEGUARDS
Read this manual carefully and completely, and
retain for future reference. Failure to adhere to safety
instructions may result in serious injury or damage.
Read this manual carefully and completely, and
retain for future reference. Failure to adhere to safety
instructions may result in serious injury or damage.
WARNING WARNING
29
30
31
32 Do not attempt to repair, replace or modify components of the appliance,
as this may cause electric shock, re or injury, and will void the warranty.
33 Do not tamper with any of the safety mechanisms as this may result in
injury or property damage.
34 Avoid contact with moving parts as this may result in injury.
35 Do not use the appliance in electrical systems other than 220–240V~
50/60 Hz. Do not use with power converters or adapters.
36 This appliance is NOT to be used by children or by persons with
reduced physical, sensory or mental capabilities. Close supervision
is necessary when any appliance is used near children and these
individuals. Children should not play with this appliance.
37 To prevent personal injury and damage to the appliance, only replace
the sealing ring with an authorised Instant Pot sealing ring. Visit our
Do not cover the air vents while the air fryer lid is in
operation. Doing so will prevent even cooking and may cause damage
to the appliance.
Do not use any accessories or attachments not authorised
by Instant Brands Inc. The use of attachments not recommended by the
manufacturer may cause a risk of injury, fire or electric shock.
Before inserting the inner pot into the appliance, wipe the
outer surface of the inner pot as well as the heating element, located at
the bottom of the interior of the cooker base, with a clean dry cloth.
Ensure they are dry and free of debris. Refer to Care, Cleaning and
Storage. Failure to do so may result in injury or property damage.
online store for purchasing details.
38 The use of accessory attachments not recommended by the appliance
manufacturer may cause injuries.
39 Proper maintenance is recommended before and after each use:
• Check the steam release valve, steam release pipe, anti-block
shield and float valve on the pressure cooking lid for clogging;
• Check the heating element and element cover on the air fryer lid for
grease and food debris;
•Prior to inserting the inner pot into the multicooker base, make sure
both parts are dry and free of food debris;
• Do not allow children to clean or maintain the unit.
See Care, cleaning and storage for more information.
40 When using the air fryer lid, do not overll the air fryer basket.
Overlling may cause food to contact the heating element, which may
result in re and/or personal injury.
41 Never connect this appliance to an external timer switch or separate
42
remote-control system.
DO NOT touch accessories during or immediately after
cooking. To avoid personal injury,
• Always use heat-resistant hand protection when removing
accessories, and to handle the inner pot.
• Always place hot accessories on a heat-resistant surface or
cooking plate.
•Only place the air fryer lid on the protective pad provided; do not
place on countertop.
•Use extreme caution when disposing of hot grease. Failure to do so
may result in serious injury or property damage.
43 While cooking, the internal temperature of the appliance reaches several
hundred degrees. To avoid personal injury, never place unprotected
hands inside the appliance until it has cooled to room temperature.
44 When the air fryer lid is in operation, hot air is released
through the air vents. Keep your hands and face at a safe distance from the
air vents and take extreme caution when removing hot accessories from the
appliance. Failure to do so may result in injury or property damage.
45 Should the unit emit black smoke when using the air fryer lid, press
Cancel and unplug the appliance immediately. Wait for smoking to stop
before removing the lid, then clean thoroughly. For further information
refer to Troubleshooting online.
46 Do not leave the appliance unattended while in use.
47 Extreme caution must be used when the inner pot
contains hot food, hot oil or other hot liquids. Improper use, including
moving the air fryer lid or cooker base, may result in personal injury. Do
not move the appliance while it is in use.

1110
IMPORTANT SAFEGUARDS IMPORTANT SAFEGUARDS
Special Lead Set Instructions
As per safety requirements, a short power supply lead is provided to reduce the
hazards resulting from grabbing, entanglement and tripping.
This appliance comes with (1) power lead. To reduce the risk of electric shock,
plug the power lead into an earthed and easily accessible electric socket.
Product Speci ications
WARNING
FAILURE TO FOLLOW ANY OF THE IMPORTANT SAFEGUARDS
AND IMPORTANT INSTRUCTIONS FOR SAFE USE IS A MISUSE
OF YOUR APPLIANCE THAT CAN VOID YOUR WARRANTY AND
CREATE THE RISK OF SERIOUS INJURY.
WARNING
Electric shock hazard. Use an earthed outlet only. DO NOT remove
earthing. DO NOT use an adapter. DO NOT use an extension lead.
Failure to follow instructions can cause electric shock and/or death.
WARNING
To avoid injury, read and understand the instruction manual before
using this appliance.
Read this manual carefully and completely, and
retain for future reference. Failure to adhere to safety
instructions may result in serious injury or damage.
Read this manual carefully and completely, and
retain for future reference. Failure to adhere to safety
instructions may result in serious injury or damage.
WARNING WARNING
48 Oversized foods and/or metal utensils must not be inserted into the
inner pot or air fryer basket as they may cause risk of re and/or
personal injury.
49 Do not store any materials in the cooker base or inner pot when not in use.
50 Do not place any combustible materials in the cooker base or inner pot,
such as paper, cardboard, plastic, Styrofoam or wood.
51 Do not use the included accessories in a microwave, toaster oven,
convection or conventional oven, or on a ceramic cooktop, electric coil,
gas range, or outdoor grill.
52 The removable inner pot can be extremely heavy when full of
ingredients. Care should be taken when lifting the inner pot from the
cooker base to avoid burn injury.
53 Use caution when removing the lid. Heat and steam escape as soon as
the lid is removed. Never place your face, hands or exposed skin over the
appliance opening where heat and steam escape when removing the lid.
SAVE THESE INSTRUCTIONS.
Find your model name and serial number
Model Name: Find it on the rating label on the back of the cooker base, near the power cord.
Serial Number: You can nd the serial number on a white sticker near the rating label.
Model: Duo Crisp AF 6 1500 W 220–240 V~ 50–60 Hz 5.7 Litres 8.9 kg
Model: Duo Crisp AF 8 1500 W 220–240 V~ 50–60 Hz 8 Litres 10.06 kg
Duo Crisp AF 6 Duo Crisp AF 8
With Pressure Cooker Lid:
cm: 34.5 L x 34.5 W x 33 H
With Pressure Cooker Lid:
cm: 37.5 L × 34.5 W × 36 H
With Air Fryer Lid:
cm: 34.5 L x 34.5 W x 35.5 H
With Air Fryer Lid:
cm: 37.5 L × 34.5 W × 38.8 H

Open
Close
1312
Initial Setup Product, Parts and Accessories
• Read all of the Important Safeguards in this User Manual before using
the appliance. Failure to do so may result in property damage and/or
personal injury.
• Use only the Instant Pot Duo Crisp pressure cooking lid and air fryer lid with
the Instant Pot Duo Crisp cooker base. Using any other pressure cooker lids or
air fryer lids may cause injury and/or damage.
• Remove all packaging material and accessories from within and around the
appliance.
• Place the appliance on a stable, level surface, away from combustible material
and external heat sources.
• Leave at least 13 cm of space around the appliance when using the air fryer lid.
• Do not remove the safety warning stickers from the lids, or the serial number
or rating label from the cooker base.
•Follow Care, Cleaning and Storage instructions to wash the appliance
before cooking.
CAUTION
Do not place
the appliance
on a hob.
Do not place
anything on top
of the appliance.
Do not block
or cover the
steam release
valve located
on the pressure
cooking lid.
Do not block the
air vents on the
air fryer lid.
Duo Crisp + Air Fryer
Before using the Instant Pot Duo Crisp, verify that all parts are accounted for.
Pressure Cooking Lid
Use the following Programmes with the pressure cooking lid: Pressure
Cook, Slow Cook, Steam, Sous Vide, Delay Start and Keep Warm. These
Programmes do not air fry.
Top
Illustrations in this document are for reference only and may differ from the actual product.
Always refer to the actual product.
Interior
Steam Release Valve
Lid Locking Pin
Float Valve Silicone Cap
Anti-Block Shield
Steam Release Pipe
(beneath anti-block shield)
Sealing Ring Rack
Sealing Ring
Float Valve
Quick Release Button
Lid Handle
Lid Position Marker
Lid Fins

1514
Product, Parts and Accessories Product, Parts and Accessories
Air Fryer Lid
Use the following Smart Programmes with the air fryer lid: Air Fry, Roast, Bake,
Grill and Dehydrate.
Front
Back
Interior
Inner Pot
Cooker Base
Illustrations in this document are for reference only and may differ from the actual product.
Always refer to the actual product.
Illustrations in this document are for reference only and may differ from the actual product.
Always refer to the actual product.
Lid Handle
Air Intake
Lid Position Marker
Heating Element
(beneath element cover)
Lid Fins
Air Vent
Element Cover
Male Power and Sensor Connector
Stainless Steel
Control Panel
Cooker Base Handles
Condensation Rim
Fill Line Indicators
Tri-Ply Bottom
Female Power and
Sensor Connector
Outer Pot
Heating Element
(interior)
Base Power Socket
(rear)

1716
Product, Parts and Accessories Product, Parts and Accessories
Accessories Lid Standing Position
Did you notice that the cooker base handles have a rectangular slot in them?
Keep your counters dry after lifting the pressure cooking lid by inserting the left
or right lid n into the corresponding slot on the cooker base.
Once the lid is safely in the standing position, it’s easy to remove the inner pot.
Illustrations in this document are for reference only and may differ from the actual product.
Always refer to the actual product.
Illustrations in this document are for reference only and may differ from the actual product.
Always refer to the actual product.
Grill/Dehydrating Tray
Multi-Level Air Fryer Basket
Air Fryer Basket Base
Protective Pad and Storage Cover
Multi-functional Rack
Note: Always place the
hot air fryer lid on the
protective pad.

1918
Control Panel
1 Time Display
The countdown timer indicates cooking and Delay Start time in hour format
(05:20 is 5 hours, 20 minutes).
The timer counts up while in Keep Warm.
2 Temperature / Pressure Display
Pressure Cooking Lid: Display indicates Lo (Low) or Hi (High) pressure or
temperature level.
Note: When using the Sous Vide Smart Programme, the display indicates temperature
in ºC (Celsius) or ºF (Fahrenheit).
Air Fryer Lid: Display indicates temperature in ºC (Celsius) or ºF (Fahrenheit).
Control Panel
3 LED Indicators
Illuminate to indicate the active Smart Programme and settings selected.
4 Smart Programmes
Pressure Cooking:
• Pressure Cook
• Sauté
• Slow Cook
•Steam
•Sous Vide
Air Frying:
• Air Fry
• Roast
• Bake
• Broil
• Dehydrate
5 Smart Programme Settings
• + / – Temp
• + / – Time
• Delay Start
•Keep Warm
• Cancel
• Start
Illustrations in this document are for reference only and may differ from the actual product.
Always refer to the actual product.
5
2
1
3
5 5
4

2120
Smart Programme Settings Smart Programme Settings
Cancel and
Standby mode
Press Cancel to stop a Smart Programme at any time.
The display returns to Standby mode and indicates OFF.
Turn sound
On/Off
When in Standby mode, press and hold +over Time until the
display indicates S On (sound on) or SOFF (sound off).
Note: Error alerts cannot be silenced.
Adjust
temperature
scale: ºC or ºF
When in Standby mode, press and hold +above Temp
until the display indicates ºF (Fahrenheit) or ºC (Celsius).
The temperature is displayed in the unit indicated.
Set a Delay
Start timer
Delay Start may be applied to the Pressure Cook, Slow Cook
and Steam Smart Programmes.
Set Delay Start for a minimum of 10 minutes to a maximum
of 24 hours.
1. Select a Smart Programme and adjust the settings as you
desire, then press
Delay Start.
Note: Once Delay Start has been selected, there is no way to
return to the cooking settings. To adjust Smart Programme
settings, press Cancel and enter new selections.
2. When the timer ashes, use the + / −Time buttons to
adjust the delay time.
E.g., 02:00 indicates that cooking will start after 2 hours.
3. Press Delay Start again to toggle to the minutes eld and
follow the same process as the previous step.
4. Press Start to begin.
The timer begins counting down.
5. When Delay Start reaches 00:00 the Smart Programme
begins.
The display indicates On and the cooker starts to Pre-heat.
Automatically
keep food
warm after
cooking
Keep Warm is on by default on the Pressure Cook, Slow Cook
and Steam Smart Programmes.
To turn automatic warming off, select an applicable Smart
Programme then press Keep Warm. The LED indicator dims
to indicate that the setting is off.
Reheat food
or keep warm
for long
periods
Keep Warm may be set from a minimum of 10 minutes to a
maximum of 24 hours.
1. When in Standby, select Keep Warm.
2. Press Keep Warm again to cycle through Lo (Low) and
Hi(High) temperature levels.
3. Use the − / +Time buttons to set a warming timer.
4. Press Start to begin.
5. When Keep Warm completes, the display indicates End.
Adjust and
save custom
temperatures
Applicable to Sous Vide, Air Fry, Roast, Bake, Grill and
Dehydrate Smart Programmes.
1. Select an applicable Smart Programme.
2. Use the − / +Temp buttons to adjust the temperature
in ºF or ºC.
3. Press Start to start the Programme and save the
temperature.
The next time the Smart Programme is selected, the new
temperature is displayed.
When air frying, the cooking temperature may be adjusted
at any time with the − / +Temp buttons. Adjustments made
after cooking begins are not saved.
Reset
individual
Smart
Programme
With the cooker in Standby mode, press and hold one Smart
Programme button until the cooker returns to Standby, it will
beep and display OFF.
The Smart Programme’s pressure level, cooking time and
temperature are restored to the factory default setting.
Reset all Smart
Programmes
With the cooker in Standby mode, press and hold Cancel
until the cooker beeps.
All Smart Programme pressure levels, cooking times and
temperatures are restored to the factory default setting.

2322
Status Messages Cleaning Before First Use
Indicates that the cooker is in Standby mode.
Indicates that the cooker is in Pre-heat mode.
May indicate that the lid is missing, not properly
secured, or that the wrong lid is being used for the
Smart Programme selected.
Display timer indicates one of the following:
• When a Smart Programme is running, the display timer
counts down to indicate the cooking time remaining
inthe Smart Programme.
• When Delay Start is running, the display timer counts
down until the Smart Programme begins.
• When Keep Warm is running, the display timer counts
up to indicate how long food has been warming.
Indicates that the Sauté Smart Programme has reached
cooking temperature and food may be added to the inner pot.
Indicates that a Smart Programme has ended and Keep Warm
is off.
Indicates overheating in the cooking chamber.
Refer to Troubleshooting.
Indicates that an error has occurred. Refer to Troubleshooting.
Remove the inner pot from the cooker base and wash it with hot water and
washing up liquid. Rinse with warm, clear water and use a soft cloth to dry the
outside of the inner pot.
Note: The inner pot is dishwasher safe.
Wipe the heating element with a soft cloth to ensure there are no stray packaging
particles present before returning the inner pot to the cooker base.
Note: Before cooking, always ensure the heating element is clean and dry before inserting
the inner pot into the cooker base. Failure to do so may damage the cooker.
The inner pot is an integral part of product safety. Food must be placed in the
inner pot, and never directly in the cooker base.
To avoid personal injury or damage to the appliance, replace a deformed or
damaged inner pot. Use only authorised Instant Pot inner pots made for this
model when cooking.
CAUTION To avoid risk of personal injury and/or property damage,
as well as damage to the cooker, do not pour food or
liquid into cooker base.
WARNING DonotlltheinnerpothigherthanthePC MAX – 2/3
(Pressure Cooking Maximum), as indicated on the
inner pot.
Exercise extreme caution when cooking and venting food such
as stewed apples, cranberries, pearl barley, oatmeal, split peas,
noodles, etc., as these foods may foam, froth or spatter, and may
clogthesteamreleasepipeand/orsteamreleasevalve.Donotll
the inner pot higher than the – 1/2 line when cooking these foods.
Illustrations in this document are for reference only and may differ from the actual product.
Always refer to the actual product.

Air Fryer Basket Base
Air Fryer Basket
Broil/Dehydrating Tray
2524
Cleaning Before First Use Overview of Pressure Control Features
Accessories
Wash the accessories with hot water and washing up liquid before using them for
the rst time, and then after each use. Rinse with warm, clear water and use a soft
cloth to dry the accessories.
To assemble the multi-level air fryer basket:
1. Place the multi-level air fryer basket base on a stable surface.
2. Position the air fryer basket over the base and press down rmly. The teeth
on the base should pop into the groove on the outside of the basket.
3. To easily lift and position the broil/dehydrating tray, hold the large holes in the
middle of the tray with 2 ngers.
4. Insert the broil/dehydrating tray into the multi-level air fryer basket, ensuring
that the raised rim is facing down.
Note: The air fryer basket must be used with the stainless steel inner pot.
Pressure Cooking Lid
The stainless steel lid included is necessary for most cooking processes, and is
essential for pressure cooking. Always ensure you only use the Duo Crisp pressure
cooking lid with the Duo Crisp cooker base.
When plugged in, the cooker plays a jingle when the lid is opened and closed.
Open and Remove the Lid
Grip the lid handle and turn it anti-clockwise to align the symbol on the lid
with the symbol on the rim of the cooker base, then lift the lid up and off
the cooker base.
Close the Lid
Align the symbol on the lid with the symbol on the cooker base, and lower
the lid onto the track. Turn the lid clockwise until the symbol on the lid aligns
with the symbol on the cooker base.
Illustrations in this document are for reference only and may differ from the actual product.
Always refer to the actual product.
Illustrations in this document are for reference only and may differ from the actual product.
Always refer to the actual product.
OpenClose
Open
Close

Open
Close
Quick Release Button
Open
Close
Open
Close
2726
Overview of Pressure Control Features Overview of Pressure Control Features
Steam Release Valve
The steam release valve sits loosely on the steam
release pipe. When the cooker releases pressure,
steam is ejected from the top of the steam
release valve.
The steam release valve is integral to product safety
and necessary for pressure cooking. It must be
installed before use and cleaned regularly.
Remove the Steam Release Valve
Pull steam release valve up and off steam release pipe.
Steam release valve must be installed before use and cleaned frequently.
Install the Steam Release Valve
Place the steam release valve on the steam release pipe and press down rmly.
The steam release valve sits loosely on the steam release pipe when installed
properly but should remain in place when the lid is turned over.
The pressure cooking lid automatically seals for easy pressure cooking, but does
not lock into place when closed. The lid can be removed during Pre-heating but
locks into place once the cooker has pressurized
Refer to Overview of Pressure Control Features — Float Valve for information on
pressurization and depressurisation.
Quick Release Button
The quick release button controls the steam release valve, sealing and venting the
cooker as you desire.
Refer to Depressurising the Cooker (Venting Methods) for details on safe
depressurisation.
CAUTION Always check the lid for damage and excessive wear
prior to cooking.
DANGER Do notattempttoremovethelidwhiletheoatvalveisup.
WARNING Use only the Instant Pot Duo Crisp lid with the
Instant Pot Duo Crisp pressure cooker base. Using
any other pressure cooker lids may cause injury and/or damage.
WARNING Do not cover or block the steam release valve.
Remove Install
Illustrations in this document are for reference only and may differ from the actual product.
Always refer to the actual product.
Illustrations in this document are for reference only and may differ from the actual product.
Always refer to the actual product.

2928
Overview of Pressure Control Features Overview of Pressure Control Features
Anti-Block Shield
The anti-block shield prevents food particles from coming up through the steam
release pipe, assisting with pressure regulation.
As an integral part of product safety, the anti-block shield must be installed before
use and cleaned frequently.
Remove the Anti-Block Shield
Grip the lid like a steering wheel and use your thumbs to press rmly against the
side of the anti-block shield (pressing towards the side of the lid and up) until it
pops off the prongs underneath.
Install the Anti-Block Shield
Place anti-block shield over prongs and press down until it snaps into position.
Do not attempt to operate the pressure cooker without the anti-block shield installed.
Sealing Ring
When the pressure cooking lid is closed, the sealing ring
installed on the underside of the lid creates an airtight
seal between the lid and the cooker base.
The sealing ring must be installed before using the
cooker and should be cleaned after each use.
Only 1sealing ring should be installed in the lid when
using the cooker. Use one for sweet dishes and one
for savoury.
Sealing rings stretch over time with normal use.
As an integral part of product safety, the sealing ring
should be replaced every 12–18 months or sooner
if stretching, deformation or damage is noticed.
Remove the Sealing Ring
Grip the edge of the silicone and pull the sealing
ring out from behind the circular stainless steel sealing
ring rack.
With the sealing ring removed, inspect the rack to
ensure it is secured, centred and an even height all the
way around the lid. Do not attempt to repair a deformed
sealing ring rack.
Install the Sealing Ring
Place the sealing ring over the sealing ring rack and
press it into place. Press down rmly to ensure there
is no puckering.
When installed properly, the sealing ring is snug behind
the sealing ring rack and should not fall out when the lid
is turned over.
Instant Tip: Silicone is porous, so it may absorb strong aromas and certain
avours. Keep extra sealing rings on hand to limit the transfer of those aromas
and avours between dishes Visit our store to color code your cooking.
CAUTION Always check for cuts, deformation and correct
installation of the sealing ring prior to cooking. Do not
use a stretched or damaged sealing ring. Only use authorised Instant
Pot sealing rings. Failure to follow these instructions may cause food
to discharge, which may lead to personal injury or property damage.
Remove
Install
Incorrect
Remove
Install
Illustrations in this document are for reference only and may differ from the actual product.
Always refer to the actual product.
Illustrations in this document are for reference only and may differ from the actual product.
Always refer to the actual product.

3130
Overview of Pressure Control Features Overview of Pressure Control Features
Float Valve
The oat valve provides a visual indication of pressure within the cooker and
appears in 2 positions.
The oat valve and silicone cap work together to seal in pressurised steam. These
parts must be installed before use and should be cleaned after each use.
Remove the Float Valve from the Lid
Place one nger on the at top of the oat valve, then turn the lid over.
Detach the silicone cap from the bottom side of the oat valve.
Remove the oat valve from the top of the lid. Do not discard the oat valve
or silicone cap.
Pressurised
The oat valve has visibly popped
up above the surface of the lid.
Depressurised
The oat valve has descended
and the top is ush with the lid.
Top Bottom
DANGER Whiletheoatvalveisup,contentsofcookerare
under extreme pressure. Do not attempt to remove
the lid. All pressure mustbereleased,andoatvalvemustbe
down. Refer to Depressurising the Cooker (Venting Methods) for
information on releasing pressure. Failure to follow these instructions
may result in property damage and/or personal injury.
Install the Float Valve
Drop the narrow end of the oat valve into the oat valve hole on the top of the
lid. Place one nger on the at top of the oat valve, then turn the lid over. Firmly
attach the silicone cap to the bottom of the oat valve.
Do not attempt to operate the pressure cooker without the oat valve and/or
silicone cap properly installed in the pressure cooking lid.
Condensation Collector
The condensation collector sits at the back of the cooker base and accumulates
overow moisture from the condensation rim. It should be installed before
cooking, then emptied and rinsed out after each use.
Remove the Condensation Collector
Pull the condensation collector away from the cooker base; do not pull down.
Note the tabs on the cooker base and the grooves on the condensation collector.
Install the Condensation Collector
Align the grooves on the condensation collector over the tabs on the back of the
cooker base and slide the condensation collector into place.
Illustrations in this document are for reference only and may differ from the actual product.
Always refer to the actual product.
Illustrations in this document are for reference only and may differ from the actual product.
Always refer to the actual product.

3332
Introduction to Pressure Cooking Introduction to Pressure Cooking
Pressure cooking uses steam pressure to raise the boiling point of water above
100ºC / 212ºF. This energy-efcient cooking method is the fastest way to
thoroughly cook a variety of your favourite meals.
Pressure cookers go through 3 stages when pressure cooking:
1. Pre-Heating and Pressurization
After you have nished inputting your selections press Start to begin. The display
reads On to indicate it has begun pre-heating. While the cooker pre-heats, it
vaporises liquid in the inner pot to create steam. Once enough steam has built up
inside the inner pot, the oat valve pops up and locks the lid of the cooker in place
for safe pressure cooking.
When the oat valve pops up, the silicone cap attached to the bottom of the oat
valve (on the underside of the lid) seals the steam inside the cooking chamber (the
inner pot) and allows the pressure to rise even higher. A higher pressure means a
higher cooking temperature.
While it is normal to see some steam escaping through the oat valve during
Pre-Heating, if you see steam escaping from around the sides of the lid, press
Cancel and refer to Troubleshooting.
Note: The time it takes your cooker to pressurise is determined by a variety of factors,
including food and liquid volume.
2. Cooking
After the oat valve pops up, the cooker needs a few minutes to nish building
pressure. When the required pressure level is reached, cooking begins. The
display switches from On to the cooking countdown timer, displayed in HH:MM
(hours : minutes) format.
Smart Programme settings (e.g., cooking time, temperature and/or pressure level,
and whether Keep Warm will come on automatically or not) can be adjusted at any
time during cooking. Refer to Smart Programme Settings for details.
3. Depressurisation
After pressure cooking is complete, follow your recipe instructions for
depressurising the cooker.
If automatic Keep Warm is on after cooking is complete, the timer counts up from
00:00 to indicate the elapsed time up to 10 hours. If not, the cooker returns to
Standby and displays End.
Note: The cooker cools and depressurises faster if automatic Keep Warm is off.
See Depressurising the Cooker (Venting Methods) for information on releasing
pressure after cooking.
DANGER Whiletheoatvalveisup,contentsofcookerareunder
extreme pressure. Do not attempt to remove the lid
while the oat valve is still up. All pressure must be released, and
oatvalvemustbedown before attempting to remove the lid. Never
attempt to force the lid open. Failure to follow the instructions may
result in property damage and/or personal injury.
WARNING The inner pot must always be used when pressure
cooking or air frying. NEVER place food or liquid in
the cooker base. Failure to follow these instructions will result in
damage to the cooker.

3534
Depressurising the Cooker (Venting Methods) Depressurising the Cooker (Venting Methods)
Always follow recipe instructions for depressurising the cooker.
When the cooker has completely depressurised, the oat valve drops into the lid
as indicated in Overview of Pressure Control Features — Float Valve.
Natural Release (NR)
Leave the quick release button in the popped-
up Seal position. As the temperature within the
cooker drops, the cooker depressurises naturally
over time.
Depressurisation time varies based upon the
volume and type of food and liquid. When the
cooker has completely depressurised, the oat
valve drops into the lid.
Quick Release (QR)
Press the quick release button down until it clicks and locks into the Vent position.
When depressed, a stream of steam is released through the top of the steam
release valve.
Note: Steam may range in opacity but is always loud!
Seal Position
NOTICE Use NR to depressurise the cooker after cooking
high-starch foods (e.g., soups, stews, chilis, pasta,
oatmeal and congee) or after cooking foods that expand when
cooked (e.g., beans and grains).
CAUTION Steam ejected from the steam release valve is hot.
Do not place hands, face, or any exposed skin over
the steam release valve when releasing pressure.
If continuous spatter occurs while venting, set the cooker back to Seal by icking
the quick release button. The button pops back up to indicate that it is sealed and
stops the depressurisation process. Wait a few minutes before trying to QR again.
If spatter continues, use NR to safely release remaining pressure.
10-Minute NR
Leave the quick release button in the popped-up Seal position for 10 minutes
after cooking has completed, then press the quick release button down until it
clicks and locks into the Vent position. When depressed, a stream of steam is
released through the top of the steam release valve.
If continuous spatter occurs while venting, set the cooker back to Seal by icking
the quick release button. Wait an additional 5minutes before trying to QR again.
If spatter continues, use NR to safely release remaining pressure.
DANGER Whiletheoatvalveisup,contentsofcookerare
under extreme pressure. Do not attempt to remove
the lid while the oat valve is still up. All pressure must be
released,andoatvalvemust be down before attempting to remove
the lid. Never attempt to force the lid open. Failure to follow the
instructions may result in property damage and/or personal injury.
NOTICE Do not use QR when cooking high-starch foods
(e.g., stews, chilis, pasta and congee) or when
cooking foods that expand when cooked (e.g., beans and grains).
WARNING
Do not lean over
or touch the steam
release valve.
Do not place unprotected
skin over the steam
release valve.
Do not cover or
obstruct the steam
release valve.
Illustrations in this document are for reference only and may differ from the actual product.
Always refer to the actual product.
Illustrations in this document are for reference only and may differ from the actual product.
Always refer to the actual product.

3736
Initial Test Run (Water Test) Smart Programmes: Non Air Frying
Follow these steps to start familiarising yourself with your Instant Pot Duo Crisp +
Air Fryer.
Note: Always ensure you are using the stainless steel inner pot when air frying. NEVER place
food or liquid into the cooker base.
Total test time: Approximately 20 minutes.
1. Remove the inner pot from the cooker base.
2. Add 750 mL of water to the inner pot.
3. Insert the inner pot into the cooker base.
4. Connect the appropriate power lead for your outlet type to the cooker base,
then insert the plug into an accessible outlet. Display indicates OFF.
5. Place and close the lid as described in Pressure Control Features — Pressure
Cooking Lid.
Note: The lid automatically seals for pressure cooking.
6. Press Pressure Cook to select the Pressure Cook Smart Programme.
7. Use the + / −Time buttons to adjust the cooking time to 5minutes (00:05).
Note: Cooking time adjustments are saved to the Smart Programme when cooking begins.
8. Press Keep Warm to deactivate the automatic Keep Warm setting.
9. Press Start to begin. The display reads On to indicate that the cooker has
begun Pre-heating.
Note: To understand how pressure cooking works, read Introduction to Pressure
Cooking while the cooker heats.
10. The oat valve rises when the cooker has pressurized. After a few minutes the
cooker reaches the target pressure level and Cooking begins. The display
changes from On to the cook time countdown.
11. When the Smart Programme is complete, the display indicates End.
12. Press the quick release button down until it clicks into the Vent position.
Pressurized steam releases through the top of the steam release valve.
13. The oat valve drops when the pressure has been fully released.
14. Open and remove the lid as described in Pressure Control Features—Pressure
Cooking Lid.
15. Carefully remove the inner pot from the cooker base, discard the water and
thoroughly dry the inner pot.
You’re ready to start cooking!
CAUTION The inner pot will be hot after cooking. Always use
appropriate heat protection when handling a hot
inner pot.
Whether you are a novice cook or a culinary expert, the Duo Crisp + Air Fryer
provides Smart Programmes to get you cooking —fast!
All oven-safe cookware is safe for use in the inner pot, and the included air frying
accessories feature multiple levels to suit your cooking needs.
Always inspect your Instant Pot pressure cooking lid, inner pot and cooker base
carefully to ensure they are clean and in good working condition before use.
Pressure Cook and Steam
The Pressure Cook and Steam Smart Programmes are pressure cooking
Programmes. Using pressurised steam ensures your dish is cooked evenly and
deeply, for predictably delicious results every time.
The Duo Crisp features 2 pressure levels to choose from:
Pressure Level Suggested Use Default Cooking
Time
Cooking Time
Range
Lo (Low) 5.8–7.2 psi
(35–55 kPa)
Fish and seafood,
soft vegetables, rice Pressure Cook:
00:35
Steam:
00:30
00:00–04:00
Hi (High) 10.2–11.6 psi
(65–85 kPa)
Eggs, meat, poultry, roots and
other hard vegetables, oats, beans,
grains, bone broth, chili
Because the pressure level controls the temperature, a higher pressure results
in a higher cooking temperature.
Pressure cooking liquids should be water-based, such as broth, stock, soup or juice.
If using tinned, condensed or cream-based soup, add water as directed below.
Instant Tip: Using the multi-functional rack will ensure your food items
are steamed and not boiled. This ensures even heat distribution, prevents
nutrients from leeching into the cooking liquid, and stops food items from
scorching on the bottom of the inner pot.
CAUTION To avoid scorching or scalding injuries, be cautious
when cooking with more than 60 mL of oil, oil-based
sauces, condensed cream-based soups and thick sauces. Add
suitable liquid to thin sauces. Avoid recipes that call for more than
60 mL of oil or fat content.
Pressure level Minimum liquid required*
5.7 Litres 1 ½ cups (~12 oz / 375 mL)
8 Litres 2 cups (~16 oz / 500 mL)
*Unless otherwise speci ied by your recipe

3938
Smart Programmes: Non Air Frying Smart Programmes: Non Air Frying
1. Place the steam rack on the bottom of the inner pot.
2. According to your recipe, add liquid to the inner pot, then place food
ingredients on the steam rack.
Note: Cold or frozen food items take longer to generate steam and slow down
pressurisation. For the fastest results, thaw frozen ingredients before cooking.
Note: When cooking beans or grains, refer to the Grain-to-Water Ratios for best results.
3. Insert the inner pot into the cooker base.
4. Connect the appropriate power lead for your outlet type to the cooker base,
then insert the plug into an accessible outlet. Display indicates OFF.
5. Place and close the lid as described in Pressure Control Features — Pressure
Cooking Lid.
Note: The quick release button will automatically pop up to the Seal position for
pressure cooking.
6. To select the Smart Programme, press either Pressure Cook or Steam.
7. You may select the default cooking time, or, use the + / −Time buttons to
create a customized cooking time.
Note: Adjustments to the cooking time and pressure level are saved when you press Start.
8. Press the same Smart Programme button again to toggle between Lo (Low)
and Hi (High) pressure levels.
9. Press Keep Warm to toggle the automatic Keep Warm setting off or on, as you
desire. Refer to Automatically Keep Food Warm After Cooking for details.
10. Press Start to begin. The display reads On to indicate that the cooker has
begun Pre-heating.
11. If Keep Warm mode is on when the Smart Programme is complete, the cooker
counts up to indicate the elapsed time. If not, the cooker goes to Standby
mode and the display indicates End.
Follow the recipe directions to select the appropriate venting method. Refer to
Depressurising the Cooker (Venting Methods).
DANGER Whiletheoatvalveisup,contentsofcookerare
under extreme pressure. Do not attempt to remove
the lid while the oat valve is still up. All pressure must be
released,andoatvalvemustbedown before attempting to remove
the lid. Never attempt to force the lid open. Failure to follow the
instructions may result in property damage and/or personal injury.
WARNING
Donotllinnerpothigherthan
the PC MAX — 2/3 line as
indicated on the inner pot.
When cooking foods that expand
(e.g.; rice, beans, pasta) do not
lltheinnerpothigherthanthe
— 1/2 line as indicated on the
inner pot.
Always cook with the inner pot in
place. Do not pour food or liquid
into the cooker base.
To avoid risk of personal injury
and/orproperty damage, place
food and liquid ingredients in the
inner pot, then insert the inner
pot into the cooker base.
Other manuals for DUO CRISP AF 6
1
This manual suits for next models
1
Table of contents
Other InstantPot Fryer manuals

InstantPot
InstantPot VORTEX 5.7QT User manual

InstantPot
InstantPot Omni Pro User manual

InstantPot
InstantPot CRISP 11-IN-1 Specification sheet

InstantPot
InstantPot AIR FRYER LID User manual

InstantPot
InstantPot VORTEX PLUS 4QT User manual

InstantPot
InstantPot VORTEX PRO User manual

InstantPot
InstantPot VORTEX PLUS CLEARCOOK User manual

InstantPot
InstantPot DUO CRISP AF 6 User manual

InstantPot
InstantPot DUO CRISP Guide