tomado TAF5001B User manual

Quality
since 1923 Excellent
service Best
choice
NL Gebruiksaanwijzing
EN Instruction manual
DE Gebrauchsanleitung
FR Mode d’emploi
ES Instrucciones de uso
IT Istruzioni per l’uso
DA Instruktioner til brug
PL Instrukcjeużytkowania
CS Návodkpoužití
SK Návodnapoužitie
TAF5001B
Hetelucht friteuse
Hotairfryer
Heißluftfritteuse
Friteuse à air chaud
Freidora de aire caliente
Friggitrice ad aria calda
Varmluftfrituregryde
Frytkownicanagorącepowietrze
Horkovzdušná fritéza
Teplovzdušná fritéza

2

3
NL Gebruiksaanwijzing
EN Instruction manual
DE Gebrauchsanleitung
FR Mode d’emploi
ES Instrucciones de uso
IT Istruzioni per l’uso
DA Instruktioner til brug
PL Instrukcjeużytkowania
CS Návodkpoužití
SK Návodnapoužitie
pagina 4-12
page 13-21
Seite 22-31
page 32-41
página 42-50
pagine 51-60
side 61-69
strona 70-79
strana 80-88
strana 89-97

•
• Gebruik dit apparaat uitsluitend voor de in de gebruiksaanwijzing
beschreven doeleinden.
• Sluit het apparaat alleen aan op wisselstroom, op een randgeaarde
wandcontactdoos, met een netspanning overeenkomsg met de
informae aangegeven op het typeplaatje van het apparaat.
• Het apparaat buiten bereik van kinderen houden. Kinderen
beseen de gevaren niet, die kunnen ontstaan bij het omgaan met
elektrische apparaten. Laat kinderen daarom nooit zonder toezicht
met elektrische apparaten werken. Houd het apparaat en het
snoer buiten bereik van kinderen jonger dan 8 jaar.
• Het apparaat kan worden gebruikt door kinderen van 8 jaar en
ouder en door personen met beperkte fysieke, zintuiglijke of
mentale vermogens of gebrek aan ervaring of kennis, wanneer zij
het apparaat onder toezicht gebruiken of zijn geïnstrueerd over
het veilige gebruik ervan en zij de daaruit voortkomende gevaren
begrijpen.
• Kinderen mogen niet met het apparaat spelen.
• Het apparaat mag niet door kinderen worden gereinigd
of onderhouden, tenzij dit onder toezicht gebeurt.
VEILIGHEIDSVOORSCHRIFTEN - NL

• Gebruik het apparaat niet wanneer de stekker, het snoer of het
apparaat beschadigd is, of wanneer het apparaat niet meer
naar behoren funconeert of wanneer het gevallen of op een
andere manier beschadigd is. Raadpleeg dan de winkelier of
onze technische dienst. In geen geval de stekker of het snoer
zelf vervangen. Reparaes aan elektrische apparaten dienen
uitsluitend door vakmensen uitgevoerd te worden.
• Verkeerd uitgevoerde reparaes kunnen aanzien lijke gevaren voor
de gebruiker tot gevolg hebben. Het apparaat nooit gebruiken met
onderdelen die niet door de fabrikant zijn aanbevolen of geleverd.
• Het netsnoer nooit scherp buigen of over hete delen laten lopen.
• Sluit het apparaat alleen aan op een geaard stopcontact.
Controleer aljd of de stekker goed in het stopcontact zit.
• Niet aan het snoer c.q. het apparaat trekken om de stekker uit
de wandcontactdoos te halen. Het apparaat nooit met nae
of vochge handen aanraken.
• Sluit het apparaat nooit aan op een externe mer of een afzonderlijk
afstandbedieningssysteem, om gevaarlijke situaes te voorkomen.
• Plaats het apparaat nooit in de buurt van apparaten die warmte
afgeven zoals ovens, gasfornuizen, kookplaten, etc. Het apparaat
op afstand houden van muren of andere objecten die vlam kunnen
vaen zoals gordijnen, handdoeken (katoen of papier etc.).
• Plaats het apparaat op een stevige, vlakke ondergrond en let op
dat er genoeg ruimte omheen is voor voldoende venlae. Er is
minimaal 10 cm ruimte nodig tussen het apparaat en de muren.
Plaats niets bovenop het apparaat.
• Laat het apparaat niet onbeheerd achter indien het apparaat
in werking is.
• Er komt hete stoom vrij jdens het heteluchrituren door
de uitlaatopeningen. Houd uw handen en gezicht uit de buurt van
de stoom en de uitlaatopeningen. Pas op voor de stoom met het
uitnemen van de pan.
• Na het gebruik is de binnenkant erg heet. Vermijd daarom het
aanraken van de binnenkant.
• Zorg er aljd voor dat het apparaat op een een, vlakke
ondergrond staat en gebruik het uitsluitend binnenshuis.

• Dit apparaat is alleen bedoeld voor huishoudelijk gebruik en niet
voor gebruik in:
- in personeelkeukens, in winkels, kantoren en andere
werkomgevingen.
- door gasten in hotels, motels en andere residenële omgevingen.
- in Bed&Breakfast type omgevingen
- boerderijen
• Indien het apparaat niet gebruikt of gereinigd wordt, zet het
apparaat geheel uit en verwijder de stekker uit het stopcontact.
• Laat het apparaat gedurende 30 minuten aoelen voordat u deze
opbergt of schoonmaakt.
• Zorg ervoor dat de ingrediënten die in het apparaat bereid
worden er goudbruin uitkomen en niet donker of bruin.
Verwijder verbrande delen.
• Ga bij storing nooit zelf repareren; het doorslaan van de
beveiliging in het apparaat kan duiden op een defect, dat niet
wordt verholpen door verwijdering of vervanging van deze
beveiliging. Het is noodzakelijk dat er uitsluitend originele
onderdelen gebruikt worden.
• Dit apparaat is uitsluitend geschikt voor huishoudelijk gebruik.
Wanneer het apparaat oneigenlijk gebruikt wordt, kan er bij
eventuele defecten geen aanspraak op schadevergoeding worden
gemaakt en vervalt het recht op garane.
De hetelucht friteuse is voorzien van oververhingsbeveiliging. Als de binnentemperatuur te hoog is, zal het apparaat door de
beveiliging automasch worden uitgeschakeld. Het apparaat kan dan niet meer gebruikt worden. Verwijder de stekker uit het
stopcontact , laat het apparaat aoelen en neem contact op met de servicedienst van Inventum of uw winkelier.
Dit apparaat is voorzien van een mer. Wanneer de mer hee afgeteld tot 0, zal er een piepsignaal klinken en het apparaat
schakelt automasch uit. Om het apparaat handmag uit te schakelen, drukt u eenmaal op de aan- en uit toets om het
frituren te stoppen, en een tweede maal op aan- en uit toets om het display uit te schakelen.
Dit apparaat voldoet aan alle eisen met betrekking tot elektromagnesche velden (EMV).
OVERVERHITTINGSBEVEILIGING
AUTOMATISCHE UITSCHAKELING
ELEKTROMAGNETISCHE VELDEN (EMV)

1. Bedieningspaneel
2. Mand
3. Handgreep mand
4. Pan
5. Luchnlaatopeningen
6. Verwarmingselement
PRODUCTOMSCHRIJVING
2. Mand
3. Handgreep mand
4. Pan
7. Ontgrendelknop-mand
8. +en-toetsenvoortemperatuurinstelling
9. Easycontrolmenuknop
10. Automaschemenu’s
11. Standbyenaan-enuittoets
12. +en-toetsenvoorjdsinstelling
13. Display(temperatuurenbereidingsjd)
14. Thermostaatindicae
4
4
6
3
2
1
5
7 2
3
9
14
812
11
10
13

VOOR HET EERSTE GEBRUIK
Voordat u het apparaat voor de eerste maal in gebruik neemt, dient u als volgt te werk te gaan: pak de hetelucht friteuse
voorzichg uit en verwijder al het verpakkingsmateriaal en eventuele promoonele sckers. De verpakking (plasc zakken
en karton) buiten het bereik van kinderen houden. Controleer na het uitpakken het apparaat zorgvuldig op uiterlijke schade,
mogelijk ontstaan jdens transport. Plaats de hetelucht friteuse op een stevige, vlakke en warmtebestendige ondergrond.
De knoppen om de hetelucht friteuse te bedienen, zijn ptoetsen en een easycontrol draaiknop. Raak de ptoetsen voorzichg
met een vinger aan om te acveren. Bij elke aanraking van een ptoets en draai aan de easycontrol knop klinkt er een geluidssignaal.
STANDBY
Zodra u de stekker in het stopcontact steekt, staat de hetelucht friteuse in de standby stand. De standby toets brandt.
In de volgende gevallen zal de hetelucht friteuse automasch naar de standby stand schakelen:
• wanneer u de stekker in het stopcontact steekt
• wanneer de ingestelde jd voorbij is
• wanneer u de standby toets gedurende 4 seconden ingedrukt houdt.
Zet de hetelucht friteuse aan en uit met de standby toets .
• De hetelucht friteuse zal alleen funconeren als de mand op de juiste wijze in de pan is geplaatst.
• Zodra de ingestelde jd voorbij is, zal de hetelucht friteuse automasch naar de standby stand schakelen. De venlator blij
wel draaien om de hetelucht friteuse af te koelen. Na ongeveer 20 seconden klinkt er 5 maal een piepsignaal en het venlator
symbool gaat uit.
• Aene: jdens het aoelen kan het display niet bediend worden.
Controleer of de spanning overeenkomt met die vermeld is op het typeplaatje en steek de stekker in een geaard stopcontact.
Het verwarmingselement is voorzien van een beschermlaag die voor het eerste gebruik verwijderd dient te worden. Dit doet
u door de hetelucht friteuse ongeveer 10 minuten op de maximumstand aan te zeen zonder voedsel in het apparaat. Er kan
een lichte rookontwikkeling ontstaan door de beschermlaag die van het verwarmingselement brandt. Zorg daarom voor goede
venlae in de ruimte. Na het verwijderen van de beschermlaag kunt u de hetelucht friteuse uitschakelen.
Verwijder de stekker uit het stopcontact. Laat de hetelucht friteuse goed aoelen en reinig de losse onderdelen voordat u de
hetelucht friteuse daadwerkelijk gaat gebruiken. Reinig de mand en de pan met warm water, een mild afwasmiddel en een
zachte spons. Aanwijzing: deze onderdelen kunnen ook in de vaatwasmachine gereinigd worden.
Reinig de binnen- en buitenzijde van het apparaat met een vochge doek.
• Plaats de hetelucht friteuse op een warmtebestendige, vlakke ondergrond.
• Plaats de mand goed in de pan.
• Plaats de pan in de hetelucht friteuse.
Plaats de pan goed in de hetelucht friteuse, anders zal deze niet funconeren.
Gebruik de en toetsen om de temperatuur °C en de jd in te stellen. De weergave in het display wisselt
automasch elke 5 seconden als er geen toets meer wordt gebruikt.

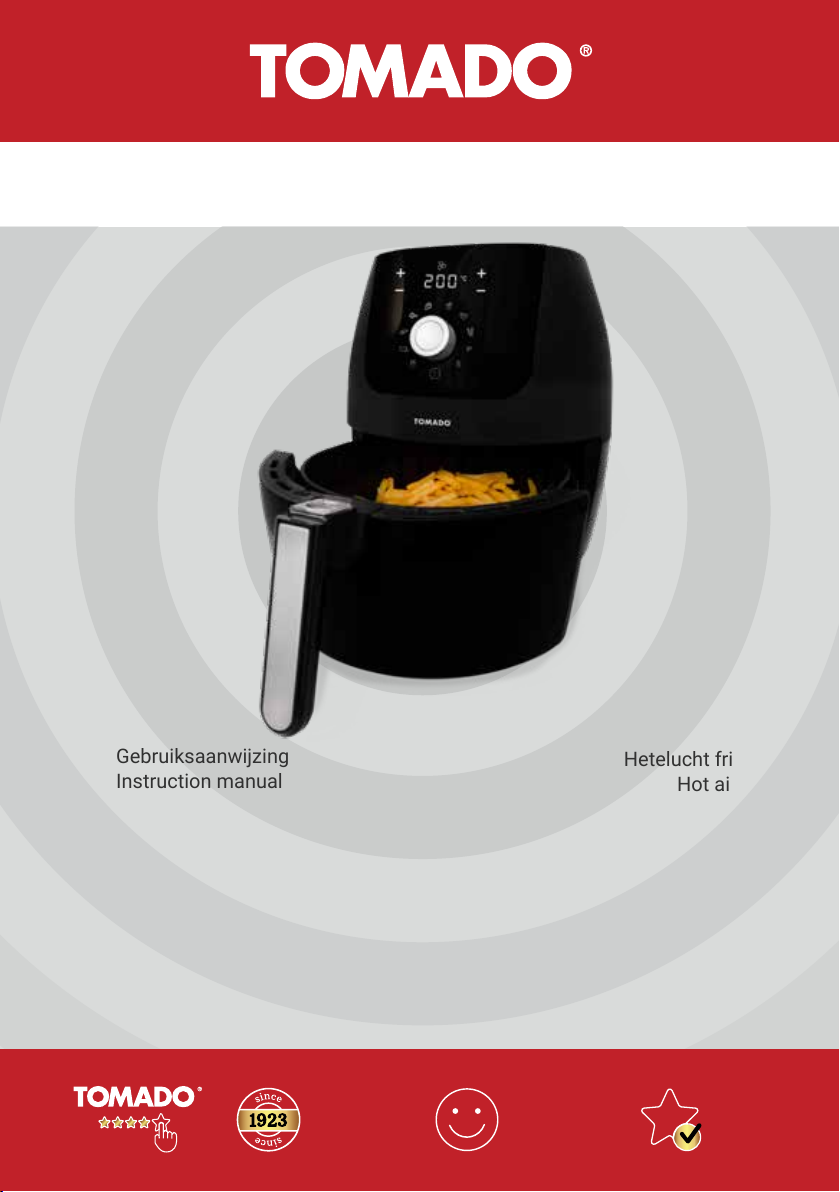
De hetelucht friteuse kan een grote verscheidenheid aan gerechten bereiden.
1. Controleer of de spanning overeenkomt met die vermeld is op het typeplaatje en steek de stekker in een geaard stopcontact.
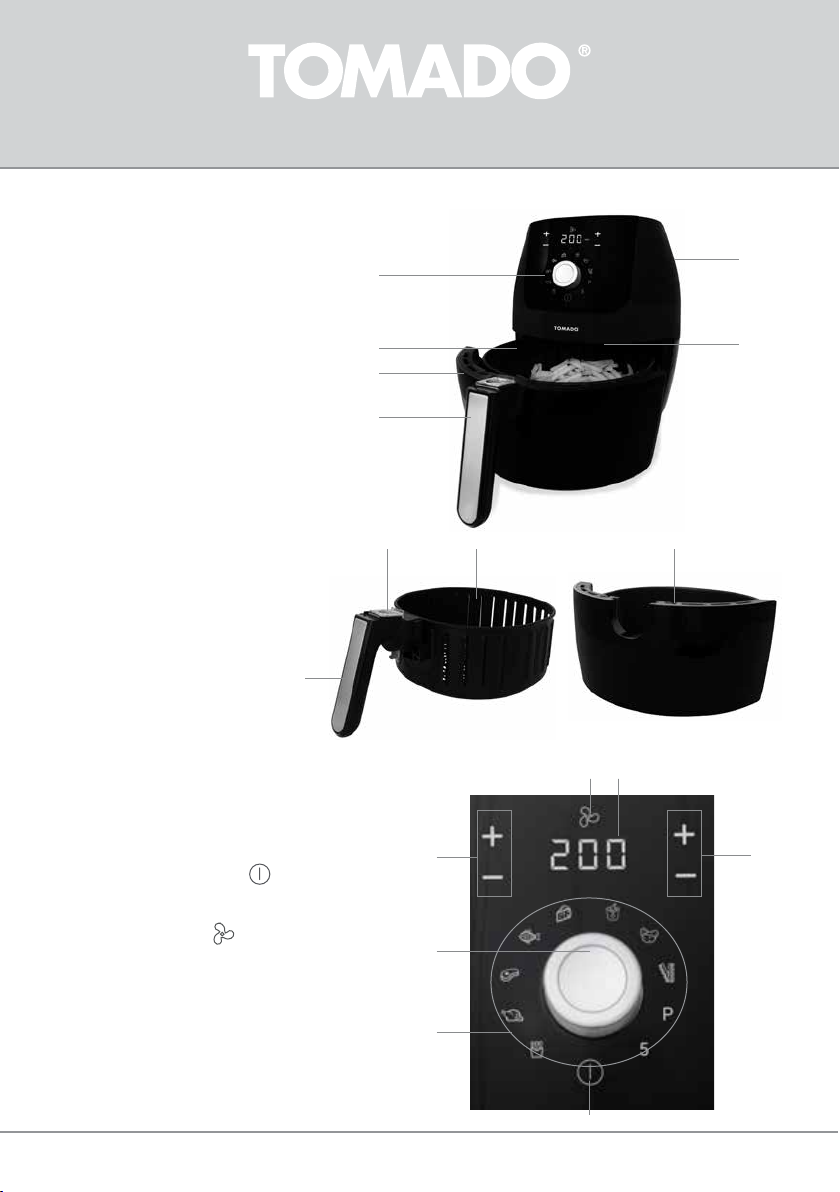
Het volledig display licht kort op en de hetelucht friteuse staat in de standby stand. De standby toets brandt.
2. Trek de pan rusg aan de handgreep uit de hetelucht friteuse.
3. Plaats de ingrediënten in de mand. Let op: overschrijdt nooit de geadviseerde hoeveelheid en vul de mand nooit boven het
maximum, want dan kan het voedsel het verwarmingselement raken.
4. Schuif de pan goed terug in de hetelucht friteuse.
5. Druk op de standby toets om de hetelucht friteuse aan te zeen. Op het display staat de voorinstelling 190°C en
15 minuten.
6. Selecteer een automasch menu met de easycontrol menu knop of stel zelf de jd ( 1 - 60 minuten ) en temperatuur °C
( 80 - 200°C ) in met de bijbehorende en toetsen.
voeg 3 minuten toe aan de bereidingsjd als de hetelucht friteuse koud is.
7. Om de hetelucht friteuse aan te zeen, drukt u vervolgens op de easycontrol menu knop.
•Het display gee afwisselend de ingestelde jd en temperatuur weer.
•Het display gee de resterende jd weer. De jd en de temperatuur kan jdens het frituren naar boven en naar beneden
worden bijgesteld door op de bijbehorende en toetsen te drukken.
Tijdens het hetelucht frituren, knippert het venlator symbool .
•Overtollige olie die uit de ingrediënten druipt, wordt opgevangen in de pan.
8. Sommige ingrediënten moeten halverwege de bereidingsjd geschud worden. Neem de pan aan de handgreep uit
de hetelucht friteuse en plaats deze op een hiebestendige ondergrond, zoals een pannenonderzeer. Druk op de
ontgrendelknop van de handgreep en l de mand uit de pan. Schud de inhoud van de mand boven de pan om lekken
te voorkomen en klik de mand weer terug in de pan.
Zodra u de pan verwijderd uit de hetelucht friteuse wordt het hetelucht frituren wordt gepauzeerd.
Let op: het display schakelt helemaal uit. Zodra u de pan weer in de hetelucht friteuse plaatst, gaat het display aan en wordt
het hetelucht frituren automasch hervat.
9. Schuif daarna de pan weer terug in de hetelucht friteuse om verder te bakken. Zodra u de pan weer in de hetelucht friteuse
plaatst, gaat het display aan en wordt het hetelucht frituren automasch hervat.
10. Zodra de ingestelde jd voorbij is, zal de hetelucht friteuse automasch naar de standby stand schakelen. De venlator
blij wel draaien om de hetelucht friteuse af te koelen. Na ongeveer 20 seconden klinkt er 5 maal een piepsignaal
en het venlator symbool gaat uit. Trek de pan aan de handgreep uit de hetelucht friteuse en plaats deze op een
hiebestendige ondergrond, zoals een pannenonderzeer.
Controleer of de ingrediënten klaar zijn.
Als de ingrediënten nog niet klaar zijn, plaats de pan dan terug in de hetelucht friteuse en zet de mer op nog een aantal
extra minuten en druk vervolgens op de easycontrol menu knop.
11. Om kleine ingrediënten te verwijderen (zoals frites), drukt u op de knop van de handgreep en lt u de mand uit de pan.
12. Schud de inhoud van de mand leeg in een schaal of op een bord. Gebruik bij grote ingrediënten een tang.
HETELUCHT FRITUREN
• Druk op de easycontrol menu knop om het hetelucht frituren te pauzeren. Druk opnieuw op de easycontrol menu knop
om het hetelucht frituren te hervaen.
• Het hetelucht frituren wordt ook gepauzeerd als u de pan verwijderd uit de hetelucht friteuse.
Let op: het display schakelt helemaal uit.
Zodra u de pan weer in de hetelucht friteuse plaatst, gaat het display aan en wordt het hetelucht frituren hervat.

• Kleinere ingrediënten hebben meestal een iets kortere bereidingsjd nodig.
• Een grotere hoeveelheid ingrediënten hee maar iets meer jd nodig en een kleinere hoeveelheid hee iets minder
bereidingsjd nodig.
• Door kleinere ingrediënten meerdere malen gedurende de bereidingsjd te schudden, wordt het eindresultaat beter
en gelijkmager.
• Bereid geen extreem vee ingrediënten zoals worstjes in de hetelucht friteuse.
• Snacks die in de oven bereid kunnen worden, kunnen ook de hetelucht friteuse worden bereid.
• De opmale hoeveelheid voor het bereiden van knapperige frites is 1500 gram. De maximale hoeveelheid is 2000 gram.
• Gebruik eventueel een oliespray om de ingrediënten licht mee te besproeien om ze nog knapperiger te maken.
• Gebruik kant-en-klaar deeg voor het snel en eenvoudig bereiden van gevulde snacks. Kant-en-klaar deeg is ook sneller klaar
dan zelfgemaakt deeg.
• Plaats een bakblik of ovenschaal in de mand als u een cake of quiche wilt bereiden of als u delicate of gevulde ingrediënten
wilt bereiden.
• De hetelucht friteuse kan ook gebruikt worden om ingrediënten opnieuw op te warmen. Zet daarvoor de temperatuur
op 150°C gedurende 10 minuten.
• Voeg 3 minuten toe aan de bereidingsjd als de hetelucht friteuse nog koud is.
• Omdat de turbo hetelucht technologie de lucht direct opnieuw opwarmt in het apparaat, maakt het voor het resultaat
niet uit dat de pan kort uit de hetelucht friteuse genomen wordt.
Omdat ingrediënten kunnen verschillen in herkomst, afmeng, vorm en merk kan Tomado niet de meest opmale instelling aangeven.
TIPS
Draai de easycontrol menu knop om de volgende funces te selecteren:
190 15
Frites 200 12
180 20
Steak 200 9
200 10
170 3
200 12
150 16
200 8
200 10
190 5 (5-30 min)
De temperaturen en jden in de tabel zijn ter indicae. Aankelijk van het formaat en het gewicht kan het nodig zijn
om de temperatuur en jd aan te passen.
Het is mogelijk om de ingestelde temperatuur en jd van de automasche menu’s aan te passen door op de bijbehorende
en toetsen te drukken.
Druk op de easycontrol menu knop om de hetelucht friteuse aan te zeen zodra u een automasch menu geselecteerd hee.
De jd in het SNEL 5 menu kan alleen in stappen van 5 minuten aangepast worden: 5-10-15-20-25-30 minuten.

REINIGING EN ONDERHOUD
Reinig de hetelucht friteuse na elk gebruik.
geen
1. Verwijder de stekker uit het stopcontact en laat de hetelucht friteuse volledig aoelen.
verwijder de pan uit de hetelucht friteuse om het apparaat sneller te laten aoelen.
2. Veeg de buitenkant van de hetelucht friteuse af met een vochge doek.
3. Reinig de pan en de mand met heet water waaraan een beetje afwasmiddel is toegevoegd en een spons. De pan en de
mand mogen ook in de vaatwasmachine gereinigd worden.
Een ontveer mag gebruikt worden om resterend vuil te verwijderen.
vul de pan met heet water en een beetje afwasmiddel en laat dit 10 minuten weken om hardnekkig vuil
te verwijderen.
4. Reinig de binnenzijde van het apparaat met heet water en een zachte spons.
5. Reinig het verwarmingselement met een zachte afwasborstel om eventuele voedselresten te verwijderen. Let op met
afwasmiddel. Dit kan achterblijven op het verwarmingselement en een bijsmaak geven aan de ingrediënten.
Alvorens de hetelucht friteuse op te bergen , moet u deze volledig laten aoelen en verwijder de stekker uit het stopcontact.
Controleer of alle onderdelen schoon en droog zijn. Berg de hetelucht friteuse op een schone en droge plaats op.
STORINGEN EN OPLOSSINGEN
De hetelucht friteuse
funconeert niet. De stekker zit niet in het stopcontact. Steek de stekker in een geaard stopcontact.
De pan zit niet goed in het apparaat. Schuif de pan goed in het apparaat.
De ingrediënten zijn niet gaar. De hoeveelheid ingrediënten
in de mand is teveel. Plaats kleinere hoeveelheden in de mand.
Kleinere pores bakken gelijkmager.
De ingestelde temperatuur is te laag. Stel de hetelucht friteuse in op een
hogere temperatuur.
De bereidingsjd is te kort. Stel een langere jd in.
De ingrediënten zijn niet
gelijkmag gebakken. Bepaalde ingrediënten moeten
halverwege de bereidingsjd
geschud worden.
Ingrediënten die over elkaar heen
liggen (zoals frites), moeten halverwege
de bereidingsjd geschud worden.
Gebakken snacks zijn niet
krokant wanneer ze uit
de hetelucht friteuse komen.
De snacks zijn niet geschikt voor een
hetelucht friteuse, maar moeten
in olie gefrituurd worden.
Gebruik ovensnacks of bestrijk de snacks
met wat olie voor een krokanter resultaat.
De pan wil niet goed in
het apparaat schuiven. De mand zit te vol. Vul de mand niet boven het maximum, maar
houd de geadviseerde hoeveelheden aan.
De mand is niet goed
bevesgd in de pan. Duw de mand in de pan totdat u een klik hoort.
Er komt wie rook
uit het apparaat. U bent vee ingrediënten
aan het bereiden. Wanneer er vee ingrediënten in de hetelucht
friteuse bereid worden, kan er veel vet in de pan
druipen. Het vet veroorzaakt wie rook in de pan
kan heter worden dan anders. Dit hee geen
invloed op het apparaat of het eindresultaat.
De pan bevat nog vetresten
van een vorige bereiding. Reinig de pan na elk gebruik. Vetresten die
warm worden, kunnen wie rook veroorzaken.

Dit symbool betekent dat dit product niet bij het gewone huishoudelijke afval mag worden weggegooid (2012/19/EU).
Volg de geldende regels in uw land voor de gescheiden inzameling van elektrische en elektronische producten.
Als u het product correct afvoert, voorkomt u negaeve gevolgen voor het milieu en de volksgezondheid.
Het verpakkingsmateriaal van dit product is 100% recyclebaar, lever het verpakkingsmateriaal gescheiden in.
RECYCLING
Verse frites worden niet
gelijkmag gebakken
in de hetelucht friteuse.
Er is een verkeerde
aardappelsoort gebruikt. Gebruik verse aardappelen die
iets kruimig aoken.
De frites zijn niet goed
afgespoeld voor het bakken. Spoel de gesneden frites goed
af om zetmeel te verwijderen.
De verse frites is niet krokant
als ze uit de hetelucht
friteuse komen.
De krokantheid van de frites
hangt af van de hoeveelheid
olie en water in de frites.
Zorg ervoor dat de frites goed droog gedept
zijn voordat de olie toegevoegd word.
Snijd de frites jner voor een krokanter resultaat.
Voeg een klein beetje meer olie toe
voor een krokanter resultaat.
Typenummer TAF5001B
Voltage 220-240Volt ~ 50/60Hz
Aansluitwaarde 1700 Wa
TECHNISCHE GEGEVENS

•
• Only use this appliance for the purposes described in the
instrucon manual.
• Only connect the appliance to alternate current, to an earthed wall
socket, with a mains voltage that corresponds with the informaon
provided on the informaon plate of the appliance.
• Keep the appliance out of reach of children. Children do not
see the dangers when handling electrical appliances. Therefore,
never allow children to work with electrical appliances without
supervision. Keep the appliance and cord out of reach of children
younger than 8 years of age.
• The appliance can be used by children of 8 years and older and
persons with a limited physical, sensory or mental capacity or
lack of experience or knowledge, provided they use the appliance
under supervision or have been instructed about its safe use and
understand the hazards involved.
• Children are not allowed to play with the appliance.
• The appliance may not be cleaned or maintained by children,
unless this is done under supervision.
• Do not use the appliance if the plug, cord or appliance are
damaged, or if the appliance no longer funcons properly or if it
is damaged in any other way. If this is the case, consult the shop
or our technical service. Never replace the plug or cord yourself.
Repairs to electrical appliances should only be performed by
skilled persons.
SAFETY INSTRUCTIONS - EN

• Incorrect repairs could cause considerable hazards for the user.
Never use the appliance with parts that are not recommended
or supplied by the manufacturer.
• Never bend the power cord sharply or allow it to run across hot parts.
• Connect the appliance only to an earthed socket. Always check
that the plug is properly inserted in the socket.
• Do not pull the cord and/or appliance to remove the plug from the
wall socket. Never touch the appliance with wet or moist hands.
• Never connect the appliance to an external mer or a separate
remote control system, in order to prevent hazardous situaons.
• Never place the appliance near appliances that give o heat,
such as ovens, gas cookers, hotplates, etc. Keep the appliance
away from walls or other objects that could catch ame,
such as curtains, towels (coon or paper, etc.).
• Place the appliance on a sturdy, at surface and make sure there
is enough space around it for sucient venlaon. A minimum
space of 10 cm is required between the appliance and the walls.
Place nothing on top of the appliance.
• Do not leave the appliance unsupervised when it is working.
• A lot of steam is released via the outlet openings during
hot air frying. Keep your hands and face away from the steam
coming out of the outlet openings. Watch out for the steam,
when removing the pan.
• Aer use, the interior is very hot. Therefore avoid contact with
the interior.
• Always make sure the appliance is placed on an even, at surface
and is only used indoors.
• This appliance is only intended for household use and not for use:
- in sta kitchens, shops, oces and other work environments.
- by guests of hotels, motels and other residenal environments.
- in Bed&Breakfast type environments
- farms
• If the appliance is not being used or is being cleaned, switch o the
appliance and remove the plug from the socket.
• Allow the appliance to cool down for 30 minutes before storing or
cleaning it.

• Ensure that the ingredients being prepared in the appliance come
out golden-brown and not dark or brown. Remove burnt parts.
• In case of a breakdown, do not make repairs yourself; a blown
safety device in the appliance could indicate a defect that
cannot be resolved by removing or replacing this safety device.
Only original parts should ever be used.
• This appliance is only suitable for household use. When the
appliance is used for any other use than intended, no claims for
compensaon can be made in case of any defects and the warranty
is invalidated.
The hot air fryer has been provided with an overheang safety system. If the interior temperature is too high, the appliance is
switched o automacally by the safety system. In that case, the appliance can no longer be used. Remove the plug from the
socket, allow the appliance to cool down and contact the service department of Inventum or your retailer.
This appliance has been provided with a mer. Once the mer has counted down to 0, a beep sound can be heard and the
appliance switches o automacally. To switch o the appliance manually, press the on and o key once to stop the frying
process, and then press the on and o key a second me to switch o the display.
This appliance complies with all requirements relang to electromagnec elds (EMF).
OVERHEATING SAFETY SYSTEM
AUTOMATIC DEACTIVATION
ELECTROMAGNETIC FIELDS (EMF)

1. Operangpanel
2. Basket
3. Baskethandle
4. Pan
5. Airinletopenings
6. Heangelement
PRODUCT DESCRIPTION
2. Basket
3. Baskethandle
4. Pan
7. Releasebuon-basket
8. +and-keysforsengthetemperature
9. Easycontrolmenubuon
10. Automacmenus
11. Standbyandon-and-okey
12. +and-keysforsengtheme
13. Display(temperatureandpreparaonme)
14. Thermostatindicator
4
4
6
3
2
1
5
7 2
3
9
14
812
11
10
13

PRIOR TO FIRST USE
Before using the appliance for the rst me, you should proceed as follows: carefully unpack the hot air fryer and remove all
packaging material and any promoonal sckers. Keep the packaging (plasc bags and cardboard) out of the reach of children.
Aer unpacking the appliance, check it for external damage that may have occurred during transport. Place the hot air fryer on
a sturdy, at and heat-resistant surface.
The buons used for operang the hot air fryer, are touch controls and an easy control rotary knob. Carefully touch the touch
controls with a nger to acvate. Each me the touch control is touched and the rotary knob is turned, you can hear a sound signal.
STANDBY
As soon as you insert the plug in the socket, the hot air fryer is in the standby posion. The standby key lights up.
In the following situaons, the hot air fryer automacally switches to the standby posion:
• when you insert the plug in the socket
• when the set me has elapsed
• when you press the standby key for 4 seconds.
Switch on the hot air fryer with the standby key .
• The hot air fryer only funcons if the basket has been placed in the pan correctly.
• As soon as the set me has elapsed, the hot air fryer automacally switches to the standby posion: The fan does connue
to run in order to allow the hot air fryer to cool down. Aer approximately 20 seconds, 5 beeps will sound and the fan symbol
is switched o.
• Aenon: during cooling it is not possible to operate the display.
Check that the voltage corresponds with what is stated on the informaon plate and insert the plug in an earthed socket.
The heang element is provided with a protecve layer that must be removed prior to rst use. This is done by seng the
hot air fryer to the maximum posion for approximately 10 minutes without any food in the appliance. A lile smoke may be
generated due to the protecve layer being burnt o the heang element. Therefore ensure sucient venlaon in the room.
Aer removing the protecve layer you can switch o the hot air fryer.
Remove the plug from the socket. Allow the hot air fryer to cool down properly and clean loose components prior to actually
using the hot air fryer. Clean the basket and pan with warm water, a mild washing-up liquid and a so sponge. Tip: these
components may also be cleaned in the dishwasher.
Clean the interior and exterior of the appliance with a damp cloth.
• Place the hot air fryer on a heat-resistant at surface.
• Properly place the basket in the pan.
• Place the pan in the hot air fryer.
Properly place the pan in the hot air fryer, otherwise it will not funcon.
Use the and keys to set the temperature °C and the me . The display changes every 5 seconds if no key is operated.

The hot air fryer can be used to prepare a wide range of dishes.
1. Check that the voltage corresponds with what is stated on the informaon plate and insert the plug in an earthed socket.
The full display briey lights up and the hot air fryer is in the standby posion. The standby key lights up.
2. Carefully remove the pan from the hot air fryer by its handle.
3. Place the ingredients in the basket. Cauon: never exceed the recommended volume and never ll the basket above the
maximum, because in that case the food could make contact with the heang element.
4. Properly slide the pan back in the hot air fryer.
5. Press the standby key to switch on the hot air fryer. The display shows the preset of 190°C and 15 minutes.
6. Select an automac menu with the easy control menu buon or set the me ( 1 - 60 minutes ) and temperature °C
( 80 - 200°C ) yourself using the accompanying and keys.
add 3 minutes to the cooking me when the hot air fryer is cold.
7. Then press the easy control menu buon to switch on the hot air fryer.
•The display alternates between the set me and set temperature.
•The display shows the remaining me. Time and temperature can be adjusted during frying by pressing the accompanying
or keys.
During hot air frying, the fan symbol ashes.
•Excess oil dripping from the ingredients is collected in the pan.
8. Some ingredients must be shaken halfway the cooking me. Take the pan from the hot air fryer by its handle and place it
on a heat-resistant surface, such as a pan coaster. Press the release buon of the handle and li the basket from the pan.
Shake the contents of the basket above the pan to prevent leaking and click back the basket in the pan.
When you remove the pan from the hot air fryer, the hot air frying process is interrupted.
Cauon: the display switches o completely. When you place the pan back in the hot air fryer, the display switches on and
hot air frying is resumed automacally.
9. Then slide back the pan in the hot air fryer to connue frying. When you place the pan back in the hot air fryer, the display
switches on and hot air frying is resumed automacally.
10. As soon as the set me has elapsed, the hot air fryer automacally switches to the standby posion: The fan does
connue to run in order to allow the hot air fryer to cool down. Aer approximately 20 seconds, 5 beeps will sound and
the fan symbol is switched o. Pull the pan from the hot air fryer by its handle and place it on a heat-resistant surface,
such as a pan coaster.
Check that the ingredients are cooked.
If the ingredients are not yet cooked, place the pan back in the hot air fryer, add a number of extra minutes to the mer
and then press the easy control menu buon.
11. To remove small ingredients (such as fries), press the buon of the handle and li the basket from the pan.
12. Empty the basket onto a dish or plate. In case of large ingredients, use tongs.
HOT AIR FRYING
• Press the easy control menu buon to pause the hot air frying process. Press the easy control menu buon once more
to resume the hot air frying process.
• The hot air frying process is also paused when you remove the pan from the hot air fryer.
Cauon: the display switches o completely.
When you place the pan back in the hot air fryer, the display switches on and the hot air frying process is resumed.

• Smaller ingredients usually require a slightly shorter cooking me.
• A larger amount of ingredients only requires a lile more me, and a smaller amount requires a lile less cooking me.
• Shaking smaller ingredients several mes during the cooking me results in a beer and more even end result.
• Do not cook extremely fat ingredients such as sausages in the hot air fryer.
• Snacks that can be cooked in the oven, can also be cooked in the hot air fryer.
• The opmum amount for preparing crispy fries is 1500 grammes. The maximum amount is 2000 grammes.
• If necessary, use an oil spray to lightly oil the ingredients and make them even more crispy.
• Use ready-made dough for a fast and simple preparaon of lled snacks. Ready-made dough cooks faster than home-made dough.
• Place a baking n or oven dish in the basket if you want to make a cake or quiche, or if you want to cook delicate or lled
ingredients.
• The hot air fryer can also be used to reheat ingredients. For this, set the temperature to 150°C for 10 minutes.
• Add 3 minutes to the cooking me if the hot air fryer is sll cold.
• As the turbo hot air technology immediately reheats the air in the appliance, briey removing the pan from the hot air fryer
does not have an eect on the end result.
As ingredients can dier in origin, size, shape and brand, Tomado is not able to provide the most opmum seng.
TIPS
Turn the easy control menu buon to select the following funcons:
in °C
190 15
Fries 200 12
180 20
Steak 200 9
Fish 200 10
170 3
Chicken nuggets 200 12
150 16
200 8
200 10
190 5 (5-30 min)
The temperatures and mes in the table are indicaons. Depending on size and weight, it may be necessary to adjust
temperature and me.
You can change the set temperature and me of the automac menus by pressing the accompanying and keys.
Aer selecng an automac menu, press the easy control menu buon to switch on the hot air fryer.
The me in the QUICK 5 menu can only be adjusted in steps of 5 minutes: 5-10-15-20-25-30 minutes.

CLEANING AND MAINTENANCE
Clean the hot air fryer aer every use.
1. Remove the plug from the socket and allow the hot air fryer to cool down fully.
remove the pan from the hot air fryer to allow the appliance to cool down faster.
2. Clean the exterior of the hot air fryer with a damp cloth.
3. Clean the pan and basket with hot water containing a lile washing-up liquid and a sponge. The pan and basket may also be
cleaned in the dishwasher.
A degreaser can be used to remove remaining dirt.
ll the pan with hot water and a lile bit of washing-up liquid and allow it to soak for 10 minutes to remove persistent dirt.
4. Clean the interior of the appliance with hot water and a so sponge.
5. Clean the heang element with a so washing-up brush to remove any food residues. Be careful with washing-up liquid.
This could be le behind on the heang element and give a foreign taste to the ingredients.
Before storing the hot air fryer, allow it to cool down fully and remove the plug from the socket. Check that all components are
clean and dry. Store the hot air fryer in a clean and dry locaon.
BREAKDOWNS AND SOLUTIONS
The hot air fryer does
not funcon. The plug is not in the socket. Insert the plug in an earthed socket.
The pan is not properly
placed in the appliance. Properly slide the pan in the appliance.
The ingredients are not cooked. The amount of ingredients in
the basket is too much. Place smaller amounts of ingredients in the
basket. Smaller porons can be fried more evenly.
The set temperature is too low. Set the hot air fryer to a higher temperature.
The cooking me is too short. Set a longer me.
The ingredients are
not fried evenly. Certain ingredients must be shaken
halfway the cooking me. Ingredients lying on top of one another (such as
fries), must be shaken halfway the cooking me.
Fried snacks are not crispy when
they leave the hot air fryer. The snacks are not suitable for a hot
air fryer, but should be fried in oil. Use oven snacks or cover the snacks with
a lile oil for a more crispy result.
It is not possible to slide the
pan in the appliance properly. The basket is overlled. Do not ll the basket above the maximum,
but observe the recommended amounts.
The basket is not properly
aached in the pan. Press the basket in the pan unl
you hear a click sound.
There is white smoke coming
from the appliance. You are cooking fay ingredients. When fay ingredients are being cooked in
the hot air fryer, it is possible that a lot of
fat drips in the pan. The fat causes white
smoke and the pan can become hoer
than normal. This does not have an eect
on the appliance or on the end result.
The pan sll contains fat residues
from a previous preparaon. Clean the pan aer every use. Fat residues
that become hot can cause white smoke.
Fresh fries are not evenly
fried in the hot air fryer. An unsuitable potato
variety has been used. Use fresh potatoes that are a lile
oury when cooked.
The fries have not been properly
rinsed prior to frying. Properly rinse the cut fries to remove starch.
Table of contents
Languages:
Other tomado Fryer manuals

tomado
tomado TAF5401S User manual

tomado
tomado TDF6001S User manual

tomado
tomado TM-5528 User manual

tomado
tomado TDF5001S User manual

tomado
tomado TAF3202B User manual

tomado
tomado TM-9025 User manual

tomado
tomado TDF2501W User manual

tomado
tomado TDF3001B User manual

tomado
tomado TM-1988 User manual

tomado
tomado TAF3201B User manual