Inta NC140CP User manual

© Intatec Ltd 2011
Non Concussive Shower with
Temperature Control
NC140CP
Installation and Maintenance
In this procedure document we have endeavoured to
make the information as accurate as possible.
We cannot accept any responsibility should it be found
that in any respect the information is inaccurate or
incomplete or becomes so as a result of further
developments or otherwise.
Intatec Ltd,
Airfield Industrial Estate
Hixon
Staffordshire
ST18 0PF
Tel: 01889 272 180
Fax: 01889 272 181
email: [email protected]
web: www.intatec.co.uk
www.divapor.com

Min Operating Press. 0.5 bar
Max Operating Press. 5.0 bar
Max Temperature 65ºC
Timed Flow @ 1 bar, 20 ±5°C
15
G
Operating Conditions
Installation
eneral information
The NC140CP is a non concussive shower control with manual temperature adjustment.
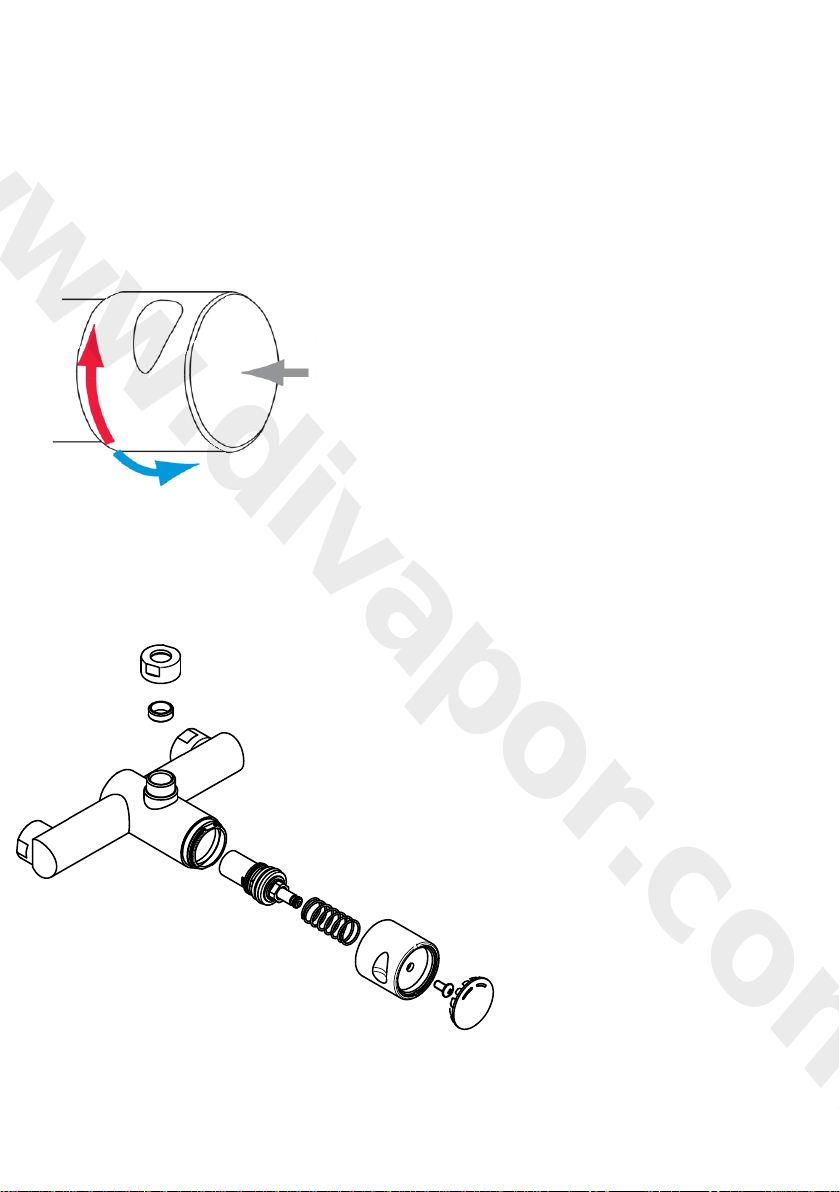
Turn the control knob clockwise to increase the mixed water temperature and anti-clockwise to reduce it.
Push the control knob to operate the shower.
In order to prevent scalding, the hot water supply should be connected to the mixer via
a thermostatic mixing valve
Your Inta shower control must be installed in accordance with the Water Byelaws.
It is recommended that a service valve is installed in the cold water supply pipe and the thermostatic mixing
valve should have connections containing an isolating valve, in order to isolate the mixer should servicing be
required in the future. All installations should be thoroughly flushed and cleaned to
may affect the performance of the mixer. This product is designed for concealed pipework, whether in a
• The thickness of wall tiles, plaster or plaster board should all be considered when routing the
hot and cold supply pipes.
solid or studded wall.
remove any debris that
± 3
• The shower requires the offset connectors to have 150mm centres and sufficient thread must
protrude from the finished surface to allow the concealing plates to be fitted and the
union nuts to be fully tightened.
• Ensure the shower will be horizontal when installed.
• The supply pipes can come from below, above, the side or through the wall.
• The supply pipes and offset connectors must be firm and secure to support the shower If not
embedded into the wall with plaster the pipes should be fixed securely to the studding or by using a
mounting plate (not supplied).
• Angle tap swivel connectors or compression/solder fittings can be used to connect the pipes
(not supplied).
• The whole system should be thoroughly flushed, prior to the connection of the hot and cold
water supplies to the shower, to remove any debris that may be in the supply pipework.
• Ensure there are no joint leaks before finishing the wall.
• Isolation valves must be fitted in an accessible position to both the hot and cold supplies
should the valve need to be isolated in the future for servicing.
Page 2
www.divapor.com
• Seal the gaps between offset connectors and tiles with mastic.
• Place the concealing plates, with a bead of mastic on the back, over the hot and cold offset connectors
and press firmly to the wall.
• Fit the shower valve to the offset connectors ensuring that the sealing washers are fitted and hand
tighten the union nuts.
• Using a suitably sized spanner, tighten the union nuts taking care not to damage the finish on
the shower valve, do not over tighten.
on mixed water
P ush down fully to turn
T urn clockwise to
T urn anticlockwise to
in crease hot water
in crease cold water
Operation
Aftercare
Servicing Instructions
To operate the shower push the control knob until
it contacts a stop and then release, mixed water
will then flow for approximately 15 seconds.
Rotating the control knob anticlockwise
progressively closes the hot water port and opens
the cold water port until it is fully open when only
flows through the shower.
Rotating the control knob clockwise progressively
closes the cold water port and opens the hot water
port until there is only hot water flowing through
the shower
Inta products have a high quality finish and should
be treated with care.
An occasional wipe with a mild washing-up liquid
on a soft damp cloth followed by a thorough rinsing
is all that is required.
Do not use an abrasive or chemical household
cleaner as this may cause damage.
If the control knob cannot be depressed fully or
does not return to its original position within
15 seconds, or the temperature cannot be adjusted
easily or water does not flow in a steady stream the
mixer may need require servicing.
Isolate the hot and the cold supplies
Remove the cover, unscrew the retaining screw
and carefully remove the control knob ensuring the
return spring does not escape and cause injury.
Using a spanner remove the cartridge from the
body. Remove any debris that may have collected
within the body, ensure the stem rotates freely and
can be depressed.
Do not attempt to dismantle any part of the
cartridge, if necessary replace with a new
cartridge.
Check the o rings and return spring for any sing of
damage and replace if necessary.
Using washing up liquid as a lubricant, to ease
assembly and prevent damage to the o rings,
re-assemble the cartridge into the body and
tighten. Re-assemble the other components
in the reverse order and turn on the water
supplies. Check the shower for leaks and
correct operation
y.
Indice
Retaining Screw
Control knob
Return spring
Cartridge
Body
Page 3
www.divapor.com

Intatec Ltd,
Airfield Industrial Estate
Hixon
Staffordshire
ST18 0PF
Tel: 01889 272 180
Fax: 01889 272 181
email: [email protected]
web: www.intatec.co.uk
Page 4
www.divapor.com
Other Inta Plumbing Product manuals


Popular Plumbing Product manuals by other brands

Hansa
Hansa FIT 6509 2203 Installation and maintenance guide

Kohler
Kohler TOUCHLESS 32323T-4 manual

Viega
Viega PureFlow Press Zero Lead Product instructions

Brizo
Brizo Tresa 65836LF quick start guide

Victaulic
Victaulic VicFlex I-VICFLEX.AQD-M installation instructions

KEUCO
KEUCO 59948 010001 Installation and operating instructions


