Integratech PHB75 User manual
Integratech bvba – Groenstraat 48 – BE3270 Scherpenheuvel - Belgium Integratech bvba – Groenstraat 48 – BE3270 Scherpenheuvel - Belgium
NL Handleiding PHB
Montage:
Installatie en onderhoud dienen steeds te gebeuren door gekwalificeerd personeel.
De lichtbron van dit armatuur is niet vervangbaar, bij einde van de levensduur moet het armatuur vervangen worden..
Beschadigde toestellen in originele verpakking worden onder waarborg omgeruild.
De aarding moet ten alle tijden correct aangesloten worden om veiligheidsproblemen te voorkomen.
Controleer steeds of de correcte aansluitspanning aanwezig is.
Gebruikte lampen
Breng oude of defecte LED armaturen steeds binnen in een geschikt verzamelpunt in overeenstemming met de geldende voorschriften met
betrekking tot milieubescherming. Gebruikte lampen kunnen gedeponeerd worden in een recyclagepunt waar ze gratis worden geaccepteerd.
Een correct gebruik van apparatuur maakt het mogelijk om waardevolle milieuhulpbronnen te behouden en negatieve gevolgen voor de
gezondheid en het milieu te voorkomen.
L'installation et la maintenance doivent toujours être effectuées par du personnel qualifié. La source lumineuse de ce luminaire n'est pas
remplaçable, le luminaire doit être remplacé à la fin de sa vie.
Les appareils endommagés dans leur emballage d'origine sont échangés sous garantie.
La mise à la terre doit toujours être correctement connectée pour éviter tout problème de sécurité.
Toujours vérifier si la tension de connexion correcte est présente.
Lampes usagées
Toujours ramener les appareils à LED usés ou défectueux à un point de collecte approprié, conformément aux réglementations en vigueur en
matière de protection de l'environnement. Les lampes usagées peuvent être déposées dans un point de recyclage où elles sont acceptées
gratuitement. Une utilisation appropriée des équipements permet de préserver des ressources environnementales précieuses et d'éviter des
conséquences négatives pour la santé et l'environnement.
1 2
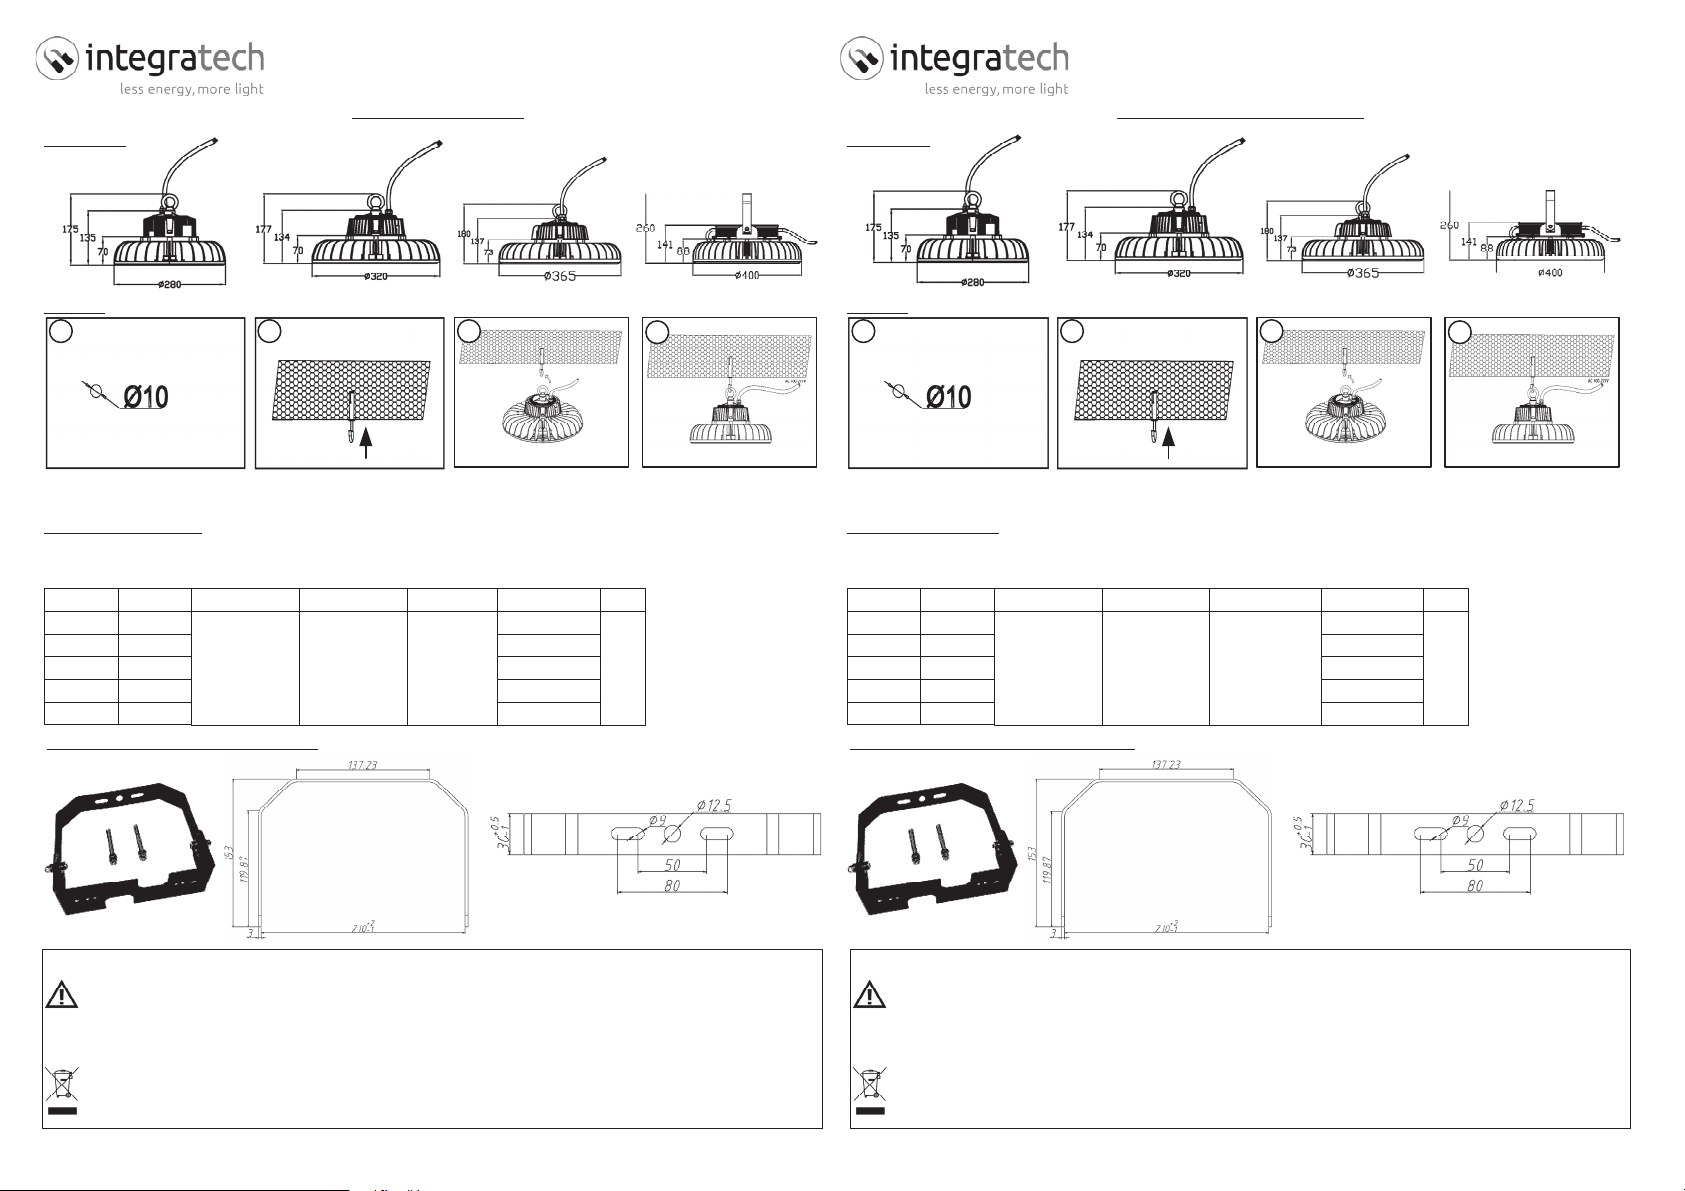
Boor een opening van 10mm Monteer de bijgeleverde
expansieplug met haak en
schroef deze aan.
Hang het toestel direct aan de
haak of gebruik een staaldraad
of ketting.
Sluit de elektrische bedrading
aan. 100~277VAC 50/60Hz
Elektrische aansluiting:
Het toestel is voorzien van 2 aansluitkabels van 2 meter lang.
Voedingskabel: bruin = fase, blauw = neutraal, geel/groen = aarding.
Dimkabel 1-10V: wit = DIM-, blauw = DIM+
Referentie Vermogen
PHB75 75W
100WPHB100
PHB150 150W
PHB200 200W
Aansluitspanning
100~277VAC
50~60Hz
Efficiëntie
Tot 145lm/W
Stralingshoek
60° optie
110° standaard
Aantal LEDs
140x SMD3030
140x SMD3030
196x SMD3030
252x SMD3030
CRI
>80
IP65
IK08
240W
34
100~277 Vac
PHB240 240W 252x SMD3030
Vaste montagebeugel PHB-WBR: (optie)
FR Manuel d’installation PHB
Montage:
1 2
Percer un trou de 10mm Fixez le bouchon d’expansion
avec crochet fourni.
Accrochez l'appareil
directement au crochet ou
utilisez un fil d'acier/chaîne.
Connectez le câble électrique.
100~277VAC 50/60Hz
Reference Puissance
PHB75 75W
100WPHB100
PHB150 150W
PHB200 200W
Voltage
100~277VAC
50~60Hz
Efficacité
Tot 145lm/W
Angle de faisceau
60° optie
110° standaard
Nombre de LED
140x SMD3030
140x SMD3030
196x SMD3030
252x SMD3030
CRI
>80
IP65
IK08
34
100~277 Vac
PHB240 240W 252x SMD3030
Support de fixation PHB-WBR: (en option)
Connection électrique:
L'appareil est équipé de 2 câbles de connexion de 2 mètres de long.
Câble d'alimentation: marron = phase, bleu = neutre, jaune/vert = terre.
Câble dimming 1-10V: blanc = DIM-, bleu = DIM +
75/100W 150W 200W
Afmetingen:
240W75/100W 150W 200W
Dimensions:

Integratech bvba – Groenstraat 48 – BE3270 Scherpenheuvel - Belgium
Installation and maintenance should always be done by qualified personnel.
The light source of this fixture is not replaceable, the luminaire must be replaced at the end of its life.
Damaged devices in original packaging are exchanged under guarantee.
The grounding must be correctly connected at all times to prevent safety problems.
Always check whether the correct connection voltage is present.
Used lamps
Always return old or defective LED fixtures to an appropriate collection point in accordance with the applicable regulations regarding
environmental protection. Used lamps can be deposited at a recycling point where they are accepted for free. Proper use of equipment makes
it possible to preserve valuable environmental resources and prevent negative consequences for health and the environment.
ENG Manual PHB
Mounting:
1 2
Drill an opening of 10 mm Assemble the supplied expansion
plug with hook and screw it tight.
Mount the device directly on
the hook or use a steel wire or
chain.
Connect the electrical wiring.
100 ~ 277VAC 50/60Hz
Electrical connection:
The device is equipped with 2 connection cables of 2 meters lenght.
Power cable: brown = phase, blue = neutral, yellow/green = ground.
Dimming cable 1-10V: white = DIM-, blue = DIM+
Reference Power
PHB75 75W
100WPHB100
PHB150 150W
PHB200 200W
Voltage
100~277VAC
50~60Hz
Efficiency
Up to 145lm/W
Beam angle
60° option
110° standard
LED quantity
140x SMD3030
140x SMD3030
196x SMD3030
252x SMD3030
CRI
>80
IP65
IK08
34
100~277 Vac
PHB240 240W 252x SMD3030
Fixed mounting bracket PHB-WBR: (option)
240W75/100W 150W 200W
Dimensions:
Integratech bvba – Groenstraat 48 – BE3270 Scherpenheuvel - Belgium
Handleiding – Manuel d’installation – Manual
PHB reflector/reflecteur
Verwijder de schroeven van de bevestigingsring. (3 schroeven 75/100/150W, 4 schroeven 200/240W).
Retirez les vis du bouchon de fixation. (3 vis 75/100/150W, 4 vis 200/240W).
Remove the screws from the fixing ring. (3 screws 75/100/150W, 4 screws 200/240W).
1
2
3
4
5
6
7
Plaats de reflector op de bevestigingsring zodat de schroefgaten overeenkomen.
Placez le réflecteur sur la bouchon de fixation de manière à ce que les trous de vis correspondent.
Put the reflector on the fixing ring to match the corresponding screw holes.
Draai de M3 vleugelschroeven handmatig in de bijbehorende schroefgaten.
Tournez les vis à oreilles M3 manuellement dans les trous correspondants.
Manually install the M3 wing screws into the corresponding screw holes.
Monteer de beschermkap op de reflector. (enkel voor polycarbonaat uitvoering)
Montez le capuchon de protection sur le réflecteur. (uniquement pour version polycarbonate)
Mount the protective cap on the reflector. (only for polycarbonate version)
Monteer de opspanring op de beschermkap en reflector.
Montez la bague de serrage sur le capuchon protecteur et le réflecteur.
Mount the clamping ring on the protective cap and reflector.
Span de klemveer aan om de opspanring vast te klemmen op de reflector.
Serrez le ressort de serrage pour fixer la bague de serrage sur le réflecteur.
Tighten the clamping spring to mount the clamping ring on the reflector.
Installeer het armatuur volgens de montageinstructies in deze handleiding.
Installez le luminaire conformément aux instructions de montage de ce manuel.
Install the luminaire according to the assembly instructions in this manual.
This manual suits for next models
4
Other Integratech Lighting Equipment manuals


Popular Lighting Equipment manuals by other brands

Lightolier
Lightolier Lighting Systems ALETTA AR2T8 Specification sheet

Angler
Angler BI-45W-RL instructions

RUSTA
RUSTA Fackla manual

Recom
Recom RACD12-LP Installation and operating instructions

Knightsbridge
Knightsbridge EMPOWER2 Installation & maintenance manual

Larson Electronics
Larson Electronics EPL-SL-2-LED-ITG-M2 instruction manual

Robe
Robe CitySource 96 user manual

Feeney
Feeney Feeney DesignRail 24V LED Lighting V2, installation instructions

Tivoli Audio
Tivoli Audio TRACE installation instructions

GVM
GVM GVM-PRO-SD300C manual

Chauvet
Chauvet FreedomPar HEX-4 Quick reference guide

ARCHIPELAGO LIGHTING
ARCHIPELAGO LIGHTING planoARCH LBLP quinceARCH installation guide


