Integrity Fabricators Kamado Grill Table for Large Big Green Egg or Kamado... User manual

Grill Table Owner’s Manual 1 | P a g e
Integrity Fabricators // Home // Outdoor Living
Proudly engineered, handcrafted, packaged and shipped from our Allendale, Michigan facility
OWNERS MANUAL
Kamado Grill Table for Large Big Green Egg or Kamado Joe
Model #GT001
Specifications:
•Counter height: 36”
•Counter depth: 30”
•Counter width: 68”
•Total width, including handles: 78” (handles are bolted on and are removeable)
•Total weight (excluding smoker): approximately 440 lbs.
•Approximate weight with drawers and bins removed: 340 lbs.

Grill Table Owner’s Manual 2 | P a g e

Grill Table Owner’s Manual 3 | P a g e
WARNING
SAFETY AND INSTALLATION WARNINGS
Electrical Safety
The unit comes with a 25’ power cord so it is not recommended to use an additional extension cord. If an additional cord
is required you should use a grounded, outdoor-rated cord with a 15 AMP capacity. The cord on the unit and any
additional cords should be arranged such that they are not near hot or sharp surfaces. Never drape cords over the
countertop where they can be accidentally pulled or tripped over. To protect against electrical shock, the power cord
and plug should be kept dry and off the ground.
The unit has internal GFCI protection so it is not required that you plug it into a GFCI circuit. It should be plugged into a
15 AMP grounded breaker. Be certain your unit is properly installed and grounded by a qualified technician in
accordance with applicable codes. To guarantee the electrical safety of this unit, continuity must exist between the unit
and an effective grounding system. It is imperative that this basic safety requirement be met. The manufacturer cannot
be held responsible for damages caused by the lack or inadequacy of an effective grounding system.
Do not operate any appliance with a damaged power cord or power plug, and do not operate any appliance after the
appliance malfunctions or has been damaged in any manner. If this should occur or if the power cord on the unit is
damaged in any way, return to the nearest authorized service facility for examination, repair or adjustment. This unit
conforms to all uniform electrical safety codes and electrical grounding regulations. Install unit according to I.A.W. local
codes or with National Electrical Code ANSI/NFPA 70 or CSA C22.1 in their absence.
Moving the Unit
The grill table is on heavy duty locking swivel casters for ease of movement. However, you should always use caution
when moving the unit to avoid damage to the unit and injury to yourself of others. When moving the unit:
•Be sure to release the lock on all 4 casters by lifting up on the black lever until it snaps into the raised position.
•Ensure you have a clear path where you are moving and that the wheels are not going to crush anything.
•Always move slowly and do not push or pull with excessive force to avoid tipping the unit.

Grill Table Owner’s Manual 4 | P a g e
FEATURES AND FUNCTIONS
Electrical Features
This unit is equipped with integrated GFCI protected 15-amp 110v outlets and USB charging ports (1 outlet on the left
leg post and 2 outlets with 2 USB ports on the right leg post). A convenient 25’ power cord allows you to reach an outlet
without the need for an additional extension cord. Plug into any 110v grounded outlet to power your table; check with a
local electrician or building contractor if you have questions regarding the capacity of the home outlet you are planning
to use. If you experience any problems with your electrical system, contact us for support or consult with a local
electrician. NEVER WORK ON OR ATTEMPT TO DISCONNECT WIRING WITHIN THE TABLE WHILE IT IS PLUGGED INTO A
WALL OUTLET AND WITHOUT DIRECTION FROM A LICENCED ELECTRICIAN.
LED Lighting
The grill table is equipped with weatherproof LED strip lighting recessed under the front edge of the countertop as well
as under the shelf on the countertop providing a beautiful effect and nighttime visibility for both the countertop and
drawers. The LED lights are powered by the cord on the unit and are controlled by a switch next to the outlet on the left
leg post. The LEDs have a rated lifetime of 50,000 hours. In the case that your light strips are damaged or need to be
replaced, each strip is connected using simple quick-connect fittings to make it as easy as possible to disconnect and
change them. If you think your lights are damaged or faulty in some way, please contact Integrity Fabricators for
consultation and specific instructions on how to proceed. NEVER WORK ON OR ATTEMPT TO DISCONNECT WIRING
WITHIN THE TABLE WHILE IT IS PLUGGED INTO A WALL OUTLET AND WITHOUT DIRECTION FROM A LICENCED
ELECTRICIAN.
Soft Close Drawer Slides
All the drawers on the grill table are equipped with heavy-duty soft-close drawer slides.
These slides also have an over-extend feature that allows you to pull the drawer out past the
front of the table which is particularly helpful for accessing the charcoal and trash bins.
Drawers can be easily removed from the table if necessary. To remove a drawer, start by fully extending the drawer and
locating the red lever near the center of the slide on each side of the drawer. Depress the levers on both side of the
drawer while pulling toward yourself to fully remove the drawer. To reinstall, simply line up the slides on both sides of
the drawer and push the drawer all the way back into the table. The slides will click back into place on their own.
Soft Close Door Hinges
The cabinet door(s) on the grill table are equipped with Blum soft close
hinges. The soft-close feature can be turned off if desired. To turn off the
soft close feature simply toggle the small black switch located on the hinge
mechanism near where it attaches to the door.
If you need to remove the cabinet door from the table for cleaning, the
hinge can be easily detached from the plate that attaches it to the table
frame. Simply pull the small lever located on the back of the hinge body to
release it from the mounting plate. Re-install the door by simply pressing
the hinge back onto the mounting plate and it will snap back into place.
Grill Table Owner’s Manual 5 | P a g e
We also made it very simple to remove or replace a door front if it is damaged by using Blum’s Inserta technology, which
is a quick-release attachment style rather than screws to fasten the hinge to the wood. To remove the door front from
the hinge, start by removing the door from the table as described above. Once the door has been removed from the
table, simply pull up on the rounded edge of the hinge body where it is attached to the door front; this will release the
mechanism that attaches the hinge to the wood. The new door front can be installed by inserting the hinge into the pre-
drilled holes on the new door and snapping the hinge body back down against the wood face.
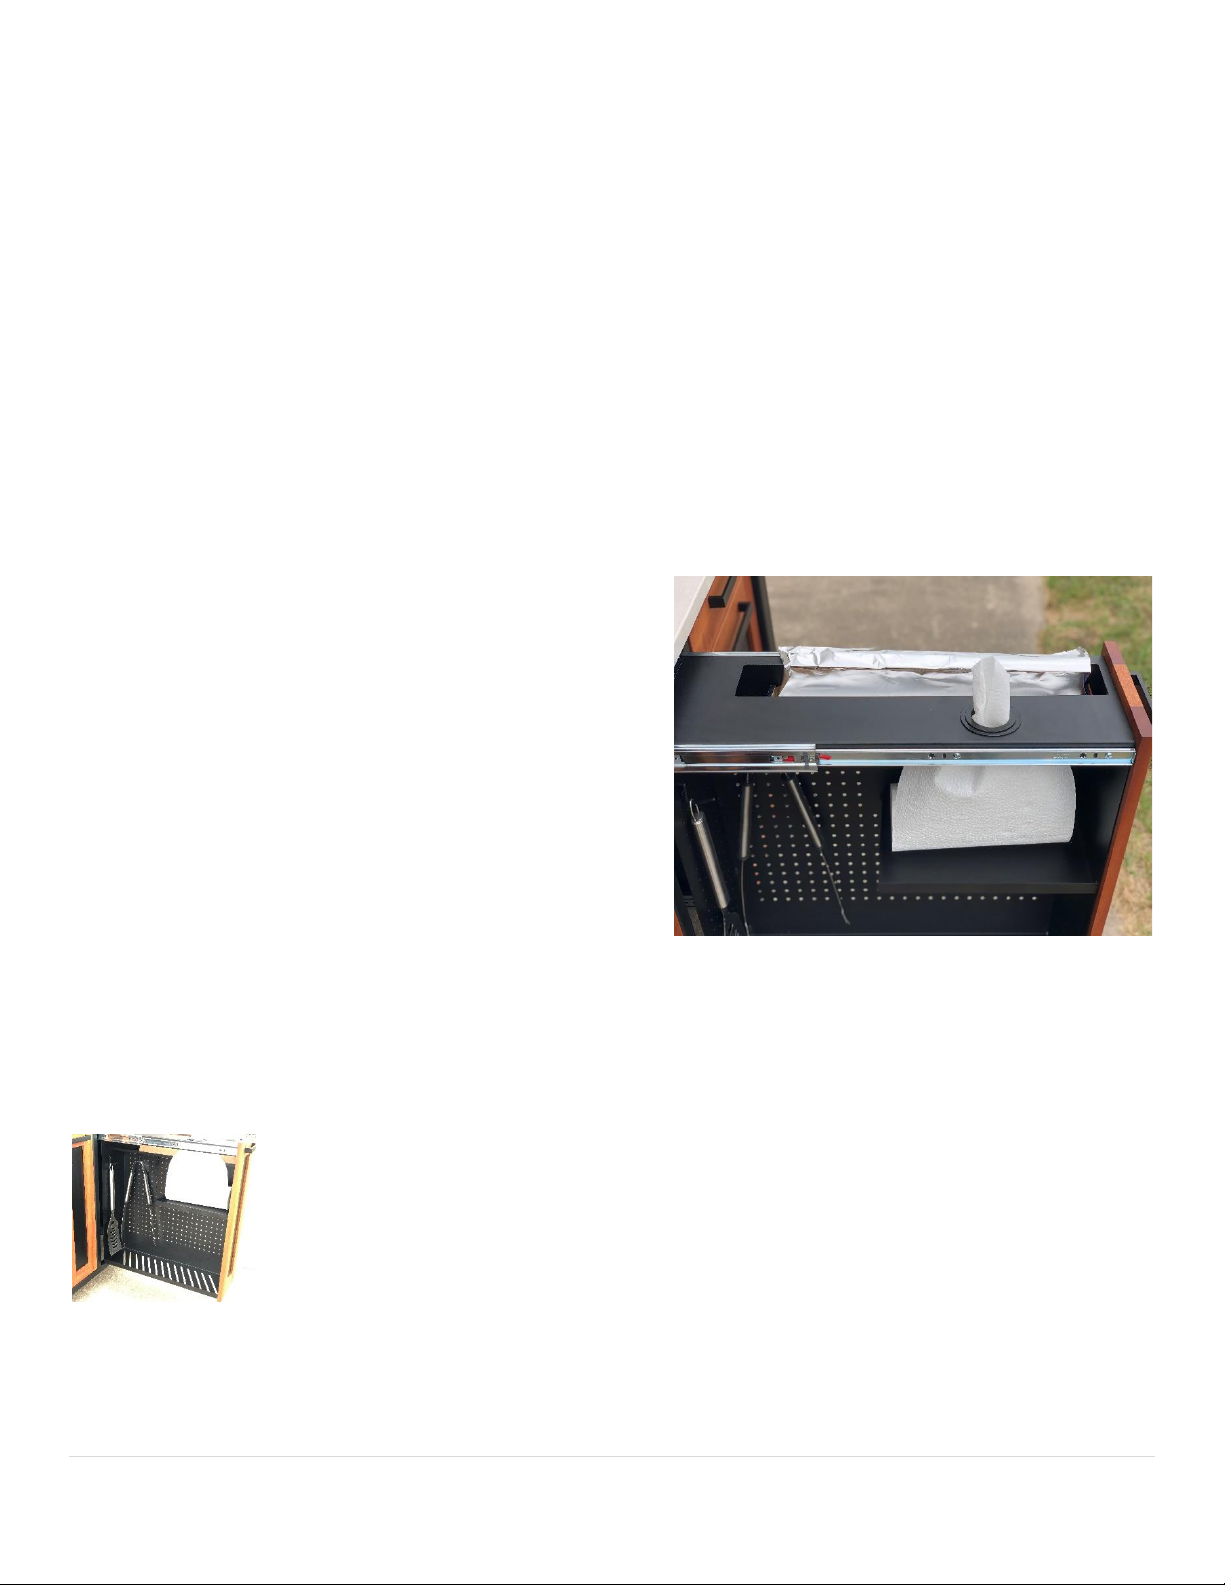
Foil and Paper Towel Dispensers
Foil and paper towel –the two things every grill master needs to have accessible at a moment’s notice. We incorporated
both of these items into the center drawer on the table to make them easy to reach whether you are standing in front of
the grill or doing prep on the table next to the grill. Paper towel dispenses through the access hole in the top of the
drawer plate. The towel roll itself sits on a generously-sized shelf to easily accommodate various size roles. A plastic snap
ring in the dispense hole helps the towel pull through smoothly. If the paper towel you are using is not pulling through
the hole as smoothly as you would like, you can remove the center plastic snap ring leaving a larger plastic ring with
more clearance.
Foil can be one of the most frustrating things to deal with while
grilling. When you need it you need it right away. Most of the
time you only have one hand free and you don’t have time to
wrestle with the box. We prototyped several possible solutions
to this problem with the goal of achieving one-hand accessibility
and a set-up that would accommodate different sizes of foil.
What we came up with is simple and highly functional. Various
size and length boxes of foil can be loaded through the top
access slot in the tall drawer. We recommend leaving the foil roll
in the box and either folding back or completely removing the lid
of the box. Pull a few inches of foil out of the box to give yourself
an easy edge to grab. Now simply pull out whatever length you
need and tear it off on the serrated edges provided on both sides
of the access slot. That’s right, no more messing with the inadequate cutting strip on the box! Pro tip: the foil will tear
the best on the same side of the slot as the foil is unrolling from the box so set the box in based on the side you use from
most often and whether you prefer to tear toward or away from yourself.
Peg Board
The tall drawer has a peg board cut into the side and back of the drawer body. ¼” holes with 1”
grid spacing allow you to use all kinds of standard hooks, brackets, cups, etc. to customize this
area for your specific storage needs. We supply several basic hooks with each unit to get you
started. Clearance from the top hook location to the bottom of the drawer is over 20” to
accommodate large utensils!

Grill Table Owner’s Manual 6 | P a g e
Trash and Charcoal Bins
The unit comes standard with a trash and charcoal bin in the large storage drawer. We
custom-designed these bins for this table and construct them ourselves out of powder coated
steel. The charcoal bin features a tapered front edge which adds to its style and makes for
easier, more accurate pouring. It also has integrated handles on 3 sides for easy lifting and
pouring. The trash bin is sized to fit a standard 13-gallon kitchen trash bag and features a top
lip to keep the bag in place.
Casters
The unit is installed on 4 heavy duty locking swivel casters for ease of portability. All 4 casters both swivel and lock to
make it as easy as possible to navigate in tight spaces. To release the lock, lift up on the black lever next to the wheel
until it snaps in the raised position. To set the lock, press down on the black lever until it snaps into the lower position.
USE AND CARE
We designed this piece to be as durable and functional as possible. However, since we have not figured out how to stop
entropy, some basic care is important to keep your table looking beautiful! The sun has a tendency to fade and destroy
everything over time, so we do recommend you keep the table covered any time it is not in use. A cover is available for
purchase if you plan to keep this outdoors in an unprotected area.
Concrete countertop
We considered a lot of different options when trying to select the perfect countertop surface for this table. We knew it
had to be non-flammable, extremely durable, able to withstand outdoor conditions, and of course it had to look
incredible! The concrete top we are using is the culmination of a lot of planning and testing. Our countertops are true 1”
thick fiberglass reinforced concrete with an exquisite acid washed finish and a top-of-the-line sealer for ultimate
durability and stain-proofing. Run your hands over the smooth surface and beautifully radiused corners and you will be a
believer!
We seal the concrete with a water-based, non-emitting penetrating hybrid sealer. This chemical reactive technology
impregnates and molecularly alters the concrete to create a hardened, crystal-like surface that is highly resistive to
etching from acidic products such as wine and lemon juice. It is also safe for contact from hot pans and provides a high
level of protection from staining. This sealer is in accordance with USDA regulation 9 CFR, Section 416.4 and the Food
Safety Inspection Service’s “Sanitation Performance Compliance Guide”.
Although this was designed with durability in mind, concrete is a stone product which means it is most prone to chipping
or denting if struck with a hard or sharp object. You should avoid striking the surface with hard, heavy objects and from
dragging rough or sharp objects across the surface. A few other do’s and don’ts when using and caring for your
countertop include:
•DO wipe up spills as they occur using a damp cloth or natural cleaning solution
•DO clean regularly with vinegar and water or other green cleaners such as Clorox Multi-Cleaner
•DO use coasters or felt pads under anything with sharp edges or that is extremely hot (over 350F)
•DO NOT use harsh chemicals or acids to clean the countertop

Grill Table Owner’s Manual 7 | P a g e
We recommend that you re-apply sealer once each year or as needed based and wear and use. No stripping is required.
Contact Integrity Fab for sealer and more information about this. Please note, for several weeks after applying the sealer
you may notice the concrete darken in the areas where water and things are left on the surface. This is normal as the
cross linking of the sealer continues. Darkening of the surface is not an indication that the sealer is not working; in fact,
it is a normal reaction as the sealer continues to cure. The reactive sealer is breathable which allows water vapor to
move through the sealer but does not easily let tannins from staining agents through.
Wood Accents
The wood used on the table is an African Mahogany (Sapele) which is a hardwood with natural weather resistant
properties. We have not used stain on the wood so all the color and grain you see are the natural look of this beautiful
wood! The wood has been coated with Penofin oil which provides an additional measure of protection for the wood and
helps prevent it from graying over time which can occur after extended exposure to the sun. To help maintain this
beautiful look we recommend that you rub a coat of Penofin oil on the wood once a year, following the application
guidelines on the can.
Steel Frame
The steel frame on the table has a powder coat finish. No specific maintenance is required; however, extended exposure
to the sun will cause the color to fade slightly over time so we do recommend you keep the table covered when not in
use. Use any household non-abrasive cleaner or dish soap for cleaning. No finish will last forever so it is possible that
rust spots will appear over time. If you want to fix rust spots that appear you can do that by carefully sanding over the
area that is rusted to remove any loose paint or rust scale. We recommend repainting that area with Rustoleum 2X satin
black paint which will be a very close match to the existing power coat finish. If a panel or frame component is damaged
somehow, replacement pieces are available to purchase. Contact Integrity Fab for more information.
WARRANTY
At Integrity Fabricators we take great pride in our work and every one of our products is carefully handcrafted. We stand
behind our products and always want to exceed our customers’expectations. For this reason, we have a limited lifetime
warranty for the original purchaser covering defects in the material and workmanship of our products.
We cannot be responsible for improper maintenance, lack of protection from weather, exposure to chemicals or other
harmful substances, general mistreatment or normal wear and tear over time. These things can result in discoloration,
staining, surface rust, scratches and other blemishes which are not covered by this warranty.
Warranty on parts:
•Frame components: Lifetime (parts only)
•Concrete: Lifetime (parts only)
•Drawer slides and door hinges: Lifetime (parts only)
•Wood: 5 years (parts only)
•Electrical components and lights: 1 year (parts only)
Consumers are responsible for all labor and shipping cost associated with warranty parts. All warranty claims are subject
to manufacturer review. Please contact Integrity Fabricators with warranty questions and make sure to have your sales
receipt information and product model number located on the back of the grill shelf when contacting us about parts.

Grill Table Owner’s Manual 8 | P a g e
Regardless of whether your item is covered by warranty, we want you to be happy with your purchase and we will be
glad to help resolve whatever issue you are having. Replacement and additional parts can be purchased through your
local dealer or from Integrity Fabricators.
Contact Information
Integrity Fabricators, LLC
5282 Rich St.
Allendale, MI 49401
Phone: (616) 345-4322 (IFAB)
Email: sales@integrityfab.com
www.integrityfab.com
Scan here for additional information:
This manual suits for next models
1
Table of contents


