Intelight Astreet LED User manual
Safety
1.
The lighting fitting should be installed, repaired and maintained by a person with the appropriate
qualifications. Incorrect installation or tampering carries a risk of electric shock.
2.
Installation of the lighting fitting must be carried out in accordance with its purpose and these
instructions.
3.
When installing lamps in an open air, never connect power supply in wet conditions.
4.
During installation or maintenance, make sure that the power supply is disconnected.
5.
When connecting the lighting fitting to the power network , make sure that the power supply
parameters correspond to the rated power. Make sure to connect the protective conductor. After
connecting the lighting fitting is energized.
6.
Do not touch the device with wet or damp hands.
7.
In case of suspicion of damage to the electrical part of the device (ballast, power cord), do not use the
lighting fitting.
8.
The device should be mounted in such a way that enables natural heat dissipation.
9.
Periodical maintenance should be done in order to assure proper operations.
10.
The manufacturer does not guarantee proper operation and shall be not responsible for any damage
or injury resulting from installation, repair or maintenance performed in contrary to the instructions,
generally accepted principles of installation, occupational safety rules, intended use or when the
installation was performed by a person without appropriate permissions.
Protection of environment
1. Cardboard or paper elements of the packaging should sent for recycling paper or deposited of into a
container for paper waste, while plastic packaging into a container for plastic waste.
2. Obsolete lighting fitting must not be disposed of as household waste and should be delivered to a
special WEEE collecting point.
Guarantee
1. The guarantee is valid for 12 months from the date of purchase.
2. The guarantee shall not cover mechanical damage, damage caused by improper installation,
operation or modifications of the lighting fitting as well as changes occurring due to natural wear and
tear of the product.
3. The manufacturer reserves that it does not take responsibility for the improper operation of the lighting
fitting as a result of interference in the lighting fitting construction carried out by the user without
permission.
4. Application of the lighting fitting: streets, roads, etc.
Handling of obsolete equipment
Pursuant to the Act of 29 July 2005 on
waste electrical and electronic
equipment and the Act of 24 April
2009 on batteries and accumulators
the presented device after use due
to hazardous substances contained in
it is subject to collection
of waste
electrical and electronic equipment.
Detailed information on WEEE
collection can be obtained from
municipal authorities.
Intelight Sp. z o.o.
8, Rydygiera str.
01 - 93 Warsaw, Poland
KTM 97334 – Instruction ASTREET LED 20 / 30 / 40 / 50, EN, ver. 08062016
EXTERIOR LAMPS
ASTREET LED
Version: ASTREET LED
INSTALLATION AND OPERATION INSTRUCTIONS
Power supply Source Standard colours Mounting
on poles IP
rating Insulation
class
230 VAC / 50Hz LED Top - grey RAL 7045
Bottom - white RAL 9016 Ø60 IP66 I
Versions LED
source
power
Total
lamp
power
Astreet LED 20 14 W 18 W
Astreet LED 30 21 W 27 W
Astreet LED 40 28 W 36 W
Astreet LED 50 35 W 45 W
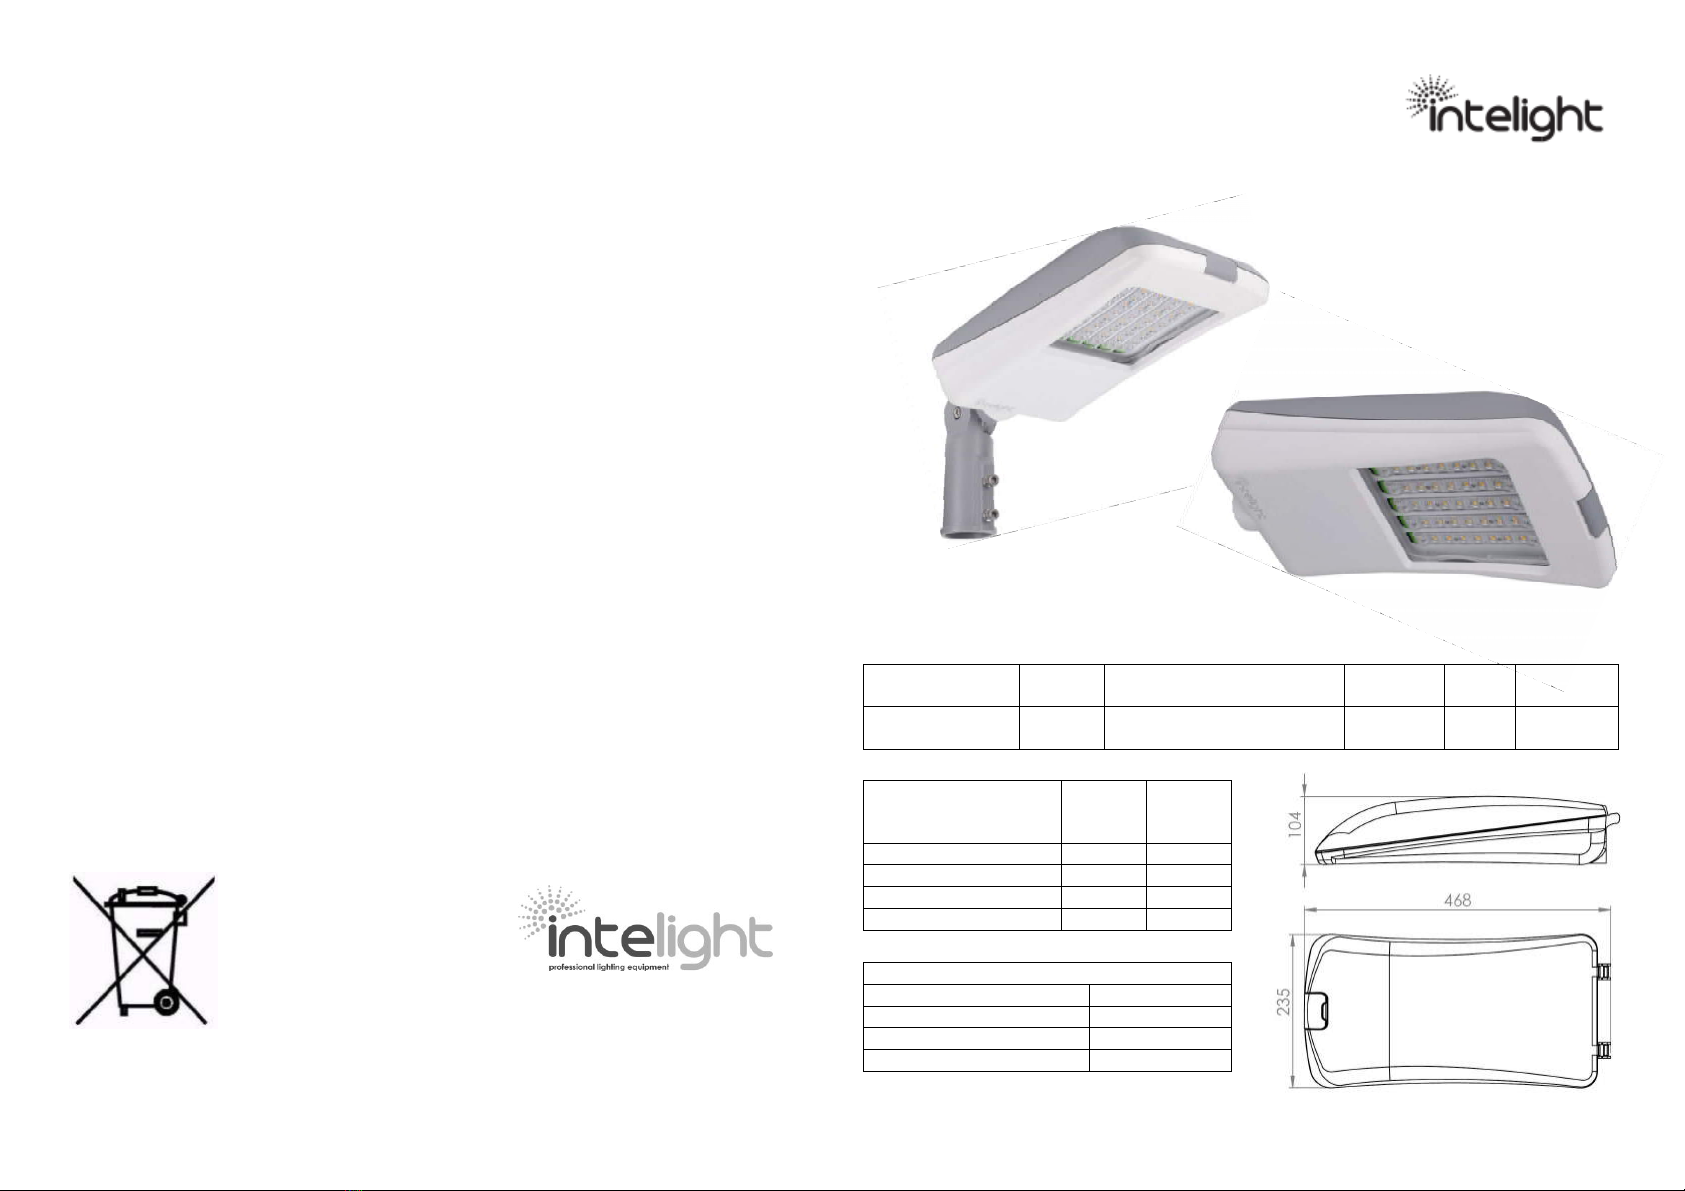
Dimensions and weights, all versions *
Length [mm] 468
Width [mm] 235
Height [mm] 104
Weight [kg] 5,0
* - without grip

Installation way
This street lamp is designed to be installed directly on a pole or on an extension grip regulated within a
range of -90˚ to +90˚, what enables to set any desired angle in relation to a street surface. This grip is an
accessory included in the lamp set.
Installation of the light fitting on a pole or a grip
1. Open the fitting by pulling the housing lock {2} on front of the lamp, then by lifting the cover {1}
upwards until the internal opening latch {8} clicks in its place.
2. Assemble the mounting grip, if needed, according to the drawing.
3. Loosen a cable gland {6} and screws of a cable strain relief {10} inside the lamp housing.
4. Conduct the power cable from a pole, through an optional grip to the lamp housing through a cable
gland {6}. Recommended cables should have a diameter between 6 mm and 12 mm (cross-section
between 0,75 mm2 and 2,5 mm2.
5. Connect an optional grip with a pole – by putting a grip on a 60 mm pole and fixing it by means of
screws.
6. Then connect light fitting with a grip – by putting a lamp housing on a 60 mm grip and fixing it by
means of screws {7}.
7. Note: both fastening operations should be done with a proper care and force 7Nm-8Nm, in order to
prevent accidental loosening of the connections.
8. Conduct the power cable through the cable strain relief {10} and tighten its screws in a way that the
cable cannot slip out.
9. Remove a mains connector {9} from its socket and put and screw in the appropriate wires of the power
cable to right terminals (e.g. power = brown or black, neutral = blue, protection earth = green and
yellow). Then insert the mains connector back to the socket.
10. Then close the cover {1} by moving it slightly up till the opening latch {8} is released and then by
moving it down.
11. Secure the housing by clicking in the housing lock {2} in its position.
Replacement of an LED driver
1. Turn off the mains supply.
2. Open the fitting by pulling the housing lock {2} on front of the lamp, then by lifting the cover {1}
upwards until the internal opening latch {8} clicks in its place.
3. Remove the mains connector {9} from its socket.
4. Remove LED driver’s {3} connectors {5} from their appropriate sockets.
5. Unscrew two driver fixings {4}.
6. Remove the LED driver {3} from its place.
7. To reinstall new LED driver inside the lamp fixture, repeat the steps 6 to 1 in a reverse order.
Replacement of Astreet 7W light modules
1. Turn off the mains supply.
2. Open the fitting by pulling the housing lock {2} on front of the lamp, then by lifting the cover {1}
upwards until the internal opening latch {8} clicks in its place.
3. Remove the mains connector {9} from its socket.
4. Push a light module {11} backwards (by pressing its grey “-“ plugs gently towards a back part of the
housing), then move it slightly upwards and remove it by pulling it to a front.
5. To reinstall new LED module inside the lamp fixture, repeat the steps 4 to 1 in a reverse order. When
inserting the LED module, make sure that its grey “-“ plug is close to the front of the lamp body, while
its green “+” plug is closer to the rear part of a lamp body.
This manual suits for next models
4


