Cree XSP Series User manual
CI379X40R0
1 of 2
INSTALLATION INSTRUCTIONS
XSP Series
LED Wall Pack
Includes: XSPW™ Luminaires
IMPORTANT SAFEGUARDS
When using electrical equipment, basic safety precautions should always be
followed including the following:
READ AND FOLLOW ALL SAFETY INSTRUCTIONS
1. To reduce the risk of electrical shock, turn off power supply before
installation or servicing.
2. This luminaire must be installed in accordance with the NEC or your
local electrical code. If you are not familiar with these codes and
requirements, consult a qualied electrician.
SAVE THESE INSTRUCTIONS FOR FUTURE REFERENCE
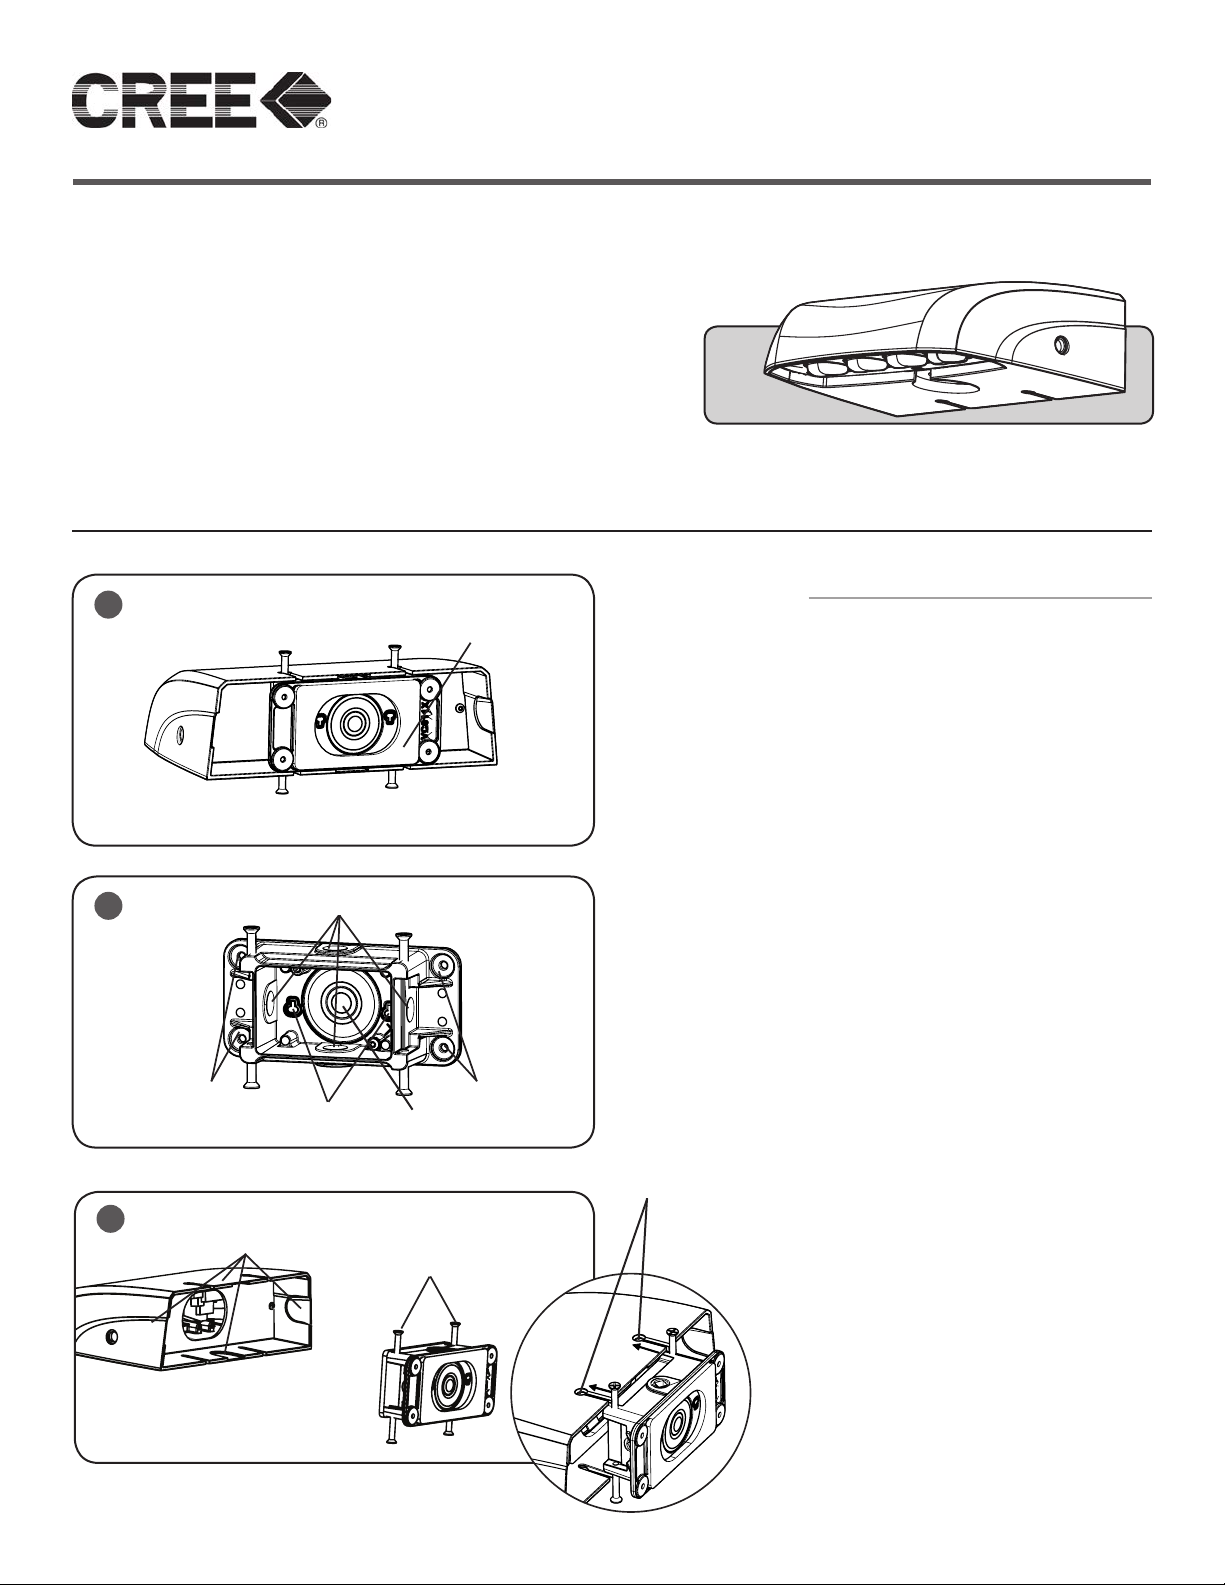
WALL MOUNTING
STEP 1:
Remove mounting box from the luminaire.
See Figure 1.
STEP 2:
IMPORTANT – If needed, the (2) Keyhole
knockouts located inside box may be
removed, but are for alignment only. See
Figure 2. Luminaire is to be supported by
(4) 3/16" mounting holes. The Mounting
holes will accommodate a #10 bolt. Select
appropriate customer supplied mounting
hardware for mounting surface. See Figure
2 and 4.
STEP 3:
Place mounting box over junction box
or conduit. If mounting over junction
box a 2-1/2" Inspection knockout hole is
included. See Figure 2 and 4.
STEP 4:
For surface wiring (4) 1/2" threaded holes
are available. See Figure 2 and 4.
STEP 5:
If mounting on a uneven surface, place
a minimum of a 1/4" bead of high grade
silicone on the black gasket encompassing
the Inspection Knockout hole on the back
of the mounting box. See Figure 4.
STEP 6:
If mounting over surface mounted conduit
use the knockout conduit openings
located on the top, bottom, or sides of the
luminaire. Knockouts can be removed by
using a hammer or pliers. See Figure 3.
STEP 7:
Before securing to wall mounting surface,
make sure mounting box is level.
STEP 8:
Secure mounting box to wall.
TO INSTALL:
1
Mounting Box
2
(2) Keyhole
Knockouts
(4) 1/2" threaded holes
(4) Mounting Holes
(4) Mounting
Holes
Conduit
Knockout
3
Luminaire
Mount Screws
Conduit Knockouts Locations
Slots on Luminaire
Housing

CI379X40R0
2 of 2
© 2013 Cree, Inc. All rights reserved. For informational purposes only. Content is subject to change. See
www.cree.com/lighting/products/warranty for warranty and specifications. Cree® and the Cree logo are
registered trademarks, and XSPW™ is a trademark of Cree, Inc. of Cree, Inc
ELECTRICAL CONNECTIONS
STEP 1:
Make the following Electrical Connections to the terminal block:
a. For 120/277V connect the black fixture lead to the voltage
supply lead (Hot 1 for 208/240V wiring).
b. For 120/277V connect the white fixture lead to the neutral
supply lead. (Hot 2 for 208/240V wiring).
c. Connect the green or green/yellow ground lead to the
green lead.
d. If Dimming is an option; connect the violet dimming
positive lead to the supply dimming positive lead.
e. If Dimming is an option; connect the grey dimming
negative lead to the supply dimming negative lead
STEP 9:
Make wiring connections
per the Electrical
Connections section.
NOTE: Once electrical
connections have been
made, carefully tuck surge
protector back into the
luminaire.
STEP 10:
Place luminaire on
mounting box by sliding
the luminaire so that
the (4) Luminaire Mount
Screws on the mounting
box are at the end of each
slot in the housing. See
Figure 3.
STEP 11:
Tighten (4) Phillips screws
and verify luminaire is
secure.
7.0"
6.0"
Mounting
2.4"
Mounting
3.4"
4
(4) Mounting Holes
for 3/16" Customer
supplied Screws
Keyhole Knockouts- Provided
for Alignment Over Junction Box
ONLY
1/2" Conduit Knockout
2-2/12" Inspection Knockout Hole for
Mounting Over Recessed Junction Box
This manual suits for next models
1
Other Cree Outdoor Light manuals

Cree
Cree C-Lite C-WP-A-TR Series User manual

Cree
Cree Edge ARE-EDG-AA User manual

Cree
Cree RSWL User manual

Cree
Cree NTW Series User manual

Cree
Cree Edge ARE-EDR-R4 User manual

Cree
Cree VG Series User manual

Cree
Cree OSQ Series User manual

Cree
Cree XSP Series User manual

Cree
Cree NTW Series User manual

Cree
Cree EDGE XPS Transportation Series User manual


