Intelligent Charging CT75A User manual

CT75A : Battery Capacity Tester
Operators Manual
Doc: DWG1051-07-R8 CT75A Operators manual.odt Pa e 1 of 55 Copyright Material of Intelligent Charging Limited © 2018
Printed On : 16/02/22
CT75A
BATTERY CAPACITY TESTER
OPERATORS MANUAL

CT75A : Battery Capacity Tester
Operators Manual
Table of Contents
1 Manual Revision History...........................................................................................................4
2 Equipment Description.............................................................................................................5
2.1 General............................................................................................................................5
2.1.1 Capacity Testing Mo es..............................................................................................6
2.2 Component Parts..............................................................................................................8
2.3 Installation.......................................................................................................................8
2.4 Controls An In icators.....................................................................................................9
2.5 Front Panel Controls an In icators....................................................................................9
2.6 Rear Panel Controls An In icators...................................................................................10
3 Cell Monitor Interface.............................................................................................................12
3.1 General..........................................................................................................................12
3.2 Cell Monitor Connection...................................................................................................13
3.2.1 Connecting flying lea s.............................................................................................13
3.2.2 Connecting using the "CROWN".................................................................................13
3.2.3 Flying Lea Connection Diagram................................................................................14
3.2.4 Crown Connection Diagram.......................................................................................15
3.3 Discharging With The Cell Monitor....................................................................................16
3.3.1 Cap Test Cell Monitor................................................................................................16
3.3.2 Automatic Cell Balance..............................................................................................16
3.4 Cell Monitor Exten e Display..........................................................................................16
3.5 Printing Data When Using The Cell Monitor.......................................................................16
3.6 Cell Scan Only Mo e........................................................................................................17
3.7 Cell Balance Only Mo e...................................................................................................17
3.8 Initialise the cell monitor.................................................................................................18
3.9 Cell Number Reversal......................................................................................................18
3.10 Cell scan an print uring stan ar charge mo es...........................................................18
3.11 Cell Monitor Manual Scan...............................................................................................19
3.12 Cell Monitor Manual Cell Balance....................................................................................19
3.13 Cell Monitor Specifications..............................................................................................20
4 Equipment Menu Operation....................................................................................................21
4.1 Charging Menu................................................................................................................21
4.2 Capacity Testing Menu....................................................................................................22
4.3 Process Operation Menu..................................................................................................23
4.4 Settings Menu.................................................................................................................24
5 Connecting A Battery.............................................................................................................25
6 Battery Capacity Test or Discharge Operation..........................................................................27
6.1 Capacity Test To 100%...................................................................................................27
6.2 Capacity Test To Target Voltage......................................................................................28
6.3 Capacity test Using Cell Monitor.......................................................................................29
6.4 Capacity Test To Faile Cells............................................................................................30
6.5 Automatic Cell Balancing..................................................................................................31
6.6 Full Battery Discharge......................................................................................................32
6.7 Performing A Capacity Test..............................................................................................33
Doc: DWG1051-07-R8 CT75A Operators manual.odt Pa e 2 of 55 Copyright Material of Intelligent Charging Limited © 2018
Printed On : 16/02/22

CT75A : Battery Capacity Tester
Operators Manual
6.7.1 Capacity Test or Discharge From A Library Entry........................................................33
6.7.2 Capacity Test or Discharge From Manual Data............................................................33
6.7.3 Capacity Test or Discharge From Previous Data..........................................................33
7 Creating Or Mo ifying Library Entries......................................................................................33
7.1 Data Entry Proce ure......................................................................................................34
7.2 Entering Discharge Data..................................................................................................34
8 Process Mo e........................................................................................................................38
8.1 Overview Of Operation....................................................................................................38
8.2 Process Menu..................................................................................................................38
8.2.1 Renaming a process.................................................................................................39
8.2.2 View or E it A Process..............................................................................................39
8.3 Process Execution...........................................................................................................39
8.4 Process Termination........................................................................................................40
9 Calibration.............................................................................................................................41
9.1 Equipment Require ........................................................................................................41
9.2 Calibration Equipment Connection....................................................................................41
9.3 Check Proce ure.............................................................................................................42
9.4 Making Calibration A justment.........................................................................................42
9.5 Reviewing Calibration Date..............................................................................................43
10 Miscellaneous Unit Functions.................................................................................................44
10.1 Description Of Stop Co es.............................................................................................44
10.2 Print Or Display Previous Operation Results.....................................................................46
10.3 Changing The Date Format An Date Time.....................................................................46
10.4 Mo ifying Display Intensity............................................................................................47
10.5 Automatic screen im....................................................................................................47
10.6 Printing battery serial number........................................................................................47
10.7 Cooling Fan...................................................................................................................47
11 Service An Maintenance......................................................................................................48
11.1 Calibration....................................................................................................................48
11.2 Cleaning.......................................................................................................................48
11.3 Battery Backup..............................................................................................................48
11.4 Printer Care..................................................................................................................49
11.4.1 Door Latch.............................................................................................................49
11.4.2 Paper Fee Button..................................................................................................49
11.4.3 Paper Roll Replacement..........................................................................................50
11.4.4 Ribbon Cartri ge Replacement................................................................................50
11.4.5 Consumables Available............................................................................................51
12 Specifications.......................................................................................................................52
13 Pro uct Disposal Instructions................................................................................................53
14 Pro uct Warranty.................................................................................................................54
15 Owners Notes......................................................................................................................55
Doc: DWG1051-07-R8 CT75A Operators manual.odt Pa e 3 of 55 Copyright Material of Intelligent Charging Limited © 2018
Printed On : 16/02/22

CT75A : Battery Capacity Tester
Operators Manual
1 Manual Revision istory
Rev Date Description
1 22-02-2010 Adapted from MB73P+ Operators Manual.
2 31-05-2-11 Added note on printin of battery serial number.
3 08-02-2012 Corrected reference to internal lithium backup battery.
4 21-11-2014 Chan ed manual to reflect bi er case with built in printer.
5 21-07-2015 Formattin chan es.
6 11-02-2020 Updated to reflex major software update.
7 22-06-2020 Added cell monitor connection details.
8 15-02-2022 Added information on the manual cell scan and balance functions.
Doc: DWG1051-07-R8 CT75A Operators manual.odt Pa e 4 of 55 Copyright Material of Intelligent Charging Limited © 2018
Printed On : 16/02/22

CT75A : Battery Capacity Tester
Operators Manual
2 Equipment Description
2.1 General
The Battery Capacity tester is an electronically controlle universal battery analysing
(capacity testing) unit. It is house in a metal enclosure esigne for bench mounting.
As it is supplie it is can be operate from a wi e input supply range from 90V to 250V.
Equipment control is via an interactive 253 x 32 ot matrix isplay an ata entry is via
a 16-key keypa . Operating mo es an functions are selecte by the use of a simple
menu system. Access to testing operation is performe by either entry of eight igit
battery library names, repeat of last capacity test or new manual parameters. During
operation the isplay will show the instantaneous values of battery voltage, current an
time elapse through the selecte program.
Process mo es can be create where complete unatten e , capacity testing can be
performe . Up to 6 ifferent capacity test steps can be create an up to 4 process
programs can be store in the unit. Each process step has an optional elaye start for
resting the battery an also each step can soun the alarm with or without a pause in
operation. The process is simply continue by pressing a key on the keypa .
Battery ata is store internally in the units non-volatile memory. The operator can a
an mo ify this list by entering the etails of the battery to be inclu e on the isplay
an keyboar . Alphanumeric igits, up to a maximum of 8 igits, i entify Battery library
entries
Batteries are connecte to the front of the unit by means of two in ivi ual high current
connectors. Connection to the battery has to be ma e via the appropriate connectors
for that battery. The unit is supplie with M8 ring crimps that must have the
appropriate connector for the battery type being teste fitte .
The IC75A can: -
Capacity Test 12V at 100A Or 24V at 80A
The unit contains a high flow rate fan to extract the heat energy generate internally
when running in capacity test mo e.
Doc: DWG1051-07-R8 CT75A Operators manual.odt Pa e 5 of 55 Copyright Material of Intelligent Charging Limited © 2018
Printed On : 16/02/22

CT75A : Battery Capacity Tester
Operators Manual
2.1.1 Capacity Testing Modes
CAPACITY TEST TO 100 PERCENT
This mo e will ischarge the battery connecte at the current specifie for the
test uration specifie thus reporting the battery capacity is 100% or more. The
capacity test will be stoppe if the target voltage is reache before the full test
time has elapse . During the capacity test an when it is terminate the isplay
will show the amount the capacity test is complete as a percentage.
CAPACITY TEST TO TARGET VOLTAGE
This mo e will ischarge the battery own to the terminal voltage specifie thus
reporting the actual percentage capacity. The capacity test will be stoppe if the
target threshol voltage is reache before the full test time has elapse . During
the capacity test an when it is terminate the isplay will show the amount the
capacity test is complete as a percentage.
CAPACITY TEST WITH CELL MONITOR
This mo e will ischarge the battery connecte at the current specifie for the
test uration specifie thus reporting the battery capacity is 100% or more. The
capacity test will be stoppe if any cell reache the cell target voltage before the
full test time has elapse . During the capacity test an when it is terminate the
isplay will show the amount the capacity test is complete as a percentage.
CAPACITY TEST TO FAILED CELLS
This mo e performs a battery ischarge as in the above mo e but oes not stop
at the first cell to fall below the set threshol , but continues until the maximum
time is met or the battery overall voltage. Each cell that falls below the cell target
voltage before the en of test will be logge with the time in which it faile .
AUTOMATIC CELL BALANCE
This mo e is esigne to ischarge the battery own to zero volts, where when
any cell reache zero volts a balancing resistor will automatically be place
across it. When the battery total voltage reache near zero all the remaining
balancing resistors will be applie .
FULL DISCHARGE
This mo e will o a basic ischarge of the battery at the current specifie for the
time specifie .
The unit can be set so that a pre efine charge or capacity test can be sche ule to start at
up to 99h 99m in the future.
The unit contains the software that will allow it to be calibrate by the en user oing away
with the nee to sen the unit to a service centre for perio ic calibration. The re-calibration
process only takes a few minutes an this is one without the nee to access the internals of
the unit.
The printer allows the operator to print har copies of the charge an test results upon
completion of the test. This report can be use to complement the service sche ule by
provi ing full traceability. The print can also inclu e the printe serial number of the battery,
Doc: DWG1051-07-R8 CT75A Operators manual.odt Pa e 6 of 55 Copyright Material of Intelligent Charging Limited © 2018
Printed On : 16/02/22

CT75A : Battery Capacity Tester
Operators Manual
an contains a signature strip so the results can be vali ate by the operator.
The unit contains the software that will allow it to be calibrate by the en user oing away
with the nee to sen the unit to a service centre for perio ic calibration. The re-calibration
process only takes a few minutes an this is one without the nee to access the internals of
the unit.
The external printer when fitte allows the operator to print har copies of the charge an test
results upon completion of the test. This report can be use to complement the service
sche ule by provi ing full traceability.
Doc: DWG1051-07-R8 CT75A Operators manual.odt Pa e 7 of 55 Copyright Material of Intelligent Charging Limited © 2018
Printed On : 16/02/22

CT75A : Battery Capacity Tester
Operators Manual
2.2 Component Parts
Upon receipt of your new battery charger analyser unpack an check that all items are
present in the containing box.
STANDARD ITEMS
One IC75A Battery Analyser
One power cor
One Set (+ve & -ve) stan ar battery lea s.
One paper Copy Operators Manual
Certificate Of Conformity
Calibration Certificate
OPTIONAL ITEMS
Cell Monitor Interface
Cell Monitor Crown (to suit battery specifie )
External Printer.
2.3 Installation
The Battery Analyser shoul be mounte on a level surface such as a workbench or
stur y shelf above the batteries with a loa ing weight of at least 50Kg.
The unit shoul be site so that at least 10cm of airspace is available all roun the si es
an top of the unit to allow free movement of air require for cooling.
Doc: DWG1051-07-R8 CT75A Operators manual.odt Pa e 8 of 55 Copyright Material of Intelligent Charging Limited © 2018
Printed On : 16/02/22
100.0 mm 100.0 mm
100.0 mm
8
5
9 A
6 B
31 2
*
CLR 0#
ENT
C
.
4
7
MEM
B63
ON
OFF
I
O
MEM
B63
ON
OFF
I
O
IC50A
** SERVICEABLE **
24 Jun 2015 14:01 o
CHARGE
CAPTEST
SETTINGS
LIBRARY
A
C
B
.
Bat 13.6V
CELL
MONITOR
intelligent-charging.com
Charging
Intelligent
Limited
IN TE L L IG E N T C H A R G IN G L IM IT E D
BATTERY C ARGER & CAPACITY TESTER
BATTERY MUST BE ISOLATED FROM
EQUIPMENT BEFORE CONNECTION
BATTERY
CAPTEST
BREAKER
C ARGE
BREAKER
OUTPUT PROTECTION
POWER

CT75A : Battery Capacity Tester
Operators Manual
2.4 Controls And Indicators
2.5 Front Panel Controls and Indicators
(A) – DISPLAY
All battery charger in ications are ma e on this 256 x 32 ot matrix vacuum fluorescent
isplay.
(C) - MAINS POWER SWITCH
Pressing this switch activates mains power. It will illuminate to in icate power is being
applie to the unit.
(D) - AUXILLIARY CONNECTOR
This 6 pin connector is the power connector for the cell monitoring unit.
(E) – KEYPAD
All battery charge an capacity test functions are activate via this 16 key keypa .
Doc: DWG1051-07-R8 CT75A Operators manual.odt Pa e 9 of 55 Copyright Material of Intelligent Charging Limited © 2018
Printed On : 16/02/22
8
5
9 A
6 B
31 2
*
CLR 0#
ENT
C
.
4
7
MEM
B63
ON
OFF
I
O
MEM
B63
ON
OFF
I
O
IC50A
** SERVICEABLE **
24 Jun 2015 14:01 o
CHARGE
CAPTEST
SETTINGS
LIBRARY
A
C
B
.
Bat 13.6V
CELL
MONITOR
intelligent-charging.com
Charging
Intelligent
Limited
IN TE L L IG E N T C H A R G IN G L IM ITE D
BATTERY C ARGER & CAPACITY TESTER
BATTERY MUST BE ISOLATED FROM
EQUIPMENT BEFORE CONNECTION
BATTERY
CAPTEST
BREAKER
C ARGE
BREAK ER
OUTPUT PROTECTION
POWER
A
B
C
D
E
F
G
H
IJ

CT75A : Battery Capacity Tester
Operators Manual
(F) - NEGATIVE BATTERY TERMINAL
Connection of the negative battery lea is ma e to this terminal.
(G) - POSITIVE BATTERY TERMINAL
Connection of the positive battery lea is ma e to this terminal.
(H) - HEAT EXCHANGER EXHAUST FAN
During use the unit absorbs electrical power, which it turns into heat, this fan exit is
where the heat is extracte from the unit. It is important that it is not obstructe .
(I) & (J) - CAPACITY TEST CIRCUIT BREAKERS
The circuit breakers are fitte to prevent high currents from being riven into the
battery or into the unit shoul a fault con ition occur. Always ensure that both the
circuit breakers are is in the ON position before starting a capacity test.
WARNING
NEVER SWITC T E CIRCUIT BREAK TO ON W EN T E UNIT IS PERFORMING A
CAPACITY TEST AS SEVERE DAMAGE MAY OCCUR TO T E BATTERY OR T E EQUIPMENT
ALWAYS PRESS STOP FIRST !
If the circuit breaker operates uring a capacity test imme iately press STOP on
remove power from the unit an isconnect the battery.
Operation of the circuit breaker is an in ication of a fault an the unit will nee to be
checke before using.
2.6 Rear Panel Controls And Indicators
Doc: DWG1051-07-R8 CT75A Operators manual.odt Pa e 10 of 55 Copyright Material of Intelligent Charging Limited © 2018
Printed On : 16/02/22

CT75A : Battery Capacity Tester
Operators Manual
(K) - Mains Lea
This is the entry point for the power lea into the unit. Always check that the lea is not
amage before use.
(L) - Mains Fuse.
The mains fuse fitte to the CT75A is 3.15A Anti-Surge 1¼”
Doc: DWG1051-07-R8 CT75A Operators manual.odt Pa e 11 of 55 Copyright Material of Intelligent Charging Limited © 2018
Printed On : 16/02/22
MAINS 220V-240V 50Hz/60Hz 2.4KW
REPLACE ONLY WITH SAME TYPE FUSE 13A S/B
240V AC
SERIAL No:
Intelligent Charging Limited
Ford House, Dewin Road,
Rackheath Ind. Est. Norwich,
Norfolk, NR13 6PS, ENGLAND.
TEL: +44-1603-722770
FAX: +44-1603-722771
MAIL: sa es@inte igent-charging.com
MODEL :
P/N :
MADE IN ENGLAND
Intelligent
Charging
Limited
KL

CT75A : Battery Capacity Tester
Operators Manual
3 Cell Monitor Interface
3.1 General
The CT75A battery analyser has built in support for the cell-monitoring interface
(TH20).
This allows the monitoring of NiC batteries of up to 20 cells.
For upgra e etails please contact Intelligent Charging Limite or your local reseller.
With the cell-monitoring interface connecte two a itional capacity test options
become available.
When the cell monitor is in use two a itional isplays can be selecte by pressing ‘B’
or ‘C’ keys on the keypa while the unit is running. Pressing ‘A’ key will return the
isplay back to the efault isplay.
‘A’ Default isplay.
This is the conventional isplay which all mo es of operation use.
‘B’ A textual list of cell voltages.
This isplay will show all 20 cell voltages being measure as a simple list.
‘C’ A graphical bar graph.
This isplay will show all 20 cell voltages being measure a graphical bar graph,
which will show the inter-relationship between each cell. Also isplaye is a line
representing the target voltage. The battery voltage an charge of capacity test
current highest cell voltage, lowest cell voltage an the "cell focus" voltage are
shown in text format. By using the left an right arrow keys on the keypa a
highlight marker can be move across each cell so that if one particular cell
voltage nee s to be monitore it will be isplaye by the right of the bar graph.
By pressing ‘0’ an either ‘’ or ‘’ keys simultaneously will cause the 1.0V
isplay win ow to be shifte up or own the 2.0V range.
The cell monitor is supplie as an interface unit with 21 patch lea connection for
connecting to batteries via in ivi ual clamps. It has a connector fitte to it where
“crown” assembly can be plugge in. The “crown” arrangement is place onto the top
of the battery with contact to the cells ma e via stainless test pins. The “crown”
arrangement is manufacture to suit one style of battery. If many ifferent styles of
batteries are in use a “crown” will be require for each battery.
The cell monitor prior to firmware revision 5.08 notes cells by efault in the or er of cell
1 being the negative en of the battery, whereas 5.08 an higher firmware efaults to
cell 1 being the cell at the positive en of the battery. The state of this con ition can be
swappe over by going to the cell monitor settings an changing the CELL DIRCT.
There are two options "Cell #2 is negative " or "Cell #1 is positive" Confirmation of the
current setting is also inclu e on the cell printout an voltage monitor screens.
Doc: DWG1051-07-R8 CT75A Operators manual.odt Pa e 12 of 55 Copyright Material of Intelligent Charging Limited © 2018
Printed On : 16/02/22

CT75A : Battery Capacity Tester
Operators Manual
3.2 Cell Monitor Connection
It is very important that this section is a here to when making electrical connections
to the cell monitor as amage can be sustaine if the connection or er is not observe .
Connect the cell monitor 6 pin plug to the battery charger.
Switch on the battery charger.
Make sure that the letters "CM" appear on the bottom line of the isplay. This means
that the charger has ma e a connection to the cell monitor.
Connect the battery main contacts "+" an "-".
3.2.1 Connecting flying leads
Supplie with the cell monitor are 20 re lea s with croco ile clips an one black lea
with croco ile clip.
Starting with the BLACK lea connect this to the cell monitor at one en an the other
Clippe onto the battery NEGATIVE terminal.
Then one by one connect the RED lea s starting at the terminal closest to the BLACK
terminal on the cell monitor an to the first cell in the chain at the NEGATIVE en of
the battery.
The lea s are numbere "01" - "20".
If your battery cell "01" is POSITIVE then a the lea s starting with "20" an
counting own to "01".
If your battery is cell "01" is NEGATIVE then a the lea s starting with "01" an
counting up to "20".
Refer to section Error: Reference source not foun Error: Reference source not foun
on how to change the cell counting mo e for your battery notation.
3.2.2 Connecting using the "CROWN"
Connect the crown to the cell monitor via its 25 way connector. Ensure the plug is
secure by the threa e ring.
Gentry apply the crown to the battery in accor ance with the fitting instruction supplie
with the crown.
Using the charger menu operations it is most useful to follow the proce ure to o a
manual cell scan initially to make sure that the cell monitor an crown have successfully
ma e all the connections. Refer to 3.6 Cell Scan Only Mo e.
UNDER NO CIRCUMSTANCES CONNECT A BATTERY TO T E CELL MONITOR
WIT OUT IT FIRST AVING POWER APPLIED FROM T E C ARGER AS
DAMAGE MAY OCCUR TO T E INTERNAL SENSING CIRCUITRY.
Doc: DWG1051-07-R8 CT75A Operators manual.odt Pa e 13 of 55 Copyright Material of Intelligent Charging Limited © 2018
Printed On : 16/02/22
CT75A : Battery Capacity Tester
Operators Manual
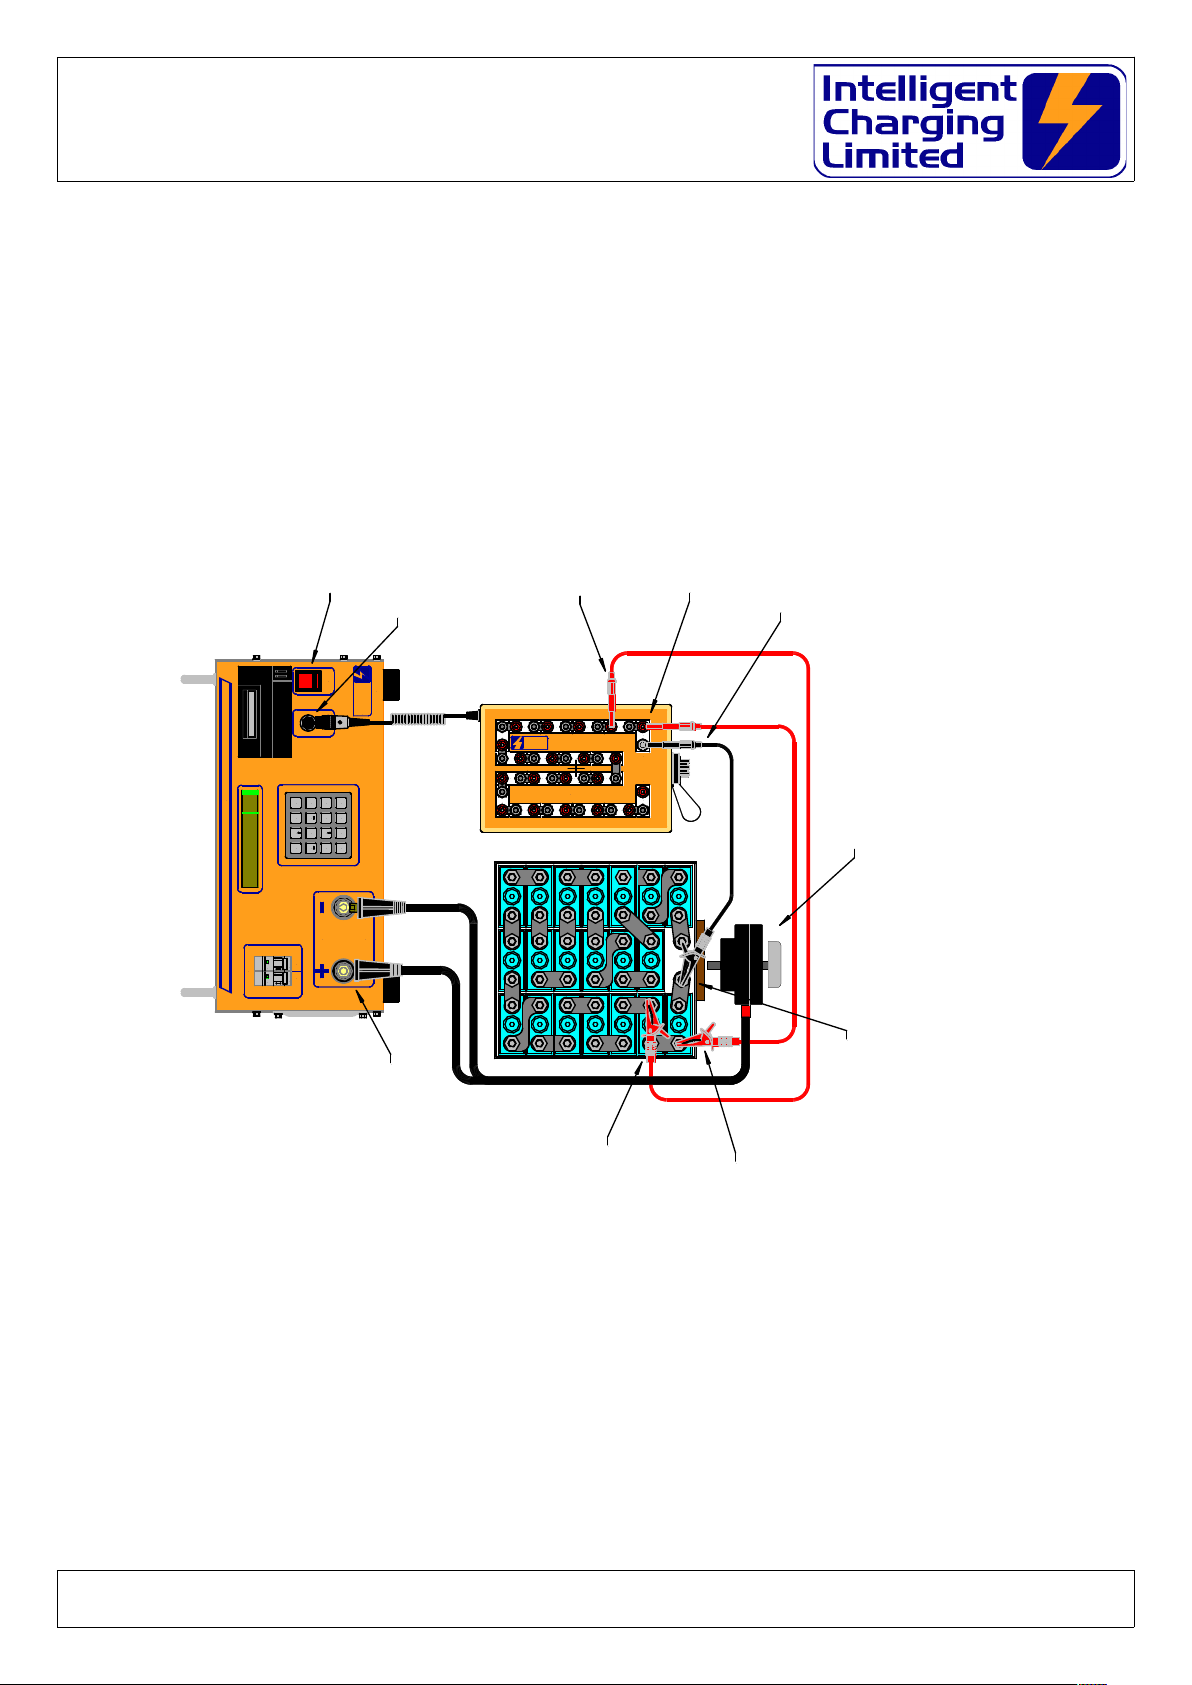
3.2.3 Flying Lead Connection Diagram
Doc: DWG1051-07-R8 CT75A Operators manual.odt Pa e 14 of 55 Copyright Material of Intelligent Charging Limited © 2018
Printed On : 16/02/22
CAPTEST
BREAKER
C ARGE
BREAKER
OUTPUT PROTECTION
CELL
MONITOR POWER
BATTERY MUST BE ISOLATED FROM
EQUIPMENT BEFORE CONNECTION
BATTERY
IN TE L L IG E N T C H A R G ING L IM ITE D
BATTERY C ARGER & CAPACITY TESTER
intelligent-charging.com
Charging
Intelligent
Limited
MEM
B63
ON
OFF
I
O
MEM
B63
ON
OFF
I
O
8
5
9 A
6 B
31 2
*
CLR 0#
ENT
C
.
4
7
MB73P+
** SERVICEABLE **
24 Jun 2015 14:01 o
CHARGE
CAPTEST
SETTINGS
LIBRARY
A
C
B
.
Bat 13.6V
2.4V
3.6V
4.8V
6.0V
7.2V
8.4V
9.6V
10.8V
12.0V
13.2V
14.4V
15.6V
16.8V
18.0V
19.2V
20.4V
21.6V
22.8V
24.0V
T 20 : IN TELLIGENT CEL L MONITOR
1.2V
POSITIVE
NEGATIVE
Intelli ent
Char in
Limited
#1 Connect Cell Monitor
#2 Switch ON Char er
#3 Connect Battery Leads to Char er
#4 Connect Battery Leads To Battery
#5 Connect -VE Black Lead To Cell Monitor
#6 Connect Ne ative Lead To Battery Ne ative Cell
#7 Connect 1st Red Lead To Cell Monitor
#8 Connect 1st Red Lead To First Cell
#9 Connect 2nd Red Lead To Cell Monitor
#10 Connect 2nd Red Lead to next cell
Repeat this in order for all the cell monitor leads
Once complete use the cell scan function to make
sure the battery is connected correctly.

CT75A : Battery Capacity Tester
Operators Manual
3.2.4 Crown Connection Diagram
Doc: DWG1051-07-R8 CT75A Operators manual.odt Pa e 15 of 55 Copyright Material of Intelligent Charging Limited © 2018
Printed On : 16/02/22
CAPTEST
BREAKER
C ARGE
BREAKER
OUTPUT PROTECTION
CELL
MONITOR POWER
BATTERY MUST BE ISOLATED FROM
EQUIPMENT BEFORE CONNECTION
BATTERY
IN TE L L IG E N T C H A R G IN G L IM ITE D
BATTERY C ARGER & CAPACITY TESTER
intelligent-charging.com
Charging
Intelligent
Limited
MEM
B63
ON
OFF
I
O
MEM
B63
ON
OFF
I
O
8
5
9 A
6 B
31 2
*
CLR 0#
ENT
C
.
4
7
MB73P+
** SERVICEABLE **
24 Jun 2015 14:01 o
CHARGE
CAPTEST
SETTINGS
LIBRARY
A
C
B
.
Bat 13.6V
#1 Connect Cell Monitor
#2 Switch ON Char er
2.4V
3.6V
4.8V
6.0V
7.2V
8.4V
9.6V
10.8V
12.0V
13.2V
14.4V
15.6V
16.8V
18.0V
19.2V
20.4V
21.6V
22.8V
24.0V
T 20 : INTELLIGENT CELL MONITOR
1.2V
POSITIVE
NEGATIVE
Intelli ent
Char in
Limited
MS25182-2
#4 Connect Battery Leads To Battery
#5 Connect Crown To Cell Monitor
#3 Connect Battery Leads To Char er
#6 Carefully Place Crown Onto
The top Of The Battery and
Secure With The Side Clips.
Once complete use the cell scan
function to make sure the battery
is connected correctly.

CT75A : Battery Capacity Tester
Operators Manual
3.3 Discharging With The Cell Monitor
3.3.1 Cap Test Cell Monitor
This capacity test mo e allows you to ischarge the battery at the require current for
your pre-selecte time until one cell goes below a pre efine target voltage typically
1.00V at which point the ischarge stops an the battery capacity can be seen. If a
printer is connecte to the unit the cell voltages can be printe at pre efine time
intervals or can be printe by simply pressing the ‘.’ key. If a printe report is require
at the en of the capacity test the final cell voltages will be inclu e .
3.3.2 Automatic Cell Balance
This mo e allows you to set a pre efine ischarge current to flatten the battery an to
perform an automatic cell balancing exercise. While uring the ischarge any cell
approaches 0.00V its balancing resistor will be switche in to re uce the reverse charge
effect. When the battery voltage falls below 3.0V an the ischarge current falls below
2.0A the cell-monitoring interface will automatically switch in all the balancing resistors
an will remain it that state until either the ‘CLR’ key is presse or the Discharge
Time elapses.
3.4 Cell Monitor Extended Display
When performing a charge or capacity test the isplay will always efault to showing
the main process con itions, but when the cell monitor is in use there are two
a itional isplays which give the operator a list of cell voltages at the instant in time or
a graphical bar isplay of the cell voltages. The alternative isplays are viewe by
pressing either of the ‘A’, ‘B’ or ‘C’ keys on the keypa .
The ‘A’ key changes the isplay to the main process con itions:
The ‘B’ key changes the isplay to the full 20-cell voltage list:
The ‘C’ key changes the isplay to a bar graph of cell voltages:
While the graphical isplay is viewe the range of the isplay can be ynamically
change from the efault 0.8 to 1.8V to a bottom limit of 0.0V to 1.0V or an upper limit
of 1.0 to 2.0V by pressing an hol ing the ‘0’ an pressing either ‘’ or ‘’ keys
respectively. Each step is an increment or ecrement of 0.1V.
3.5 Printing Data When Using The Cell Monitor
If the printer is fitte to the charger analyser an the cell monitor is in use there are
a itional printing facilities available. When performing a charge or capacity test the cell
voltages can be printe manually at a time to suit you by simply pressing the ‘.’ key or
a print interval can be specifie in minutes. When the cell monitor is in use the full list
of cell voltages will also be inclu e in the final print at the en of the operation. The
cell monitor printout is a similar format to the figure below:
Doc: DWG1051-07-R8 CT75A Operators manual.odt Pa e 16 of 55 Copyright Material of Intelligent Charging Limited © 2018
Printed On : 16/02/22

CT75A : Battery Capacity Tester
Operators Manual
3.6 Cell Scan Only Mode
A mo e of operation is available where the cell monitor interface can be scanne while
the unit is i le. This is obtaine through the SYSTEM menu. While in this mo e the ‘B’
& ‘C’ keys will isplay the textual cell voltages or the bar graph respectively.
In or er to perform this operation follow this proce ure.
From MAIN page select : -
SETTINGS -> SYSTEM -> MORE.... -> CELL MONIT -> CELL SCAN
The charger will then request the number of cells to be scanne an once entere the
isplay will change to the bar graph isplay "C". The numeric isplay can be selecte by
pressing "B". Note for this feature to work the battery main connector nee s to be
connecte to the battery. The charger performs no other checks an will keep the cell
scan mo e in operation in efinitely. To stop this operation press the "CLR" key.
3.7 Cell Balance Only Mode
If a battery has bee previously raine an simply requires the balancing to be
performe , then this feature can be use instea of the "CELL BALANCE" function
from the "DISC ARGE" operation. It is important that the cell of the battery have
been ischarge to a safe level before performing this as overheating will occur.
From MAIN page select : -
SETTINGS -> SYSTEM -> MORE.... -> CELL MONIT -> BALANCE
Doc: DWG1051-07-R8 CT75A Operators manual.odt Pa e 17 of 55 Copyright Material of Intelligent Charging Limited © 2018
Printed On : 16/02/22
Cell Volts At 0h14m39
Cell 1 is POSITIVE
L=16 0.383V H=17 1.049V
01 1.041V Pass
0 1.047V Pass
03 1.033V Pass
04 1.039V Pass
05 1.0 9V Pass
06 1.045V Pass
07 1.041V Pass
08 1.037V Pass
09 1.037V Pass
10 1.041V Pass
11 1.019V Pass
1 1.031V Pass
13 1.0 9V Pass
14 1.035V Pass
15 1.031V Pass
16 0.383V Fail 0h1 m36
17 1.049V Pass
18 1.007V Pass
19 1.0 5V Pass
0 0.997V Fail 0h14m 9

CT75A : Battery Capacity Tester
Operators Manual
The charger will then request the number of cells to be scanne an once entere the
isplay will change to the bar graph isplay "C". The numeric isplay can be selecte by
pressing "B". Note for this feature to work the battery main connector nee s to be
connecte to the battery. The charger performs no other checks an will keep the cell
balance mo e in operation in efinitely. To stop this operation press the "CLR" key.
3.8 Initialise the cell monitor.
If the cell monitor has been connecte while power is on the battery charger, it will not
be recognise until this operation is performe or the power is cycle .
From MAIN page select : -
SETTINGS -> SYSTEM -> MORE.... -> CELL MONIT -> INITIALISE
The charger will "beep" an isplay a message in icating the cell monitor has been
initialise . Press "CLR" repeate ly to get back to the MAIN page an verify the symbol
"T " appears.
3.9 Cell Number Reversal
Ol er mo els of the TH20 are marke with cell numbers starting with #1 through to
#20 (The maximum number of cells that can be monitore ). Cell #1 is consi ere to be
the cell which is connecte to the negative (-ve) cell en of the battery whereas cell
#20 (in a 20 cell battery) is consi ere to be the cell which is connecte to the positive
(+ve) en of the battery.
Many battery manufacturers use the reverse cell numbering where cell #1 is the
positive (+ve) en of the battery an in the case of a 20 cell battery the #20 cell is the
negative.
Because of this numbering technique the battery charger has an option in the cell
monitor settings to “reverse” the cell numbering for isplay an printing purposes. The
cell isplays show which is +ve en of the battery an which is the negative so that if
the cell numbering is reverse it is shown which way roun the numbering takes.
From MAIN page select : -
SETTINGS -> SYSTEM -> MORE.... -> CELL MONIT -> SETTINGS -> CELL
DIRCT
Select >> NEXT >> or << PREV << to change to either : -
"CELL #1 IS NEGATIVE -VE" or
"CELL #1 IS POSITIVE +VE"
Then press "ENT"
This setting are remembere after power off.
3.10 Cell scan and print during standard charge modes
The charger has an option which allows the use of the cell monitor to monitor an print
Doc: DWG1051-07-R8 CT75A Operators manual.odt Pa e 18 of 55 Copyright Material of Intelligent Charging Limited © 2018
Printed On : 16/02/22

CT75A : Battery Capacity Tester
Operators Manual
cell voltage uring the stan ar charge mo es where only the battery total voltage is
being use as the reference, such as CONSTANT VOLTAGE CHARGE (Although the cell
monitor will not work with Lea Aci batteries) CONSTANT CURRENT CHARGE an
MULTI-STEP CHARGE or CAPACITY TEST TO 100%, CAPACITY TEST TO TARGET an
FULL DISCHARGE.
When these mo es of operation have the following properties.
"DON'T USE CELL MONITOR" The cell monitor is only use in the cell charge an
capacity test mo es.
"ALWAYS USE CELL MONITOR" The cell monitor is always use on the charge an
capacity test mo es above. The the charger oes not act the on the cell voltage values,
it only isplays them.
"PROMPT TO USE CELL MONITOR" Use of the cell monitor will be confirme when
START is selecte .
From MAIN page select : -
SETTINGS -> SYSTEM -> MORE.... -> CELL MONIT -> SETTINGS -> SCAN
MODE
Select >> NEXT >> or << PREV << to change to either : -
"DON'T USE CELL MONITOR"
"ALWAYS USE CELL MONITOR"
"PROMPT TO USE CELL MONITOR"
Then press "ENT"
This setting is remembere after power off.
3.11 Cell Monitor Manual Scan
There is a feature in the cell monitor settings which allows a manual scan of cell
voltages without running a charge or capacity test. This is a useful tool for checking
correct connection of the flying lea s or crown connection before starting a charge or
capacity test.
With the battery connecte to the charger an the cell monitor connecte to the battery
perform the following menu steps.
SETTINGS → SYSTEM → MORE.... → CELL MONIT → CELL SCAN
Then enter the number of cells to be scanne from 1 to 22. Scanning will then begin.
The ‘B’ key changes the isplay to the full 20-cell voltage list:
The ‘C’ key changes the isplay to a bar graph of cell voltages:
To en the manual cell scan press the ‘CLR’ key.
3.12 Cell Monitor Manual Cell Balance
There is a feature in the cell monitor setting which allows a manual cell balance to be
Doc: DWG1051-07-R8 CT75A Operators manual.odt Pa e 19 of 55 Copyright Material of Intelligent Charging Limited © 2018
Printed On : 16/02/22

CT75A : Battery Capacity Tester
Operators Manual
performe on all cells connecte to the battery. In or er for this proce ure to be
execute no cells may have an open circuit voltage of more than 1.00V.
With the battery connecte to the charger an the cell monitor connecte to the battery
perform the following menu steps.
SETTINGS → SYSTEM → MORE.... → CELL MONIT → BALANCE
Then enter the number of cells to be balance from 1 to 22. The charger will then
check the voltages of the cells an if any are above 1.0V will alert the operator an will
not allow manual scanning to be performe .
If the cell voltages are satisfactory the cell balancing an scanning will begin.
The ‘B’ key changes the isplay to the full 20-cell voltage list:
The ‘C’ key changes the isplay to a bar graph of cell voltages:
To en the manual cell balance press the ‘CLR’ key.
3.13 Cell Monitor Specifications
Power +5.0V
Cell Voltage Range -2.0V to +2.0V
Max No. Cells 20
Scan Rate 1.4 secon s
Balance Switching current 2.0A
Balance continuous current 1.0A
Balance Resistance 1.0 ±1% 2W
Voltage Accuracy 0.004V*
Note the voltage accuracy is not in epen ent of the overall battery voltage accuracy.
Doc: DWG1051-07-R8 CT75A Operators manual.odt Pa e 20 of 55 Copyright Material of Intelligent Charging Limited © 2018
Printed On : 16/02/22
Table of contents


