Intelligent Star Leviathan 5000 User manual

User Manual
Leviathan 5000

1
Attachment are the warning levels with different situations
Please read carefully to have the best performance and safety
SAFETY GUIDE
or death immediately
if keep running in this situation
ATTENTION
WARNING
WARNING
DANGER
That is mean it may cause property damge or even damage to
people
FORBID FORCE UNPLUG THE POWER
HANDLING OF POWER PLUG , POWER CORD &SOCKET
Classification of Warning
Meaning of Marks
Use the correct ballast come with
the Leviathan and make sure the
spec is suitable. Use others ballast
may cause the damage to the pump
and ballast. You can contact the
distributor or the shop to replace /
buy the ballast once the ballast was
broken.
Do not forcibly bend, pull, twist, slap,
or place heavy objects on, pinch,
or modify the power cord or power
adapter. The power cord may be
damaged, resulting in fire or electric
shock.
Do not connect or disconnect the
power with wet hands. It may cause
an electric shock.
FORBID
FORBI
Insert the power adapter securely
to the bottom
Failure to do so may cause fire due
to electric shock or overheating.
Always have a drip loop on the
power cord. Do not allow water
droplets to travel through the cord
and come in contact with the outlet
since it may cause a fire or electric
shock.
DRIP LOOP
That is mean it has the possibility of serious injury to people
That is mean it may cause the serious injury to people or death

2
WARNING
ATTENTION
ATTENTION
WHILE OPERATION
SAFETY GUIDE
INSTALLATION
WARNING
HANDLING OF POWER PLUG , POWER CORD & SOCKET
Please unplug the power during
maintenance.
It may cause an electric shock.
Dust on ballast needed to be cleaned
regularly. Accumulated dust may
cause fire due to moisture. Please
wipe off with a dry cloth.
Do not install in places with the high
temperatures (e.g near a fire, near a
heater, under the scorching sun) or
exposed directly under the sunlight.
It can only be used indoors below 35 ° C.
Do not install in places where the
power cord or ballast may get wet.
It may cause electric shock and
leakage.
WARNING
Be careful when carrying or installing
this product in order to prevent damage
from product.
Do not use or placed at outdoors. It
may cause overheat, explosion, etc.
Do not install this product near to
children, since there is an danger
to children.
In case of abnormality (burnt smell, etc),
immediately unplug the power and
stop using it. It may cause overheat
or fire. Please contact the retailer that
you purchased or our company.
Do not modify or process this produuct
by yourself. It may cause damage or
injury to people.
Do not operate when the pump can
not circulate water or the body is
not filled with water. It may cause
damage or fire.
Do not use for any purpose other
than recommendation. It may cause an
unexpected accident or danger.
3
ATTENTION
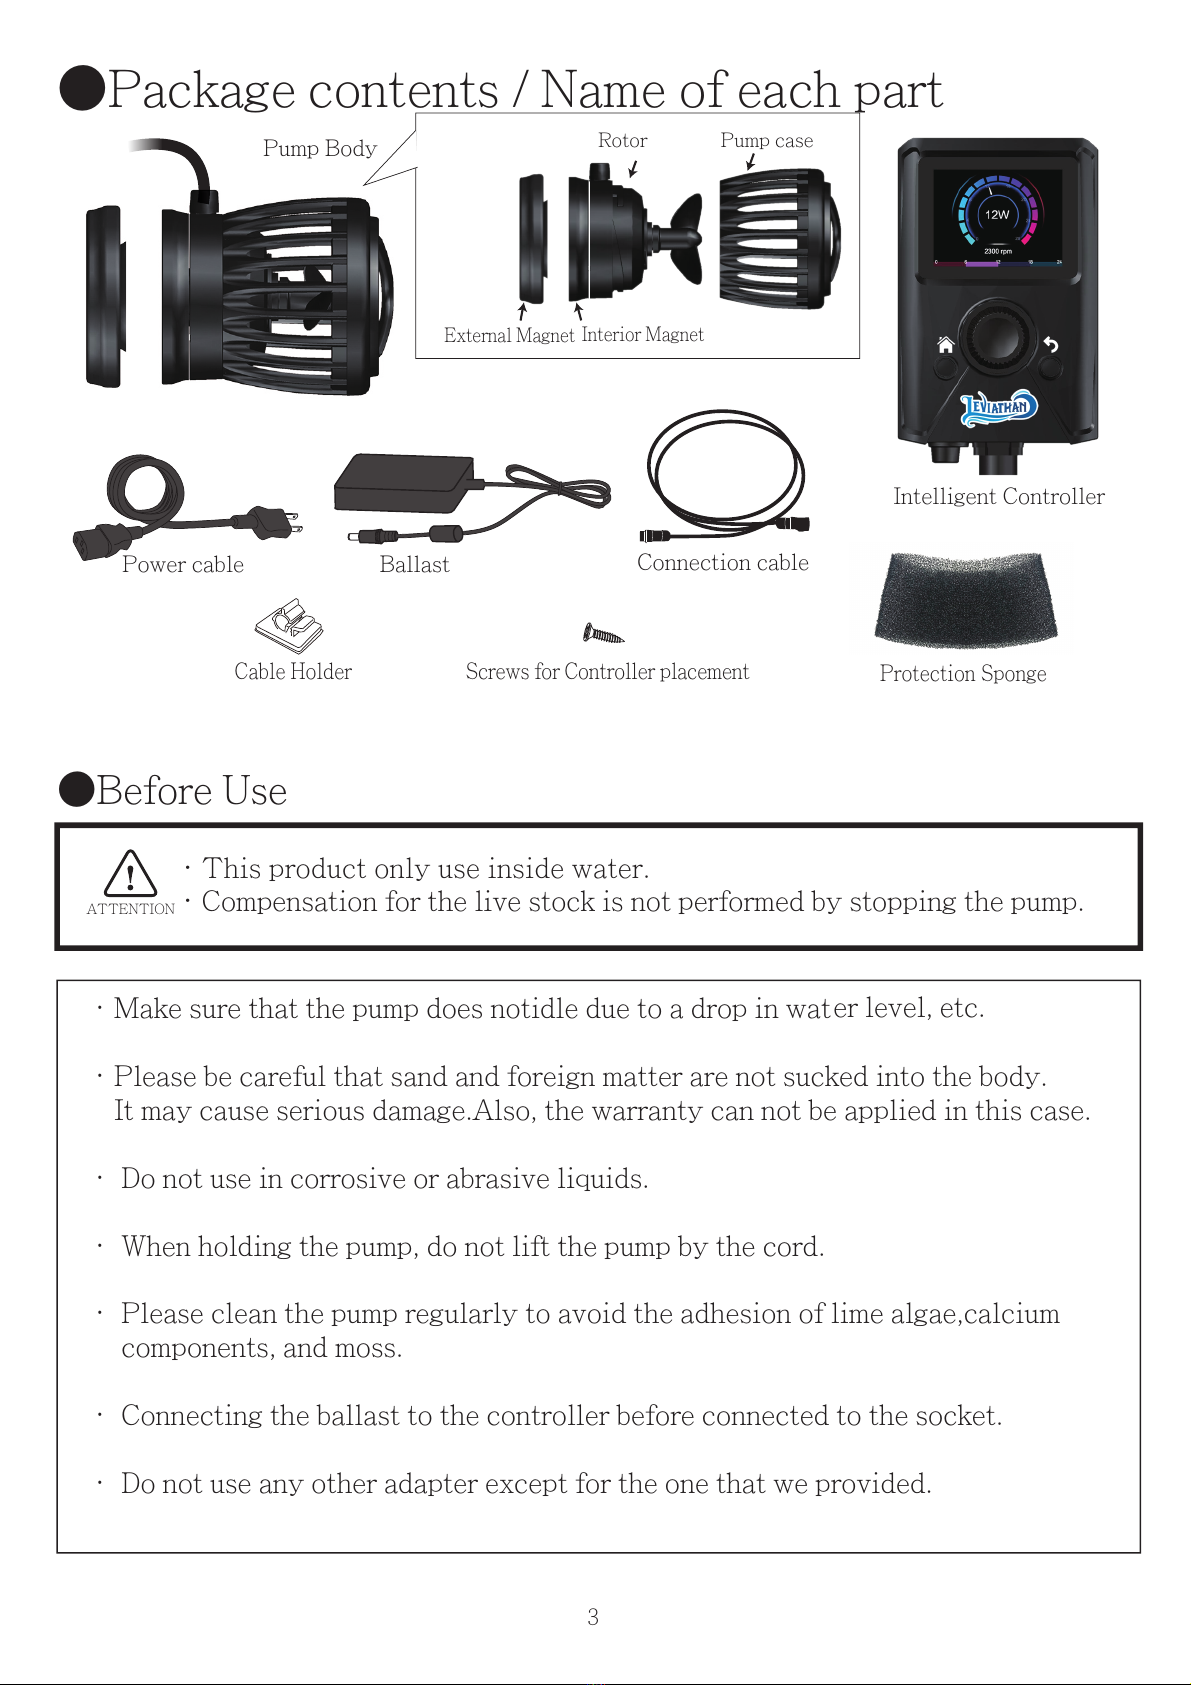
●Before Use
●Package contents / Name of each part
.Compensation for the live stock is not performed by stopping the pump.
.This product only use inside water.
External Magnet Interior Magnet
Rotor Pump case
Pump Body
Intelligent Controller
Power cable Ballast Connection cable
Cable Holder Screws for Controller placement Protection Sponge
·Make sure that the pump does notidle due to a drop in water level, etc.
·Please be careful that sand and foreign matter are not sucked into the body.
It may cause serious damage.Also, the warranty can not be applied in this case.
· Do not use in corrosive or abrasive liquids.
· When holding the pump, do not lift the pump by the cord.
· Please clean the pump regularly to avoid the adhesion of lime algae,calcium
components, and moss.
· Connecting the ballast to the controller before connected to the socket.
· Do not use any other adapter except for the one that we provided.

4
●INSTALLATION
1. Please clean the glass before you place the external magnet.
2. Place the pump in correct place and slide the external magnet
close to the internal magnet.(see ref. at Right)
3. You can take out the rotor / pump body without remove the magnet.
4. Remove the cap of connector on controller before connect to the pump.
You can use the extend cable if necessary.
Do not attach the magnet together directly since it might cause injury and demage of the glass.
If you place the pump too close to the corner of glass and it might cause noise / sound reflection
※
※
Cap
Model
Leviathan 5000
●Specification
8 0 ㎜74 ㎜
95 ㎜15 ㎜
Max.Glassthickness20mm
FLOW RATE
CAPACITY OF AQUARIUM
MAX. POWER CONSUMPTION
GLASS THICKNESS
50∼20,000 L /h
150∼2,200L
24W(±5%)
0.4W(±5%)
Max. 20mm
MIN. POWER CONSUMPTION
Do not turn on the power beforethe pump set up
correctly inside the water.

5
●Cable & Controller placement
●FLOW DIRECTION ADJUSTMENT
5.CONNECTION GRAPH
①Cable arrangement
②Controller Placement
Use the cable holder to fix the cable as your wish.
You can fix the controller with built in fix plate.
Remove the fix plate from the back of the controller.
Screw to fix the plate to the right position.
REMOVABLE
Make sure the direction is correct
CONTROLLER
POWER CORD
BALLAST
ADJUSTABLE
PUMP
ATTENTION
FOR SAFETY USE THIS PRODUCT , PLEASE CONNECT EACH PARTS IN THE CORRECT WAY LIKE
THE PICTURE ABOVE.
MAKE SURE TO SETTING UP DRILL LOOP IN EACH WIRE AND LOCK THE CONNECTOR FIRMLY.
THE PUMP WILL AUTOMATIC TURN ON IN MIN. POWER(5%) AFTER YOU CONNECTED ALL PARTS
AND THE POWER CORRECTLY.
6
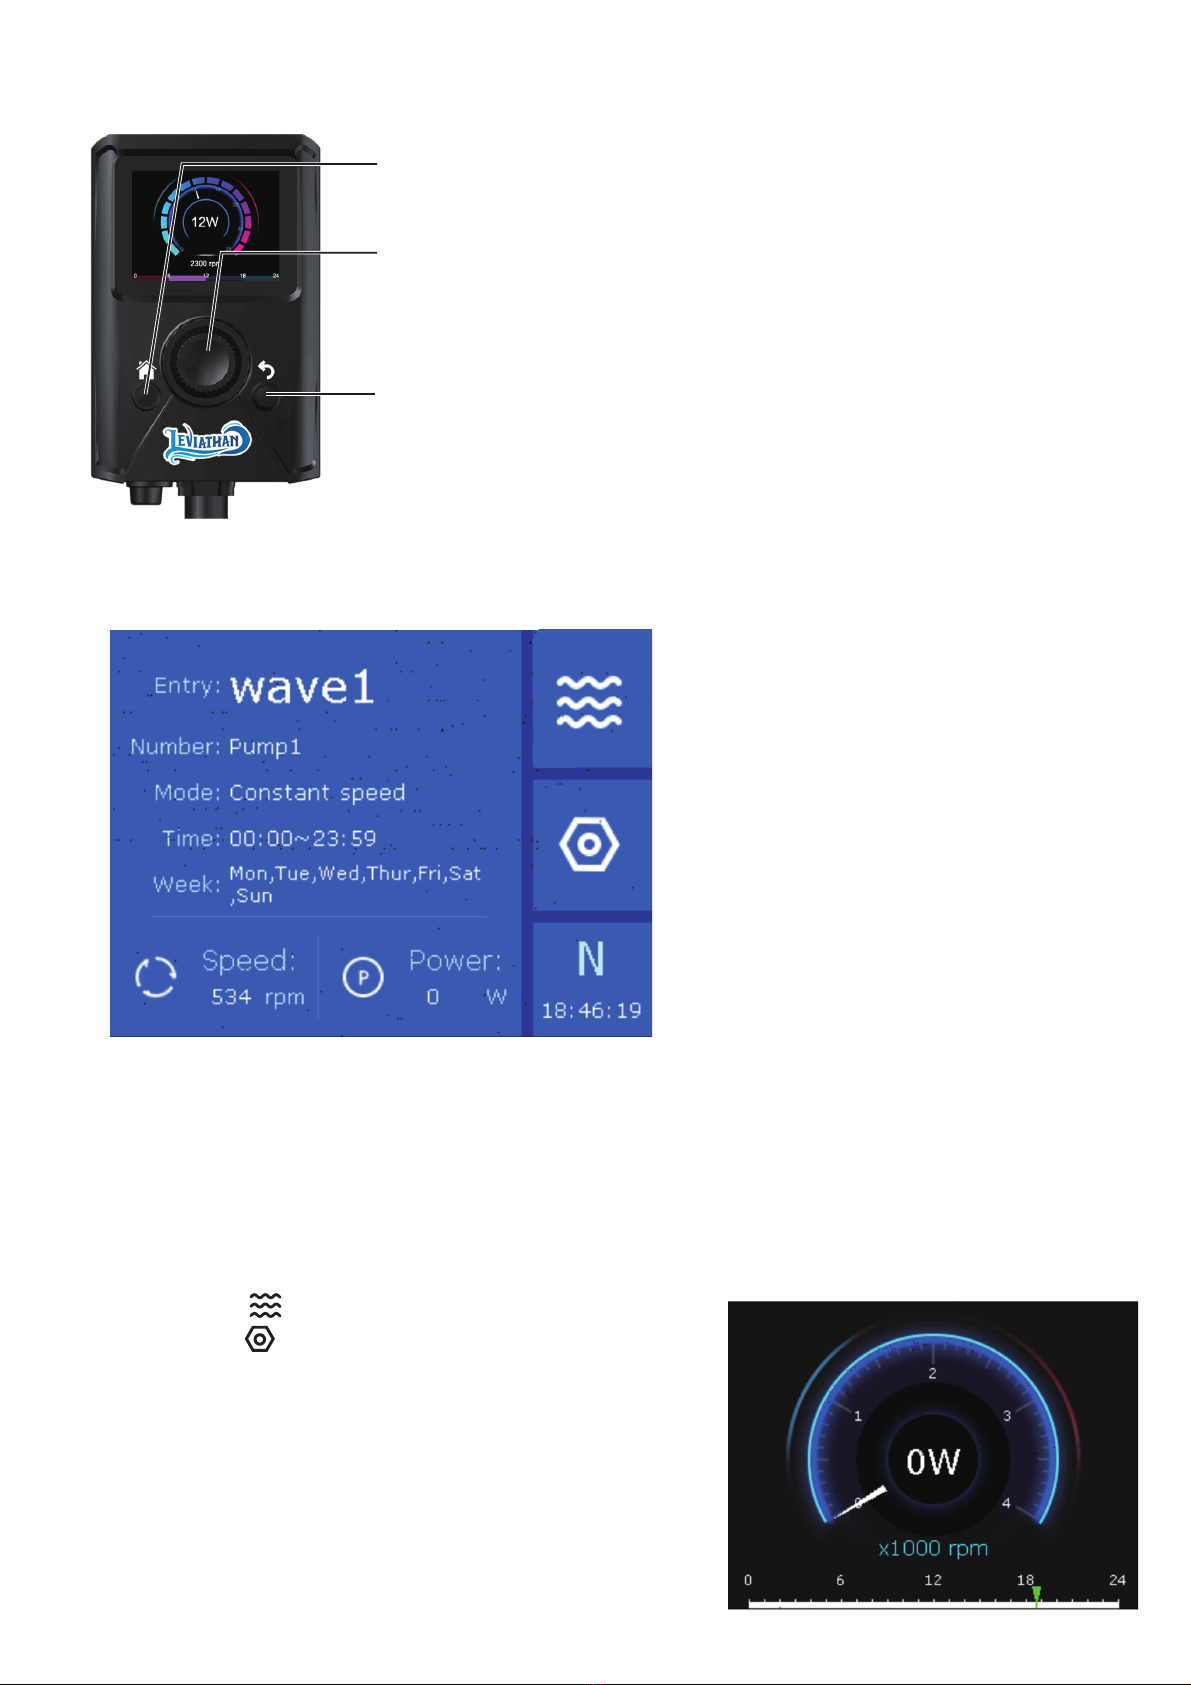
RETURN TO HOME PAGE
Entry:Current Wave schedule.(Details please check “Wave schedule setting”)
Number:Current link up pumps.
Mode:Current mode of wave setting.
Time:Current wave setting operate time period.
Week:Current wave setting operate days in a week.
Speed:Current Speed (RPM) of the pump.
Power:Current power consumption of the pump.
Wave ICON( ):
Setting wave schedule and details.
Setting ICON( ):
Advanced setting of pump and controller.
N:Current connection status.
※If left unattended for a while, the power consumption
and the speed(RPM) will be displayed on the standby screen.
.Press any button to return to the home screen.
RETURN TO LAST PAGE
●HOME
●RETURN
●CONTROLLER INTRODUCTION
●HOME SCREEN
※N = Normal Mode.(No connection with other Leviathan pumps / Standalone operation)
※M = Master Mode.(Master unit of connection with other Leviathan pumps)
※S = Slave Mode.(Master unit of connection with other Leviathan pumps)
CHOOSE THE OPTION AND
PUSH TO CONFIRM
DIAL
●

7
Setting up the wave schedule by different mode , time period and days.
You can set up as much as 16 different schedules per day.
Press the dial, WAVE1, WAVE2, WAVE3....
and the Wave settings are displayed.
(e.g.WAVE1 is working on the left picture. )
Turn on this schedule with ON /OFF option.
Status:
(Status , Mode , Time and Save will display at the interface)
1. Click on Wave ICON ( )
2.
Turn the dial to WAVE1 and press it to enter the setting interfcae.
●WAVE SCHEDULE SETTING

8
Mode:
Pumps are working with constant flow.
tnatsnoC
Simulation of strong wave like a rough sea.
Rough Sea
Tide
You can choose different wave modes.
There are 4 pre set Mode :Constant
, Rough sea , Tide ,Random.
And Customs allows you to set
up all details by advanced aquarist.
All settings are allowed to setup with
details separately.
When you select Rough Sea, you will see the interface
like the picture on the left.
You can set up the following items on this interface:
Max Speed: Maximum wave power
Min Speed: Wave minimum power
Wave length: You can set the wave intensity
interval. The shorter the speed, the more gradual
the wave strength changes.
Simulation of tide
, gradually changes strength.
When you select Tide, you will see the interface
like the pitcure on the left.
You can set up the following items on this interface:
Max. Speed: Maximum wave power
Min. Speed: Minimum wave power
Wave length: You can set the gap between the
strength of the wave. The shorter the speed, the
more gradual the wave strength changes.
When you select constant mode, you will see the interface
like the picture on the left, and you can set the power of the
flow with the Max. speed.
The graph below shows the pump's power, the
horizontal axis is the elapsed time, and the
operation of the pumps being set.

9
【Luminous Dial Ring 】
The Dial Ring will illuminous the color of your current wave pattern.
The gap between the strength and the wave
becomes a random wave.
Random
Fully custom wave pattern for advanced aqua
r
ist
Custom
Each wave schedule is available to setting up
operate time period and day.
※To keeping the Leviathan operate all day ,make sure to set up time range from 00:00 ~ 23:59.
Please do not set up the time range from 00:00 ~ 00:00, it will not have any response for your setting.
Time:
If you select Random, you will see the interface like
the picture on the left.
You can set up the following items on this interface.
Max Speed: Maximum wave power
Min Speed: Minimum wave power
If you select Random, you will see the interface like
the picture on the left.
You can set up the following items on this screen.
Max Speed: Maximum wave power
Min Speed: Minimum wave power
Rise Time: You can set the interval between the
minimum and maximum times of the wave.
Fall time: You can set the distance betweeen the
waves from the maximum time to the minimum time.
Constant (Green) , Rough Sea (Blue) , Tide (Pink) ,Random (Orange),Custom(Purple)
When you select time, you will see the interface
like the picture on the right.
Weekday: You can set days of the week that
the Wave schedule you are setting up currently.
Time range: Allows you to set the time period of
the wave schedule you are setting up currently.

10
Holding Home button for 5 seconds will start the feed mode.
Make sure to save after adjust the setting in each wave schedule .It will not have any response if
you did not save the setting.
●Setting of multiple wave schedule
●Feed mode setting
①Mode
Normal:Stand alone mode.
Master ∕ Slave:Multiple Leviathan connection.
②Wi-Fi Connect to the Wi-fi network for alert function.
①Jammed: Anything stuck the pump or jammed. System will send alert email automatically.
②Leakage of water: Water leakage warning. When there are leakage of water and the pump
too close to the surface , the RPM will raise abnormally and system will
send alert email automatically.
③Power down: Power down for more than 15 minutes.
System will send alert email automatically.
③Feed Custom Feed mode detail
Speed: Power of feed mode
Time: Leading time of feed mode
④Restore factory setting Restore factory setting
⑤Set system time Set the time
⑥Alarm email Register the E-mail address then the system will
send email alert when error / power down occur .
●Setting
Soluation of error:Solve the problem then restart the pump and controller.
● ERROR
Save:
You can set the time period and the day of the week to make the schedule of. Wave2,
Wave3... after setting up Wave1.The schedule can be set up to 16 schedule
per day(Wave1 to 16).
E.g.: If the Wave1 and Wave2 time settings conflict, the priority will follow
the first schedule .In this case , the schedule will follow Wave1.
Feed mode will start to count down for 10 minutes (you can setup time & power in setting
page) and return to normal after finished.
Holding Home button for 5 seconds will manually
terminate feed mode count down.
On the standby interface, press the home button once, then press the home button for 5 seconds
to start feed mode.
Click the Setting ICON

Leviathan can be connected up to 4 units.
【Method】
①Each leviathan is placed in aquarium.
②Click to Setting ICON , and click to Mode , assign 1 Leviathan for a Master unit
and others are setting to be Slave unit
③Leviathans will automatic connected after restart from changing Mode。
④After pumps connected in a loop , all slave unit will follow the wave schedule from Master
unit.
●Multiple Leviathan connection
●Maintenance
2.
1. Remove the sponge from the pump and wash it with tap water.
3.
Use the soft brush to remove the impeller for each part, and rinse well with tap water.
●Optional Parts
Manufacturer : Intelligent Star Technology Limited
Global Distrubitor : ZOOX AQUARIUM LIMITED
Http://www.zooxaquarium.com
Email : [email protected]om
● If you have any trouble or question, please contact the shop you purchase or contact us.
※Make sure to unplug in the power before starting to maintenance.
※Make sure you understand the structure of the pump.
※Do not use detergents or stiff sponges or brushes.
※When cleaning the power cord or outlet, clean it with a soft, dry cloth.
Please keep removeing dirty and calcium components regularly (at least once
a month) for safety use. Also, please remove dust and dirt from electrical
outlets and other place.
To remove the rotor from internal magnet , twist the rotor counterclockwise.(See. Page 3)
Back up battery module (Release on 2020)
Extension connector: Connects between the pump body and the controller to increase the convenience
of cable extension and maintenance.
Table of contents
Popular Water Pump manuals by other brands


Ribimex
Ribimex Ribiland 100QJD210-0.75 User and maintenance manual

Davey Water Products
Davey Water Products TotalFlo TF180S Installation and operating instructions

Chicago Pneumatic
Chicago Pneumatic TITAN E+ Series Operator's manual

Barmesa Pumps
Barmesa Pumps 8BSE-HADS Installation, operation & maintenance manual

Ulvac
Ulvac G-5DA instruction manual

Flotec
Flotec FP4800 Series owner's manual

Wilden
Wilden H220 Operation

Flomotion Systems
Flomotion Systems 2001H Series Installation and operation manual

Brute Force
Brute Force AC 22365 instruction manual

jurop
jurop RV360 Instructions for installation, use and maintenance manual

Ecolab
Ecolab Elados EDPL V60 user manual

Goulds
Goulds GDOC Installation and operating instructions