IntelligentAg Engage Zone Control User manual
MAINTENANCE MANUAL
Document revision: 1.2
Last revised: February 22, 2019

Engage® Zone Control Maintenance Manual
600840-000047 Page 2 of 9
Engage® Zone Control
Maintenance Manual
© 2018-19 Intelligent Agricultural Solutions All Rights Reserved.
Engage® Zone Control Maintenance Manual. All content within is copyrighted by Intelligent
Agricultural Solutions, and may not be reprinted without permission.
The content of this manual is furnished for informational use only, is subject to change without
notice, and should not be construed as a commitment by Intelligent Agricultural Solutions.
Intelligent Agricultural Solutions assumes no responsibility or liability for any errors or
inaccuracies that may appear in the content contained in this guide.
U.S. Patent Application #15/639497, and foreign patents pending. Intelligent Agricultural
Solutions, Engage® Zone Control, Intelligent Agricultural Solutions, Intelligent Ag, Intelligent Ag
Monitoring Solutions, IAS, and the IAS logo are trademarks or registered trademarks of
Intelligent Agricultural Solutions. iPad is a registered trademark of Apple Inc., registered in the
U.S. and other countries. App Store is a service mark of Apple Inc. All other trademarks are
property of their respective owner.
Intelligent Agricultural Solutions, 1810 NDSU Research Circle North, Fargo, ND 58102 USA.
Visit us on the web at www.intelligentag.com
Related Documentation
Document Number Document Title
600840-000043 Engage® Zone Control Installation Guide
600890-000059 Engage® Zone Control Operator's Guide

Engage® Zone Control Maintenance Manual
600840-000047 Page 3 of 9
WARNING
CAUTION: The Engage® Zone Control unit is heavy. Use proper precautions such as
steel toe boots and gloves. Lifting and installing the unit may require two people.
CAUTION: Unplug the bin harness from the Engage® Zone Control unit enclosure before
performing any maintenance.
CAUTION: Engage® Zone Control unit gates and cleaning tools are sharp. Use caution
when handling these components.
IMPORTANT: Read the Engage® Zone Control Installation Manual (600840-000043) before
installing the system.
IMPORTANT: Do not use an air or electric impact wrench when re-assembling any
components.
This document may have been recently updated. For current documentation, videos, and other
resources, visit www.intelligentag.com/support.

Engage® Zone Control Maintenance Manual
600840-000047 Page 4 of 9
MAINTENANCE PROCEDURES
The Engage® Zone Control unit requires periodic and end-of-season cleaning for optimal
performance. Refer to the information in this document for cleaning and storage requirements.
Tools needed
•15 mm socket, ratchet, and extension
•15 mm wrench
•Torque wrench
•¼” hex drive (for ground wire screw)
•Compressed air or shop vac
•Wire brush (such as a bore brush)
•Cleaning tool (included)
Daily Maintenance
NOTE: If you remove any components inside the enclosure, make sure that the inside of the
enclosure and the parts removed are clean before reinstalling them.
1. Open the gates through the tractor’s virtual terminal.
2. Unplug the bin harness that plugs into the Engage® Zone Control unit enclosure.
3. Clean off any dirt from the enclosure lid. Remove the pin from the latches on the sides of
the unit and undo the latches. Then, slide the lid off.
4. Use compressed air or a shop vac to remove any residue from inside the Engage® Zone
Control unit enclosure and on the ledge where the enclosure and the plate meet. Use a
wire brush or scraper to remove any remaining residue.
5. Remove the manifold cover. Blow out any residue around the gates.
6. Plug the bin harness into the Engage® Zone Control unit enclosure. Cycle the gates
open and closed through the tractor’s virtual terminal to ensure that there is no product
remaining on the gates.
Engage® Zone Control Maintenance Manual
600840-000047 Page 5 of 9
Disassembling the Engage® Zone Control Unit
TIP: Refer to the diagram on page 8 for labelled part names.
1. Cycle the gates open and closed through the tractor’s virtual terminal.
2. Unplug the bin harness that plugs into the Engage® Zone Control unit enclosure.
3. Clean off any dirt from the enclosure lid. Remove the pin from the latches on the sides of
the unit and undo the latches. Then, slide the lid off.
NOTE: Be careful not to damage the gasket when removing the lid.
4. Unplug all connections from the motor controller harness.
5. Unscrew the screw holding the ground wire to the motor mount and remove the ground
wire.
IMPORTANT: Before removing the motor mounts, make note of the serial number of
each motor controller and if it is installed on the left side or right side of the enclosure.
The motor controllers must be reinstalled in their original position.
6. Remove the 2 bolts holding each motor mount to the enclosure and remove the motor
mounts.
CAUTION:
Engage® Zone Control unit gates are sharp. Use caution when handling
gates.
7. Pull the gates toward the back of the enclosure and remove them. Do not pry the gates
out.
End-of-Season/As-Needed Maintenance
1. Disassemble the Engage® Zone Control unit by following the instructions in the previous
section.
2. Use compressed air or a shop vac to remove any residue inside the enclosure and on
the end stop (see diagram on page 8). Use a wire brush or scraper to get any remaining
residue.
3. Clean residue from the gates using a wire brush or scraper.
4. Insert the provided cleaning tool through each gate slot. Use the tool to scrape the sides
and the end stop to remove any residue or debris buildup. Thoroughly clean the end
stop to ensure proper functioning of the gates.
5. Use compressed air or a shop vac to clean out any additional dirt that was loosened in
the previous step.

Engage® Zone Control Maintenance Manual
600840-000047 Page 6 of 9
BEFORE STORAGE:
Reassembling the Engage® Zone Control Unit
After cleaning, follow the suggestions below for storing your system, depending on if you’ll be
storing your air seeder indoors or outdoors.
If you store your air seeder indoors:
1. Push the gates back into the gate slots with the two tabs on the gates facing up.
2. Re-position the motor mounts in their original position in the enclosure (left or right side
of the enclosure).
Ensure that the nut holding clips rest on top of the short side of the gates (as seen in the
diagram on page 8) and that the magnet is facing up. You can move the nut holding clips
to align with the gates, or pull the gates out to meet the position of the nut holding clips.
TIP: It is easier to align the nut holding clips if you position the motor mount at an angle
and align the nut holders individually from one side to the other.
IMPORTANT: Use care when reinstalling the motors so that you do not bend the lead
screws.
3. Tighten the 2 bolts on the motor mounts. Torque to 31 ft-lbs.
4. Re-attach the ground wire to the motor mount, making sure that the serrated tooth
washer is between the ring terminal and the motor mount.
5. Plug all connections of the motor controller harness back into their respective
connections. Refer to the motor controller harness connections diagram at the end of
this document.
NOTE: Ensure that that harness is routed toward the back of the enclosure.
6. Place the lid back on the enclosure, but do not latch the lid until you are ready to use
the system again next season.
7. Plug the bin harness into the Engage® Zone Control unit enclosure.
8. Cycle the gates open and closed through the tractor’s virtual terminal.
If you store your air seeder outdoors:
1. Do not re-install the gates or motor mounts. Place the lid back on the enclosure and
secure the lid with the latch.
2. Store the gates and motor mounts indoors or in a climate-controlled area to prevent
condensation on electrical components. Ensure that the motor mounts are protected so
that the lead screws do not get bent.
IMPORTANT: At the beginning of the next season, perform the steps on the next page
before using the system.
Engage® Zone Control Maintenance Manual
600840-000047 Page 7 of 9
AFTER STORAGE:
Preparing the Engage® Zone Control Unit for Use
If you stored your air seeder indoors:
Secure the lid with the latch. The unit is now ready for use.
If you stored your air seeder outdoors:
1. Clean off any dirt from the enclosure lid. Remove the pin from the latches on the sides of
the unit and undo the latches. Then, slide the lid off.
NOTE: Be careful not to damage the gasket when removing the lid.
CAUTION:
Engage® Zone Control unit gates are sharp. Use caution when handling
gates.
2. Verify that the gates are clean. Push the gates back into the gate slots with the two tabs
on the gates facing up.
3. Re-position the motor mounts in their original position in the enclosure (left or right side
of the enclosure).
Ensure that the nut holding clips rest on top of the short side of the gates (as seen in the
diagram on page 8) and that the magnet is facing up. You can move the nut holding clips
to align with the gates, or pull the gates out to meet the position of the nut holding clips.
TIP: It is easier to align the nut holding clips if you position the motor mount at an angle
and align the nut holders individually from one side to the other.
4. Reinstall the motor mounts and tighten the 2 bolts. Torque to 31 ft-lbs. Ensure that the
motor mounts are installed in their original position (left or right side of the
enclosure, as noted in Section 2).
IMPORTANT: Use care when reinstalling the motors so that you do not bend the lead
screws.
5. Re-attach the ground wire to the motor mount, making sure that the serrated tooth
washer is between the ring terminal and the motor mount.
6. Plug all connections of the motor controller harness back into their respective
connections. Refer to the motor controller harness connections diagram at the end of
this document.
NOTE: Ensure that that harness is routed toward the back of the enclosure.
7. Place the lid back on the enclosure and latch the lid.
8. Plug the bin harness into the Engage® Zone Control unit enclosure.
9. Cycle the gates open and closed through the tractor’s virtual terminal.
Engage® Zone Control Maintenance Manual
600840-000047 Page 8 of 9
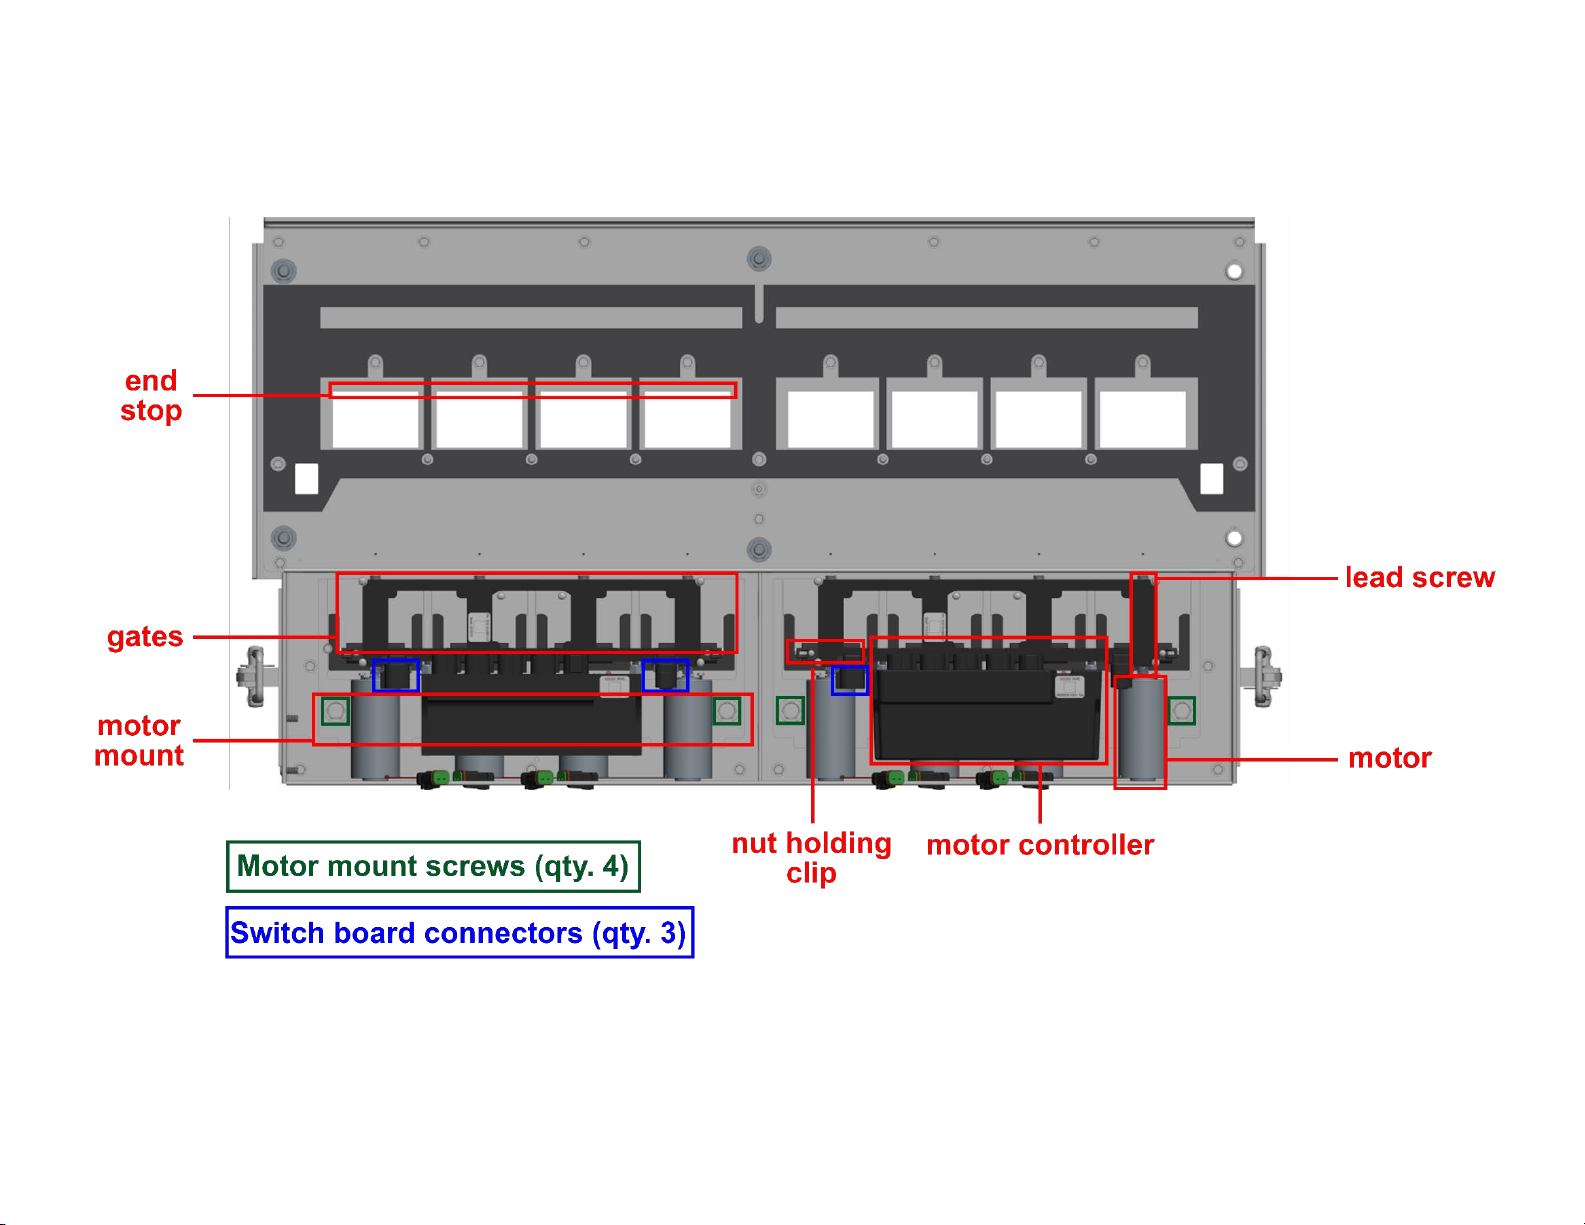
ENGAGE® ZONE CONTROL UNIT COMPONENTS

Engage® Zone Control Maintenance Manual
600840-000047 Page 9 of 9
MOTOR CONTROLLER HARNESS CONNECTIONS
Other manuals for Engage Zone Control
3
Table of contents
Other IntelligentAg Farm Equipment manuals


