IntelliLeash Products TC-1000 User manual
Soft Touch Training Collar
USER MANUAL
Model: TC-1000
• RechargeableElectronicRemoteTrainingCollar
• 1,000ft.Range
• Waterproof
• 201TotalSettingsofVibration&Shock
• ToneMode
• LCDDisplay
IMPORTANT SAFETY NOTES
WARNINGS
Not for aggressive dogs. Do not use on dogs under 15 pounds. DO NOT USE this
product if your dog is aggressive or prone to aggressive behavior. Aggressive dogs
can cause severe injury and even death to their owner and others. If you are unsure
whether this product is appropriate for your dog, please consult your veterinarian or
certified trainer.
The Soft Touch Training Collar MUST be used only for healthy dogs. We recommend
you take your dog to a veterinarian before using the collar if he is not in good health.
Improper use of training collars, or use on pets with health problems, can cause
severe injury to animals or humans wearing the collar / receiver. It is strongly recom-
mended that you:
• Keepthisdeviceawayfromsmallchildren
• Obtainadvicefromacertiedpettrainer
• Alwaysbeginusingthelightestcorrectionsettingsthatachievethe
desired results
• Bekeenlyawareofanyprolongedorunusualirritation/suering
from you pet
• Ifinjuryoccurs,oryourpetbecomesdisorientedoraggressive,immediately
discontinue use and take your pet to a veterinarian if necessary.
CAUTION
Risk of skin damage. Please read instructions below carefully. A properly adjusted
collar is important, because a loose collar may cause inconsistent performance.
Wearing a collar for a long time or wearing a tight collar may cause skin damage, i.e.
skin irritation or sores. These steps will help you keep your pet safe and comfortable.
It is important to continue daily checks of the contact area. If irritation or sores are
found, discontinue use of the collar until the skin recovers.
ADDITIONAL CAUTIONS
• Pleasefollowallinstructionsinthismanual.
• Avoidleavingthetrainingcollaronthedogformorethan12hoursperday.
• Re-positionthetrainingcollaronthepet’sneckevery1to2hours.
• Checkthetrainingcollartopreventexcessivepressure.
• Neverconnectaleash,rope,orcabletothesofttouchcollar,oritwillcause
excessivepressure.
• Washthedog’sneckandthemetalcontactweeklywithadampcloth.
• Ifarashorsoreisfound,stopusingthecollaruntiltheskinrecovers.
— 1 —
Tips: Press buttonfor2secondstoturnontheremote.Pressbutton
for3secondstoturnotheremote.
Tips: 10secondswithoutoperating,theback-lightturnsoand2minuteslater
LCDdisplayturnso.
REMOTE Transmitter)
—2— — 3 —
Power On / Off Button:Toturnon,pressthepowerbuttonfor2seconds
(the receiver will vibrate).
Toturnreceivero,pressthepowerbuttonfor3secondsuntilthereceiverbeeps.
Charging: It takes 3 to 4 hours to charge fully.
Tips:
1. When the Receiver is low power, the LED indicator will blink slowly.
2. Whenthesystemisworkingorfullycharged:theLEDindicatorwillbe
continuously illuminated.
3. The Receiver will go to Power Saving Mode after one minute of no movement.
When the receiver is in power saving mode, correction signals sent from the
remote to the receiver are ignored.
RECEIVER attached to collar
SETUP PROCEDURES
1. Charge the Remote and Receiver.
Please fully charge the Remote and Receiver
before you use the products.
Remote: When plugged in the red light
will be flashing until fully charged. When fully
charged the red light will remain on.
Receiver: When plugged in the green light
will be flashing until fully charged. When fully
charged the green light will remain on.
It takes three to four hours to charge fully.
Charging Port
LED Indicator
Power On / Off
Pairing Button

— 4 —
SETUP PROCEDURES cont.) A.
C
2. Pair Remote and Receiver
A. First turn on the remote by pressing and holding the
modebuttonfor2seconds.
B. PresstheA/B
A
B
button until the letter A is displayed.
(Ifyouarepairingasecondreceiver,selectB.)
C. To place the receiver in pairing mode, start with the
receiverturnedo.Pressandholdthepowerbutton
untilitrstvibratesANDthenbeeps.Onceitbeeps,
theLEDlightonthereceiver(nexttothepower
button) will begin flashing, indicating it is in the
pairing mode.
D. Press and hold the signal send button
until the receiver beeps. This completes
the pairing.
Pairing must be completed in 10 seconds
orthereceiverwillexitpairingmodeand
return to the previous condition.
Tips:
• Ifyouhavepurchasedasecondcollar,selectchannelBandrepeatthestepsto
pair the second remote.
• Ifyoucannotpairthedevicesuccessfully,itmaybecausedbysignal
interference. Please change to another location away from other electronics
and try again.
• TheRemoteandReceiverwillgointoSleepModeifyoudon’tuseitfor
two minutes. Any movement on the Receiver will activate the collar, and
any button you press on the Remote will activate the Remote.
• Ifyouhavetworeceiverspairedandyouforgetwhichoneispairedtoeach
channel, press the mode button until the small light bulb symbol on the
upper left part of the LCD display is selected. Pressing and holding the
signal send button will cause the LED indicator on the receiver matching
thechannel(AorB)selectedontheremote.
D.
3. Test Pairing and modes:
A. Confirm that both the remote and receiver are turned on and charged.
SelectchannelAorBdependingonwhichreceiveryouaretestingforproper
pairing:
C.
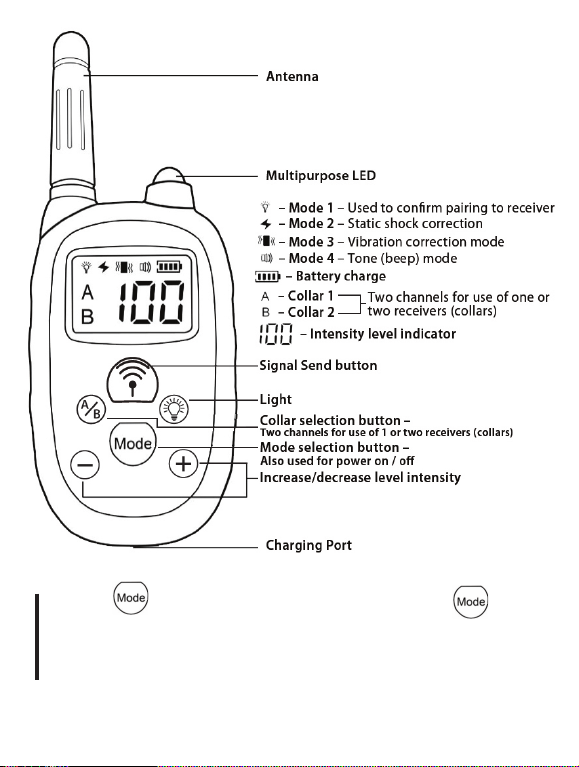
Tone (Beep) Mode: Press the mode button on the remote until the
speaker is illuminated indicating the tone mode is active. Pressing the signal
send button should cause the remote to beep until the button is released.
D.
Vibration Mode: Press the mode button on the remote until the
vibration signal is illuminated indicating the vibration mode is active.
Pressing the signal send should cause the receiver to vibrate. To test the levels,
press the + button to increase the intensity level (100 is the highest) and
the – button to decrease the intensity (001 is the lowest intensity level).
E.
Static Shock Mode: Press the mode button on the
remote until the static signal is illuminated indicating
the static mode is active. Place the static tester over
the two prongs (remove the rubber tips from the
prongs if in use for the test) and hold in place.
Pressing the signal send button should cause
the light on the tester to illuminate.
To test the levels, press the + button to increase the intensity level
(100 is the highest) and the – button to decrease the intensity (001 is the
lowest intensity level).
F. Pairing confirmation mode: Press the mode button on the remote until
the light bulb is illuminated indicating the pairing confirmation mode is active
PressingandholdingthesignalsendshouldcausetheLEDnexttothe
power button on the receiver to flash until released.
4. Setting up the Collar:
• Therearetwosetsofmetalcontactsprovided—onelongandoneshort.
If your dog has long, thick hair, screw the long contacts onto the collar. If your
dog has short hair, use the shorter prongs. Tighten snugly with an adjustable
wrench, being careful not over-tighten.
• Optionalrubbertipcoversmaybeinsertedoverthesteeltipsforadditional
comfort. There is a slight decrease to the static transfer, but not substantial.
5. Fit the Collar Receiver
Propertofthecollarisimportantforeectivetraining.Thecontactpointsmust
havedirectcontactwithyourpet’sskin.
SETUP PROCEDURES cont.)
— 5 — — 6 —
Please follow these steps:
• Makesurethatthereceiveristurnedo.
• Properttingisbestachievedwithyourdogstandingcomfortably(3A).
• PlacetheReceiverCollaronyourpet’sneckashighupasitwill
comfortably rest.
– Centerthecontactpointsunderneathyourpet’sneck,inthecenter(3B).
–
The strap should be adjusted snug enough so the contacts touch the skin but
withenoughslacktoputonengerbetweenthecollarandthedog’sneck.
– Thecollarshouldtsnugly.Butbesureitislooseenoughtoallowone
ngerspacebetweenthestrapandyourpet’sneck(3C).
• Oncethecollarhasbeenproperlytted,youmaytrimtheexcesslength,being
carefultoleaveenoughextralengthforanticipatedgrowthofyourpet.
Tips:
• Sometimesyouneedtotrimthehairaroundthecontactpointtomakesure
thatcontacttouchesdog’sneck.
• DONOTshavethepet’sneckasthismayincreasetheriskofskinirritation.
Check the installation again as your pet becomes more comfortable with
the collar.
6. Training Tips:
A. If possible, seek training advise from a certified trainer.
B.Alwaysusetheleastamountofcorrectionrequiredtoaectyourdog’s
behavior positively.
C. There are three basic“correction” modes:
1. The most gentle correction mode is the tone mode. Some dogs respond to
thetonemodeonly.Whentrainingfortheothermodes,it’srecommended
thatyoualwaysrstsendatonebeforeastrongerstimulation.Overtime,
your dog may reply to the tone immediately to avoid the stronger correc-
tion stimuli. The tone volume can not be adjusted with the + or – buttons.
2. Thenextlevelupforcorrectionstimuliisthevibration mode. When this
mode is selected, pressing and holding the signal send button will cause
thereceivertovibrateuntilthebuttonisreleased,butforamaximumof
10 seconds. When in this mode, the intensity level can be adjusted from
1 to 100, with 100 being the highest intensity.
3. The strongest level of correction stimuli is the static correction mode.
When in this mode, pressing the signal send button will cause the receiver
to send static shocks between the two prongs on the receiver. The shock,
similar to the stimulation you get when rubbing your socks on the carpet
and touching a metal object. The intensity can be adjusted between 1 and
100, with 100 being the strongest. The static shocks will continue as long
asyouholdthesignalsendbutton,butforamaximumof10seconds
D. To test for the proper setting on each of the vibration or static mode, begin
with a low level setting between 5 and 10. When your dog is distracted, press
the signal send button and watch for a reaction. Gradually increase the setting
and retry when the dog is distracted. When you have the correct setting, you
willnoticethatthecorrectiongetsyourdog’sattention,butyoushouldn’tsee
obvious pain or discomfort that persists after the correction.
E. If you always use the tone before a stronger correction, eventually your dog
should respond to the tone without having to use a stronger correction.
7. FREQUENTLY ASKED QUESTIONS
1. Is the Receiver Collar waterproof? Yes, the Receiver is fully waterproof.
2. Is the Remote waterproof? No, the Remote must be kept away from water.
3.
How long can I continuously deliver Vibration or Static Shock to my pet?
The maximum amount of time you can deliver the Vibration or Static Shock to
your dog continuously is 10 seconds. And then the remote will go to Protection
Mode.
4. What should I do if my dog’s neck becomes red and irritated? Stop
using the product immediately for at least 48 hours. If the condition persists
beyond 48 hours, please consult your veterinarian.
5.
Can I attach a leash to the Receiver Collar?
No, this can result in the contact
points touching tightly your dog’s neck. Use a separate collar when needed.
6. When should I recharge the Remote and Receiver?
Remote: The low battery symbol will appear at the bottom of the LCD screen.
ReceiverCollar: The green LED will be blinking slowly when the power is low.
Manufacturedby
IntelliLeash Products, Inc.
Joliet, IL 60431 www.intellileash.com
© copyright IntelliLeash Products
Press and Hold 5 seconds
(Vibrate then Beep)
Table of contents


