Intermedia Polycom VVX 400 User manual

Polycom VVX
400/410 DeskPhone
Owner’s ManualV.3
1

1INTRODUCTION.....................................................................................................................................4
Using this Document Notational conventions.......................................................................................... 4
Typographical conventions ............................................................................................................................. 4
Special messages............................................................................................................................................ 4
Definition ........................................................................................................................................................ 4
Basic Requirements........................................................................................................................................ 5
2USING YOUR HOSTED PBX PHONESYSTEM .............................................................................................7
System Description ........................................................................................................................................ 7
Getting Started............................................................................................................................................... 7
Polycom VVX400/410 Desk Phones Introduction to your Polycom Desk Phone ........................................... 7
Before You Use Your Phone............................................................................................................................ 8
Interacting with your Polycom VVX400/410 Desk Phones .......................................................................... 9
Screen Saver ................................................................................................................................................. 10
The Screen Saver displays: ............................................................................................................................ 10
Information Screen ...................................................................................................................................... 10
Main Menu Screen: ..................................................................................................................................... 11
Adjusting the Volume................................................................................................................................... 12
3DESK PHONE– BASIC CALLFEATURES ...................................................................................................13
Placing Calls .................................................................................................................................................. 13
To place a call using the handset: ................................................................................................................ 13
To place a call using Hands-Free Speakerphone mode: .............................................................................. 14
To place a call using the headset: ................................................................................................................ 14
Placing a second call .................................................................................................................................... 15
Answering Calls ............................................................................................................................................ 16
To answer a call using the handset:............................................................................................................. 16
To answer a call using Hands-Free Speakerphone mode:........................................................................... 16
To answer a call using the headset: ............................................................................................................. 17
Using Automatic Answer:............................................................................................................................. 17
Inbound Caller ID ......................................................................................................................................... 18
Ending Calls .................................................................................................................................................. 18
Forwarding Calls........................................................................................................................................... 18
Call Management FeaturesCall Hold ........................................................................................................... 22
Conferencing Calls........................................................................................................................................ 23
Transferring Calls .......................................................................................................................................... 25
Note
.............................................................................................................................................................. 27
Call Park........................................................................................................................................................ 27
Paging (Intercom)......................................................................................................................................... 28
Redial ............................................................................................................................................................ 28
Mute ............................................................................................................................................................. 29
Directed Call Pickup ...................................................................................................................................... 29
4MANAGING INCOMINGCALLS .............................................................................................................31
Rejecting Calls .............................................................................................................................................. 31
Diverting Calls............................................................................................................................................... 31
5USING VOICEMAIL ................................................................................................................................32
Setting up the voicemail box for the first time ........................................................................................... 32
Retrieving messages from your Desk Phone ............................................................................................... 32
Retrieving messages when you are away from the office .......................................................................... 33
Returning a Call ............................................................................................................................................ 33
Change your Voicemail PIN .......................................................................................................................... 33
Record a Personal Greeting via the Phone.................................................................................................. 33
Forward Voicemail Messages via the Phone ............................................................................................... 34
Logging into your Voicemail Box via the Web ............................................................................................. 34
Retrieving messages via the Web ................................................................................................................ 34
Forward Voicemail Messages via the Web .................................................................................................. 35
Voicemail Notification via Email .................................................................................................................. 37
To Create a Voicemail Group ....................................................................................................................... 38
2
Call Recording ............................................................................................................................................... 30

Change the Number of Rings Before Voicemail Picks Up............................................................................ 39
6CALL LISTS ANDDIRECTORIES ..............................................................................................................40
Managing Call Lists....................................................................................................................................... 40
Managing Contacts ...................................................................................................................................... 41
Adding Contacts Manually........................................................................................................................... 41
Adding Contacts From Call Lists ................................................................................................................... 42
Editing Contacts ........................................................................................................................................... 42
Deleting Contacts ......................................................................................................................................... 43
Placing Calls to Contacts .............................................................................................................................. 43
Searching for Contacts................................................................................................................................. 43
7CUSTOMIZING YOURPHONE ...............................................................................................................44
Configuring Basic Settings............................................................................................................................ 44
Changing the Appearance of Time and Date ............................................................................................... 44
To configure the time and date formats: .................................................................................................... 44
Changing the Backlight Intensity.................................................................................................................. 45
To modify the backlight intensity: ............................................................................................................... 46
Enabling the Headset Memory Mode ......................................................................................................... 46
Selecting the Correct Headset for Electronic Hookswitch .......................................................................... 47
To select a headset that supports electronic hookswitch: ...................................................................... 47
Selecting the Ring Type................................................................................................................................ 47
To change the incoming ring type:............................................................................................................... 47
Changing the Language................................................................................................................................ 47
8INSTALLATIONOVERVIEW ...................................................................................................................49
Before you Begin Your Installation............................................................................................................... 49
Assigning Extension Numbers and Phone Numbers to Phones .................................................................. 51
Understanding Extensions and Lines ........................................................................................................... 51
9INSTALLING YOUR HOSTEDPBX ...........................................................................................................52
Installing Desk Phones ................................................................................................................................. 52
Option 1: Connect Desk Phones using your existing data network ............................................................ 52
Option 2: Connect Desk phones using your existing data network thenconnect the phones to your
computer ...................................................................................................................................................... 53
Installing the Desk Phone Wirelessly ........................................................................................................... 54
Step 1) Installing the Wireless Transmitter.................................................................................................. 54
Step 2) Connect phones wirelessly (within 40’) using the WirelessAdapter .............................................. 54
Activating the Service .................................................................................................................................. 55
Conformance ................................................................................................................................................ 57
Important Safety instructions...................................................................................................................... 57
FCC Information ........................................................................................................................................... 58
Customer Owned Coin/Credit Card Phones ................................................................................................ 58
Data Equipment ........................................................................................................................................... 59
Systems......................................................................................................................................................... 59
Automatic Dialers......................................................................................................................................... 59
Toll Restriction and Least Cost Routing Equipment .................................................................................... 59
Equal Access Requirements ......................................................................................................................... 59
Electrical Safety Advisory ............................................................................................................................. 59
Radio Interference ....................................................................................................................................... 59
RF Radiation Exposure ................................................................................................................................. 60
Modifications................................................................................................................................................ 60
3

1 Introduction
CongratulationsonpurchasingtheIntermediaHostedPBXphone
system and service. Youwill now be ableto share your phone
connectionbetweenfixed &wirelesshandsetsandacrossmultiple
locationsusingthelatest in‘VoiceoverIP’services.
This User Guide will show you how tosetup and use your new
PBX phone system andservice.
Using this Document
Notational conventions
Acronyms are defined the first time they appear in the text. The
term LAN refers to a group of Ethernet-connected computers at
onesite.
Typographical conventions
Italictext is usedforitems you select from menus and drop-down
listsandthenames of displayedwebpages.
Boldtext is usedfortextstringsthat you type when prompted by
the program andtoemphasizeimportantpoints.
Special messages
This document uses thefollowingiconstodrawyourattentionto
specificinstructionsorexplanations.
Providesclarifyingornon-essentialinformationonthecurrent
topic.
Definition
WARNING
Explainsterms oracronymsthat maybe unfamiliarto many
readers.
Providesmessagesofhighimportance,includingmessages
relatingtopersonalsafety orsystem integrity.
4

Basic Requirements
The Hosted PBX phone system is designed to use your existing
broadband data connection as well astheexisting data wiringin
your office. Where you don’t have data wiring, you may use the
optionalWirelessTransmitterand WirelessAdapters toconnect
DeskPhoneswirelessly.
In order to use all the features of the Hosted PBX phone system
and service,youmust havethefollowing:
•
BroadbandInternetaccess
•
Atleast one free port on yourrouter or modem/router
•
Your router must be set to DHCP
5

2 Using Your Hosted PBX phonesystem
System Description
TheHosted phonesystem supportsupto100phones
•
Youcan have as few as one phone at an address
•
Cordlessphonescanbe usedinconjunctionwith Desk
Phones or can be installed standalone
•
ThroughyourAdmin Portal,youcanviewinformationand
make changes to phonesystem
Getting Started
This section of your Owner’s Manual is your guideto usingthe PBX
phone system andits features.Italso explains how toprogram system
settings for your Desk Phones.
Polycom VVX400/410 Desk Phones
Introduction to your Polycom Desk
Phone
The Polycom VVX400/410 Desk Phone provides a powerful, yet
flexibleIPcommunicationssolution,delivering excellentvoicequality.
The high-resolutiongraphic display suppliescontentfor call
information, directory access,andsystem status.Thephones support
advancedfunctionalityincludingmultiplecall appearances,HTTPS
security,anda suite ofbusinessphonefeatures.
Somesystem settingsare programmedthrough yourAdminPortal
website whileothersareprogrammedthroughthephone.
7
Before You Use Your Phone
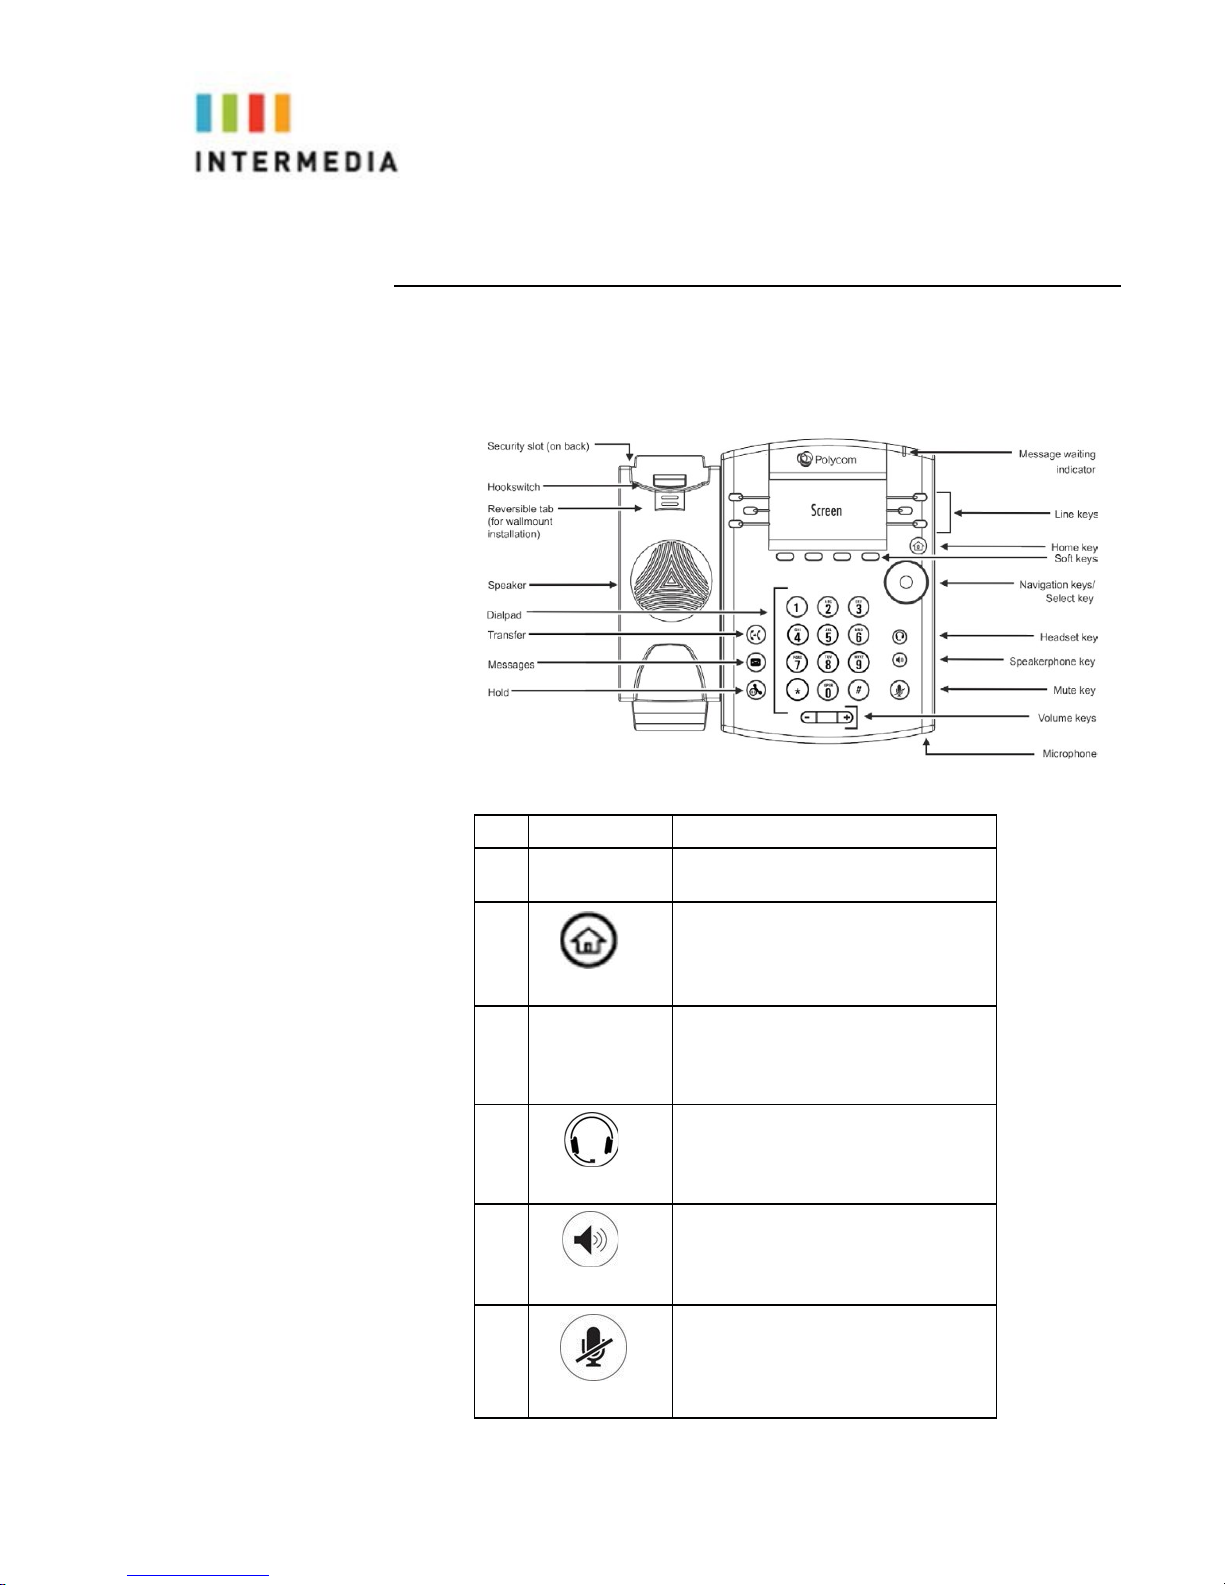
Theimagebelow and tabledescribethevarious featurebuttons of
your phone.
Button
Description
1Voicemail
Indicator
Flashing redlight indicatesthere isa
voicemailonthe phone.
2
The home key returns you tothe
Home
Screenofthe phone.Pressing ittwice
returnsyou tothe idlescreen.
3
FullColor
TouchScreen
ColorTouchScreen.Touchsensitive,
full color screen that allows youto
Select to highlight andselect,orscroll
using up down left andright
4
Headset Key- Light is green withthe
use of an analog headset and Blue
whenusing a USBheadset.
5
SpeakerphoneKey–Glowsgreen
when inuse.
6
MuteKey- Glows redwhen in use.
8

7
Volume up and down key
8
Microphone
Transmitssound without using the
handset, this is an audio input device.
9
Speaker
Transmits sound without usingthe
handset, this isfor audio output.
10
DialPad
Allows entery of numbers, letters and
other characters, also allows for selec-
tion of numbered menuitems.
11
Security Slot
Allows forphysically locking the
phonedown with the use of a laptop
cablelock.
Interacting with your Polycom VVX400/410 Desk Phones
This section containsinformationontheterms usedwheninteracting with
yournewPolycom VVX400/410 Desk Phone.
Press:
Depress and release a button on thephone.
Highlight:
Usethedirectionalpadtochoosewhichiteminagivenscreenyou
wishtomodify. Anitemthatis“highlighted”willstandoutfromthe rest with its
color,intensity,ortone.
Select:
Pressthebuttoninthecenterofthedirectionalpadtoperformanactionon
thecurrenthighlighteditem.
MenuNavigation:
Selectingmenus and submenus to access settings and
information.
Scrolling:
Using the directional pad to navigate a list.
Dial Pad:
Thealpha/numeric buttonsontheface of thetelephone. (See
Beforeyou useyourphonefordetails.)
Buttons:
Physicalbuttonslocatedonthephone.
Soft-keys: The four buttons located immediately underneath the screen. Their
current function is displayed in the corresponding box at the bottom of the
screen. Not all soft-keys will have a function in everyscreen.
In this document, references to those keys will have the format “[Function]key.”
For example, on the idle screen, the far left soft-key says “New Call” aboveit.
To generate a dial tone from the idle screen, press the New Call key.
9

Screen Saver
The Screen Saver automatically displays when the phone has been idle for60
seconds.
The Screen Saver displays:
•
Your Extension Number
•
The Company/Enterprise name we have on file
Your phone is still fully functional. To disable the lock screen simply start dialinga
number, press the home button, or pick up thehandset.
Information Screen
The displayscreen of yourphone provides you with a host ofimportant
informationelements. This screen is alsoreferredtoas the
idle screen
.
Thetoplineofthe screen displays:
•
Popuptext
•
Do Not Disturbsymbol
•
Missed call text or second incoming caller display
•
Prompttext (for example, “Enter number”)
•
Time and datetext
•
Voicemail and missed call indicators
•
New CallOption
•
ForwardOption
•DND/Do Not Disturb Option
The maincontent area of the screen displays the phone number as-
signedto the phone as well as your company name. As a call comes in,
thisareadisplayscallerinformation.
10

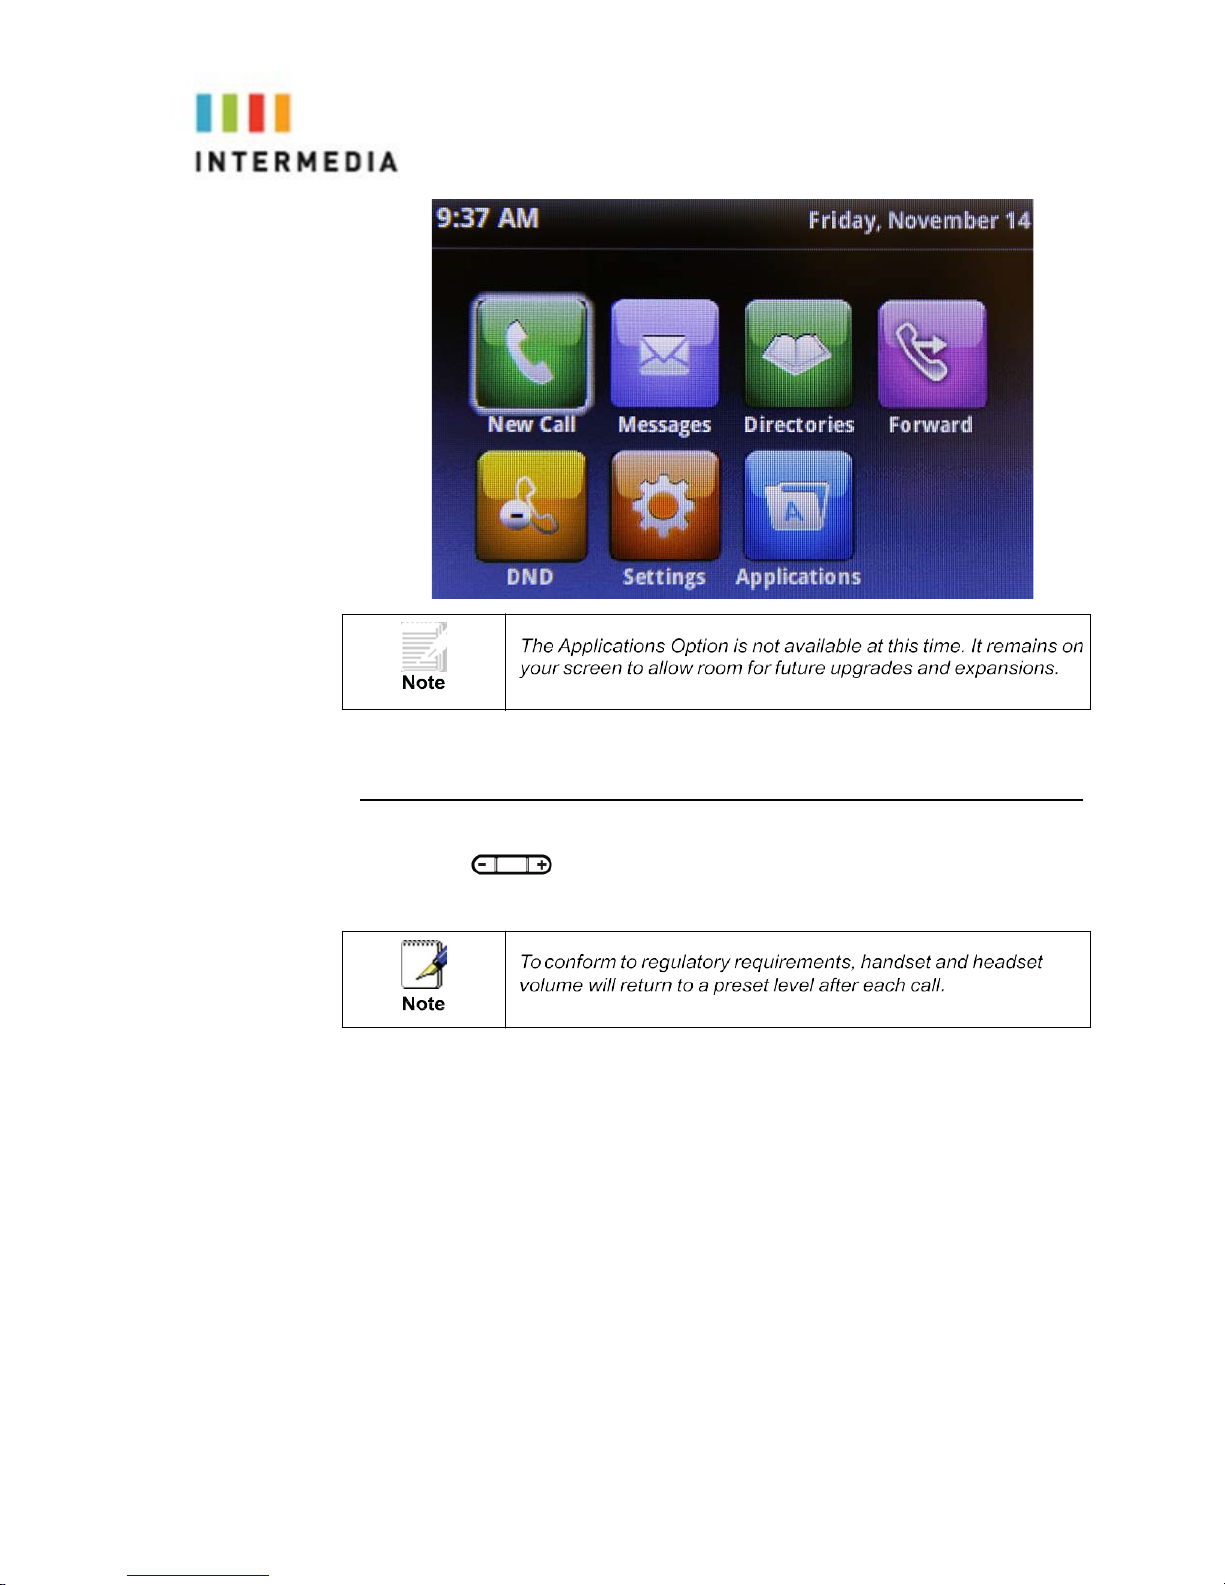
Main Menu Screen:
This screen isthe first point for more menu selections. Youcan reach this
menu atanytime bypressing .
and
11
Adjusting the Volume
Press
to adjust receiver volume during a call. Pressing these
keys in the idle state adjusts the ringer volume.
12

3Desk Phone– Basic CallFeatures
Placing Calls
Youcan place a call in many ways usingyour Desk Phone:
•
using thehandset
•
using thespeakerphone
•
using theheadset
Youcanalso dial thenumberfirst—called“hot dialing”— andthen choose
the method you will use tospeak tothe other party.
Youcan searchthe call lists orthe local contactdirectory anddialfrom
thesearchresultspage.
During a call, you can alternate between Speakerphone Hands-Free,
Headset, or Handset modes by pressing the
or
keys, or picking
up the handset.
The call durationof active calls is visiblewithin the active callwindow on
the graphic display.
To place a call using the handset:
Dothefollowingsteps inany order:
Pickupthehandset.
Dialthe number usingthedialpad.
Press the ”<<” key to backspace
13
To place a call using Hands-Free Speakerphone mode:
Do one of thefollowing:
Withthehandseton-hook
1. From the idle screen, press the New Call key orpress to obtain
dial tone.
2. Dial the number using the dial pad and press the Send key or wait for
the call to automatically connect.
Withthehandseton-hook
1. Dial the number using the dial pad.
2. Press or the Dial key
To place a call using the headset:
Doone of thefollowing:
Withtheoptionalheadsetconnected
14

1. From the idle screen, press the “New Call” key or press to obtain
dial tone.
2. Dial the desired number using the dial pad.
Withtheoptionalheadsetconnected:
1. Dial the desired number using the dial pad.
2. Press
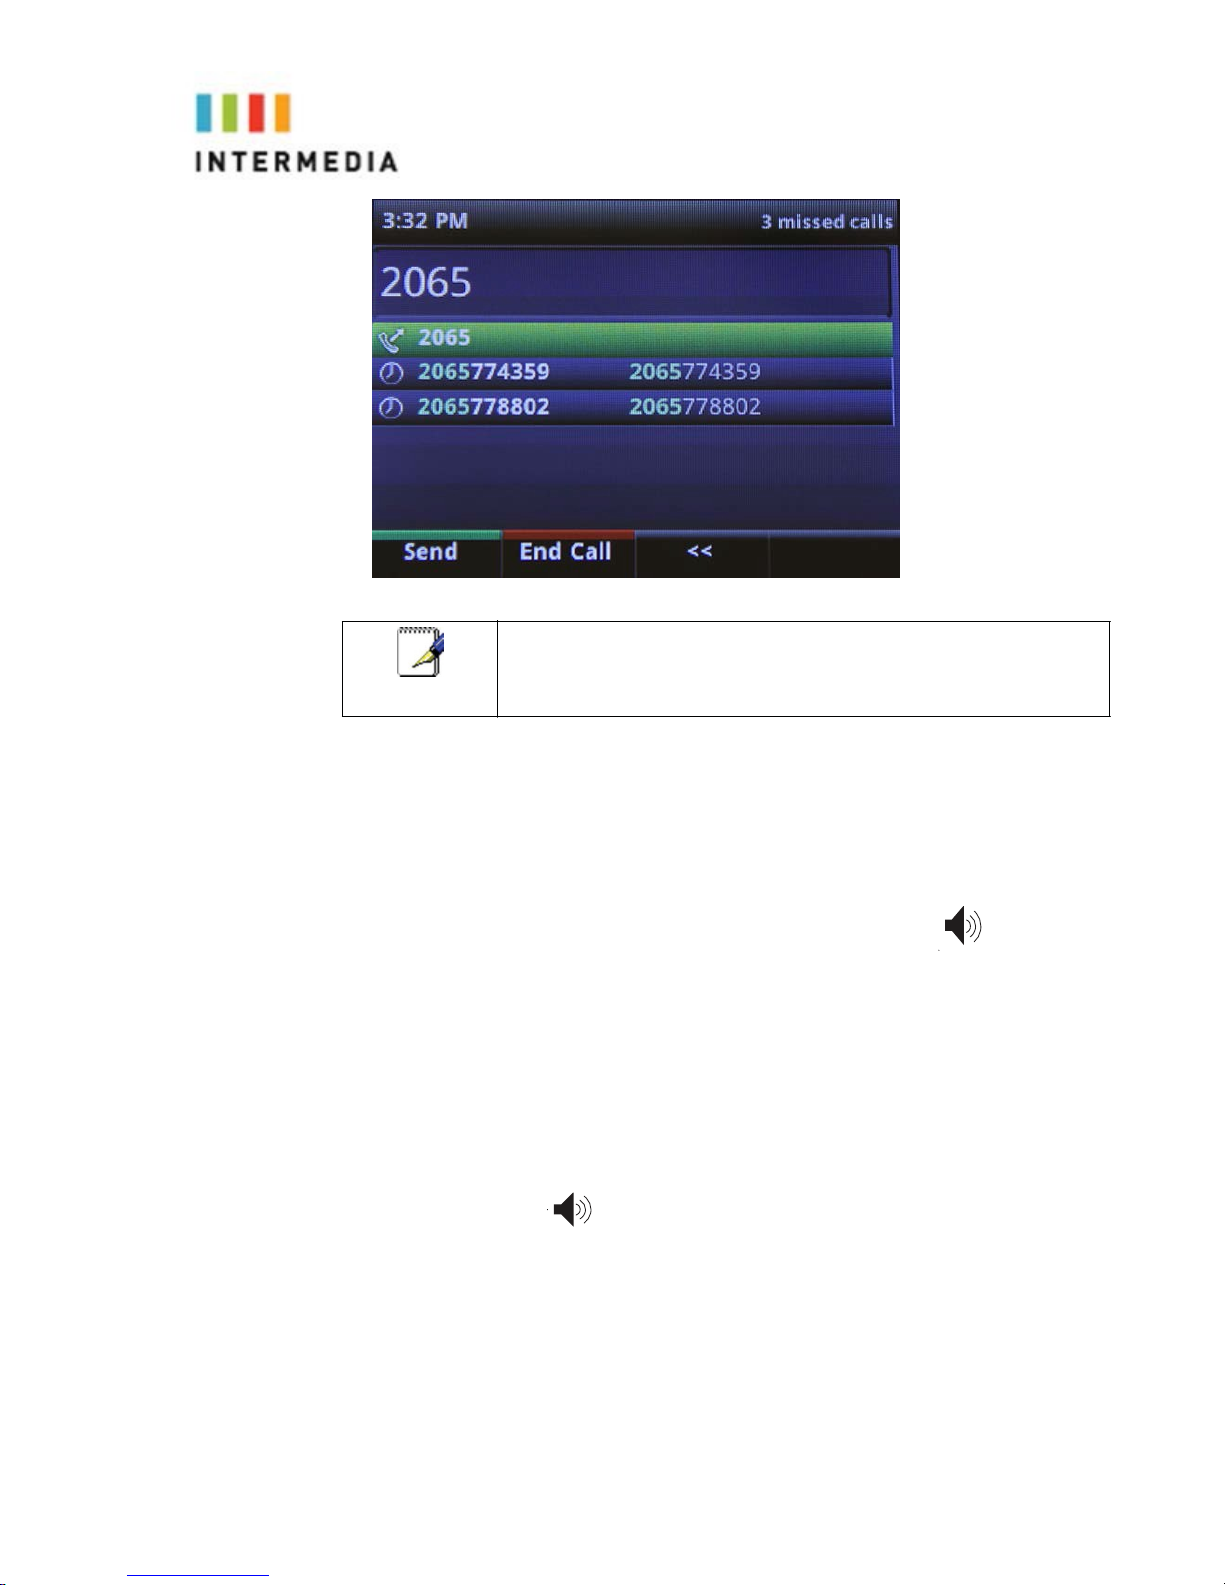
Placing a second call
While on a call, you may place that call on hold and make
a second call.
1.
Press the “Hold” key This will place your caller on hold
2. Press the “New Call” key for a dial tone
3.
Dial the10-digit phone number or 3-digit extension number
4.
Press the “Send” key or wait for a few seconds toautomatically
connect
-Thedisplaywillnowshowinformationaboutbothcallsincluding
therecipient’snumberandthelengthofthatcall.
-Press Up/Down on the directional pad to highlight a call that
you would like to perform an action to
-You can press a line button to switch to the call on that line,
placing the current call on hold.
-On the left side of the screen you will see two phone
symbols. The active call will have the “play” symbol, thecall
on hold will have the “pause” symbol.
Soft-Key functions during a second call:
Hold: Places the highlighted call on hold.
Resume: Resumes the highlighted call. If there is anactive
call, this will place the currently active call on hold.
End: terminates the current active call. Does not affect calls
on hold.
Additional information on headsets can be found on page 48
of this guide.
15

Transfer: Transfers the highlighted call to specified phone
number or extension. After pressing transfer, dial the desired
number or extension and then press Transfer again to
connect the call. See the Call Management Features section
for further information.
More: Cycles through additional soft-key actions.
Conference: allows you to add a party to that call. While ona
call, press the Conference key, dial your second party, and
when the second party has answered, press the More key
and then Conference to join the calls.
Join: conferences your current active call with the call onhold
Lines/Calls- toggles displaying current calls and the status of
your phone’s lines
Answering Calls
There are afew methods to answer a call, similartothoseof placing a call.
•
using thehandset
•
using thespeakerphone
•
using theheadset
To answer a call using the handset:
Pickupthehandset.
To answer a call using Hands-Free Speakerphone mode:
Press
and speak into the phone.
OR
Press the Answerkey.
16

To answer a call using the headset:
Press
or follow the instructions for your optional headset.
Using Automatic Answer:
AutomaticAnswer allows acalltobe answeredwithouttouchingthephone.
Theincoming call still shows on thedisplay and does providethe Answer
and Reject keys.
EnablingAutomaticAnswer:
1.
Press
> Settings> Basic>Preferences>
Additional information on headsets can be found on
page 48 of this guide.
17
AutoAnswer
2.
SelectAutoAnswer SIP Calls
3.
Select Yes
4.
Press the Savekey.
DisablingAutomaticAnswer:
1.
Press
> Settings> Basic> Preferences>
AutoAnswer
2.
SelectAutoAnswer SIP Calls
3.
Select No
4.
Press the Savekey.
Inbound Caller ID
CallerIDName andNumber are presented onthe screenof your phone
with each inbound call. If you are using a Simultaneous hunt groupthe
name of that hunt group will also be passed throughto the display of your
phone.
Ending Calls
Toend a call:
Doone of thefollowing:
•
Pressthe End Call key.
•
If you are using a headset, press .
•
If you are using the speakerphone, press.
•
If you are using the handset, replacethe handset onthereceiver.
Forwarding Calls
You can configure your phone so that incoming calls are forwarded to
another party based on certain conditions (refertoStaticForwarding).
Youcanalsoforward calls while your phonerings (refertoDynamic
18

Forwarding).
All incomingcalls can beforwardedtovoicemailwhileDoNot Disturb is
enabledonyourphone.
StaticForwarding
Static Forwarding allowsyouto automaticallysend allincomingcallsto
anotherphone number or extension. You can forward all calls
immediately, after a specified number of rings, or if the line is busy.
Toforwardallincomingcalls toanother party immediately:
1.
From the idle display, press the Forwardkey
.
2.
Selectthe option that you would like tochange. The options are:
o
Always—To forward all incoming calls
o
No Answer—To forward unanswered incoming call
o
Busy—To forward calls that arrive when you are already in a call
3.
Depending onyourselection:
a
If you selected Always, enter the 10-digit phone number thatyou
would like to forward calls to. If transferring calls to anotherphone
within your system, use the 10-digit direct phone number for that
phone. You can view a complete list of extensions and their
corresponding phone numbers in the Numbers and Extensions tab
of the Admin Portal.
19

b
Ifyouselected NoAnswer,you will see thatyour phone number is
entered inthe Contact field by default. By entering your own phone
number in this field,the phone will send callerstoyour voicemail box if
you do not answer. You may enter a number to forward all
unanswered incoming calls to and how many rings to wait be-
fore forwarding(one ring is approximately 4.5 seconds).Avalue from
4 to 6 is recommended.
c
If you selected Busy, you will see that your phone number is
entered inthe Contact fieldby default. By entering your ownphone
number in this field,the phone will send callerstoyour voicemail box if
your phone is busy. You may enter a number to forward all future
incomingcallstowhenall ofyourincoming lines are busy.
20

4. Press the Enablekey to confirmcall forwarding.
Fwd: [destination number] appears alternating with the date/time and
voice message indicator to confirm callforwardingisenabled.
ToDisableCallForwarding:
1.
From the idle display, press the Forward keyonthe display.
2.
Select the option tochange.
3. Press the Disablekey.
Theidle display returns and the regularicon appears belowthe date and
time.
Dynamic Forwarding
Dynamic Forwardingallows youtoforwardanINCOMING calltoanother
phonenumber orextension while yourphone is ringing. Youmay only use
DynamicForwardingwhileyourphoneisringing.
Toforwardanincomingcalltoanotherparty:
1.
When the phone rings, presstheForwardkey.
2.
Enter a number to forward the incoming call to.
3. Press the Forward key again.
The incoming call is forwarded tothe other party.If call forwardingis
disabled,allfuturecalls will notbeforwarded andforwardingwill remain
disabled.
21
This manual suits for next models
1
Table of contents
Other Intermedia Telephone manuals


