Intex Marketing PureSpa SJB-HS-20 User manual

264
A
(264IO) SPA (JET + BUBBLE) ENGLISH 7.5” X 10.3” PANTONE 295U 08/06/2015
English
OWNER’S MANUAL
PureSpa™
SJB-HS-20 / SJB-HS-22
SJB-HS-30 / SJB-HS-33
IMPORTANT
SAFETY RULES
Read, understand, and follow
all instructions carefully before
installing and using this product.
264-*A*-R1-1608
Do not forget to try these other fine Intex products: pools, pool
accessories, in-home toys, airbeds and boats available at fine
retailers or visit our website.
Due to a policy of continuous product improvement, Intex reserves
the right to change specifications and appearance, which may
result in updates to the instruction manual without notice.
For illustrative purposes only.
©2015 Intex Marketing Ltd. - Intex Development Co. Ltd. - Intex Trading Ltd.
- Intex Recreation Corp.
All rights reserved/Tous droits réservés/Todos los derechos reservados/Alle Rechte
vorbehalten. Printed in China/Imprimé en Chine/Impreso en China/Gedruckt in China.
®™ Trademarks used in some countries of the world under license from/®™ Marques utilisées dans certains pays sous licence de/
Marcas registradas utilizadas en algunos países del mundo bajo licencia de/Warenzeichen verwendet in einigen Ländern der Welt in
Lizenz von/Intex Marketing Ltd. to/à/a/an Intex Trading Ltd., Intex Development Co. Ltd., G.P.O Box 28829, Hong Kong & Intex
Recreation Corp., P.O. Box 1440, Long Beach, CA 90801 • Distributed in the European Union by/Distribué dans l’Union Européenne
par/Distribuido en la unión Europea por/Vertrieb in der Europäischen Union durch/Intex Trading B.V., Venneveld 9, 4705 RR
Roosendaal – The Netherlands
www.intexcorp.com

264
A
SAVE THESE INSTRUCTIONS
(264IO) SPA (JET + BUBBLE) ENGLISH 7.5” X 10.3” PANTONE 295U 08/06/2015
English
Page 2
Warning.......................................................................................... 3-5
Parts............................................................................................... 6-7
Product Information & Specifications........................................ 8
Set-up............................................................................................. 8-11
Salt Level Information.................................................................. 12
Operation....................................................................................... 13-14
LED Code Chart............................................................................. 15
Maintenance and Chemicals........................................................ 16-23
Storage........................................................................................... 23
Troubleshooting............................................................................ 24-26
Warranty......................................................................................... 27
TABLE OF CONTENTS

264
A
SAVE THESE INSTRUCTIONS
(264IO) SPA (JET + BUBBLE) ENGLISH 7.5” X 10.3” PANTONE 295U 08/06/2015
English
Page 3
IMPORTANT SAFETY RULES
When installing and using this electrical equipment, basic safety precautions should always be followed, including the following.
READ AND FOLLOW ALL INSTRUCTIONS
• The spa electrical appliance should be supplied through a residual current device (RCD) having a
rated residual operating current not exceeding 10 mA. If a leakage current of more than 10mA is
detected, the RCD will operate and cut-off the power supply, in such case, unplug and stop using the
spa at once. You must contact the local service center for assistance and/or repair of the product.
• Parts containing live parts, except parts supplied with safety extra-low voltage not exceeding 12V,
must be inaccessible to a person in the spa.
• Electrical installation shall fulfill the requirements of local national standards.
• Parts incorporating electrical components, except remote control devices, must be located or fixed so
that they cannot fall into the spa.
• To reduce the risk of injury, do not permit children to use this product unless they are closely
supervised at all times.
• Children should not use spas or hot tubs without adult supervision.
• To reduce the risk of child drowning, supervise children at all times. Attach and lock spa cover after
each use.
• To reduce the risk of injury:
a)The water in a spa should never exceed 40°C (104°F). Water temperatures between 38°C (100°F)
and 40°C (104°F) are considered safe for a healthy adult. Lower water temperatures are
recommended for young children and when spa use exceeds 10 minutes.
b)Since excessive water temperatures have a high potential for causing fetal damage during the early
months of pregnancy, pregnant or possibly pregnant women should limit spa water temperatures
to 38°C (100°F).
c)Before entering a spa or hot tub, the user should measure the water temperature with an accurate
thermometer since the tolerance of water temperature-regulating devices varies.
d)The use of alcohol, drugs, or medication before or during spa use may lead to unconsciousness with
the possibility of drowning.
e)Obese persons and persons with a history of heart disease, low or high blood pressure, circulatory
system problems, or diabetes should consult a physician before using a spa.
f) Persons using medication should consult a physician before using a spa since some medication may
induce drowsiness while other medication may affect heart rate, blood pressure, and circulation.
DANGER
WARNING
• Risk of Accidental Drowning. Extreme caution must be exercised to prevent unauthorized access by
children. To avoid accidents, ensure that children cannot use this spa unless they are supervised at
all times.
• Risk of drowning. Inspect the spa cover regularly for leaks, premature wear and tear, damage, or
signs of deterioration. Never use a worn or damaged cover: it will not provide the level of protection
required to prevent unsupervised access to the spa by a child.
• Risk of injury. Replace damaged cord immediately. Do not bury cord.
• Risk of Electric Shock. Do not permit any electric appliance, such as a light, telephone, radio, or
television, within 3.5 m (11.5 feet) of a spa or hot tub.
• Risk of Electric Shock. Do not use and unplug the spa when it is raining, thundering or lightning.

264
A
SAVE THESE INSTRUCTIONS
(264IO) SPA (JET + BUBBLE) ENGLISH 7.5” X 10.3” PANTONE 295U 08/06/2015
English
Page 4
g)People using medications and/or having an adverse medical history should consult a physician
before using a spa or hot tub.
h)Check with a doctor before use if pregnant, diabetic, in poor health, or under medical care.
• People with infectious diseases should not use a spa or hot tub.
• To avoid injury exercise care when entering or existing the spa or hot tub.
• Do not use drugs or alcohol before or during the use of a spa or hot tub to avoid unconsciousness
and possible drowning.
• Pregnant and possible pregnant women should consult a physician before using a spa or hot tub.
• Water temperature in excess of 38ºC degree may be injurious to your health.
• Do not use a spa or hot tub immediately following strenuous exercise.
• Prolonged immersion in a spa or hot tub may be injurious to your health.
• When pregnant, soaking in hot water for long periods can harm your fetus. Measure the water
temperature before entering. Do not enter spa if water is hotter than 38°C (100°F). Do not stay in
spa for longer than 10 minutes.
• Spa heat in conjunction with alcohol, drugs, or medication can cause unconsciousness.
• Exit immediately if uncomfortable, dizzy, or sleepy. Spa heat can cause hyperthermia and
unconsciousness.
• The causes, symptoms, and effects of hyperthermia may be described as follows: Hyperthermia
occurs when the internal temperature of the body reaches a level several degrees above the normal
body temperature of 37°C (98.6°F). The symptoms of hyperthermia include an increase in the
internal temperature of the body, dizziness, lethargy, drowsiness, and fainting. The effects of
hyperthermia include failure to perceive heat; failure to recognize the need to exit spa or hot tub;
unawareness of impending hazard; fetal damage in pregnant women; physical inability to exit the spa
or hot tub; and unconsciousness resulting in the danger of drowning.
• The use of alcohol, drugs, or medication can greatly increase the risk of fatal hyperthermia in hot tubs
and spas.
• Always add chemicals to water, never add water to chemicals. Adding water to chemicals may cause
strong fumes or violent reactions and hazardous chemical spray.
• Never jump or dive into a spa or any shallow body of water.
• Assembly and disassembly by adults only.
• This appliance can be used by children aged from 8 years and above and persons with reduced
physical, sensory or mental capabilities or lack of experience and knowledge if they have been given
supervision or instruction concerning use of the appliance in a safe way and understand the hazards
involved. Children shall not play with the appliance. Cleaning and maintenance must be performed
by an adult above 18 years old, and who is familiar with the risk of electric shock.
• No part of the electrical appliance is to be located above the bath during use.
• Keep the plug of this product more than 4m away from the spa and at a height of 1.2m at least.
• Always unplug this product from the electrical outlet before removing, cleaning, servicing or making
any adjustment to the product, and on raining days.
• Do not bury the electrical cord. Locate the cord where it will not be damaged by lawn mowers, hedge
trimmers and other equipment.
• If the supply cord is damaged, it must be replaced by the manufacturer, its service agent or similarly
qualified persons in order to avoid a hazard. Use only identical replacement parts when servicing.
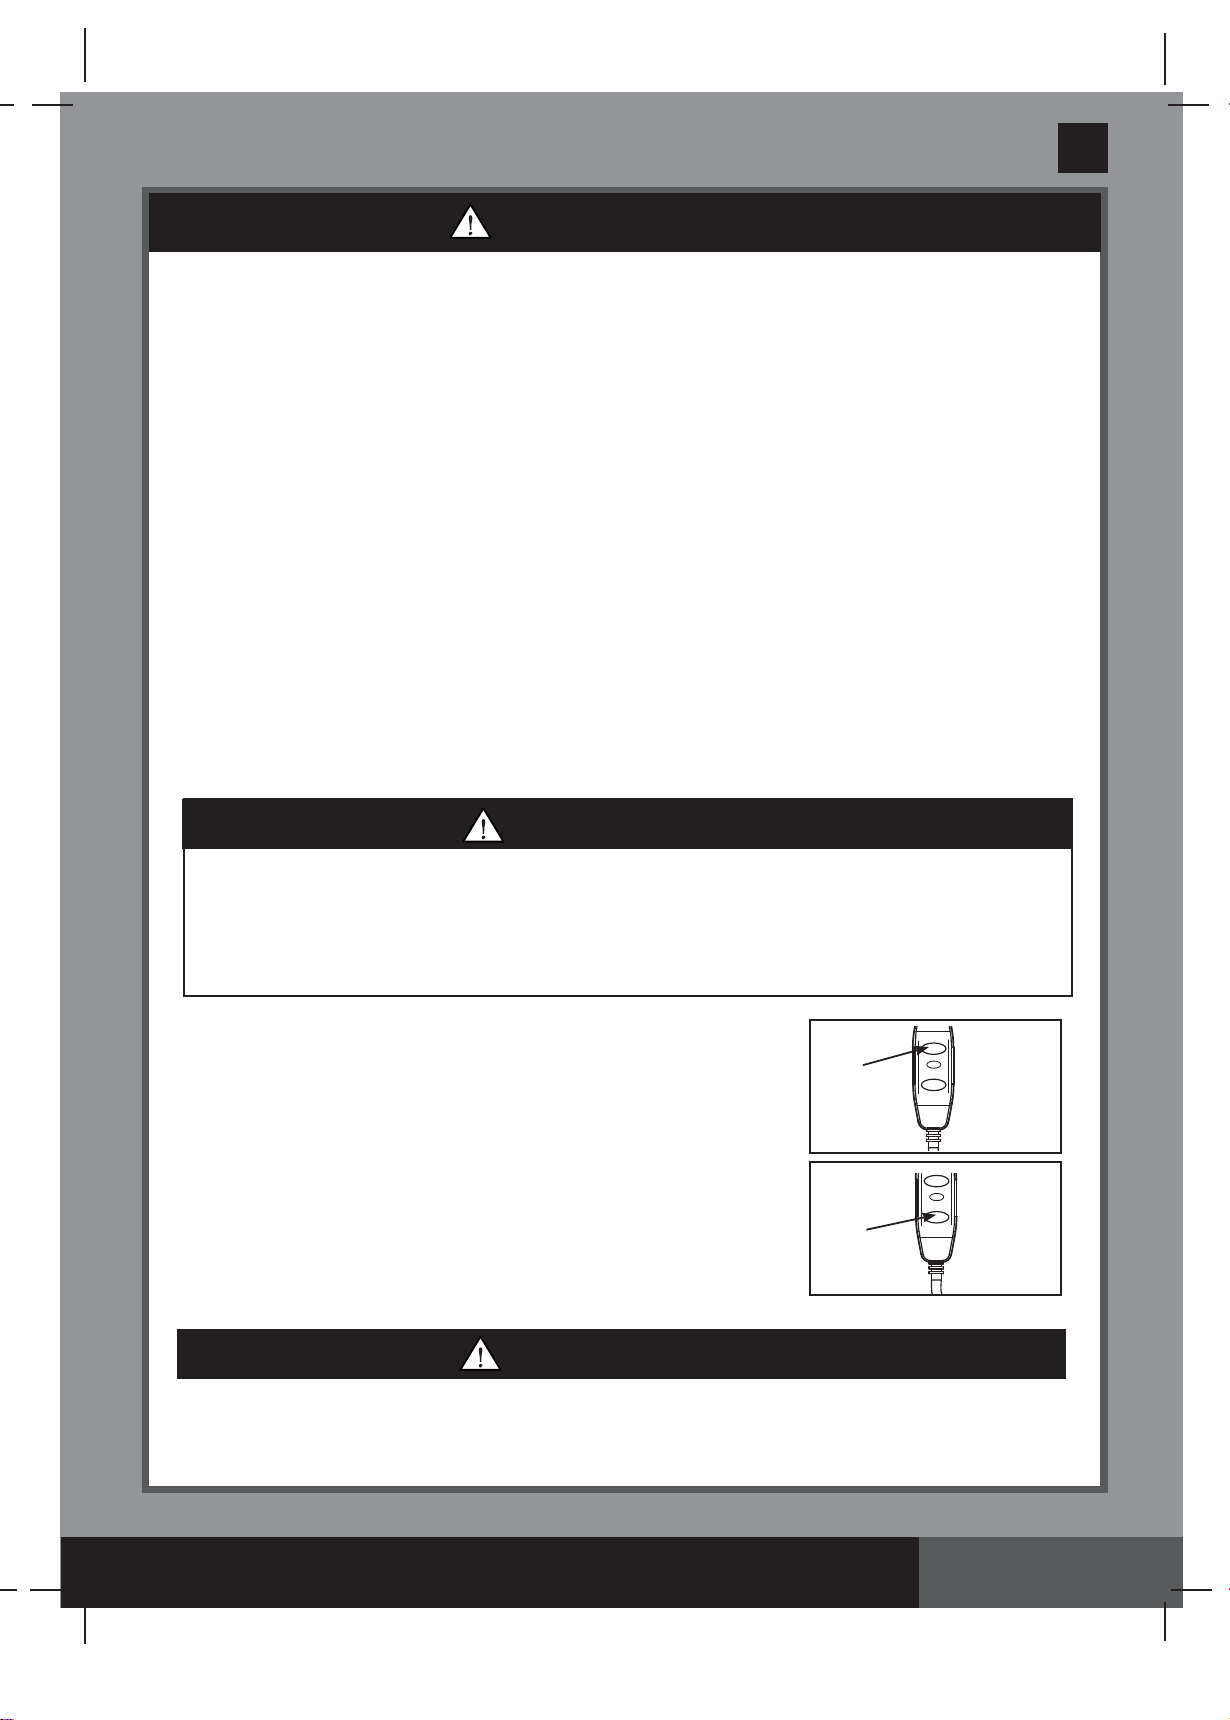
WARNING

264
A
SAVE THESE INSTRUCTIONS
(264IO) SPA (JET + BUBBLE) ENGLISH 7.5” X 10.3” PANTONE 295U 08/06/2015
English
Page 5
CAUTION
• Maintain water chemistry in accordance with manufacturer’s instructions.
1. Press the RESET button on the RCD.
2. Turn on the spa electrical equipment.
3. Press the TEST button on the RCD. The RCD indicator should
turn off and the electrical equipment should shut off. If the RCD
indicator does not turn off, and the electrical equipment does not
shut off, the RCD is faulty. Do not use the spa. Contact a qualified
electrician to correct the fault.
4. Press the RESET button on the RCD. The indicator on the RCD
should turn on. If the RCD indicator does not turn on, the RCD is
faulty. Do not use the spa. Contact a qualified electrician
immediately to correct the fault.
WARNING
TEST
RESET
RESET
TEST
TEST
RESET
RESET
TEST
TEST
• To reduce the risk of electric shock, do not use extension cords, timers, plug adaptors or converter
plugs to connect unit to electrical supply; provide a properly located outlet.
• Do not attempt to plug in or unplug this product while standing in water or when your hands are wet.
• Do not leave the spa empty for extended period of time. Do not expose the spa under direct
sunshine.
• When the appliance is not in use for long period of time, such as in the winter, the spa set should be
disassembled and stored indoor.
• Adequate drainage system must be provided around the spa to deal with overflow water.
• Do not allow the water in the spa to freeze. Do not turn on the spa when the water is frozen.
• Do not use the spa if damaged in delivery and/or malfunctioning in any fashion. Contact the Intex
service center for further direction.
• Never use the spa alone or allow others to use the spa alone.
• Never pour water with a temperature higher than 40°C (104°F) into the spa directly.
• Keep all pets away from spa to avoid any damage.
• Do not add bath oil or bath salt to the spa water.
• The spa must be setup on a level, flat and smooth surface that is capable of supporting the maximum
load of the filled spa with four adult occupants: weight 2500 lbs (1136Kg); six adults: 3500 lbs
(1592 kg).
• Provide adequate drainage system around the spa to deal with overflow water and splashes.
WARNING
• This product is provided with a RCD located at the end of the power cord. The RCD must be
tested before each use. Do not use the spa if the RCD does not function properly.
Disconnect the power cord until the fault has been identified and corrected. Contact a qualified
electrician to correct the fault. Do not bypass the RCD. There are no serviceable parts inside
the RCD. Opening the RCD will void the warranty.

264
A
SAVE THESE INSTRUCTIONS
(264IO) SPA (JET + BUBBLE) ENGLISH 7.5” X 10.3” PANTONE 295U 08/06/2015
English
Page 6
PARTS
Before assembling your product, please take a few minutes to check the contents
and become familiar with all the parts.
NOTE: Drawings for illustration purpose only. Actual product may vary. Not to scale.
10
8
21
5
22
1
6
3
4
1213
16
11
14
26
A
B
C
A
B
C
15
23
30
29
28
20
31 32 33
2
D
27
9
24
35
34 7
18
17
19
25

264
A
SAVE THESE INSTRUCTIONS
(264IO) SPA (JET + BUBBLE) ENGLISH 7.5” X 10.3” PANTONE 295U 08/06/2015
English
Page 7
When ordering parts, be sure to quote the model number and part numbers.
PARTS (continued)
Before assembling your product, please take a few minutes to check the contents
and become familiar with all the parts.
REF. NO. DESCRIPTION QTY. PART NO.
4 ADULTS 6 ADULTS
1CONTROL BASE 1 12096 12196
2SPA FILTER MOTOR 1 11888 11888
3CONTROL PANEL (INCLUDED #4) 1 11949 11949
4 CONTROL PANEL BOLT 3 11996 11996
5PRESSURE GAUGE 1 11741 11741
6CONTROL PANEL BOLT WRENCH 1 11053 11053
7SPA INFLATION HOSE 1 11830 11830
8SPA CONTROL INLET/OUTLET O-RING 2 11788 11788
9 CONTROL BASE INFLATION CAP 1 11991 11991
10 SPA DRAIN PLUG 1 11995 11995
11 SPA DRAIN VALVE ADAPTOR 1 11718 11718
12 FILTER CARTRIDGE HOUSING 1 11798 11798
13 FILTER CARTRIDGE 2 11692 11692
14 FILTER CARTRIDGE HOUSING LID 1 11797 11797
15 INLET PLUG 1 11739 11739
16 SPA TUB 1 12090 12116
17 SPA COVER 1 11951 12117
18
SPA COVER INFLATABLE BLADDER (PRE-INSTALLED IN SPA COVER)
1 11884 12114
19 GROUND CLOTH 1 11717 12110
20 ELECTROLYTIC CELL NUT WRENCH 1 11854 11854
21 TEST STRIPS 1 11855 11855
22 WRENCH 1 11742 11742
23 OUTLET PLUG 2 11782 11782
24 INFLATION HOSE ADAPTOR 1 11829 11829
25 MALE BUCKLE 8 11994 11994
26 FEMALE BUCKLE 8 11993 11993
27 SPA CONTROL AIR INLET O-RING 1 11687 11687
28 ELECTROLYTIC CELL COVER SCREW 4 11712 11712
29 ELECTROLYTIC CELL COVER 1 11890 11890
30 ELECTROLYTIC CELL COVER O-RING 1 11897 11897
31 ELECTROLYTIC CELL NUT 1 11852 11852
32 ELECTROLYTIC CELL 1 11851 11851
33 ELECTROLYTIC CELL O-RING 1 11853 11853
34 DEFLATION OUTLET CAP 1 11992 11992
35 DEFLATION HOSE ADAPTOR 1 11935 11935

264
A
SAVE THESE INSTRUCTIONS
(264IO) SPA (JET + BUBBLE) ENGLISH 7.5” X 10.3” PANTONE 295U 08/06/2015
English
Page 8
PRODUCT SPECIFICATIONS
SET UP
Cord-connected spa with pump, heater, water jet, blower, control panel, built-in hard water treatment, and
sanitation system.
This product requires a minimum of 13 Amps. If the circuit breaker trips, please check that no other
appliances or other large loads are on the same circuit as the spa.
Site preparation and requirements
• The spa can be installed indoor or outdoor. For household use only.
• Make sure the area is free of sharp objects under or around the spa.
• Provide a properly located power outlet to connect the spa and allow easy access for periodic testing of the cord
mounted RCD.
• Make sure there is enough clearance around the spa for full access to the spa equipment for maintenance and/or
service.
• The area shall facilitate draining purposes during long term spa storage.
Additional requirements for indoor installation
• Make sure the floor can support the full weight of the filled spa with the maximum number of occupants. Check with a
qualified contractor or a structural engineer to verify this requirement.
• Make sure the floor is water resistant and non-slip surface. Do not install the spa on carpet or other materials that will be
damaged by moisture, condensation.
• Do not install the spa indoors on a second floor above finished living space due to the possibility of water and humidity
damage.
• Humidity is a natural side effect of indoor spa installation. The room shall be properly ventilated to allow moisture to
escape. Install a ventilating system to prevent excess condensation, moisture in the room.
Additional requirements for outdoor installation
• Spa owners may need to comply with local or states laws relating to childproof fencing, safety barriers, lighting, and
other safety requirements. Contact your local building code enforcement office for further details.
• Make sure the surface is level, flat, smooth and strong enough to support the full weight of the filled spa.
• Do not setup the spa on grass or dirt, as this increases the amount of debris entering the spa, and damage the spa floor.
• Do not expose the spa to direct sunlight for extended period of time.
• It is possible to install and leave the spa outside at a temperature not lower than 4°C (39°F) provided the water
temperature inside the spa is higher than 4°C (39°F) and the water inside the circulation system, pump, pipe are not
frozen. Put a “temp barrier mat” between the spa floor and the ground to prevent heat loss from the bottom of the spa
and to provide better heat retention.
Maximum seating capacity: 4 adults 6 adults
Water capacity: 210 gal (795 L) 290 gal (1098 L)
Inner/outer diameter: 59/79 in (150/201 cm) 66/86 in (168/218 cm)
Height: 28 in (71 cm)
Jet pump: 0.9 HP / 220-240 V / 50 Hz 0.95 HP / 220-240 V / 50 Hz
Bubble air blower: 1.1 HP / 220-240 V / 50 Hz
Filter pump flow rate: 460 gal/hr (1,741 L/hr)
Heater power: 2,200 Watts / 220-240 V / 50Hz
Temperature range: 20ºC – 40ºC (68ºF – 104ºF)
Temperature rise: 1.5-2.5ºC/hr (3ºF – 4.5ºF/hr) 1-2ºC/hr (2ºF – 3.5ºF/hr)
Number of Water Jet Nozzles: 4 6
Number of Bubble Jets: 120 140
Spa tub recommended working air pressure: 0.083 bar (1.2 psi)

264
A
SAVE THESE INSTRUCTIONS
(264IO) SPA (JET + BUBBLE) ENGLISH 7.5” X 10.3” PANTONE 295U 08/06/2015
English
Page 9
SET UP (continued)
Setup the spa with at least 2 persons.
1. Move the entire package to the selected site. Do not drag the spa tub across the ground as this can
cause damage and leakage.
Open the carton carefully as this carton can be used to store the spa during long term storage or when
not in use.
2. Lay out all the parts on the ground and make sure all the parts are accounted for. For missing or
damaged parts contact the appropriate Intex Service Center listed in the separate “Authorized service
Centers” sheet.
Spa Control Unit Assembly
1. Connect the control panel (3) cable plug into the receptacle on top of the spa control base and screw in
the plug cover firmly by hand (see drawing 1). Note: Spread the ground cloth with the bubbles facing
down over the cleared area where you intend to setup your spa.
2. Screw the control panel bolts (4) with the provided bolt wrench (6) to secure the control panel (see
drawing 2).
3. Plug the spa control unit into an electrical outlet.
For indoor inflation:
Inflate the Spa Tub Wall
1. Take out the ground cloth (19) and spread it over the cleared area. Then spread out the spa liner over
the ground cloth and point the drain valve towards a suitable draining area.
NOTE: Spread the ground cloth with the bubbles facing down over the cleared area where you intend
to setup your spa.
2. Unscrew the control base inflation cap (9) to reveal the air blower inflation outlet, insert one end of the
inflation hose (7) into the outlet and turn to the right to lock it (see drawing 3).
3. Unscrew the air valve cap to reveal the stem in the up position for inflation. Insert the other end of the
inflation hose (7) into the valve and turn to the right to lock it in position (see drawing 4).
4
6
2
1
12
3

264
A
SAVE THESE INSTRUCTIONS
(264IO) SPA (JET + BUBBLE) ENGLISH 7.5” X 10.3” PANTONE 295U 08/06/2015
English
Page 10
SET UP (continued)
6. Disconnect the inflation hose (7) from the air valve and attach the pressure gauge (5) to the air valve.
The pressure gauge indicator should be in the green area for a properly inflated spa tub (see drawing 6).
Repeat previous steps to add more air if necessary.
7. Replace the air valve cap back.
NOTE: The cap is designed to be screwed on and off. Never exert force as this could cause the
complete internal inflation system of the valve to come loose. See “Spa Tub Air Valve Fastening” for
valve maintenance.
Inflate the Spa Cover Air Bladder
1. Open the inflation valve and insert the inflation
hose
(7) into the valve; press to inflate
until it is firm to the touch but not hard (see
drawing 7).
2. Disconnect the inflation hose (7) from the air
blower inflation outlet and the valve.
3. Replace the control base inflation cap (9) back;
close and recess the inflation valve.
NOTE: If there is a need to add some air to the spa tub wall or spa cover air bladder after they have been
setup, refer to above “Inflate the Spa Tub Wall” and “Inflate the Spa Cover Air Bladder” sections. The cover
air bladder is preinstalled inside the spa cover. If it needs to be reinstalled, place the uninflated air bladder
inside the spa cover lip before inflating the bladder.
5
4
7
1 2
6
5
1
2
3
9
24
4. Press the button to turn on the control unit panel buttons first. Press the button to inflate the
spa tub wall until it is firm to the touch but not hard (see drawing 5).
IMPORTANT: Do not over inflate or use high pressure air compressor to inflate.
5. Press the button again to turn it off.
7
7

264
A
SAVE THESE INSTRUCTIONS
(264IO) SPA (JET + BUBBLE) ENGLISH 7.5” X 10.3” PANTONE 295U 08/06/2015
English
Page 11
SET UP (continued)
Deflation
For Spa Tub Wall:
1. Unscrew the cap to reveal the stem, push the stem in
and turn 90 degree right to secure it in the down
position
(see drawing 8).
2. Once the deflation is completed, push the stem in and
turn 90 degree left to return it to the inflation position.
3. Replace the cap back.
For Cover Air Bladder:
1. Pull valve cap out and squeeze the valve at its base
until deflated.
2. Close and recess the valve back.
Spa Control Unit Installation
1. Connect the spa control unit to the spa tub (see drawing 9). Hand-tighten the connectors securely.
Do not use tools to tighten.
CAUTION: Do not sit, lean, cover or place any objects over the spa control unit.
2. Attach the filter cartridge housing assembly to the inside of the spa tub outlet grid (marked “B”) (see
drawing 10).
Inflate the spa tub first before installing filter pump fittings.
3. Before filling with water ensure the bottom drain valve caps are securely closed on the inside and outside.
4. Fill the spa tub with freshwater to a level between MIN and MAX marked on the inside of the spa wall. Do
not over fill the spa. Never move the spa tub with water inside and/or with the control base attached to the
spa as the spa or control base may be damaged.
WARNING: Never pour water with a temperature higher than 40°C (104°F) into the spa
directly. It is recommended to fill the spa tub with lukewarm water for quick heating and
energy saving.
5. Place the spa cover and spa air bladder (pre-installed in spa cover) over the spa tub, and make sure the
spa cover buckles are locked using the key provided after pulling the buckled straps tight.
IMPORTANT: Inspect the spa cover regularly for leak, premature wear and tear or deterioration. Never
use a damaged spa cover.
6. Ensure the spa is plugged into an electrical socket and press the button to turn on the control unit
panel buttons first. Press the button on the control panel to activate the heater, see “Spa Control Unit
Panel” operation section.
IMPORTANT: The following conditions will lead to slow water heating:
• The ambient temperature is lower than 50ºF (10ºC).
• Outdoor wind speed is above 8-12 mph (3.5-5.4m/s).
• The jet function is activated when heating the spa water.
• The spa is not properly covered with the spa cover when the water is heating.
8
10
B
B
C
A
A
C
B
9

264
A
SAVE THESE INSTRUCTIONS
(264IO) SPA (JET + BUBBLE) ENGLISH 7.5” X 10.3” PANTONE 295U 08/06/2015
English
Page 12
The spa comes with a built-in saltwater sanitation system. Common salt (sodium chloride) is
made up of two elements, sodium and chloride. During the installation of the device, a
measured quantity of salt is dissolved in the SPA water to make it slightly salty. The SPA water
flows through the sanitation system’s electrolytic cell to produce chlorine. The chlorine dissolves
in the water and instantly starts destroying bacteria and algae. It also oxidizes all other organic
materials.
• Which kind of salt to use:
Use only Sodium Chloride Salts
Use only sodium chloride (NaCl) salt that is at least 99.9% pure. It is also acceptable to use water
conditioning salt pellets (the compressed forms of evaporated salt). However, it will take a longer
time for them to dissolve. Do not use iodized or yellow (yellow prussiate of soda) colored
salt. Salt is added to the SPA water and the electrolytic cell uses the salt to create chlorine. The
purer the salt the better the performance of the electrolytic cell.
• Optimum Salt Levels
The ideal salt level in the SPA water is between 2000-3000 ppm (parts per million). The optimal
level is 2500 ppm.
A too low salt level will reduce the efficiency of the sanitation system and result in low chlorine
production. Too high a salt level may damage the power supply and cause corrosion to metal
fixtures and accessories. The salt in the SPA is constantly recycled. The loss of salt is due only to
SPA water being physically removed from the SPA. Salt is not lost due to evaporation.
• Adding Salt
1. Switch the JET pump on to start the water circulation.
2. Keep the sanitation system turned off.
3. Evenly spread 4.4 lbs / 2 kg of salt around the inside perimeter of the SPA.
4. Brush the SPA bottom to speed up the dissolving process. Do not allow salt to pile up on the
bottom of the SPA. Run the JET pump for one hour to thoroughly dissolve the salt.
5. When all the salt is dissolved, press the sanitizer button to activate the sanitation system
(see “Sanitation System Operating Instructions” section), code “003H” is flashing and set the
sanitation system to desired operating hours. NOTE: DO NOT press any other buttons on the
control panel, ensure the heater is off and attach the spa cover during the sanitizing process.
• Removing Salt if Salt Level is too high
If too much salt has been added, the unit will beep and display “E92” (see “LED Code Chart”). If
this happens, turn off the sanitation system by pressing the ON/OFF button , and unplug the
spa. You will need to lower the salt concentration. The only way to do so is to partially drain the
SPA and refill it with fresh water. Drain and refill approximately 25% of the SPA water until the “E92”
alarm code disappears.
• Adding Salt if Salt Level is too low
If not enough salt has been added, the unit will beep and display “E91” (see “LED Code Chart”).
If this happens, turn off the sanitation system by pressing the ON/OFF button , unplug the
spa and wait 10 seconds. Plug and turn on the spa, add 1.1 lbs / 0.5 kg increment of salt until the
“E91” alarm code disappears (see “Adding Salt” section).
SALT LEVEL INFORMATION

264
A
SAVE THESE INSTRUCTIONS
(264IO) SPA (JET + BUBBLE) ENGLISH 7.5” X 10.3” PANTONE 295U 08/06/2015
English
Page 13
OPERATION
On/Off Button: Once the unit is plugged in, use this button to active the control unit panel buttons. The
light next to the button is green when activated. Press this button to turn off all currently activated functions.
NOTE: The On/Off button may appear as a black button in the center of the control panel.
Heat Button: Use this button to activate the heating system. The pump will heat the spa water until the
water temperature reaches the set temperature. When the spa water temperature drops 1-2°C (1.8-3.6°F)
below the set temperature the heating system will restart. When the flame icon on the display is red, the
heating system is activated. When the flame icon turns green, the water is at the set temperature. The
heating system is at rest and the filtration system will continue working nonstop.
NOTE: To stop the filtration system while the heater is at rest mode, press the flame button first and then
the filter button. Pressing the flame button only while the heater is at rest mode will turn off the heating
system only and the filtration system will operate for another 24 hours before it turns off automatically.
Celsius/Fahrenheit Toggle button:
The temperature can be displayed in either Fahrenheit or Celsius. The system’s default is Celsius.
CAUTION: NEVER use the spa if indicated water temperature is more than 40°C (104ºF).
Temperature Adjustment Buttons: Pressing the Temperature Increase or Decrease buttons will
cause the LED to flash. When flashing you can adjust to the desired temperature setting. If you hold these
buttons down the values will rapidly increase or decrease. The new and desired temperature setting will
remain on the LED display for 5 seconds to confirm the new value.
NOTE: The default temperature is 20°C (68°F).
NOTE: Temperature adjustment ranges from 20°C (68°F) to 40°C (104°F).
Water Filter Button:
This button turns the filter pump on and off.
If the heating system is activated the filtration system will
automatically start.
The water filter icon on the display is green when activated.
Water Jet Button: Use this button to activate the jet massage system. After 30 minutes of continues
use, the jet massage system will automatically turn off. The water jet icon on the displays is green when
activated. The angle of the water jet nozzles inside the spa tub wall can be adjusted manually.
WARNING: Do not run jet system when the cover is attached, air pressure may accumulate inside the spa
and cause irreparable damage and bodily harm.
Bubble Button: Use this button to activate the massage system, which has a 30-minute auto-shutoff
feature. The bubble icon on the displays is green when activated.
WARNING: Do not run Bubble system when the cover is attached, air can accumulate inside the spa and
cause irreparable damage and bodily harm.
Sanitizer Button: Use this button to activate and set operating hours for the sanitation system.
LED Display: Once plugged in the LED displays the current water temperature automatically.
NOTE: The built-in hard water treatment function works automatically in conjunction with the filtration system.
Jet Nozzle Adjustment
The amount of water and pressure coming out from the jet nozzles can be adjusted by turning the jet
nozzle rim clockwise (maximum water output), counterclockwise (low water output) or anything in between.
Closing one or 2 jet nozzles will divert more water pressure to the other jet nozzles.
A: Heat Button
B: Celsius/Fahrenheit Toggle Button
C: Temperature Increase Button
D: Temperature Decrease Button
E: Water Filter Button
F: Water Jet Button
G: Sanitizer button
H: LED Display
I: On/Off Button
J: Bubble Button
SPA CONTROL UNIT PANEL
)
F
J
D
C
B
A
H
GI
E
-+
40 C
o

264
A
SAVE THESE INSTRUCTIONS
(264IO) SPA (JET + BUBBLE) ENGLISH 7.5” X 10.3” PANTONE 295U 08/06/2015
English
Page 14
SANITATION SYSTEM OPERATING INSTRUCTIONS
1. Activate the sanitation system:
Press the sanitizer button on the control panel, this will
activate the sanitation system as well as the filter pump. The
sanitizer icon and the filter icon turn green. Flashing code “003H”
appears on the control panel’s LED, indicating that the unit is ready
to be programmed.
2. Set operating hours for the sanitation system:
With the minimum preset hours (code “003H”) flashing, press the
sanitizer button to increase the time from 003H, 005H to 008H
hours (see “LED CODE CHART” section). Pressing the button
after the maximum number of hours (code “008H”) will deactivate
the sanitation function and the LED panel will display the spa water
temperature. If you have selected too many hours keep pressing to
repeat the cycle. Once the operating time is set, the display LED
panel will stop flashing after 10 seconds and the sanitation system
starts working. For first time use of the spa, set the operating hours
to “008H”. During the sanitation, the information displayed on the
LED panel alternates between the spa water temperature and the
remaining hours of sanitation.
After the cycle is completed the LED panel displays the water
temperature. Test the water with the included test strips, and make sure the free chlorine
level is between 2-4 ppm.
Note: DO NOT press any other buttons on the control panel, ensure the heater is off and
attach the spa cover during the sanitizing process.
3. Readjust operating time if necessary:
During the sanitizing process, the operating hours can be re-adjusted if necessary. Press the
sanitizer button, the LED code “003H” will flash. Repeat step 2.
4. Turn off the sanitation system manually if necessary:
During the sanitizing process, you can turn off the sanitation system manually. Simply press
the ON/OFF button on the control panel. The sanitation system will stop and the
sanitizer icon light will disappear.
5. Restart the sanitation system:
When the programmed cycle ends, the LED panel displays the water temperature, the unit
will stop sanitizing and the sanitizer icon light disappears. To restart the sanitation system,
following the above steps.
6. Test the SPA water regularly:
The free chlorine level in the SPA water may vary depending on the number of occupants,
local water condition and sunlight intensity exposure (outdoor use). During the initial use of
the spa, test the spa water at least 2 times per day with the included test strips to maintain
the free chlorine between 2-4 ppm. After the free chlorine level appears to be stabilized, test
the SPA water every week to maintain optimal sanitizing level.

264
A
SAVE THESE INSTRUCTIONS
(264IO) SPA (JET + BUBBLE) ENGLISH 7.5” X 10.3” PANTONE 295U 08/06/2015
English
Page 15
LED CODE CHART
LED Reading Definitions
001H Operating Hour (1 hour remaining)
002H Operating Hours (2 hours remaining)
003H Operating Hours (3 hours remaining)
004H Operating Hours (4 hours remaining)
005H Operating Hours (5 hours remaining)
006H Operating Hours (6 hours remaining)
007H Operating Hours (7 hours remaining)
008H Operating Hours (8 hours remaining)
E90 No water flow
E91 Alarm Code (Low Salt Level)
E92 Alarm Code (High Salt Level)
E94 Water temperature too low
E95 Water temperature is around 50°C (122°F)
E96 System Error
E97 Dry-fire Protection
E99 Water temperature sensor broken
END
After 72 hours of continuous heating operation, the pump will hibernate
automatically. The rapid heating and water filtration functions are
disabled.

264
A
SAVE THESE INSTRUCTIONS
(264IO) SPA (JET + BUBBLE) ENGLISH 7.5” X 10.3” PANTONE 295U 08/06/2015
English
Page 16
MAINTENANCE AND CHEMICALS
Water Sanitation
The spa owner must regularly check and keep the spa water sanitized with scheduled maintenance (daily, if
necessary). Adding sanitizer and other chemical will control bacteria and viruses present in the spa water.
The maintenance of a proper water balance through appropriate use of sanitizers is the single most important
factor in maximizing the life and appearance of the spa tub as well as ensuring clean, healthy and safe water.
Proper technique is important for water testing and treating the spa water. See your pool/spa professional for
chemical, sanitizer, test kits and testing procedures questions.
CATUTION: ALWAYS FOLLOW THE CHEMICAL MANUFACTURER’S DIRECTIONS, AND
THE HEALTH AND HAZARD WARNINGS.
Do not add chemicals if the spa is occupied. This can cause skin or eye irritation. Concentrated chlorine
solutions can damage the spa tub. In no event is Intex Recreation Corp., Intex Development Co. Ltd., their
related companies, authorized agents and service centers, retailers or employees liable to the buyer or any
other party for costs associated with the loss of spa water, chemicals or water damage.
WARNING
Always unplug this product from the electrical outlet before removing, cleaning, servicing or
making any adjustment to the product.
SPA WATER CHEMISTRY AND BALANCE
Preferred Water Chemistry Reading
Minimum Ideal Maximum
Free Chlorine 2 ppm 2 - 4 ppm 5 ppm
pH 7.2 7.2 - 7.6 7.8
Total Alkalinity (TA) 60 ppm 80 ppm 120 ppm
Calcium Hardness (CaCO3)100 ppm 150–250 ppm 350 ppm
Saturation Index (SI) –0.3 0 +0.3
Water Temperature 20ºC / 68 ºF 20–40ºC / 68–104ºF 40ºC / 104ºF
Free chlorine: is the chlorine residual present in the spa water.
Result if too low – Inadequate level of disinfection.
Result if too high – cause odor problem, skin & eye irritation, corroded metals and other materials.
pH: a value that indicates how acidic or basic the spa water is.
Result if too low – Corroded metals, eye & skin irritation, and destruction of total alkalinity.
Result if too high – Scale formation, cloudy water, shorter filter/heater runs, eye & skin irritation, poor chlorine
efficiency.
Total Alkalinity (TA): indicates the degree of the water’s resistance to pH change. It determines the speed
and ease of pH change, so always adjust total alkalinity before adjusting the pH level.
Result if too low – Corroded metals, eye & skin irritation. Low alkalinity will cause the pH to be unstable.
Result if too high – Scale formation, cloudy water, shorter filter/heater runs, eye & skin irritation, high chlorine
demand.

264
A
SAVE THESE INSTRUCTIONS
(264IO) SPA (JET + BUBBLE) ENGLISH 7.5” X 10.3” PANTONE 295U 08/06/2015
English
Page 17
Calcium Hardness (CaCO3): refers to the amount of calcium and magnesium dissolved in the water.
Result if too low – Difficulty balancing water, corrosion of metal components, eye & skin irritation and water
foaming.
Result if too high – Scale formation, cloudy water, eye & skin irritation, difficulty balancing water and filter/
heater inefficiency.
Saturation Index (SI): temperature, calcium hardness concentration, total alkalinity and pH represent the
main factors influencing scale formation. The tendency of water to either form scale or corrode is indicated by
the Saturation Index (SI):
SI = pH+TF+CF+AF-12.1
*Where: TF = Temperature Factor; CF = Calcium Hardness Factor; AF = Total Alkalinity Factor
SPA WATER CHEMISTRY AND BALANCE (continued)
Water Temperature TF Calcium
Hardness (ppm) CF Total
Alkalinity (ppm) AF
(ºC) (ºF)
8 46 0.2 75 1.5 50 1.7
12 54 0.3 100 1.6 75 1.9
16 61 0.4 150 1.8 100 2.0
19 66 0.5 200 1.9 150 2.2
24 75 0.6 250 2.0 200 2.3
29 84 0.7 300 2.1 300 2.5
34 93 0.8 400 2.2 400 2.6
40 104 0.9 500 2.3 -- --
-- -- -- 1000 2.6 -- --
Test the water pH, Temperature, Calcium Hardness and Total Alkalinity levels. Use the equivalent Factors in
the SI equation.
SI = 0, Balance
If SI > 0, Scaling or cloudy water condition.
If SI < 0, Corrosive to metals or eye & skin irritating condition.
The SI is considered satisfactory if the value is within -0.3 to +0.3 range. Zero being perfect.
SPA Water Adjustment
How to adjust the spa water chemistry when the levels are off the range. CAUTION: Always follow the
chemical manufacturer’s directions, and the health and hazard warnings.
Total Alkalinity (TA) Adjustment
Remove the spa cover to aerate the water and use the included test strips to check the chemistry level.
Ensure the chlorine level in the water is between 2-4 ppm first, as chlorine will affect the TA test result.
If the TA level (and not the pH) is higher than 120 ppm, to lower the TA level, you add muriatic acid (hydrochloric
acid) or sodium bisulfate.
If the TA level is lower than 60 ppm, you add sodium bicarbonate.
For example (for 4 adults’), if the TA level is 180 ppm, the desired decrease is 60 ppm, from below chart, you
need to add 0.269 Lb (121 g) of sodium bisulfate or 0.101 qt (96 ml) of muriatic acid
If the test strip color is between 180 ppm and 240 ppm, and close to 180 ppm, you can also add 0.269 Lb
(121 g) of sodium bisulfate or 0.101 qt (96 ml) of muriatic acid.
If the reading is more than 240 ppm, you can add sodium bisulfate or muriatic acid to the water drop by drop
until the test strip indicates a 240 ppm reading, then add 0.528 Lb (238 g) of sodium bisulfate or 0.202 qt
(192 ml) of muriatic acid.
NOTE: After adjustment, retest the water after 24 hours and adjust again if necessary.

264
A
SAVE THESE INSTRUCTIONS
(264IO) SPA (JET + BUBBLE) ENGLISH 7.5” X 10.3” PANTONE 295U 08/06/2015
English
Page 18
SPA WATER CHEMISTRY AND BALANCE (continued)
Lowering Total Alkalinity
Amount of Sodium Bisulfate to lower Total Alkalinity
Raising Total Alkalinity
Amount of Sodium Bicarbonate to raise Total Alkalinity
Amount of Muriatic Acid to lower Total Alkalinity
(Muriatic acid: 31.45%)
pH Adjustment
After the total alkalinity has been lowered to 120 ppm or raised to 80ppm and the pH is still high or low, you
can adjust it using the following chart.
Lowering pH
Lowering pH Using Muriatic Acid
Lowering pH Using Sodium Bisulfate
Desired level 60 ppm 80 ppm 100 ppm 120 ppm 140 ppm
Volume:
210 gal / 795 L
0.269 Lb 0.358 Lb 0.448 Lb 0.528 Lb 0.627 Lb
121 g 161 g 202 g 238 g 283 g
Volume:
290 gal / 1098 L
0.368 Lb 0.492 Lb 0.614 Lb 0.737 Lb 0.860 Lb
168 g 224 g 279 g 335 g 391 g
Desired level 60 ppm 80 ppm 100 ppm 120 ppm 140 ppm
Volume:
210 gal / 795 L
0.101 qt 0.135 qt 0.169 qt 0.202 qt 0.234 qt
96 mL 128 mL 160 mL 192 mL 223 mL
Volume:
290 gal / 1098 L
0.139 qt 0.185 qt 0.232 qt 0.278 qt 0.324 qt
132 mL 176 mL 220 mL 264 mL 308 mL
Desired level 20 ppm 40 ppm 60 ppm 80 ppm
Volume:
210 gal / 795 L
0.059 Lb 0.118 Lb 0.178 Lb 0.237 Lb
27 g 53 g 80 g 107 g
Volume:
290 gal / 1098 L
0.081 Lb 0.162 Lb 0.244 Lb 0.326 Lb
37 g 74 g 111 g 148 g
Volume 210 gal (795 L) 290 gal (1098 L)
Total Alkalinity 120 ppm 80 ppm 120 ppm 80 ppm
From→To
8.4→7.2 0.028 qt 0.018 qt 0.038 qt 0.025 qt
26 mL 18 mL 36 mL 24 mL
7.8→7.2 0.019 qt 0.013 qt 0.026 qt 0.017 qt
18 mL 12 mL 22 mL 16 mL
Volume 210 gal (795 L) 290 gal (1098 L)
Total Alkalinity 120 ppm 80 ppm 120 ppm 80 ppm
From→To
8.4→7.2 0.071 Lb 0.047 Lb 0.095 Lb 0.063 Lb
32 g 21 g 43 g 29 g
7.8→7.2 0.047 Lb 0.032 Lb 0.064 Lb 0.043 Lb
21 g 14 g 29 g 20 g

264
A
SAVE THESE INSTRUCTIONS
(264IO) SPA (JET + BUBBLE) ENGLISH 7.5” X 10.3” PANTONE 295U 08/06/2015
English
Page 19
SPA WATER CHEMISTRY AND BALANCE (continued)
WARNING
Muriatic acid is a caustic chemical and liquid solution of sodium bisulfate (NaHSO4)
is highly acidic. Handle all chemicals with care and wear extra personnel protective
equipment including goggle and gloves. It is very important not to splash acid onto
your skin or clothing, or into your eyes.
Calcium Hardness Adjustment
Use the included test strips to check the water hardness level and adjust it following below chart.
Lowering Calcium Hardness
If your household water supply is treated with a softener, mix the spa hard water with the soft water
according to the water volume ratio chart to lower the calcium hardness:
Initial level 1000 ppm 500 ppm 350 ppm 250 ppm
Desired level:
100 ppm
Water Volume Ratio (Vhard water:Vsoft water)
1:9 1:4 2:5 2:3
Lowering Calcium Hardness Using Soft Water
Raising pH
Raising pH Using Sodium Bicarbonate
Volume 210 gal (795 L) 290 gal (1098 L)
Total Alkalinity 120 ppm 80 ppm 120 ppm 80 ppm
From→To 6.8→7.2 0.541 Lb 0.361 Lb 0.737 Lb 0.491 Lb
243 g 163 g 335 g 224 g
Raising Calcium Hardness
If the calcium hardness level in the spa water is lower than 100 ppm, add calcium chloride into the spa
water.
Volume 210 gal (795 L) 290 gal (1098 L)
m (CaCl2) 0.197 Lb 89 g 0.269 Lb 122 g

264
A
SAVE THESE INSTRUCTIONS
(264IO) SPA (JET + BUBBLE) ENGLISH 7.5” X 10.3” PANTONE 295U 08/06/2015
English
Page 20
MAINTENANCE
IMPORTANT
Unplug the power cord before cleaning the system. Cover the water inlet and outlet with
the plugs to prevent water spillage. After completing all maintenance tasks, you must
plug the power cord back in and remove the plugs.
Electrolytic Cell Cleaning
The electrolytic cell has a self cleaning function incorporated into the electronic control's programming. In
most cases this self cleaning action will keep the cell working at optimum efficiency. In some regions, the
SPA water is hard (high mineral content) which varies depending on the local water condition, this would
cause deposits on the titanium plate and affect the sanitizing efficiency, so the cell may require periodic
manual cleaning. To maintain maximum performance, we recommend that you open and visually inspect
the electrolytic cell every two weeks for SPA water (Calcium hardness < 100 ppm) or weekly for SPA water
(Calcium hardness > 350 ppm).
The following steps provide instructions on how to clean the cell.
Inspection and cleaning:
1. Turn off the spa and unplug the power cord from the electrical socket.
2. Unscrew the filter cartridge assembly from the spa stub wall, and use the included plugs (15 & 23) to
cover the water inlet and outlet fittings from inside of the spa tub to prevent water from flowing out.
3. Remove the four screws from the transparent cover using a Phillips screwdriver (not included) and
remove the cover from the spa control unit.
Maintenance of Spa Water and Cartridge
Protect all the spa occupants from possible water-related illnesses by keeping the spa water clean and
sanitized. Always practice good hygiene. To ensure proper spa water quality follow these procedures:
1. Inspect and clean the filter cartridge every day, and change the filter
cartridge every 3 days.
a. Unscrew the cartridge housing assembly from the spa tub wall
and remove the cartridge (see drawing 11).
b. Use a garden hose to rinse off the cartridge. If the cartridge
remains soiled and discolored it should be replaced. Keep spare
cartridges on hand.
c. Reinstall the clean cartridge back into the cartridge housing and
replace the cartridge housing assembly back onto the spa tub wall.
2. Change the spa water every 2 weeks. See “Spa Tub Drainage” and
“Spa Tub Cleaning” sections for details.
3. Use spa chemicals to maintain proper water chemistry. Spa damage
resulting from misuse of chemicals and mismanagement of spa water
is not covered by the warranty.
4. All occupants must shower before entering the spa.
11
14
12
13
This manual suits for next models
3
Table of contents
Other Intex Marketing Hot Tub manuals
Popular Hot Tub manuals by other brands

Sundance Spas
Sundance Spas 850Export Series Installation & owner's manual

Jacuzzi
Jacuzzi alimia instructions

Image
Image IMSB61610, IMSG61610 user manual

Aquatic
Aquatic SYMPHONY SERIES Owners manual/install guide

CalderaSpas
CalderaSpas Caldera Spa Vacanza Series owner's manual

Aquatic
Aquatic LUXEAIR 23 ai23lux7036 Specification sheet